The Grow Awards 2026 🏆 


Likes
Comments
Share


Likes
6
Share
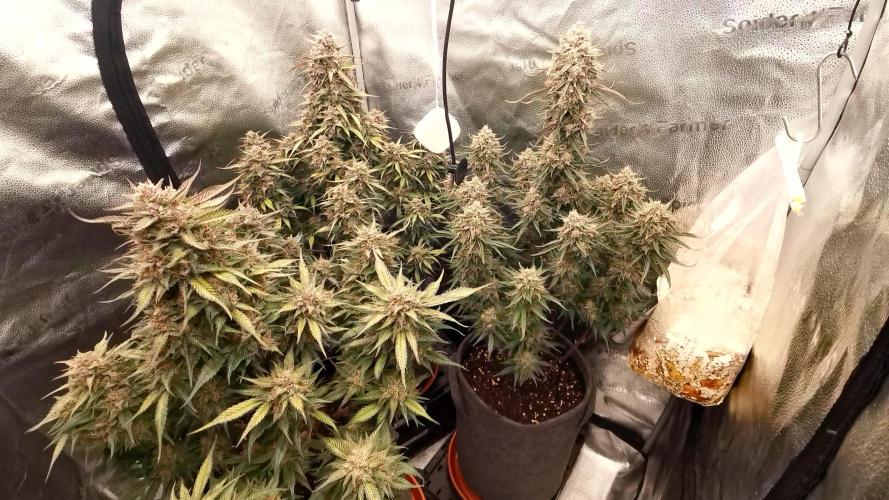
@Alienrdwc1
Follow
Plenty of brown hairs now..so think going to run till Sunday then drain and refil with RO water and flawless finish for 5 days ish..

Processing
Likes
Comments
Share
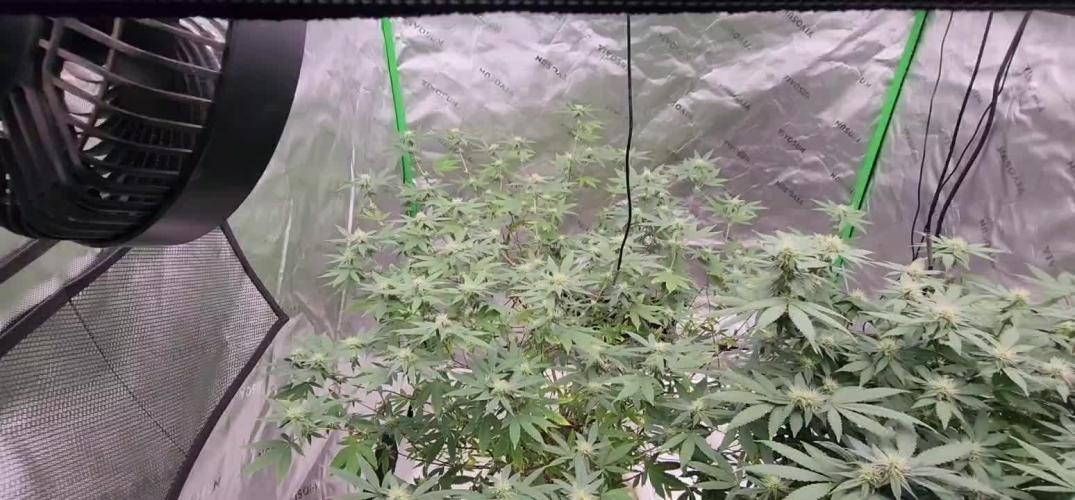
@JiminyCricket
Follow
So basically for some reason I wasn't able to add my next week which caused me to start this "duplicate first grow diary". Then I decided trying to split my diary into four separate ones to better catalogue my grow, and I'm just having a lot of issues getting everything straight.
SO! I decided to continue posting full scope pictures of the whole setup, all four plant sets included.
Will try to update more on everything tomorrow!


Likes
8
Share
@Marshydrots1000
Follow
Looking good starting to fatten up now. Pistols browning. Still alot of clear trichomes. Start dragon force to help ripen phase for a week. Then flush and hopefully fade her out in good time!

Processing
Likes
12
Share
@Mistertemps
Follow
The buds are starting to plump near the end of week 8. I’m just amazed at the whole process!! Starting to understand now what is meant my stacking nicely😎. Still no smell I rubbed the stem and it definitely smelled like weed not like a house plant. But overall no smell from the buds yet. The sugar is developing nicely I think🤷♂️🤷♂️🤷♂️
Likes
42
Share
@KrautFabrik
Follow
Day 41: nutrients like plan
---------------------------------------------
Added some non organic nuts. to boost the flower.
Can someone give me advise for an organic pk booster?
She is getting frosty ❄️🦍
Happy growing 🌱

Likes
22
Share
@APOLLO
Follow
Morning Folks !! a very solid week in, girls look spot on. I can stand there for ages and just stare at them, I know many here share my feelings 😇
anyway... All girls have been flushed twice this week as normal with half strength nutes. Stopped PK 5 days ago.
1 Stardawg under trellis, is done producing by the looks of it and just cooking now. Other 2 stardawgs are yet to swell up a bit more. Bright Orange hair and trichomes makes bud appear golden 😍
BlueDream is swelling still constantly and smells incredible. though she is a bit moody but this cycle is dialed in well, so girls are happy , very happy. Bud feels chunky and heavy to touch. Each plant has its own unique smell profile I cant decide which one I like more. Girls loved the microbes and safe to say I'll be using that stuff in every grow. Its a deal maker imo.
They are nearing end altogether and had been a great experience so far. Learned a lot. Wanna guess the outcome?? 😎 I m thinking 4 - 5 ounce off a girl more or less.... maybe... we'll see
Enjoy pics and stay safe.

Likes
20
Share
@eldruida_lamota
Follow
Que pasa familia, traigo la 2 semana de esta farm cheese, la verdad que se está comportando muy bien y el alimento aportado de advanced nutrients como siempre lo agradecen.
Ph controlado, temperatura y humedad dentro de los parámetros, ya quitamos el propagador y ya es esperar hasta que cojan altura para pasarla a floración.
web: http://bit.ly/2uJAjgy
ts600: http://bit.ly/3cnv0Ev
code: an420
Nos vemos la semana que viene fumetillas

Likes
10
Share
@SgtDoofy
Follow
5/8
Watered both with plain PH'd water yesterday. Both of the plants are sucking up leaves. Trichomes are only really looking amber on the brown leaves, but otherwise milky.
5/10
Decided that these brown-leaved buds on Trainwreck were ready, so I tried a little bro-science and watered an hour before harvesting. Noticed there were some really nice green young buds intertwined, so I did my best to trim around to leave them for another week or so. No weight measurements yet, will wait till after trimming and before curing.

Likes
30
Share
@Ganjagrandaddy
Follow
Week 5 it is then. I had hoped on a 4 week veg period as I have been so used to autoflowers that this has become my normal. I had also forgot how much I enjoy training the ladies to work better with the l.e.d coverage and limitations of my grow room height. The HST is goi g really well with the Bruce responding with so.e nice fattening limbs and great potential mainstays. The idea is to fool the plant into thinking that each growing tip is the main-stem ( merristem) This will ensure an even distribution of all the available resources. As they progress towards flowering flip , i am trying to get each tip to the pots edge. This will allow me to tie them down to the edges and when the stretch period begins , they will grow vertically to create a ring of main buds. This allows airflow around each bud, which lessens the risk of mould and also allows lots of available light to reach the whole lengths. I did snap one limb of rhe Bruce bit it was the f.i.m so it won't be a huge loss of it doesn't repair in Time.
The candy rain is doing a great job of catching up now with only 4 tips to train and plenty of light, I am hoping she catches up this week to be flipped to flower.
Both of the Jealousy girls are really healthy and happy. again they are being trained fairly aggressive and are handling all I am throwing at them with twists and bends.
No issues with anything so far so fingers crossed that I can flip them next update and begin the real fun of seeing the training pay off. Be safe and well Growmies.
UPDATE 11/5/23
I flipped the lights to 12/12 today so will update in a weeks time on the 1st weeks stretch. Lost the snapped main I repaired on jealousy #1 but no issue as she has plenty of potential mains


Likes
7
Share
@Green_fingers
Follow
Just giving her water on the daily now won’t be long now hopefully till harvest👨🌾
Likes
10
Share
@SgtDoofy
Follow
3/27
Been fighting the warmth of the lights and the rising temps lately. Amnesia is still sacrificing leaves, but much more slowly now, letting me pick out about 5-10 per day. I really don't know what caused it all, but at least this could make trimming easier. I'm trying to make sure I pull off all the browning and crispy leaves so that they don't get absorbed by growing bud. Trainwreck is getting much more purple, but is also browning in some spots. Trainwreck doesn't let go of any leaves, as the base of them is still green, which makes it more difficult to sift through the brown leaves and pull them out. Fed at the end of last week, may have been Friday.
3/29
Feeding 3/4 nutrients today!
3/31
Fed 1/2 strength nutrients and lowering lights to 50% before going away for the weekend.
4/1
They survived my time away.
4/2
Some crispy leaves needed to be plucked from Trainwreck to open up other budsites. Trichomes are still not amber.
Likes
70
Share
@CBD_Sweden
Follow
@MephistoGenetics,
Hi all the happy people here in GrowDiaries.
This is my second cultivation ever and it will be fun to try a bigger space than my closet grow.
First, I'm just going to say I'm done with the construction of my new growroom.
The room is 2.14 meters by 1.7 meters and has a ceiling height of 2 meters.
It provides a floor area of 3.6 square meters.
I use a 54 Watt Lightwawe T5 for germination and 2 Pcs 400 Watt HPS lamps.
I have a channel fan that replaces the room air about 40 times an hour to get a comfortable environment in the room, the air enters a fresh air intake from the outside.
The air is purified through a carbon filter to then leave the room to the rest of the basement.
Then I use that heat to heat the rest of the basement.
I will use 10 pcs 15 liter Autopots to grow with and a 100 liter water tank that supplies the pots of water and nutrition.
I will grow completely organically in soil and will watercure my buds to get the best possible medicine for me.
But there are no cultivation rooms to be displayed here, so I continue with what is most important.
Today I have put my seeds in paper towel and hope the seeds have germinated within a few days.
I am very excited to see how the new growroom will work and how this Illuminauto 21 - Sour Crinkle will turn out.
Illuminauto 21 - Sour Crinkle (Grape Crinkle x Sour Crack)
Two of our fastest and frostiest varieties collide to make a sweet and sour delight!
Expect super frosty, compact nugs that won't be a toke for novices.
Destined to be a great strain for extraction work too!
Plant size - Small - Medium
Cycle time - 60-65 days from sprout
Indica/Sativa - 80/20
Frost level - Extra Ridiculous
https://www.mephistogenetics.com/product-page/illuminauto-21-sour-crinkle
.................................................................................................................................................................................................................................................................................................................................................
2017-08-21. Started to germinate the seed.
.....................................................................................................................................................................................................................................................................................................................................................
2017-08-23. Seed germinated and put in small pot in the humidity dome.
.........................................................................................................................................................................................................................................................................................................................................................
2017-08-27. Slow and steady she grows.
---------------------------------------------------------------------------------------------------------------------------------------------------------------------------------------
2017-08-28. Transplanted in 15 liter autopot. Check the roots on this girl
-----------------------------------------------------------------------------------------------------
2017-08-29. New movie of the girl.
-------------------------------------------------------------------------------------------------------------------------------------------------------------------------------------------------------------
2017-08-29.
Hello to you who read my diary, I just want to say that I am pleased that you have chosen to check in with me and in my diary.
I just want to say that I do this for myself and for a steady flow of my medicine.
Everything you read and see in my diary is 100% honest and I will never distort or beautify anything here.
I document my crops so that I can learn from my mistakes and also to look back at those different crops.
I try to update with pictures every day and with text if something special has happened in the garden.
This is my strainhunt for the best medicine and the beginning of my journey with cannabis and the cultivation of it.
-----------------------------------------------------------------------------------------------------------------------------------------------------------------------
2017-08-30. Cleaned the room this morning, just vacuuming and cleaning with chlorine solution. Im testing the fan to control temp and humidity, it works great.
Added some pics and a movie. Everything is looking great right now.
-------------------------------------------------------------------------------------------------------------------------------------------------------------------------------
2017-08-31. 3 new pics.
---------------------------------------------------------------------------------------------------
2017-09-01. New pics and a video from the grow room today.
------------------------------------------------------------------------
2017-09-02. New pic.
----------------------------------------------
2017-09-03. New video from this morning.
---------------------------------------------------------------------
2017-09-04. Week 2 starts now, new pics.
-----------------------------------------------------------------------------------------------------------------------------------------
2017-09-05. KL 08.00. Cleaned the room this morning, just vacuuming and cleaning with chlorine solution.
KL 12.00. The girl got 2 liters of water with nutes in it, added a video.
---------------------------------------------------------------------------------------------------------------------------
2017-09-06. KL 08.00. The girls woke up after their beauty sleep, the leaves are always a bit down after 6 h of darkness, but they will stretch now when the HPS lamp starts.
Everything looks good and I keep trying to tuck the leaves so they get the maximum amount of light where needed. Added pics and video.
--------------------------------------------------------------------------------------------------------------------------------------------------------
2017-09-07. Day 17 from sprouting. I have never tested PH in my grows, when growing organic in soil iv learned that it adapt PH by it self. But im curious by nature so i had to test.
Kl 10.00 Tested PH in the soil, it was 6.9 and tested my tap water and it was 6.8. Added video of the girl.
Kl 22.30. New pics.
------------------------------------------------------------------------------------------------------------------
2017-09-08 KL 08.00. Good morning, added new video.
2017-09-08. Kl 23.50. Gave every girl 3 liters of water and nutes, added new video.
------------------------------------------------------------------------------------
2017-09-09. Kl 21.00. Defoliated a lot and added pics.
-----------------------------------------------------------------
2017-09-10. Kl 08.00. Last day of week 2. New video.
2017-09-10. Kl 23.00. 3 new videos.

Likes
11
Share
@HowtoBubatz
Follow
We’re deep in bloom now, and the buds are fattening up nicely on all three ladies!
The scent is getting stronger by the day and interestingly, while they all share a base note of red pepper, each plant has developed its own unique aroma twist.
Really curious to see how that translates after the cure. Overall, everything’s going smoothly, no issues to report. They’re happy, healthy, and stacking up beautifully. Let’s keep it rolling! 💪🌿


Likes
15
Share
@XperencdGmanXG
Follow
It's all about the bacteria! Took the EM1, fish shit, kefir, worm castings, soil activator, ground malted barley, fine ground egg shells (uncooked), fine ground shrimp shells (uncooked) and molasses and brewed it out as a tea for 36 hours until it was bubbling. This one I'm calling the Ultimate microbe bomb. I applied this to the ladies after I moved them to the flowering tent and boy have they exploded in Growth of just over 2" in one Gas Lantern Day. Will flop them to flower at some point in the coming days. after I get them to grow a bit taller.
Likes
20
Share
@Automaniac
Follow
Welcome to week 8 / week 5 of flowering!
Heading into week 5 of flowering now. Her buds continue to fatten up nicely and starting to show a blue tint.
✅Day 50: 128oz of water.
✅Day 51: No water.
✅Day 52: No water.
✅Day 53: 128oz of water.
✅Day 54: No water.
✅Day 55: No water.
✅Day 56: 128oz of water.
Likes
7
Share
@KannaKullektiv
Follow
Hiiigh friends 🙌
Welcome to week 9. 😍
The plant's sun protection becomes more and more present and the odor becomes stronger. The tall lady is now the smallest but has the fatter buds. It remains exciting.. 😊
See you next week. 👋
Arturo for KannaKullektiv
🙏
Likes
6
Share
@Cultivandomedicinanatural
Follow
Esta es la última semana de crecimiento que le doy a las pequeñas, el último día antes de hacer el cambio de horas de luz le hago una pequeña poda de bajos ya que eso le dará más aire a la zona baja y más fuerza a la parte superior de nuestras plantas. En esta semana terminamos con una Ec de 1.6 y un ph de 5.8. Están creciendo muy rápido y con fuerza en los tallos.
Los tamaños de las pequeñas son: las red hot cookies 24 y 34 cm, las tropicanas 27 y 37 cm y la purple puch og 24 cm.
