The Grow Awards 2026 🏆 


Likes
Comments
Share
@BavarianBudmeister
Follow
ENGLISH VERSION BELOW
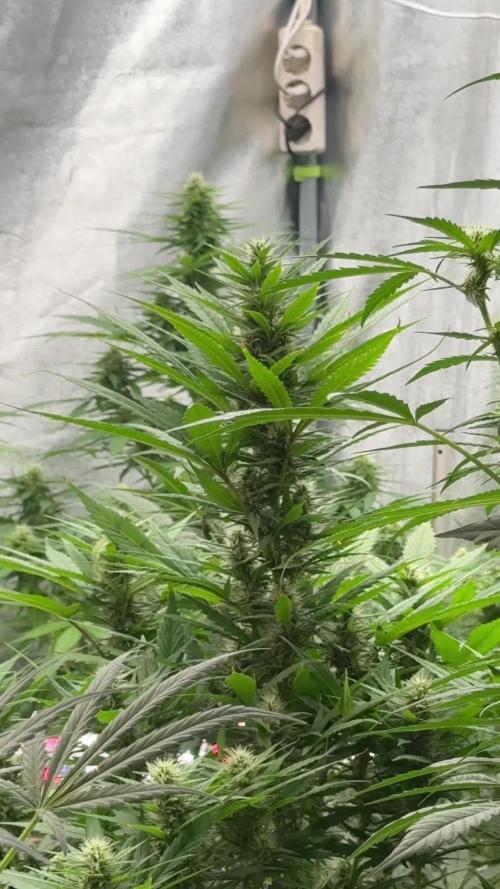
Wie ich im letzten Update geschrieben habe, fällt dieses hier etwas größer aus und enthält auch mehr Fotos und Videos.
Die Pflanzen haben sich gut entwickelt, waren aber mittlerweile zu groß für ihre kleinen Töpfe und zeigten Anzeichen von Wurzelstress. Ich habe sie daher in 9-Liter-AirPots umgetopft, die ich noch von einem alten Projekt übrig hatte. Als Substrat verwende ich eine 70/30-Mischung aus Canna Coco Professional und Peligran Perlite von Knauf. Ich liebe dieses Zeug – man kann es praktisch nicht überwässern. Die Wurzelballen habe ich mit etwas Mycotrex von Biotabs bestreut. (Mycorhizzae)
Um ehrlich zu sein: Ich war einfach zu faul, neue Stofftöpfe zu kaufen, also dachte ich mir, warum nicht die alten AirPots wiederverwenden :-) Mal sehen, wie sie sich darin machen.
Ich habe die Pflanzen auch in ihre „endgültige“ Umgebung gestellt – ein 120x120-Zelt (4×4 für meine imperialen Freunde ;-) – und ab jetzt werden sie über meinen geliebten Ebbe-/Flut Eigenbau versorgt. Ich habe es vor 10 Jahren gebaut, und es ist immer noch ein echter Segen. Einmal am Tag werden die Pflanzen mit Nährlösung aus einem 200-Liter-Tank (52 Gallonen) geflutet. Leider bedeutet das auch, dass ich euch nicht mehr sagen kann, wie viel Nährlösung jede Pflanze genau bekommt – sie nehmen sich einfach, was sie brauchen.
Das neue Zelt wird mittels eines AC Infinity Controller 69 klimagesteuert, sodass ich die Bedingungen deutlich besser im Griff habe. Ich versuche, einen VPD von etwa 1,2 zu halten. Die Klimaanlage ist auf 22 °C (~71 °F) eingestellt und der Luftbefeuchter hält die Luftfeuchtigkeit bei etwa 62 %.
Offtopic:
Ich musste eine große Lemon Orange-Mutterpflanze räumen, um Platz für die vier Humboldt-Mädels zu schaffen. In den nächsten Tagen werde ich sie zurückschneiden müssen.
Was demnächst ansteht:
In den nächsten Tagen werde ich die Pflanzen toppen. Die abgeschnittenen Spitzen werde ich versuchen, als potenzielle Mütter zu bewurzeln – vielleicht ziehe ich ja ein DNA-Los :-).
Meine Frage an euch diese Woche:
Mit welchen Substraten und Bewässerungssystemen habt ihr schon herumexperimentiert – und was hat euch am meisten überzeugt? Schreibt es mir gerne in die Kommentare!
_________________________________________________________________________________________________________________________________________________________
As I wrote in last weeks update this one will be a bit bigger and contain more photos.
The plants were coming along nicely but the were to big for their tiny pots and showed some root stress. I transplanted them into 9 Liter AirPots which I had laying around from an old project. The substrate is a 70/30 mix of Canna Coco Professional and Peligran Perlite from Knauf. I love this stuff. You basically can't overwater it. I sprinkled the root balls with some Mycotrex from Biotabs (Mycorhizzae)
Tbh I wast just too lazy to buy new fabric pots so I thought why shouldn't I use these old AirPots :-) We'll see how they perform.
I also placed the plants in their "final" habitat which is a 120x120 (4×4 for my imperial friends ;-) and from now on they get fed by my beloved DIY-Ebb and Flow system. I built this 10 years ago and it's still a charm to have. Once a day the plants will get "flooded" with nutrient solution from a 200 L (52 gallon) tank below. Unfortunately this also means I can't tell you how much nutrient solution they received anymore as they just take as much as they need.
This tent is climate controlled by an AC Infinity controller 69 so I should be able steer them way better. I try to keep them at a VPD of around 1.2. I have my AC set to 22°C (~71°F) and my humidifier keeps the tent around 62%.
Offtopic:
I had to evict a big Lemon Orange Mom to make space for the 4 Humboldt girls. I will have to cut her back in the next days.
Upcoming: I'm going to top them in the next few days I will try to keep the tops as potential mothers if I hit the DNA lottery :-).
My question for you this week: With which substrates and watering systems have you messed around so far and what did you like the most? Please tell me in the comments

Likes
5
Share
@Brasson
Follow
Haven't done any feeding so far, I've been usong miracle grow so I think that's the only reason it's doing okay. I'm buying Remo kit nutrients this week and im excited to see what a difference it will make. But any advice on how much I should do for her first feeding or even what I should start with exactly would but greatly appreciated.
Likes
10
Share
@RivenWaters
Follow
Starting 7 seeds, only six made it to the solo cups. ETHOS genetics seeds are ; Planet of the Grapes 55ind/45sat, Cotton Candy Grapes 70/30, Grape Diamonds 50/50, Apex Kush 90/10, and Skunk Hero x Afghgan Kush 100/0 ; DNA Genetics seed, Cataract Kush 99/1 Ind. dom.


Likes
8
Share
@DogDoctorOfficial
Follow
Mango Kush – Week 4 Flower (Week 8 from Seed)
The bulking begins: pistils, stacking, and balanced nutrition
Grower: Dog Doctor
Strain: Mango Kush (Pheno #1 & Pheno #2)
Environment: 8×8 Grow Room
Control System: TrolMaster Tent-X brain + WCS substrate sensors (The ThinkRoulette ecosystem)
Lighting:
• ThinkGrow Model One
• ThinkGrow ICL-300 (x2 inner canopy lights)
• Future of Grow Black Series 600W
• Lumatek Zeus 465W Compact Pro
⸻
🌸 Week 4 Flower – Bulking Mode Activated
Week 4 is an important checkpoint in any bloom cycle. The Mango Kush sisters are no longer just “in flower”, they are now building flowers. Pistils are everywhere, thick and vibrant, forming the foundation for what will become dense, resin-packed buds.
Both phenos are looking strong:
• Pheno #1 – More advanced, pistil clusters stacking into early budlets, filling her frame with confidence.
• Pheno #2 – A little behind, but catching up fast. She may have taken longer to flip (since she germinated later), but she’s now pushing out strong, healthy white hairs that signal the start of her bulking stage.
This week’s studio and improvised studio photos capture this perfectly—the transition from “flower set” to flower building.
⸻
💧 Feeding Update – Simplifying for Strength
This week, we made an important nutritional adjustment:
• Removed: Aptus All-in-One Liquid & Aptus Top Booster
• Kept:
• Aptus Regulator – 0.15 ml/L
• Aptus CalMag Boost – 0.25 ml/L
• Plagron Power Buds – 1 ml/L
• Plagron Sugar Royal – 1 ml/L
• Plagron Green Sensation – 1 ml/L
Why this change?
At this stage, the super soil’s NPK balance (nitrogen, phosphorus, potassium) is already strong enough to sustain healthy growth and flower formation. Adding the All-in-One Liquid or Top Booster would risk redundancy, too much nutrient overlap can actually slow the plant down, cause salt build-up, or push her into unnecessary stress.
By keeping only the boosters and biostimulants, we are:
• Supporting flower stacking and density (Power Buds).
• Enhancing terpene and resin production (Sugar Royal).
• Adding a multi-function bloom enhancer (Green Sensation, famous for its late-flower results).
• Maintaining structure, transport, and stress resistance (Regulator).
• Keeping calcium and magnesium in check (CalMag Boost).
🌱 Educational takeaway: Week 4 is about controlled nutrition, not force-feeding. Too much input can overwhelm plants; the art is in balancing what the soil already provides with just enough supplements to guide the plant’s energy toward flowers.
⸻
🌡️ Environment – Stability Matters
The Mango Kush girls continue to thrive under the TrolMaster Tent-X + WCS ecosystem, giving live readings of:
• Soil moisture (watering when ~19–20%)
• EC levels (tracking buildup)
• Temperature & RH (still peaking high at times, but stable airflow keeps the canopy safe)
The ThinkRoulette ecosystem (TrolMaster + lighting synergy) has been running flawlessly, creating a stable and responsive environment. This consistency is what allows the girls to focus their energy on bulking rather than on fighting stress.
⸻
💡 Lighting – Canopy in Harmony
The four-light setup continues to shine as a perfectly balanced orchestra:
• ThinkGrow Model One – Deep canopy penetration.
• ThinkGrow ICL-300s – Mid-canopy energy, no sites left behind.
• Future of Grow Black Series 600W – Spectrum balance.
• Lumatek Zeus 465W Compact Pro – Evening out the footprint.
Result: The canopy is even, pistils are popping from top to bottom, and no part of the plant is left in the dark.
⸻
🌱 Genetics Check-In – Mango Kush in Mid-Flower
Mango Kush (Mango × Hindu Kush) is famous for her fruity-sweet aroma with earthy Kush undertones. Week 4 is where the genetic potential starts to show:
• Bud structure is beginning to define itself—rounded calyx clusters forming the early shape.
• Aroma is still light, but brushing against the plants gives faint hints of fruit and spice.
• Phenotypic difference: Pheno #1 is flowering earlier and faster, while Pheno #2 lags a week behind. This may result in staggered harvest windows, giving two slightly different expressions of the same strain.
⸻
🔮 What to Expect & What Not to Expect
✅ What to Expect in Week 4–5:
• Noticeable bud bulking.
• Rapid calyx development, pistil clusters getting denser.
• First trichomes appearing under macro view.
• Water demand increasing steadily.
• Early terpene hints becoming stronger week by week.
❌ What Not to Expect Yet:
• Full aroma profile (that comes around Week 5–6).
• Major resin frosting (Week 5 onward).
• Final bud density or color changes (those happen in later bloom).
Educational takeaway: Patience is key. Week 4 is about building structure. The “icing” (frost, density, aroma explosion) comes later.
⸻
🔄 Recap So Far – The Journey
• Weeks 0–2: Seedlings established with Aptus Start Booster.
• Weeks 3–4 (Veg): Pheno #1 stretched tall, Pheno #2 filled out compact.
• Week 5: Flip to 12/12 → stretch begins.
• Week 6 (Flower Week 2): Bloom boosters introduced, lights upgraded.
• Week 7 (Flower Week 3): Clear flower set, pistils everywhere, irrigation system added.
• Week 8 (Now, Flower Week 4): Bulking stage, pistils thick and abundant, nutrition simplified, environment stable.
⸻
🙏 Gratitude
To the community—thank you for following along, for sharing knowledge, and for keeping the love of cultivation alive. These reports are more than just grow logs, they are learning tools, and together we’re documenting the journey of two Mango Kush sisters from seed to flower.
And to the gear, the TrolMaster, the ThinkRoulette ecosystem, and the full lighting orchestra, you make this possible. Technology doesn’t grow the plant, but it empowers the grower to let the plant reach her full potential.
⸻
📸 This week’s highlight: Studio and improvised studio shots capturing the moment where flower set becomes flower build.
✨ In short: Week 4 Flower is the week of foundations. The pistils are thick, the flowers are forming, and the stage is set for resin and density in the weeks to come.
📲 Don’t forget to Subscribe and follow me on Instagram and YouTube @DogDoctorOfficial for exclusive content, real-time updates, and behind-the-scenes magic. We’ve got so much more coming, including transplanting and all the amazing techniques that go along with it. You won’t want to miss it.
• GrowDiaries Journal: https://growdiaries.com/grower/dogdoctorofficial
• Instagram: https://www.instagram.com/dogdoctorofficial/ • YouTube: https://www.youtube.com/@dogdoctorofficial
There’s a new series blooming and it’s more than just plants. It’s about process, patience, and paying attention.
⸻
Explore the Gear that Powers My Grow
If you’re curious about the tech I’m using, check out these links:
• Genetics, gear, nutrients, and more – Zamnesia: https://www.zamnesia.com/
• Environmental control & automation – TrolMaster: https://www.trolmaster.eu/
• Advanced LED lighting – Future of Grow: https://www.futureofgrow.com/
• Root and growth nutrition – Aptus Holland: https://aptus-holland.com/
• Nutrient systems & boosters – Plagron: https://plagron.com/en/
• Soil & substrate excellence – PRO-MIX BX: https://www.pthorticulture.com/en-us/products/pro-mix-bx-mycorrhizae
• Curing and storage – Grove Bags: https://grovebags.com/
⸻
We’ve got much more coming as we move through the grow cycles. Trust me, you won’t want to miss the next steps, let’s push the boundaries of indoor horticulture together!
As always, this is shared for educational purposes, aiming to spread understanding and appreciation for this plant. Let’s celebrate it responsibly and continue to learn and grow together.
With true love comes happiness. Always believe in yourself, and always do things expecting nothing and with an open heart. Be a giver, and the universe will give back in ways you could never imagine.
💚 Growers love to all 💚
P.S. – Pheno #1 vs. Pheno #2
A quick note on the sisters’ timelines:
• Pheno #1 remains ahead—already deep in flower, stacking pistils fast and showing more advanced bud formation.
• Pheno #2, while it started later, is catching up beautifully. Her pistils are now bursting and forming thick clusters, but she still sits a bit behind her sister.
This difference is natural: Pheno #2 germinated later and is effectively running on a slightly younger internal clock. The 11/13 light schedule (11 hours on, 13 hours off) means she is easing into flower at her own rhythm.
👉 What this means: Both plants are thriving, but don’t expect them to bulk or finish at the same exact time. This staggered development could actually be a gift—two harvest windows, two terpene expressions, one journey.
Educational takeaway: Even seeds from the same strain can flower on different schedules. Rather than forcing uniformity, let each phenotype tell its story. Patience reveals the full genetic spectrum.
🌿 Grower’s Note
“This week felt like the real beginning of bloom. The room is alive—white hairs, bulking pistils, and that early whisper of aroma that promises so much more to come. Pheno #1 leads the charge, Pheno #2 follows on her own time, and together they remind me that growing is not about control, but about partnership. The plants teach us patience, and in return, we give them care.”

Likes
3
Share
@Sococannaflow
Follow
I didn’t take any photos of this strain once it went Hermie, but here’s a video of all the jars, I also have a storage tote of untrimmed buds for making rso :)

Likes
169
Share
@SlowpokeFuegobud
Follow
🍊 🐶 💜 🍊 🐶 💜 🍊 🐶 💜 🍊 🐶 💜🍊 🐶 💜 🍊 🐶 💜 🍊 🐶 💜 🍊 🐶 💜
Welcome to week 9, my fellow growmies!! 💚 💚 💚
DAY 57
Watered with 3ml humics +growzyme + bigfruits 💧
DAY 59
Watered with 3ml bloom (?) + 2ml PK + 4ml humics + growzyme + 3ml bigfruits 💧
DAY 61
Watered with 4ml bloom + 3ml PK + 4ml humics + growzyme + bigfruits 💧
DAY 63
Watered with 4ml bloom + 2ml PK + 4ml humics + growzyme + bigfruits + LO + 2ml calmag
💧
Thanks for stopping by, it's a true pleasure to have you as visitors!! 💚 💚 💚 😘
💜 🐘
______________________________________________________________
About Sour Tangie Dawg cannabis seeds
Sour Tangie Dawg is a sativa dominant cross between the famous Tangie and Chemdawg. Expect a combination of sweet & fruity mixed with a gassy, jet-fuel flavour. The amazing mix of citrus, tangerine, pine and gasoline produces uniquely rich, dank buds. The powerful sativa high is strong, uplifting and long lasting, great for creativity and socialising.
Chemdawg is the parent of OG Kush, all Diesel strain originate from Chemdawg. The Tangie is originally a Skunk hybrid strain but extremely fruity with the trademark Tangerine flavour. This strain is potent with THC-levels over 20% alongside very generous yields of top quality weed, very suited for hash and rosin producers. If you’re looking for a strain to produce the best tasting concentrates this Sour Tangie Dawg is a proven winner! She easy to grow and the perfect choice for SCROG growing due to her growth speed and stretch. We advise switching to 12/12 light when 75% of the net is filled. For outdoor growers the harvest period is early October. Indoors she’s finished after 9 weeks of flower - fast for a sativa dominant strain. We recommend growing in soil with organic nutrients for the best tasting weed.
Get some fantastic genetics here: https://supersativaseedclub.com/ 💜 🐘
___________________________________________________________________________
SETUP:
80x80x180 cm Zelsius
240W Full Spectrum LED IR UV dimmable
DW240H-A6-HS
Heatsink color red
LED Chips:
512pcs SAMSUNG LM301H + 24pcs Osram 660nm + 8pcs Osram IR 730nm + 8pcs UV 385nm
Color mix: 2700K + 4000K
2,8umol/J
Driver HLG-240H-C2100B
Coverage: veg 5x3ft / flower 4x2ft
Product size: 628x205x68mm
Green Buzz Nutrients
Shouts go out to my sponsors @GreenBuzzNutrients, thanks so much for your support! ❤️
If anyone would like to try their amazing organic products, use code GD42025 for generous 25% discount (for orders of minimum 75€) ✨
https://greenbuzznutrients.com/
Biobizz Lightmix
custom exhaust fan 320/270cm³/h
Carbon Active Granulate 240cm³/h
tab water pH 8 - EC 0,25 with Calmag to 0,5
Advanced Hydroponics pH minus Grow + Bloom to pH 6.2
🍊 🐶 💜 🍊 🐶 💜 🍊 🐶 💜 🍊 🐶 💜🍊 🐶 💜 🍊 🐶 💜 🍊 🐶 💜 🍊 🐶 💜

Likes
19
Share
@proud_to_grow_loud
Follow
Fun to grow and took to lst and supercropping very well. I am keeping a mother of the stinkiest pheno I got. I made some other seeds that I will be growing out after Jinxproof's pheno hunt. I will be doing a few grows coming up here and its going to be gnarly! Stay tuned in for modern genetics that have been tested and stabilized. These were bag seed from regular seed of LA confidential given to a friend that won them in a giveaway from DNA Genetics.


Likes
25
Share
@GODSGIFT_2005_JM
Follow
🍼Greenhouse Feeding BioGrow
⛺️MARSHYDRO
The ⛺️ has a small door 🚪 on the sides which is useful for mid section groom room work. 🤩
☀️ by VIPARSPECTRA (models: P2000 & XS 2000)


Likes
2
Share
@MoMedicalAlchemist
Follow
Day 32 flower update Emerald Harvest nutes everything looks great...they're fattening up this week...they're all 60-70 day flower times as recommended by the breeders

Likes
10
Share
@extraterrestrial1
Follow
Day 1
Water: 50ml RO water
Humidifier: 70-75% (HIGH-MIST)
Fan Speed: Mid-Low
Light on @ 16:20 (22.5° celsius @ 70% RH)
Light off @ 9:20 (19.5° celsius @ 65% RH)
---------------------------------------------------
Day 2
Water: N/A
Humidifier: 80% (MID-MIST)
Fan Speed: Low
Light on @ 16:20 (21.7° celsius @ 78% RH)
Light off @ 9:20 (19.3° celsius @ 81% RH)
---------------------------------------------------
Day 3
Water: N/A
Humidifier: 80% (MID-MIST)
Fan Speed: Mid-High
Light on @ 16:20 (21.4° celsius @ 77% RH)
Light off @ 9:20 (20.5° celsius @ 78% RH)
---------------------------------------------------
Day 4
Water: N/A
Humidifier: 80% (MID-MIST)
Fan Speed: Mid-Low
Light on @ 18:30 (21.3° celsius @ 80% RH)
Light off @ 9:30 (20.1° celsius @ 75% RH)
--------------------------------------------------
Day 5
Water: 50ml RO water
Humidifier: 80% (MID-MIST)
Fan Speed: Mid-Low
Light on @ 19:00 (22.3° celsius @ 80% RH)
Light off @ 13:00 (19.7° celsius @ 81% RH)
--------------------------------------------------
Day 6
Water: N/A
Humidifier: 80% (MID-MIST)
Fan Speed: Mid-Low
Light on @ 19:00 (22.3° celsius @ 74% RH)
Light off @ 13:00 (19.1° celsius @ 83% RH)
--------------------------------------------------
Day 7
Water: N/A
Humidifier: 80% (MID-MIST)
Fan Speed: Mid-Low
Light on @ 19:00 (21.8° celsius @ 78% RH)
Light off @ 13:00 (18° celsius @ 83% RH)
--------------------------------------------------


Likes
5
Share
@BenChasinBigBudz
Follow
Sorry I only have two pictures today but it really isn't much to see. She's still in half veg half bloom mode. Soon she should be loading up.
Either way I will be uploading this entire grow journal to my YouTube channel which is easy to remember. I am Ben and I chase big budz. Ben Chasin' Big Budz
Hope to see you there


Likes
33
Share
@Happygrowing
Follow
Cazzo è enorme!!
65 cm di diametro e mi occupa più di mezza tenda 1x1...
Che dire!!
Fantastica la sua crescita.
Già esplosiva dopo il topping...
Avevo visto che non aveva quasi ricevuto stress e avevo capito sin da subito che è una pianta fortissima, in piena salute e con grandi margini di grandezza/robustezza.
Questo fenotipo è chiaramente forte e resistente ha una dominanza sativa forse più della percentuale che scrivono...
Sono molto orgoglioso dei miei lavori ed esperimenti con le autofiorenti.
Non voglio fare stime di peso ma sicuramente sarà una pianta pesante.
Ho contato almeno 40 Budsites 😱😱😱

Processing
Likes
2
Share
@Cogollo_eu
Follow
**Encontrarás la traducción a español al final de la descripción**
From/Desde: 09/09/19 || To/Hasta: 15/09/19
From day/Desde día: 08 || To day/Hasta día: 14
Blueberry Cookies Diary / Diario de las BlueBerry Cookies:
https://growdiaries.com/diaries/38769-dinafem-039-s-blueberry-cookies-at-the-ocean
-----IMAGES & VIDEOS-----
V1 - Transplanting day. I'm using 10 l Aeropots as final recipient. I've used:
- Small layer of ATAMI HydroRokz (perlite) at the bottom of the pot, just for cover bottom holes and to retain a bit of humidity
- Over the perlite i placed 1l of mixture with BioBizz "All Mix" and Volcanic Soil
- Again over, 1l of mixture with BioBizz "Light Mix" + Volcanic Soil & Guano
- And filled the rest with BioBizz "Light Mix" + Volcanic Soil
It's the second time that i broke half of the roots of a plant doing a transplant, It happened to me just for not being careful enough to hold the soil by the lower part. While this is no good, no further signs of that mistake other than the recorded video ;).
V2 - Quick show up on how to correct the color of photos taken under red/ping/purple light.
First I merge the HDR image from 3 bracketed shots, then I apply my custom color adjustment in the HDR resulting image.
As i show in the video, to correct the red light, you have to enhance the blue and green curves, just play with a point in the curves until you find the best adjustment for each of both curves. Then you should go to tones, and play a bit with reds, pinks & purples... and.... Voilá, you can see the results, easy and effective..... but no more easy than using the right white spectrum.
P1 - Cookies Showdown before transplant
P7 - Volcanic soil and Guano
-----WEEK SUMMARY-----
This week was very easy, i didn't do anything to these babies apart from the transplant. This is the first time im mixing something with the soil, I hope not to overfeed the Cookies with the nutes, as i'm going to use the same nutrients i was using.
The first 10 days they were growing in my 60x60x40 tent (DP60), with a terrible chinese light that i always use the first week wen I plant.
PandaGrow 100W (50W draw) - http://www.pdgrow.com/index.php?m=Show&a=index&cid=12&id=53
So after transplanting when i place the plans under the Quantum Board or the Platinum LED, i've notice it on them immediately, they really don't like this kind of chinese lights.
Thus after the transplant the plants has started to grow and wide much more and much quickly.
-----WATERING CALENDAR-----
12/09/19 DAY 11 - 1,5 l after transplant with all week nutrients @ 0.8 EC & PH5.8
*****ESPAÑOL*****
-----IMÁGENES & VÍDEOS-----
V1 - Día de transplante. Transplantaré a AeroPots de 10 l. Para el transplante he usado:
- Una capa pequeña de ATAMI HydroRokz (perlita) en el fondo de los tiestos, sólo para cubrir los agujeros y retener un pelín de humedad.
- Encima de la perlita he puesto 1 l de mezcla de BioBizz "All-Mix" con tierra volcánica
- De nuevo encima he puesto otro litro de mezcla de BioBizz "Light-Mix" con guano y tierra volcánica
- El resto está relleno con una mezcla de BioBizz "Light-Mix" con tierra volcánica
Es la segunda vez que se me parter unas raíces por la mitad en un transplante, eso me pasa por no ser lo suficientemente cuidadoso como para agarrar el sustrato por su parte baja. Esto no es algo bueno, pero he de admitir que aparte del mal rato de que se te partan las raíces, a la planta no le sucede nada de nada, sigue creciendo al mismo ritmo que su hermana.
V2 - Un ejemplo rápido de como corregir la iluminación de una foto tomada bajo un espectro rosado o rojizo
En el vídeo primero compilo el HDR compuesto de 3 fotografías horquilladas y una vez compilado le aplico mi ajuste de color.
Como muestro en el vídeo, para corregir este tipo de luces hay que realzar las curvas de color azul y verde, simplemente con un punto por encima de la mitad de la línea media hasta encontrar los puntos más adecuados para tu luz. una vez encontrados, sólo hay que ir a los tonos y ajustar un poquito el rojo, rosa y morado.
P1 - Muestra de las Cookies antes del transplante
P7 - Tierra volcánica y Guano
-----SUMARIO SEMANAL-----
Esta semana ha sido muy sencilla, no les he hecho absolutamente nada a las pequeñas a parte del transplante. Esta es la primera vez que mezclo algo con el sustrato y espero no sobrealimentar las cookies ya que voy a seguir usando los mismos nutrientes que he usado con anterioridad y de la misma manera.
Los primeros 10 días han crecido en mi tienda de 60x60x40 (DP60), con una luz china terrible:
PandaGrow 100W (50W draw) - http://www.pdgrow.com/index.php?m=Show&a=index&cid=12&id=53
Siempre uso esa luz los primeros días de cada cultivo, por lo que al cambiarlas a la Quantum o al Platinum LED lo noto al toque, realmente no les gusta nada la luz china esa, inmediatamente se ponen a crecer y ensanchar mucho mas.
-----CALENDARIO DE RIEGO-----
12/09/19 DÍA 11 - 1,5 l después del transplante con todos los nutrientes semanales @ 0.8 EC & PH5.8

Likes
8
Share
@Staffedition
Follow
Привет друзья мои!
Моё растение во всю ветёт и пахнет!
Этот малыш явно хочет жить и не сдаётся!)
Вот я понимаю стремление.
Кустик маленький но мне нравится.
Всем мира и добра и хорошей генетики!

Likes
20
Share
@Cauli
Follow
Week 13 for Chemical Candy.
This will be a hard farewell … that lady became so beautiful, it'll be a pity to chop her.
Despite the problems (grown super near to the lamp, broken main stem while tying to bend her down) she really performed outstanding in a short time.
Buds are dense and covered in trichomes, smell is gassy with a very chemical touch – very special one. loved her 💚
Likes
43
Share
@Jack_Greenstalk
Follow
added trellis netting this week to start SCROG. two layers close to eachother so I don't have to wait for entire square of growth to tuck under higher growth to keep flat even canopy. also minimizes my need for zip tie and garden ties needinf adjustment. I'm happy with veg growth thus far, and once the screen fills up with more green in a week or two these two ladies will both be ready to flip to flower. waiting on lower nodes to develop a bit more and get best use I can from a big(ish) 315 w LEC light.
the girls are getting foliar every 3 or 4 days. using heavy 16 foliar only at the moment but will follow their foliar mix as grow progresses.
smell has gotten much heavier, especially in nemo, the more blueberry pheno of the two, looking at the fan leafs I think V is more haze pheno with super thin sativa leaf structure.
