The Grow Awards 2026 🏆 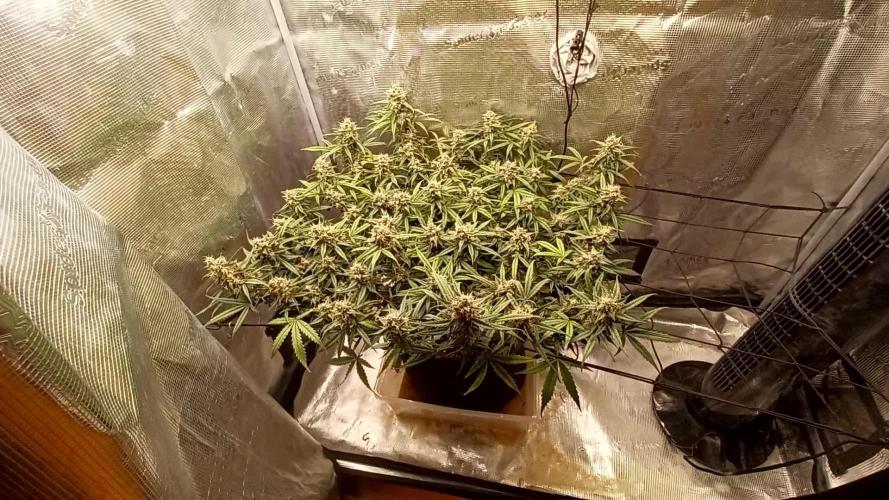


Likes
Comments
Share


Likes
2
Share
@TommyBVRSA75
Follow
Video - middle growing phase on 9th week ( ending of 3rd flowering week ) - Blooming start.
Explaining my grow area - LED settings - temperature and humidity conditions - Strain descriptions
Likes
4
Share
@Hix57
Follow
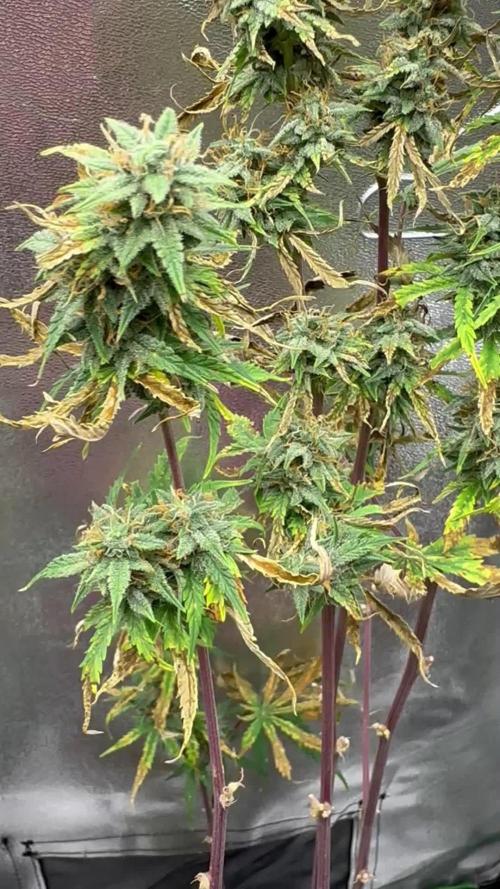
À l'aube du 55e jour, la plante navigue avec à travers ses cycles de vaie, malgré une légère bataille contre une carence en calcium.
Cette petite épreuve a été en grande partie surmontée grâce à l'ajout judicieux de CalMag.
A ce jour, elle laisse place à une période intense de maturation. Les têtes s'épanouissent sous un voile scintillant de trichome.
En espérant qu'elle termine son cycle dans 2 semaines 🙏
Merci a Louloutre

Likes
2
Share

Likes
17
Share
@CanabisLoverHobbyGrower
Follow
Another good week smoothie really coming along now zkittles still seems a bit behind she is going I can tell by the white hairs ect but not sure if I've hindered her in anyway , maybe stressed her abit with defoliating I'm not sure,.. starting week 7 now... appreciate any input 👌
Likes
3
Share
@Unculti_responsable
Follow
Esta semana hicimos la última poda de bajos y alicales , es una de las últimas podas q hacemos! Después de esto la vamos a pasas a 10 litros y ya la mandamos a florecer creo q esta más q lista para arrancar el proceso de floración


Likes
2
Share
@CalGonJim
Follow
MONDAY 5/19 12AM Doing great, have to separate Cory and Trevor this week. 1130 pm
.🚨🚨🚨.STONED GENIE order..I got one broken 64 dollar land the 12 inch 19 dollar black double percolator was TOTAL GARBAGE!!!!! it had a fake 10 star review.... at least I got 2 4 inch down stems for 117 .....complete WASTE of money, should have just thrown the money in the garbage.......... so pissed....🚨🚨🚨
5/24 3 pm new light lots of godamned work why do I do this to myself??? 330pm what. a nightmare, I put the extra red and blue 20 cheap lights with this monster light, nice balance of color with the blue. I love this light, Mars Hydro...why do you do this to me. Totally worth it, best lights on the planet, so far.
5/25 230am NEW DESIGN NIGHT. USB FANS -- Small usb fans at the end of ducting are effective intake air filters. HOWEVER the fans are cumbersome the wires are a pan in the as. design 2 part clip gravity 4 inch wire. twists thru fan . ONE tlong up the tube for balance other to CLIP on to duct.
3am clips are good new designs emerging. fasting all night so I can work and get new ideas. fans are a go, we have a new design using clips, no external wires. the load bearing usb wire is safe, not load bearing to the connections just the cable, its perfect..
Mexicans and jew & white trash cops and their arzonz fed family and judges have been committing unimaginable property and financial crimes against me. If I am suicided. it was them. I am ready to die, unafraid of every one of you fucking bastard traitors and I mean it.
Likes
27
Share
@Smokwiri
Follow
Bola Mintz by Anesia Seeds
Wet toiletpaper in ziplock bag method.
Old recommendation from a fellow GD grower and works really good.
Lets wait for germination, i will update the diary with pictures when it has some root going on.
Also posted some pictures of my line-up for the coming months
--update1- took 4 days to get a nice little root to transplant into the soil...
So we made a nice video of the transplant from paper towel in ziplock bag to coco
--update2 - 1 day later i noticed something was coming out of the soil...added some pics of it

Likes
9
Share
@HUMO_Cultiva
Follow
Update week 1 day 4 of bloom , this week we put the net to make the technique that calls scrog we see next week what is the resul

Likes
12
Share
@BluetenVomBodensee
Follow
Day 63
Fiona handled the defoliation really well so I LSTd her one (last?) time. I think the intense stretching is over and from now on all that will grow are her many (!) flower sites 🌸 First pistels showing and you can already smell her.
Day 66
Fed her 2l with half the recommended dose of nutes.
She is so happy with life right now, she started praying 🙏😍
She is not growing in size anymore so the daily LST sessions are over.
Day 67
Just when I thought Fiona couldn‘t make me any prouder, I found a calyx that seems to indicate she is going to develop the red/purple optics promised for 60% of the strain‘s plants 🤞
Likes
245
Share
@Roberts
Follow
I did a top dressing with the dynomyco last week and washed it into my coco upon watering. Not sure if the extra fungus helps or not, but can't hurt. Thc bomb is getting rather large for a 100 watt spider farmer SF-1000 light. I am running the board at 11 to 12 inches from tops of plant. Which is safest I can get the light in my growing conditions. I have been steadily keeping upped Amounts of phosphorus and potassium. While trying to reduce nitrogen levels. I been keeping underside clear. Waiting for the flowers to start stacking up. Looks like this will be a longer grow. Thanks again spider farmer, and bomb seeds🌱👍
Thanks again to everyone in the grow diaries community. I really appreciate everyone that shows their support through likes, and follows. Also like to invite everyone to my YouTube channel for more cannabis related videos. Extra thanks to my subscribers there😀😀😀

Likes
38
Share
@Cariboo_OG
Follow
Utopia Haze is a rare heavily sativa dominant hybrid (90% sativa/10% indica) strain created through back crossing Brazilian Sativa strains. This tasty little bud took home 1st Place for Best Sativa in the 2008 High Times’ Cannabis Cup and for good reason – with its potent 18-22% average THC level and long lasting cerebral effects, Utopia Haze is one powerhouse smoke. The Utopia Haze high comes on soon after you finish your first toke, hitting you with a strong cerebral lift that infuses you with a sense of hazy relaxation.
Type: Feminised/Photoperiod
Cultivation: Indoor/Outdoor
Flowering Time (days): 70-75
Indoor Yield (g): Up to 650
Feminised Outdoor Harvest Month: October
Feminised Outdoor Harvest Month Week: 3rd-4th week
Aroma: Citrus, Woody, Pungent, Mint
Effect: Cerebral Lift, Hazy Relaxation, Sleepy
Welcome Everyone to the Final Entry of my Utopia Haze Grow !
There is so much to discuss ! I have been extremely busy as of late trying to get this Harvest together, but i am happy to have it here for you now !
I Seriously under estimated the amount of time, help from others, and my own necessary skills to pull this off.. and i still kind of screwed it up lol !
But its worth noting i have never actually done this before and trying to document it during....was extremely hard.
It is next to impossible to work an iPhone with rubber gloves on !
First I want to discuss everything step by step so before you jump straight into the comments on how the end product is so small in "quantity"
Rest assured i am happy with its"quality"...and thats all that matters to me because Life is a journey not a destination! and i have learned so much from this grow that I couldn't be any happy even if i messed some things up :)
But at the very least I hope you read through this entry in its entirety with an open mind and focus more on the process, rather than just the outcome!
I ran out of Ice & i was only able to wash three times..(normally I've heard you should go sometimes 5-6 washes)
Preparation is Key & things will be much better next round :)
Photos 1-22
These are pretty self explanatory but for those of you just tuning in now.. this is what happens to a very happy plant when you don't have the necessary tools to monitor key components of growing cannabis.. Ph, as well as EC levels play a very key role in the outcome of your grow lol that being said I was just able to save this plant by purchasing both tools but that doesn't mean the plant didn't suffer because of the prior events.. This was a Huge reason behind me choosing to turn this harvest into what i would consider
"Solventless Hash Rosin" from "Ice water extracted Bubble hash".
Pictures 23
The idea here is the process of using "fresh Frozen Cannabis" this has been discussed many a time online on such sites as instagram and here on grow diaries as well.. I personally have Never tried the process so i decided to try it out and make a judgement for myself..
Video 24
The Cannabis has now been in the freezer for 72 hours making it very well frozen.. as you can tell i struggled getting it all into the 25u Screen Wash Bag. One thing of note i would do differently is i will de-stem my next batch as i also believe this played a part in the amount of plant matter that escaped through the sieves.
Photo/Video's 25-28
The idea here is "ice water Seiving" & especially with the bags that I am using here that are only have screen material on the bottom portion of the bag it is very important to have spaces in-between the screens to allow the water to pass directly through the screens into the bottom bucket with the least amount of resistance.. because the hash is so extremely temperature dependant if it gets warm on the side of the bag.. it will stick there and not make it to the bottom to become use able product..
29
You do not need to use as much Ice as i used here lol... the idea is to keep everything very cold..i certainly achieved that but at the sacrifice of using so much that i ended up grinding product and producing "contaminants" but in the end they are just plant matter that i would be smoking when i rolled up my joint either way so.. I'm not super disappointed..
But it should be noted that what you want to achieve here is a Layering effect where you have the wash bag between two small layers of ice while the "water current" washes the Trichomes away allowing them to be separated by the screens setup below :)
Before Starting the machine you should allow some time (i.e.;10-12minutes pre soak to allow the product to become saturated) before the first cycle.
By video 32 I have just ran out of ice lol..
Video 33-34
Here I have a tip for you.. to separate the screens that you sieve through.. cut 5 gallon buckets to stretch them across nice and tight.. it'll make scooping your Bubble that much easier ! i learned this from the many "Frenchy" videos I have watched :)
Picture 35
Here in lays the problem for most people.. drying your hash without loosing vast amounts of "Terpenes" whilst also stay ever vigilant against mold !
Thanks to all those videos I've watched on youtube.. id like to think this was one of my most successful parts of this process..
Things to Note; Terpenes start to seriously evaporate at temperatures 68F or 20C
you need to stay as cold as possible whilst bringing the Relative Humidity in the space down into the 40-30% to stay away from that nasty mold !
I used my cold storage room in the basement.. with a dehumidifier running to keep the space at 45% RH & staying at a constant 15c.
All while spreading the hash as thin as possible across parchment paper, on top of the white screens with a fan moving air across both sides of the paper.
Pictures 36-38
These are some macros i took in the middle of my drying session I fell in love with the colour.
Yes i know the black spots are plant material but they will get caught when i bag the hash & squish the oil out.
Thing to Note; at this stage it is important to ensure you 'micro plane" the hash down as fine as you can whilst staying weary of the temperature... any "chunks" will hold pockets of moisture.. that lead to potential problems..ie; mold ...
Picture/Video 39-41
Successfully planed bubble hash ready to be bagged and Squished !
Picture 42
Ive decided to follow Pedro.. from Pedros Grow Room and double bag to be on the safe side so i don't have any blow outs.
So thats One 25u bag inside one 160u bag ! :)
Pictures 43
This is almost 3 grams of the bubble hash from above, already melting in the bag.. this is where i ran into trouble again lol things started getting to warm in the house and i was only able to get one of the three squish's i did on video :( things started getting sticky.
Picture 44
This is basically just a photo of the equipment I'm using; 3x5 LowTemp Cage in the frame I built myself, with a 20Ton bottle jack.
Something to note here is this is an older Lowtemp model with only a single heating zone which is which i have it closed here heating Both sides of the press :)
As well as the importance of having adequate pressure on your plates.. my rig is very overkill for the size of hash bags..lol
Video 45
Here is the lovely press video.. its didn't quite work the way i wanted either lol my directional folding wasn't quite tight enough for a big "drip" :)
&the Press was set to 65°c
Photo's 46-50 are pretty self explanatory :) I had a blow out.. but still managed to pull an 80% return from the hash once squished...& yes it tasted amazing :)
Was it worth it in the end... that could be debated.. for some..i understand..its not your thing, but for those of us that are interested in making our own concentrates.. free from Solvents...
I wouldn't make it any other way :)
If even ONE of you reading this diary finds it helpful to reference for ANYTHING.....even if its "what not to do" ill consider it a success !
Thanks again for tagging along on this garden adventure.. its been one heck of a journey !
Much Love from B.C. Canada,
Until Next time,
Cariboo


Likes
6
Share
@Skynets_Growing
Follow
I feel like I‘m in a waiting room, the time passes extremly slowly when you‘re waiting your turn. And my turn named Elsa‘s Harvest, but she taking her time… and i Grant her it…see you next week.

Likes
6
Share
@StonerMike
Follow
Purple lemonade has been looking crazy for weeks smh. I haven’t had time to continuously update. Pics and video are from 7.22
Likes
12
Share
@TappedN
Follow
Sorry For The Delay but I was kinda busy ......Anywho on 3/19 I Changed The light Schedule form 18/6 to 12/12 To Begin My Pre-Flower Stage I Also Bent The Last Few Uneven Tops To Have A Table Top like Canopy (LST) Also Cut Off all Little Branches (Lollipopping) To Prevent Getting Any Little Pop Corn NUGs. Then ON 3/20 I Increased My Light Intensity From 25% to 50% And began giving These Girls There Flower Nutrients Listed Above .
AN Updated Video Of the Week POSTED ABOVE Video Taken About 3 Days After Making These Changes And yes The are All Showing to Be Females


Likes
57
Share
@nonick123
Follow
Día 76 (08/07) Riego con 1 Litro H2O + Regulator 0,15 ml/l + K-Boost 1 ml/l + CaMg-Boost 0,3 ml/I + TopBooster 0,3 ml/l - pH 6.2
Ultimo riego con nutrientes. Empezamos el flush (aunque no soy muy partidario del flush, voy a probar las indicaciones de Aptus)
Día 77 (09/07) La planta empieza a llegar al final de ciclo, porque ha reducido el consumo de agua en los últimos días
Riego con 750 ml sólo H20 - ph 6.2
Día 78 (10/07) Riego con 750 ml sólo H20 - ph 6.2
La senescencia está llegando. Efectivamente solo le faltan unos días para la cosecha! 😍💥💨😁
Día 79 (11/07) Riego con 750 ml sólo H20 - ph 6.2
Revisión con el microscopio 60x! Los tricomas están 80% trasparentes + 20% de turbios.
La cosecha se va a demorar unos 4-5 días más
Día 80 (12/07) Riego con 750 ml sólo H20 - ph 6.2
He sufrido un ataque de gusanos y tengo que eliminar tres cogollos...
Los últimos días no he podido estar encima de ella tanto como me gustaría... 😞
Día 81 (13/07) Riego con 750 ml sólo H20 - ph 6.2
Vuelvo a revisar los tricomas y sigue sin estar lista....
Status tricomas: 50% turbios + 50% trasparentes
Día 82 (14/07) Hace mucho calor aqui! 37 ºC
Riego con 1000 ml sólo H20 - ph 6.2
💦Nutrients by Aptus Holland - www.aptus-holland.com
🌱Substrate PRO-MIX HP BACILLUS + MYCORRHIZAE - www.pthorticulture.com/en/products/pro-mix-hp-biostimulant-plus-mycorrhizae


Likes
1
Share
@JBsTastyBudz
Follow
Sorry I started this diary late... I'll go back and edit the height and all that when the lights come on and add nutrients in.. Using Advanced Nutrients pH perfect line with Big Bud, Bud Candy, Nirvana, and Overdrive... Use Flawless Finish at the end.


