
Likes
Comments
Share


@Canadian
Follow
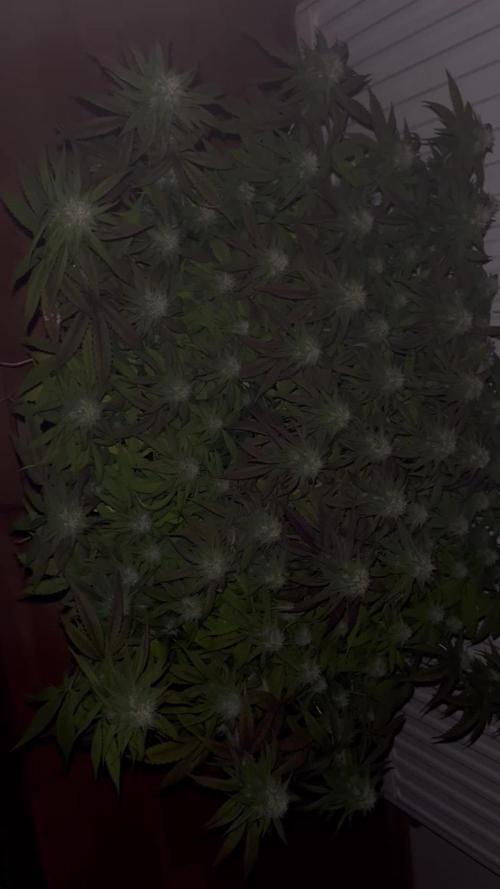
Thank you for reading I will continue to update once they are drying and ready for cure.
I have cut down in jar everything the wait was 91 grams please consider that when they comes to my scale weight i wait until the main stem breaks with a loud crunch and the buds are really dry to the touch reason for it I have a very busy life and at the end of the day this is just a hobby so I cannot be opening those jars many times a day at most one in the morning and one in night so I want to avoid mold on them.so I push in a Boveda pack to keep them nice.
After three weeks in jar that smell has incremented a lot be aware if where you are it's not allowed to smoke because once you open that bag or container everybody knows you open one of those buds it is incredibly powerful smoke and it is very very smooth great strain to have.
Taste 10 out of 10
Aroma 10 out of 10
High 10 out of 10 . Night. strong THC.
Yield 10out of 10.
Taste 10 out of 10
Aroma 10 out of 10
High 10 out of 10 . Night. strong THC.
Yield 10out of 10.
thank you for reading have a happy grow

Likes
9
Share


@eldruida_lamota
Follow
Vamos familia actualizamos la cosecha de las kritical.
La verdad que el secado muy bien 7 días en Malla y a los botes, 40% humedad y 24 grados es la temperatura ambiental que han tenido en el secado.
Por lo demás de miedo os la recomiendo.
Gracias a Agrobeta y Mars hydro , sin ellos este proyecto no sería igual 🙏.
Agrobeta:
https://www.agrobeta.com/agrobetatiendaonline/36-abonos-canamo
Mars hydro:
Code discount: EL420
https://www.mars-hydro.com/
Buenos humos.

Processing
Likes
24
Share


@Grnhead
Follow
Just getting going again after some mods to my grow box. I’ve replaced the main CFL bulb with an LED and it is much brighter. I also removed the second carbon filter to create more space in the box. The new setup allows for more even space and light distribution and overall more growing space.
With the additional light I thought I would try out CO2 so I added an Exhale365 bag.
Starting out with 3 plants, 2 Pineapple Express and 1 Pineapple Skunk. There was some type of burn on the first seedling but that was earlier on and it has grown a lot since I first noticed it. I planted the seeds days apart so a few are behind.
Growbox summary:
* grow space: 19”H x 17”W x 21”D
* 4 small, 1 medium internal fans
* 3 gallon hydro reservoir
* 6 inch exhaust fan + 4 inch exhaust fan in sequence
* 150W Mars Hydro TS-1000 (new)
* 3 X 20W LED side lights (+1 new)
* Exhale CO2 bag (new)
Water temps are ranging from 68 up to 70.
It’s a small space, but with light covering all sides I think I can get a decent yield. Last time 3.2 ounces were harvested from it. Hoping to hit 5 ounces this time by creating fewer, but larger colas.
Day 6 update:
* The pinex-1 is looking a little funky. It has weird leaf growth, some minor defects in color, super short compared to the others, and the first leafs are starting to canoe a little.
* pinex-2 and pskunk are looking good and growing well, but the leaves aren’t very green.
* decided to bump up nutrients a little by moving to week 2 on the schedule and diluting to 60%. That took the ppm up from 400(200 base) to 630(210 base). Hoping if they weren’t getting enough nutrients that this will fix it.
* the new light might be a little to bright for these babies. Dimmed it to about 75% power.


Likes
9
Share


@MassEric
Follow
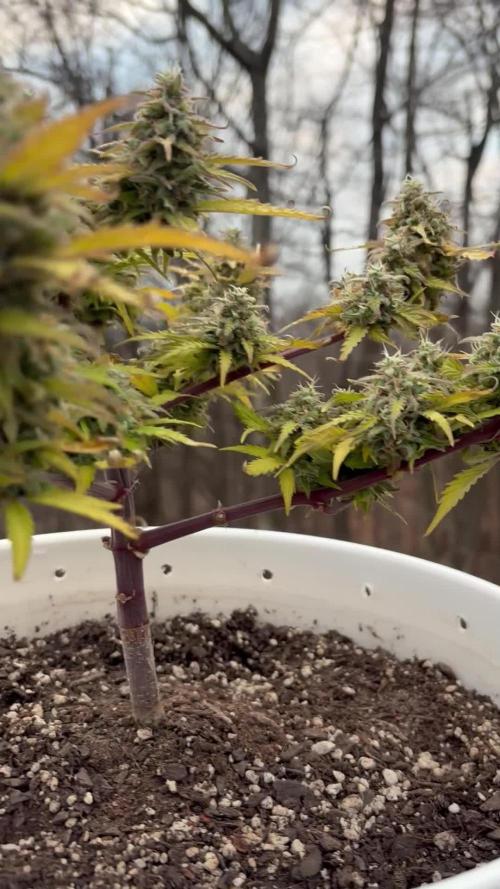
Another week down and I think its time to move the camera up a bit. Getting hard to keep them both in that dumpy camera's optics. At some point I'm doing to invest in some decent glass for these videos.
The plants seem to be rocking along fine after their initial topping. Did some light defoliating here and there but I'll pretty much leave them alone from this point on. I might do a bit more training but honestly I'm not after a perfect canopy.

Likes
12
Share


@H2Smith
Follow
📅 16.04-21 (Flower Day 50 since 12/12)
📜 Addition of 175ml total care. Trhichome analysis: everything is transparent.
⚗️ 2.06
💦 5.99
🌊 55L
📏
📅 17.04-21 ( Flower Day 51 since 12/12)
📜 Set PH 6.10. Removed 40l. Addition of 35l in the tank at 4 p.m. Addition of 45l at 7pm. 10% of the leaves turn black
⚗️ 1.93
💦 6.14
🌊 75L
📏
📅 18.04-21 (Flower Day 52 since 12/12)
📜 10l emptying of the system.
⚗️ 1.9
💦 6.10
🌊 55L
📏
📅 19.04-21 (Flower Day 53 since 12/12)
📜 10l emptying of the system. 30% of the leaves turn black
⚗️ 1.86
💦 6.14
🌊 70L
📏 cm
📅 20.04-21 (Flower Day 54 since 12/12)
📜 10l emptying of the system. 40% of the leaves turn black
⚗️ 1.85
💦 6.10
🌊 60L
📏 cm
📅 21.04-21 (Flower Day 55 since 12/12)
📜 theoretical start end of flo - analysis of trichomes: wait and see flushing within 1 - 2 days. Set ph a 6.2
⚗️ 1.85
💦 6.15
🌊 50L
📏 cm
📅 22.04-21 (Flower Day 56 since 12/12)
📜 👌 i fill 50 liter at 23h20
⚗️ 1.83
💦 6.20
🌊 50L
📏 cm
_____________________________________________________
📅 Day - 📜 Note - ⚗️ EC -💦 PH -🌊 Water -📏 Height
Equipment:
Idrolab 12 bucks
Chiller teco Hy500
weather controler with Co2 : PRO-LEAF BECC-B2
Bavagreen 720w
Bavagreen 720w
Bavagreen 240w
Bavagreen 240w
Nutrients and PH controller: PRO-LEAF PHEC-B2
Nutrients: Green House feeding - powder feeding hybrids | Powder feeding boost
Extractor: primaklima PK250-1 PK250-L1 x2
System and roots care: Idrolab Total care


Likes
34
Share


@AbroCadabro
Follow
Cindy has been flipped to flower! Both plants in my tent have reached their max veg height and width. I did a preflower defoliation and flush and have flipped to a 12/12 light cycle.

Likes
21
Share


@w33dhawk
Follow
Moin moin liebe Leute erstmal Entschuldigung das ich Woche 8 nicht hoch geladen habe, hab einfach den Kopf zu voll zur Zeit der grow läuft an sich ganz gut alle 2 Tage muss ich die Arme der okto moms neu anpassen mit der Höhe damit die Äste einiger maßen auf gleicher Höhe bleiben. Hab zusätzlich heraus gefunden was die Flecken auf den blättern verursacht ich hab die ganze zeit extract und bat boost gleichzeitig genutzt dabei werden die Zusätze getrennt benutzt (ich depp wieder) extract für vegi phase und in blüte umstellen auf bat boost naja die okto moms leben und gedeihen werde die tage auch auf 12/12 licht plan umstellen und somit ist dann auch die Hälfte des grows schon wieder rum euch noch ein schönen Sonntag meine homies und growmies

Likes
2
Share


@UrbanBoer
Follow
An interesting discovery was made with this plant’s pot, I observed how having a row lesser of drainage drastically effected how I water this lady. Her grow medium swamps up if I maintain a 1lt daily water schedule, which would result in drowning the roots, luckily my grow medium has sponges up when wet, allow the slow irrigation to take place to avoid root rot. Luckily it’s spring time and in Mzansi(South Africa) it is hot enough to push my greenhouse’ temperature higher than the outdoor temperature, to encourage some form of evaporation and humidity, next week I will add pictures of the thermometers, and you can see the drastic difference in temperature.
Likes
9
Share

@Lvnsource
Follow
This weeks feed log 👇
D: 78 - 9.5L - Si,[6ml],Vega[8ml],Flores [10ml],INPUT; [1.426 EC],[6.1 pH],Ca/Mg[5g & 3g]- RUNOFF; 3.3L pH [6.3] ,[2.458 EC]
——————————————————————————
EC is starting to come down, will be continuing the lower EC feeds until I’ve reached my target 🎯
The canopy is slightly uneven / messy. I’ll be dealing with it once there’s more space inside the grow area. Some purple is showing up on some fan leaves , pH of the medium is dialed in, so might be root zone related + environmental; judging by (temp difference btw day/night), nothing too serious 👍 !
Feed Log from 27.03 ;
D: 82 - 10L - Si,[3.8ml],Vega[4ml],Flores [18ml],INPUT; [1.326 EC],[6.0 pH],Ca/Mg[4.8g & 1.5g]- RUNOFF; 3.8L pH [6.3] ,[2.262 EC]


Likes
9
Share


@Headies
Follow
So Friday will be day 70. I messed up a lot, did lst and used big pots so I'm thinking these might go 3-5 more weeks. They smelled so amazing a few times today though. First the purple punch, then the sour diesel, then the girl scout cookies, each gave off aromas one after the other a few times today. The purple punch smalls so sweet and delicious.
Processing
Likes
3
Share


@macrocefalo
Follow
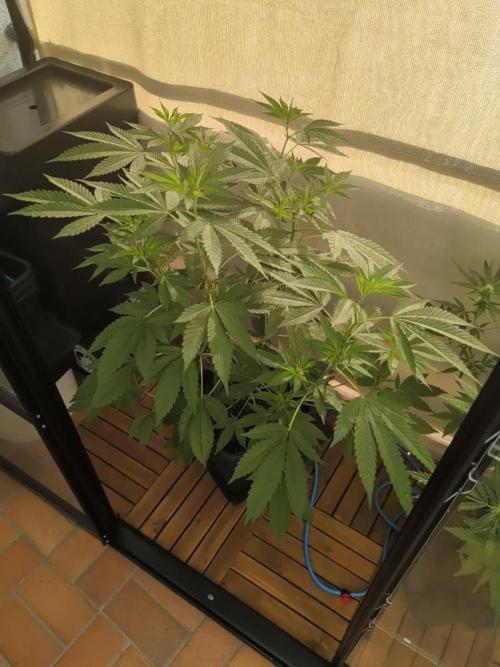
The plants grow well in the first week I had 100% germination in the seeds, for a first-time sailor I'm happy. I added the humidifier to keep the humidity at 65%. Now in the second week I increased the quantity of fertilizers but always following the supplier's table and the plants seem to be enjoying their food.
Likes
4
Share

@BossberryFarms
Follow
Decided they were ready to harvest! As always, I’m so grateful for the beautiful growing experience! Not a huge harvest but I learned/observed a few things this grow:
- 5 gallon plastic buckets did not work great for me. Kept way too much moisture and it really hurt the plants. I’ll stick to fabric pots for now on 😬
- I couldn’t figure out how to regulate the grow room for the optimal temp/humidity the plants needed. I finally figure it out, but these plants suffered big time.
BUT I’m glad they survived and am grateful for what they did produce! Plant C was such a joy to watch grow with its natural split.
I will update with final weights and more details later!

Processing
Likes
14
Share


@PlantGod
Follow
Excited to see the pistols keep coming and coming
I have such tight spacing that the buds will probably start connecting by the end of the week on the Royal Gorilla
Day 19- Tomorrow I will tie some branches down to open up the plants more. The LSD plants needs it the most!

Likes
13
Share

@Green_Zyphoria
Follow
Day 56 update, and man, the summer heatwave is officially pushing us to the limit! Inside the greenhouse, it’s getting incredibly hot, but the Gorilla Melon is handling it like an absolute champ. No real signs of heat stress yet, though you can tell she is working hard. Honestly, the AutoPot system is the real MVP this week; with these soaring temperatures, the constant water supply from below keeps her perfectly hydrated without any scary dry spells.
To keep the canopy nice and even, I went ahead and did some more topping on the taller shoots to balance out the height before she gets any bigger. On the pest front, we had a little drama: the ChrysoCards unfortunately baked in the intense heat and didn't survive. Lesson learned! To fix this, I released a fresh batch of live green lacewing larvae instead. I just put them right onto the main branch junctions on the plant. It’s working beautifully—the thrips are visibly retreating, and I’ve barely seen any new damage on the big fan leaves this week. Slowly but surely, we are winning this battle!
Likes
13
Share


@gr3g4l
Follow
Una vez pasados los dias huele bién, sabe bién y buen efecto.
Matices y aromas Terrosos , café y a cítricos.
Fácil de cultivar.
Likes
19
Share


@CannabisAprendiz
Follow
Bueno , este es el segundo cultivo que realizó del la cepa "Waka" , el anterior lo tengo igualmente documentado en otro diario .
en esta ocasión cultivamos los clones que habíamos recolectado del cultivo pasado , guardando los fenotipos que nos gustaron más y los clones restantes los pasamos a floración que fueron los que se le hizo seguimiento en este diario.
El crecimiento fue bastante explosivo y reaccionaron muy bien a cada trasplante realizado .
pude observar que los clones de cada fenotipo seleccionado se desarrolló con mucha similitud al de sus madres .
El olor en vegetación es bastante discreto y en floración se pone un más intenso
El desarrollo en floración fue explosivo generando bastante resina y se vieron muy hambientras .
Al fumar se puede sentir un rico toque cítrico en las N° 4 se siente un fuerte sabor a limón en algunas flores mucho mas marcado que en otras,
N° 3 y 13 un agradable toque a naranjas muy rico de sentir en el paladar , La N° 8 con pizcas dulces bastante interesantes.
El humo al fumar es muy suave lo que permite sentir mejor el sabor de cada fenotipo.-
saludos y buenos humos😉
Al momento de cosechar se cortaron los clone y se dejo secando en oscuridad a temperatura ambiente por cerca de 16 días posterior a eso se pasó a curar en frascos
Likes
20
Share

@ThatsmyGrow
Follow
Einfach eine super Woche
Ich bin einfach wieder komplett überzeugt davon autoflower indoor anzubauen, dank fastbuds gibt's so geile Sorten.
Ich will am ende alle mal gegrowed haben
Likes
16
Share


@Sadhus
Follow
Ce run ce passe vraiment a merveille,aucun souci, plante vigoureuses et très saine ! Rien a signaler rien a dire ! Juste parfait ! Merci kannabia, Madame grow , et trolmaster !
