
Likes
Comments
Share

@Dr_Zauberer
Follow
Good week folks always best week! Pudding them up for dry for around 10-12 days again.

Likes
7
Share


@smoking_hills9
Follow
All done, can't wait to try.
So final results are 520gr of quality
half solid buds🤩✔️ that's not include the bottom trim and small buds.
The whole harvest of 54 trees has the weight 5kg of solid quality buds, and around 2 kg of bottom trim and small buds🤩😶🌫️✔️


Likes
Comments
Share

@Tower84
Follow
🇩🇪🌱🍒 Woche 1 – Keimung | Cherry Limeade by Doja 🍒🍋
Eigentlich wollte ich diesen Sommer eine Indoor-Pause machen 😅. Aber ich konnte einfach nicht die Finger von meinem neuen Living-Soil-Beet lassen und musste es unbedingt ausprobieren. Außerdem bin ich schon lange auf der Jagd nach einem Strain mit einem echten Kirscharoma 🍒🤞.
Die Wahl fiel deshalb auf Cherry Limeade von Doja, eine Kreuzung aus Lime Sickle und Lemon Cherry Gelato 🍋🍒.
Nach nur 3,5 Tagen hat der Samen direkt im 130-Liter-Living-Soil-Beet das Licht der Welt erblickt 🌱✨. Ein besserer Start hätte kaum sein können!
? Die Erde wurde am 24. April selbst angemischt aus:
🔸 50 L Bio Canna Terra Plus
🔸 30 L Bimsstein
🔸 10 L Living Bio Char
🔸 10 L Reishülsen
🔸 10 L Kompost
🔸 20 L Wurmhumus
🔸 Universal Amendment Mix von Almicanna für 130 Liter
🔸 150 g Alfalfa Pellets 🌱
🔸 100 g Kelp 🌊
🔸 300 g Malted Barley 🌾
Bis auf die Bio Canna Terra Plus stammen alle Zutaten von Almicanna ❤️.
Die Mischung wurde auf einer 4 × 4 m Plane vorbereitet und mit etwa 25 Litern Wasser aus dem Gloria-Drucksprüher angefeuchtet 💦. Anschließend durfte die Erde für 14 Tage abgedeckt in der Garage reifen.
Danach wurde das 50 × 50 cm Almicanna-Beet befüllt und die Cover-Crop-Mischung ausgesät 🌿. Anschließend wurden SF-Nematoden von Öre Protect gegossen ?. Die Oberfläche bekam eine Mulchschicht aus Hanfspänen und zusätzlich zog eine Handvoll Kompostwürmer aus meiner Wurmbox ein ?❤️.
Nachdem das Cover Crop schön gewachsen war, wurden zwei Arten von Raubmilben eingesetzt:
🕷️ Hypoaspis miles
🕷️ Amblyseius cucumeris
Das Beet durfte anschließend etwa einen Monat lang einfahren ⏳. In dieser Zeit gab es einmal selbstgemachtes Ackerschachtelhalm-Brennnessel-Ferment 🍵 und einmal Komposttee ☕.
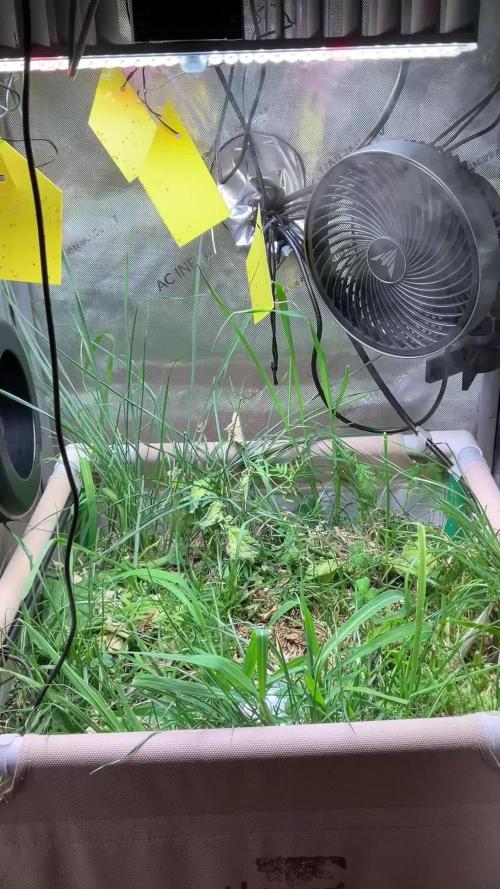
Mittlerweile ist das Bodenleben regelrecht explodiert 💥. Wenn man vorsichtig die Erde zur Seite schiebt, sieht man jede Menge Springschwänze, Würmer und Milben. Genau so habe ich mir ein lebendiges Ökosystem vorgestellt ❤️🌎.
Die Bewässerung erfolgt über vier Blumat Maxi Tropfer 💧, gespeist aus einem 30-Liter-Tank. Die Bodenfeuchtigkeit überwache ich mit einem MMM TXSU Tensiometer (20 cm) und peile etwa 100 mbar in der Vegetationsphase und 120 mbar in der Blüte an 📈.
Während der Sämlingsphase wird das Klima über den AC Infinity Controller im VPD-Modus geregelt 🌡️💨. Zielbereich sind 0,6–0,8 kPa. Die sanlight ist auf Stufe 2 eingestellt (200 PPFD).
Vor der Aussaat wurde ein Großteil des Cover Crops kleingeschnitten und als Mulch auf dem Beet belassen 🌿✂️. Anschließend kam ein einzelner Cherry-Limeade-Samen direkt in die Mitte des Beetes.
Und heute, nach nur 3,5 Tagen, hat die Kleine ihren Kopf aus der Erde gesteckt 🌱.
Nach Monaten der Vorbereitung beginnt nun endlich das eigentliche Abenteuer. Ich freue mich riesig auf dieses Projekt und bin gespannt, ob mich diese Dame am Ende tatsächlich mit dem erhofften Kirscharoma belohnen wird 🍒🤞❤️.
⸻
🇬🇧🌱🍒 Week 1 – Germination | Cherry Limeade by Doja 🍒🍋
I originally planned to take a break from indoor growing this summer 😅, but I simply couldn’t resist testing my new living soil bed. Besides that, I’ve been chasing a strain with a truly authentic cherry aroma for quite some time 🍒🤞.
That’s why I chose Cherry Limeade by Doja, a cross between Lime Sickle and Lemon Cherry Gelato 🍋🍒.
After just 3.5 days, the seed emerged directly in the 130-liter living soil bed 🌱✨. Couldn’t ask for a better start!
? The soil mix was prepared on April 24th using:
🔸 50 L Bio Canna Terra Plus
🔸 30 L pumice
🔸 10 L Living Bio Char
🔸 10 L rice hulls
🔸 10 L compost
🔸 20 L worm castings
🔸 Almicanna Universal Amendment Mix for 130 liters
🔸 150 g alfalfa pellets 🌱
🔸 100 g kelp 🌊
🔸 300 g malted barley 🌾
Everything except the Bio Canna Terra Plus came from Almicanna ❤️.
The mix was prepared on a 4 × 4 m tarp and moistened with about 25 liters of water using a Gloria pressure sprayer 💦. It was then left covered in the garage for two weeks to mature.
After that, the 50 × 50 cm Almicanna bed was filled and seeded with a cover crop blend 🌿. SF nematodes from Öre Protect were applied ?, followed by a hemp mulch layer and a handful of compost worms from my own worm bin ?❤️.
Once the cover crop was established, two beneficial predatory mite species were introduced:
🕷️ Hypoaspis miles
🕷️ Amblyseius cucumeris
The bed was then allowed to cycle for about one month ⏳. During that time, it received one watering with homemade horsetail and nettle ferment 🍵 and one compost tea ☕.
Soil life has absolutely exploded 💥. Every time I gently move aside the mulch, I can see countless springtails, worms and mites. Exactly what I hoped for in a thriving living soil ecosystem ❤️🌎.
Watering is handled by four evenly distributed Blumat Maxi drippers 💧 connected to a 30-liter reservoir. Soil moisture is monitored with an MMM TXSU tensiometer (20 cm depth), targeting around 100 mbar during veg and 120 mbar during flower 📈.
Humidity and VPD are controlled by the AC Infinity controller 🌡️💨, maintaining a VPD range of 0.6–0.8 kPa during the seedling stage.
Before planting, most of the cover crop was chopped and dropped as mulch 🌿✂️. One single Cherry Limeade seed was planted directly in the center of the bed.
And today, after just 3.5 days, she finally broke through the surface 🌱.
After months of preparation, the real adventure finally begins. I’m incredibly excited about this grow and can’t wait to see if this lady will reward me with the authentic cherry aroma I’ve been searching for 🍒🤞❤️.

Likes
13
Share


@GERGrowDesigns
Follow
Dear Growers ,
Welcome to Veg Week Day 19-28 of Sweet Seeds Studio 54 Stardust Auto.
Whether you're a beginner or an expert, you are warmly invited to join, ask questions, and share your own experiences along the way!
Project Setup & Conditions:
• Brand/Manufacturer: Sweet Seeds
• Tent: 222cmx150cmx150cm
• Light: 2x 720 Watt Full Spectrum
• Humidity: 50%
• Soil: Narcos Organix Mix
• Nutrients: Narcos Products
• pH Value: 6
Big Love to Sweet Seeds for theyre Outstanding Strains and Genetics .
If you want Germinitation results like mine , check out Kannabia Seeds with my link [https://www.kannabia.com/de?ref=61966] and grab the germination device or theyre amazing strains . Trust me – it’s worth it for sure ! Code GGD at Checkout for another 20% Discount
Stay curious and keep up Growing —we look forward to welcoming you back for the next chapter soon!

Likes
5
Share


@RastaRick
Follow
Tok off large fan leaves on day 24. Seeing preflower starting. Decided to try out a natural shape instead of doing LST. I hope this doesn't backfire... The blackberry gum on the right is getting big. I like how autopotamus has natural shape... But he also has much more light haha

Likes
2
Share


@Natrona
Follow
Tropicanna Poison XL Auto
W4F2
7/20-26
The hot weather returned with humidity and days of scattered thunderstorms. I fertilized once this week with I49 and top dressed with worm castings since I saw some yellow leaves near the bottom. Thankfully with all the rain we’ve had this month she doesn’t show any deficiencies or bud or root rot. I fertilized with I49 grow 1 tbsp/gal & 2 tbsp I49 Flower.
With the extreme heat and rain, my auto Tropicanna Poison XL Auto had a huge stretch a full 7 inches this week and now at 22 inches tall. There are no nutrient deficiencies and demonstrates resistance to fungal diseases.
Thank you all for your continued support and encouragement. Your likes and comments motivate me to keep sharing my journey. Let’s continue to learn to grow together!
Stay green, growers love 💚🌿
💫Natrona💫
Likes
44
Share


@Aedaone
Follow
The temperatures, humidity, and watering volume(if measured) in grow conditions are all averaged for the week. The pH is soil pH. Any watering done by me is well water which is 7.6 pH and 50° F. Any listed nutrients are ml/gallon of water to be fed.
Day 1 we had high temperature of 89°F. We had scattered thunderstorms and roughly two hours of rain. No watering today
Day 2 we had a high temperature of 80°F. The skies were partly cloudy with a healthy breeze. I water 2-2.5 gallons today.
Day 3 we had a high temperature of 79 and partly cloudy skies. This cooler weather has been nice. I watered 2-3 gallons each pot once.
Day 4 we had high temperature of 92°F. I watered 3-4 gallons from the hose.
Day 5 we had a high temperature of 85°F. Skies were cloudy to overcast with off and on rain until noon. Then partly cloudy in the afternoon. I added 50ml of blood meal and 50ml of iron spread evenly across the tops of the pots. Watering was done by rain today. The roots have begun to grow down through the pots into the ground. Because we get high winds this is a bonus. The #1 plant has some small spots of powdery mildew on it today.
Day 6 we had a high temperature of 86°F, a short rain shower, with cloudy to partly cloudy skies. Watering done today by the rain.
Day 7 we had high temperature of 81°F skies were cloudy to partly cloudy. We had some intermittent heavy rain so everyone was watered by nature today.
Likes
7
Share


@Eddjack
Follow
Ci siamo !!! No vedo l ora di farmi il regalo di natale. Odora di dolce, fragola e zucchero. Il terreno e carico di nutrienti infatti credo che questa settimana andrà ad acqua . Piena di gemme appiccicose e profumate sarà pronta prima di natale speriamo bene.
Dajeforte growers!
Likes
11
Share


@w00tGrow
Follow
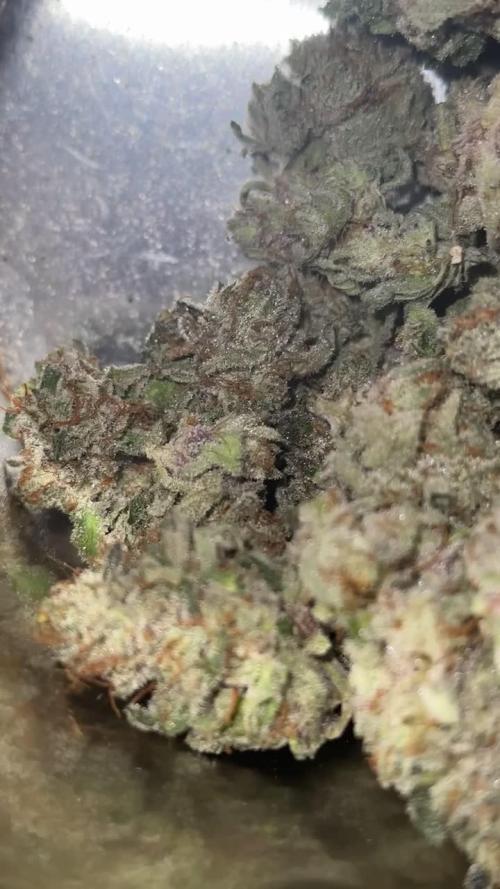
Here comes the last week, but i think they will need some extra time, will check later on mycroscope.


Likes
24
Share


@BillMonroe
Follow
More hairs are coming. Everything looks good to me.
The temperatures sure are getting high, but the plant is doing well.
I'm not sure if the twisted new growth was a problem. The leaves turned out fine.

Likes
5
Share


@CookiDoggi
Follow
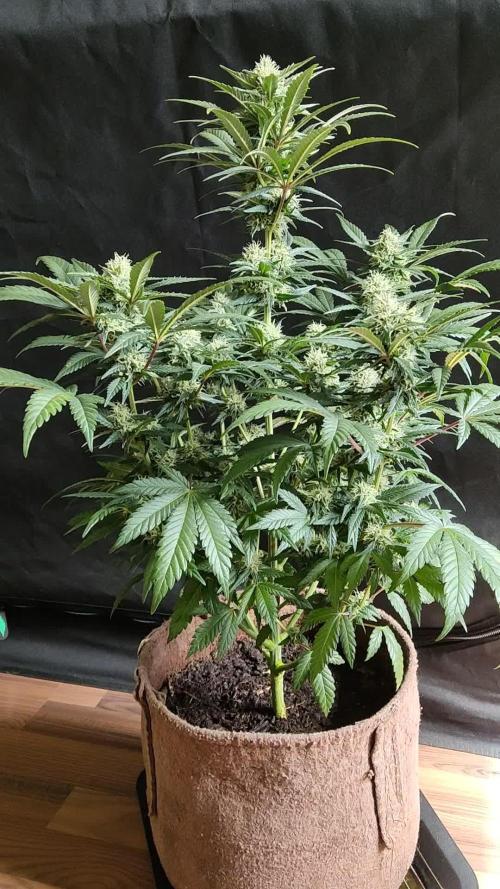
Looking good!! She grew a lot since the last week!! It looks like the topping has been healed correctly.
The next days I transplanted the plant into a 12L pot to let her grow well and then I also topped the two branches. I guess it is too much stress but we will see how it goes!!
Likes
20
Share


@DrGanj
Follow
budding up nicely now. One pheno looks to be growing different bud formations and is much more frosty. O stupidly didn't take a cut of this in veg so I've taken a flower cut to reveg and try monstercropping.

Likes
5
Share

@Ekoms
Follow
"Last days for Biscotti 2 and 3. I think I'll harvest them in 3 to 5 days. They smell amazing! BM 1 needs 7 to 10 days max, but I might just cut everything at once to make room for the next round. We'll see what the trichomes show."
Likes
12
Share

@GrowWithFlow
Follow
Flower Week 7 successful. Planta looking fire . Start to flush now with Enzym plus from Aptus for sure 🌱
Likes
6
Share


@Brookillinit
Follow
I started the week super cropping. Each of these babies is looking great now.


Likes
12
Share


@Doja420
Follow
Hi guys!!🌱
It´s been a while since I posted an update so here we are with my baby Runtzies update from 31.01.2025🏼
She´s growing really well, having some huge leaves, I had to remove two of them, as you can see (see pics). She´s healthy and that's all that matters🍀🍬
(Ive been watering her in the past days with only regulated water and not that much- just about 70-100ml I think.
-----------------------------------------------------------------------------------
🍬🍀 W E E K 3 🍀🍬
✨31.01.2025- It was feeding day for Runtzies🍴 I gave her some more nutrients from BioBizz and PLAGRON. It was also the first time I cut some leaves from the top.
✨04.02.2025-So it´s time for another big update inhere!
Last time I watered her (about two days ago) I just wanted to let her grow an didn't think too much about it... yeah
I was just more than shocked the moment I took that pot in my hand- I saw little stigmas showing up there✨ She also stretched a lot! She´s about 19cm now.
To be honest I don't know if that´s on me or just her living her life. That´s my 2nd plant that's going on that fast. I´m not really concerned tho- would rather say happy
So today I decided to water her a bit more, I progressed about 500-600ml with good feeding in there. I also cut the first 2 branches off. I'll let her rest the next few days and update soon!
Peace out guys🌱

Likes
299
Share


@Metatronix
Follow
Good day to all my friends and visitors here on GD.
Decided to finally finish this diary, I took my time with his one ;)
Now we cut the second POGP auto plant, the first cut you can find in week 17. The plant from week 17 weighted 660g. wet, this one finished at 1,85kg. wet.
The girls where autoflower but thanks to me starting this grow in cold day temps (14 degree Celsius) the started flower really late, maybe that's also the reason for all my problems with this strain during the grow?!
The two plants where different phenotypes, the smaller one (from Week 17)though small had nice hard flowers, the bigger one as the only plant from four I grew during the growop started foxtailing.
Both of them branched nicely the smell was quite strong and awoul xD like gasoline and something rotten, it smelled so bad i checked a couple times under microscope for any signs of mold in the flower and to my suprise I found nothing.
Thank God later during drying the smell would subdue to a more generic "hazediesel" smell
--------------------------------------------------------------------------------------------------
SE7000 done it's magic with this grow as with all my other grow ops.
For anyone who is interested in obtaining this efficient and affordable light fixture ($ to gram) here's the link:
https://spider-farmer.com/products/spider-farmer-upgraded-se7000-730w-commercial-led-grow-light/
A shout out to SSSC for the gift of genetics: supersativaseedclub.com/
Thank you all for your companionship on this voyage, I hope you enjoyed it at least as much as I did.
Also thank you for this awesome year together here.

Likes
10
Share


@L1lium
Follow
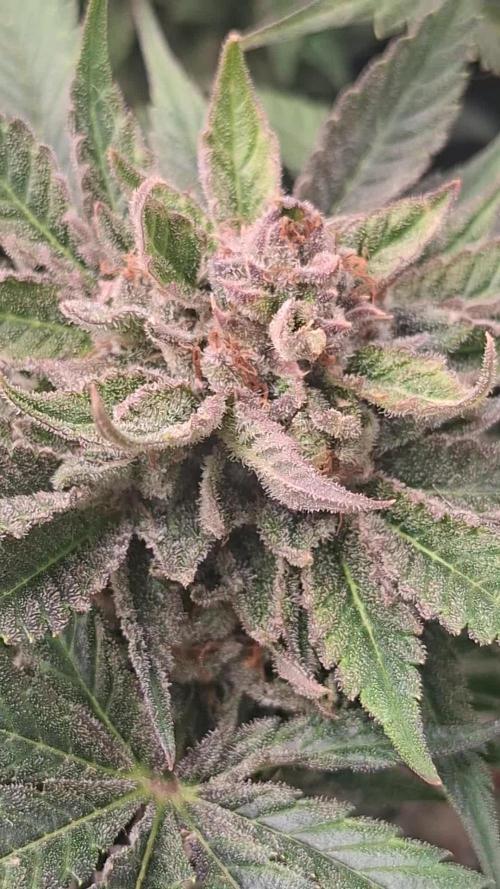
Die ersten gelben blätter unterhalb kommen und man merkt, dass die energie in die blüte geht, die buds werden immer dicker und harziger. ich schätze noch knapp 1 1/2 Wochen bis zur Ernte. Leider ist das Wetter katastrophal, ich hoffe auf eine besserung.