The Grow Awards 2026 🏆 


Likes
Comments
Share
@leithsffs
Follow
I started harvesting 6 days ago. I'll finish it tomorrow.
I was in trim jail Aaaaalllllll day today. I started at 5:30am and finish putting the last label on the jars at 6:30pm. I did, however, take a 1 hour break for lunch.
The results for Sept 21:
Orange Sherbet FF - 188.43 grams, 6.73oz (2 plants)
Gorilla Cookies FF - 86.97 grams, 3.1oz
The results for Sept 27:
Orange Sherbert FF - 104.5 grams, 3.73 oz (2 plants)
One more quick trim day to go.
The results for Oct. 3:
Gorilla Cookies FF - 36.28 grams, 1.3 oz
Not including all of the little popcorn buds I chopped up and threw into the trim, it's 14.86 oz.
That's it for this run.
Take care, gromies!!

Likes
11
Share
@Vegetoo420
Follow
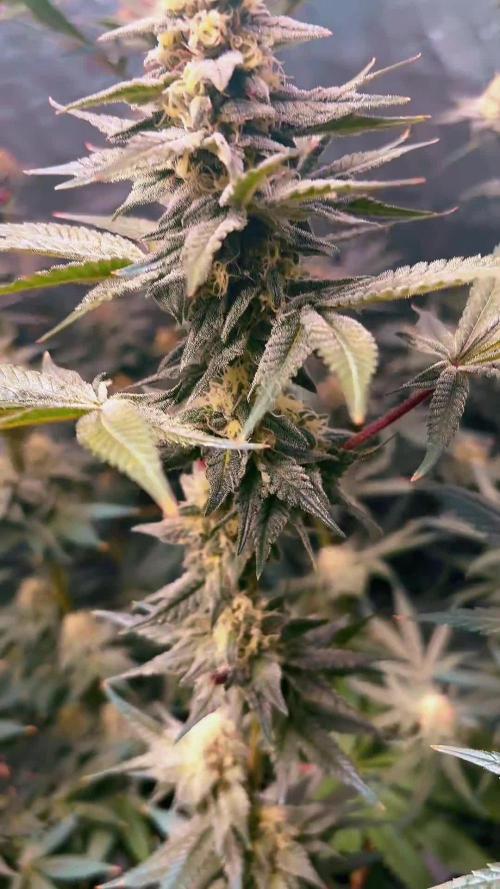
Buds looking denses, they are sticky and there’s a powerful sour smell !!
I made a good defoliation on this tent

Likes
8
Share
@Staffedition
Follow
Всем привет друзья!
Разачеровывает меня Fast Buds.
Вторая растиха не достигает заявленных результов Fast Buds
Всем добра и хорошего роста!
Likes
48
Share
@Northern_Ent
Follow
Aug 31: Fast. I got home from work today and could see a notable increase on the flowers. Very exciting.
Sep 2: plants are fine but we’re having yet another bad air day due to wildfire smoke. The red tint on the photos is due to smoke. This is pretty bad, but it was worse a few times in May. It’s supposed to clear later this weekend.
Sep 3: still smoky but rained a bit which helps. Gorilla Cookies has the best flowers but also seemed to catch the most rainwater in the buds. Gave each branch a shake to help prevent problems.
Sep 4: soil is holding water since the last compost tea. This reduction in infiltration rate can happen apparently, and the trick is to not overwater it. It’s also cool today so minimal water used.
Sep 5: cool today with gusty winds that blew over Bruce and Gelato. Small footprint of the 5 gallon bag isn’t quite big enough to be stable when plant is this big. Trade off with using a more easily moved size, and that should also help promote early flowering.
Processing
Likes
3
Share
@XxBILLZAxX
Follow
Increased their food by a tad. Looked perfectly health raised to about 1900ppm.
Again spider mites at it crawling up every leaf and creating a colony. I thought it was over until I sat there nearly every night finding the f*****s and rubbing the leaves with the spray.
Defoliation was needed ASAP due to them stretching nicely. Started slowly from the bottom up. (repeated this process every 3-5 days.)
Likes
17
Share
@CanadianFillmore
Follow
Welcome back growfessors to another episode of growfessor theatre!
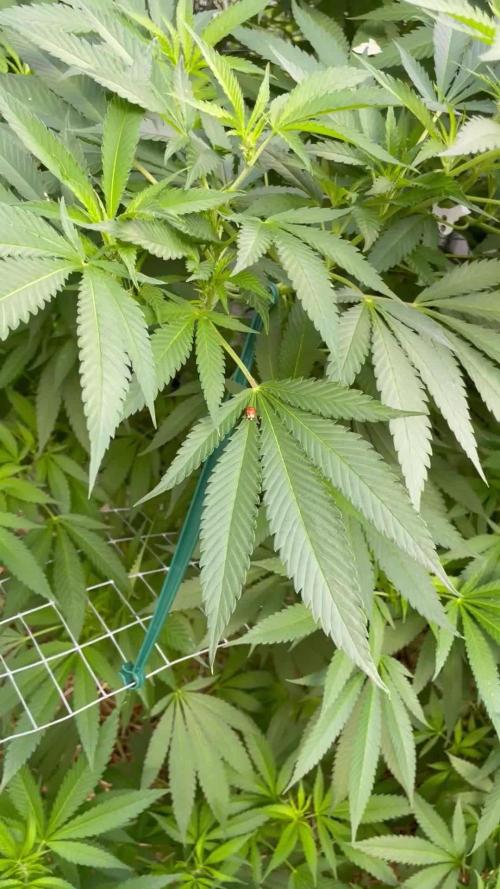
Week 5F begins, the ladies are looking good, but hungry!! Will continue to monitor through the week, as they are drying out the pro-mix HP medium quickly.
Defoliation conducted on each lady. However LSD and Divine storm needed the most attention.
Thanks for stopping by growfessors, tune in next week for another episode 👽🌳💚


Likes
5
Share
@Staffedition
Follow
Привет друзья!
Вот и прошла ещё одна неделя!
Растение здоровое, чувствует себя комфортно.
Потихонечку тяну ветки, что бы все шишки были под светом.
Всем добра и хоршего роста!!!


Processing
Likes
4
Share
@samadhi
Follow
All I can say at this point is these genetics are stellar. She is still putting on bulk and has formed some truly beautiful colas. She's showing mostly cloudy trichs at this point so I believe I may chop her next week. I am not wanting to go too far past peak THC production as I am not looking for sleep medicine with high CBN.
The smell is floral and quite pleasant to behold. She's frosty and looks like she will press into decent rosin when all is said and done. She's just coasting now, drinking plain pHd water and enjoying the last of her time in the tent. Really looking forward to the cut on this one.
Thanks for following along and please click "Like" below if you dig what I'm doing here. Cheers! 👊🌱☮️✌️

Likes
12
Share
@rickhaZe
Follow
debido a quemaduras que encontre en las plantas el dia 14/06, dia 29 desde germinacion, debi regar con cal max, ya que creo que hay falta de calcio - magnesio. aplique 1.2 ml por litro de agua.
no creo que sea exceso de ferti ya que todos riegos se han preparado con la dosis minima que indica.
se sigue regando con 0.4 L cada 48hrs
una tecnica que he hecho es ir acomodando o doblando las hojas hacia abajo dando prioridad a los bracitos de cada planta.
Dia 30: riego de agua 600 ml de agua
Dia 32: todas las plantas en floracion
Aplicamos solo tek groow ya que las manchas en las plantas se debian a falta de azúfre lo concluimos con un grupo de amigos todos growers y un agrónomo.
Por que queremos continuar con la tabla de grotek nutrients y el domingo dia 34 aplicar blossom blaster

Likes
6
Share
@Ninjabuds
Follow
It’s day 43 of flower! All of the plants look great! I’m going to start dialing back the light intensity slowly over the next couple weeks. Harvest time is getting close

Likes
5
Share
@Timmytooturnt
Follow
Plants in containers seem to be 2 weeks ahead of plant in ground, marigolds dping great


Likes
35
Share
@nonick123
Follow
Día 44 (15/07) Wow! No hay shock de trasplante! 😍💥😁
Todas las ramas se han estirado hacia arriba tras el ajuste de LST y se están formando nuevos nodos rápidamente
Esta combinación de nutrientes de Lurpe + substrato de PRO-MIX HP es una maravilla 😍
Día 45 (16/07) Ayer tuvimos ola de calor (37 ºC) y han aguantado muy bien!
A última hora de la tarde (cuando ya no había sol directo) les apliqué H2O en spray foliarmente para refrescar los estomas
Hoy parece que vuelven las temperaturas estándar para esta época del año: 29 - 30 ºC en las horas centrales del día
Riego con 1 litro de H20 pH 6,5
Día 46 (17/07) Pequeños ajustes de LST
Hay algunas ramas inferiores que no se han formado / estirado mucho
Lo más probable es que haga una buena limpieza este domingo, 7 días después del trasplante, para dejar solo los brotes por encima del 4º nudo
Día 47 (18/07) Riego con 0,5 litro de H20 pH 6,5
Este domingo (día 50) haré limpieza de partes bajas y tal vez también de nuevo topping en las 4-6 ramas principales 😁
Día 48 (19/07) Día de muchísimo calor con 37 ºC. A ver como lo llevan!
Riego con 0,5 litro de H20 pH 6,5
Día 49 (20/07) Para ayudarles a llevar mejor el calor de las horas centrales del día, coloca una malla de sombreo (70%) sobre el invernadero
Lo cierto es que se nota que baja mucho la temperatura debajo de la malla! Van a estar más fresquitas! 😍
Riego con 0,5 litro de H20 pH 6,5
Día 50 (21/07) Training session!
Hago limpieza del tercio inferior de la planta, de todas las ramas y nudos que no superan la línea del dosel marcada por el 4º nudo (1er topping)
También hago topping (2º) a todas las ramas principales
La idea es tener 12 ó 14 colas principales para que no se hagan muy altas
De paso saco unos cuantos clones de las ramas inferiores eliminadas 😁💥
Para superar el estrés, hago las siguientes aplicaciones y riego:
- Riego con 1 Litro de Té Vegetativo de Lurpe Solutions. Preparación: 24 horas con bomba de aire (oxigenación) con ingredientes:
Green Sunrise 8 ml/L + Insect Frass 16 ml/L + Hummus Lombriz 8 ml/L + Melaza 1 ml/L + Kelp Hidrolizado 0,25 g/L
- Aplicación foliar Kelp hidrolizado de Lurpe Solutions a 0,25 ml/l
💦Nutrients by Lurpe Solutions - www.lurpenaturalsolutions.com
🌱Substrate PRO-MIX HP BACILLUS + MYCORRHIZAE - www.pthorticulture.com/en/products/pro-mix-hp-biostimulant-plus-mycorrhizae

Processing
Likes
9
Share
@wickedb
Follow
i love the flowering stage .........im new to this site i love to get or give advice very open minded into new styles of growing!!!!!!!!!!.....................i kept up my lst 5th day 2nd week of flower im all caught up on my update!!!

Likes
30
Share
@Roberts
Follow
Watermelon auto is growing great in the Gen1:11 nutrition, under the Medic Grow Mini Sun-2. She got a solution change today to more of a blooming mix. Her colas are starting to form. 🤞🏻she performs great in next few weeks. Everything is going good and not much else to report at the moment. Thank you Medic Grow, Gen1:11, and Royal Queen Seeds. 🤜🏻🤛🏻🌱🌱🌱
Thank you grow diaries community for the 👇likes👇, follows, comments, and subscriptions on my YouTube channel👇. ❄️🌱🍻
Happy Growing 🌱🌱🌱
https://youtube.com/channel/UCAhN7yRzWLpcaRHhMIQ7X4g


Likes
17
Share
@m0use
Follow
This was a fun project that was a few years in the making and a year later to see if they would last a season for this upload to happen. Before any of this I would bike aorund town grabbing up all the old Ikea solid pine bed slats that I could find and storing them in the basement. I have a lot of wood down there, any size worked as long as I have enough of them. The hot days to find them were the first and last of the months because that's when people where moving in/out. I also kept an eye on the free section on local online classifieds as well. The entire purpose of this was to recycle as much off the streets as I could before buying anything to finalize the project. In the end I only bought sealer, screws and some takeaway/beers. All the wood was 100% free and salvaged off the streets of Toronto saving it from the dumpster bin.
After collecting all the slats for about 2 years I was playing aorund with them on how I wanted to make this work. I had previously done a little project like this before but I messed it up and the boxes where crap. did not last longer then 2 seasons, they where thin and shallow as well could not grow much of anything in them. I Was talking to my friend who is renovating their house and we brainstormed some ideas on the boxes, I found some designs I liked online and said lets make something like this out of what I have here. We tossed out a few of the design features when looking at them as it would have been wasted wood and extra work not needed. If I had more wood them maybe it could have been an option but simple was the name of the game. They taught me what I needed to know like how the miter saw and sander worked, plus all the other tools I was using. They did help out with a table saw and creating the triangle support joints in the corners, They used some pine left overs they had while making a staircase indoors. I did not feel up to the task of using a table saw given all the relatives I know who have lost a finger to them.
In the end we decided the design would be three boards high and take an alternating pattern on corners. layer one short, layer 2 long, layer 3 short. Went with a galvanized and painted deck screw so it can take the weathering. Ran into some problems like making everything level as some of the boards were warped and other ones had undesired aspects like knots and tacky sticker goo I could not remove. So I used them for the base that will not been seen so much. Clamped everything down and called it a day.
Once it was all done and over with, I then brought them back home from my buddies work garage and started to seal them. I went with a boiled linseed oil as its a food safe option should the wood degrade into the soil I will plant in them. I will need to reapply it to the boxes year after year but the main coat is the most important one and I put it on 3 layers with a good dry in between coats. the inside of the boxes that where coated did not degrade at all as the sun did not hit them so it will not need a new coat just the outside. Overall the end result was very impressive for myself, I've never taken a woodworking class ever and It was a near perfect outcome for me. Heavy Duty Planter Boxes for all my gardening needs. I made a last min decision to add in a plastic liner to preserve the wood even longer and stapled that into the frame. it has held up quite well and may need replacing end of 2nd or 3rd year out in the sun. Used a thick moisture wrap plastic with UV protectors in its formula.
Lets see what I can grow in them this year!
m0use's haus of projects - garden box edition
Likes
26
Share
@ButterfliesLittleFarm
Follow
Hello Diary.
At the end of the story, I am very happy with the whole cycle and finally the outcome. 😍
More or less all the information is in the diary, there are really a lot of photos that speak more than words.
What I would point out at the end of this story, the Hulkberries were different. One was more developed in width and that eventually had a higher yield as well. He reached a height of 105cm, while the other was more developed in height and grew to 117cm.
But the Hulkberry is a great sativa strain, I didn’t have any problems throughout the cycle, I didn’t do any training I just did a little defoliation twice. 👌
The branches were dried for 12 days after which they were finished in jars for another three weeks.
In the end I would like to thank the Royal Queen Seeds for making this wonderful strain, Grow Diaries where I can learn, and share something I really love.
Thanks to everyone who stopped by and looked at the diary, squeezed the like button or commend the diary.
See you soon with new journey.
Likes
422
Share
@Crashoverite
Follow
Hi all 😁
Welcome to my 🍌💜👊 week update.
Hope everyone keeping well and having a great week.
Thank you so much for your all support on this bananas journey 💜💚💜💚
What a amazing week. Very little to work around those beauties. The smell is so delicious already. They smells like sweet berries. Buds are loaded with trichomes, very sticky and hard as rocks especially on Athena. Trichomes are mainly clear and some parts milky. Absolutely love power of LST and how it worked on this strain. If you won't look under net it's almost impossible to see which cola belongs to main stem.
Week 11
Dec 25 - Dec 31
Dec 25-26
Joyful observation
Dec 27
Selective defoliation and
First watering for this week. Nutes adjusted, almost 8ltr between both. Runoffs PH on both at 6.2. I am finding this PH level for this strain as perfect. Girls are looking super healthy and drinking they mixture like crazy.
Dec 28-30
All is going smoothly. I can see more and more weight each day.
Dec 31
Secomd watering foe this week. 8 ltr beetwen both.
It's the last day of this week and also end of 2023!!
See you in the new year 🍾🥂🍀
Peace and love brothers and sisters ✌️💚
Links
https://2fast4buds.com/seeds/banana-purple-punch-auto
https://plagron.com
https://www.biobizz.com/
https://fishheadfarms.com/