
Likes
Comments
Share

@eldruida_lamota
Follow
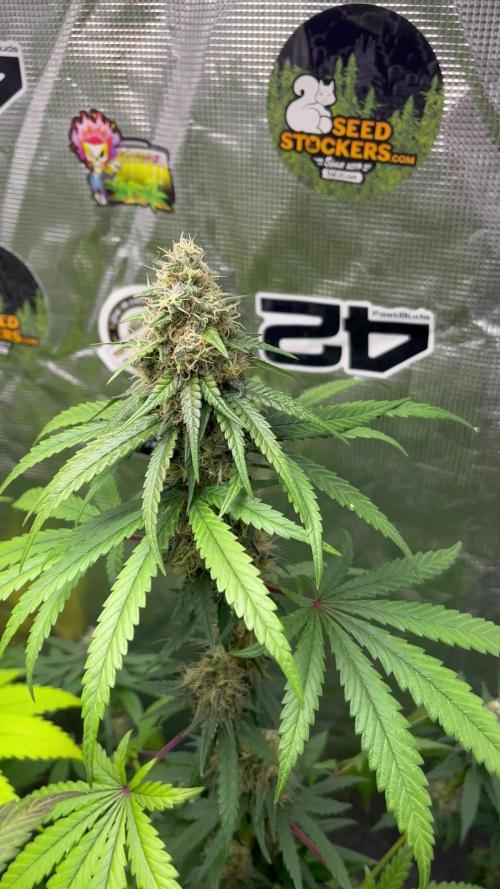
Vamos familia, actualizamos la sexta semana de floración de estas Runtz de MSNL.
La temperatura que estuvo entre los 24-26 grados y humedad dentro de los rangos correctos.
En cuanto a las plantas las veo verde sano, estiraron bien y ensancharon bastante también.
En este indoor hay que decir que no tengo ninguna plaga.
Se nota que los nutrientes de la marca Agrobeta, añadí Thor y Mega Pk, hacen sus funciones.
Las flores empezaron a engordar y a llenarse de tricomas, por el momento todo correcto, os dejé también alguna novedad y un cambio en la sala,
agradecer al equipo de Mars hydro por el nuevo TSW2000. (los últimos 5 años cultive solo con los leds de esta marca).
- os dejo por aquí un CÓDIGO: Eldruida
Descuento para la tienda de MARS HYDRO.
https://www.mars-hydro.com
Hasta aquí todo, Buenos humos 💨💨💨

Likes
36
Share


@Kushsmoker516
Follow
Almost there probably another 20-30 days for blueberry and white widow im guessing while peyote zkittles is taking her time


Processing
Likes
16
Share


@CzAlmighty
Follow
Blue dream. Je poznat ze o proti OG ztrácí tsk týden což je pořad super. Moc se těším až s ni začnu LST. JE to skvělá odrůda od Humbol. ❤️🌞

Processing
Likes
10
Share


@LedboxCulture
Follow
BEST genetics
I want to see the different clours of the flowers right now🎌📸
Expectatives Is all. I have the BEST phenos here🎌🌱💣
Likes
29
Share


@Smokwiri
Follow
Plant is doing good ;) its getting wide too ;)
Zamnesia 10% discount voucher for seeds: GROWITGD

Likes
6
Share


@jaydee702
Follow
harvested two buds found 10 seeds they are very potent regardless the buds were about 8 inches each with 5 seeds could have been alot worse if i didnt see they turned hermi and worked really hard to find and destroy all male flowers i gave it hell tho.Wish i knew how they stressed to turn cloning is the most stress they got and some topping early on other than that they were well taken care of. will be harvesting by next week for sure tricombs are milky and there is alot of amber ones also they are ready and ripe
Likes
37
Share


@PapaNugs
Follow
Another good week come and gone. A couple of the girls needed nutrients so I add some general hydroponics blend into those that needed them. Didn't seem to make much difference yet. But they are getting into late flower.
Orange sherbet isnt great right now. No real smell and not looking great. Not sure but prolly too small of a pot.
Dimmed to 80%
Here are the lights details:
Medic Grow Mini Sun-2 150W LED
Model: MN150-022
Spectrum mode: V1
Efficacy: 2.8 umol/J
Thanks for stopping by!
You can find the light on Grow Diaries:
https://growdiaries.com/grow-lights/medic-grow/mini-sun-2-150-watts
You can find the light on Medic Grow's website:
https://medicgrow.com/

Likes
39
Share


@Bluemels
Follow
Tag 112: Zeit zum Spülen bzw. Ich gebe keinen Dünger mehr. Weil die Shogun doch schon recht hell/gelb ist, aber gebe ich noch Alg a mic dazu um noch etwas grün zu erhalten.
Das Wetter hier spielt mir mal mehr mal weniger in Karten, der Sommer dieses Jahr ist sehr durchwachsen 😬

Likes
15
Share


@TommyBVRSA75
Follow
Más una semana con lluvia consecutiva y dias con poco solo directo. Todavia un fuerte crecimiento vegetativo y muchas hojas junto a los espacios inter nudos.
Esta semana he empezado con fertilización mezcla organico y mineral ( Bionova Autoflowering Supermix + Fish Mix Biobizz - plano Trypack All in Outdoor/ Soil pack). Sigue mantenimiento de Melaza negra sin sulfatos y aminoácidos y agente de crecimiento de raíces (Biolcan Bioroot).
La agua en uso ha sido la de la lluvia, pero ultimamente he tratado el agua de grifo con Tetra Aquasafe (para acuarios, que elimina clorito, flúor y metales pesados). En la falta de agua OR, creo que este agente de limpeza hace una limpieza basica sin contaminar plantas y sustrato.
He encargado tambien a RQS clips para LST para que coloque las hojas interiores cogiendo sol.
Seguimos en un grow muy sólido y sin problemas, pese a la enorme cantidad de agua de la lluvia y el sol corto de los ultimos dias.
Jah Jah Dios en el comando...

Likes
41
Share


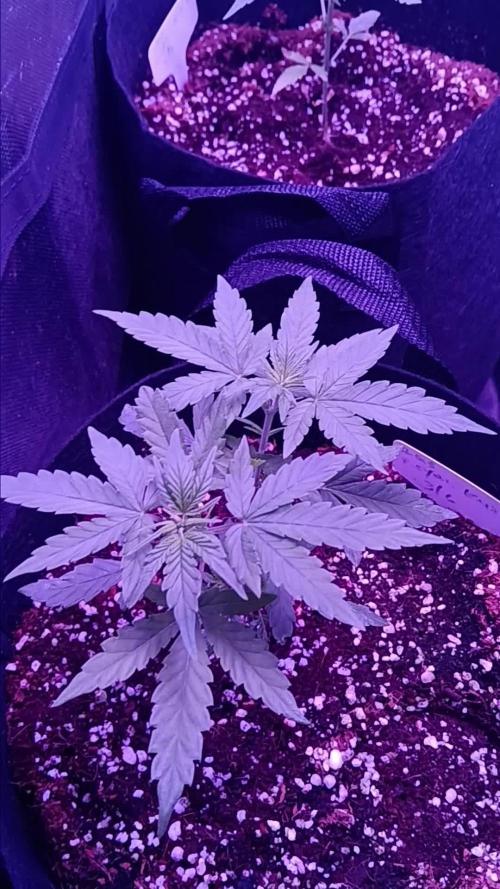
@PrairieFrostGrow
Follow
********Week 9 Vegetation- Sept 12 to 18, 2020*******
This will be the last veg week. Flipped to flower cycle at the end of the week:)
LST this week on these girls. Getting them ready to put in a SCROG I think. Pull them down for now to start pulling them wider and make it easier to fill in the canopy’s net. Actually, they were only tied down for this week. At the end of the week I removed the ties. These girls need to be allowed to grow tall. I achieved my goal of spreading out the branches and making her wider for the start of flower. Now I just have to let her go and hope she will get another 12” to 18” taller in the stretch.
There were 4 feed days this week and Advanced Nutrients Bud Ignitor was introduced this week.......getting ready for flower👍 Switch to Bloom nutes next week. Going to finish these girls with Advance Nutrients line this run. I may have to use a supplemental from Green Planet to get through to harvest. This lines bottles are getting closer to a year and a half old now........use em uip👌😃 Not buying more Bud Factor X for example (still have a couple of syringes worth) but rather will add Terpinator and Rezin instead.
Little more detail:
Sept 12/20
- CalMag @ 2ml, VeloKelp, Vitrathrive @ 1.5ml, AN Sensi Grow A&B @ 1ml
- 610ppm and 5.9pH
- Each girl given 2L
- Pulled out and cleaned up to get ready for netting
- Canopy height fairly even today.....little more time to fill in though.
Sept 14/20
- Giving them a hearty feeding today with lots of ml’s to rinse off the roots a little more
- Sensi CalMag @ 2ml, B52, Microbial Mass @ 1.5ml, Sensi Grow @ 1ml
- 880ppm and 5.4pH
- Each girl given 4L and they had a nice amount of runoff - maybe 30% this time.
- Canopy filling in nice but worried about these girls height compared to Gorilla Girl beside them. Uneven heights down the road??
Sept 15/20
- Add some sweetener to feed the microbes today,.
- Sensi CalMag @ 2ml, Bud Candy, B52 @ 1.5ml
- 625ppm and 5.2pH
- 2L each for the girls
- Leaf colour is a little light so getting the Magnesium up and Nitrogen......that’s why using the heigh nitrogen Advance Nutrients Cal Mag.
- pH is a little low but I am cool with it and working on not letting the pH drift too much yet in their run.
- They are ready.........they want to flower😃
Sept 17/20
- Bud Ignitor introduced today as we get ready for Flower phase next week.
- Sensi CalMag, Sensi Grow A&B, Bud Ignitor, all @ 1ml/L
- 485 ppm and 5.7pH
- Each girl given 2L
- Ready to flip now but I concerned that I need to have these girls at least 8” higher than they are beucase they are not going to stretch as much as the other girls in the tent.
- these girls have some most fan leaves growing.......I want to pull them but I am resisting😉
- Swtich the light cycle tonight to 12/12 and get the party started👊👍
That takes us to the end of Veg for these two girls. They have some very thick main branches and lots of large fan leaves. I expect to see further side branching growth in the next couple of weeks. they both have 4 nice main tops forming so I expect they should have a few chunky buds by the end💪 The girl in the 3gal pot is doing very well and I would suggest looking better than the girl in the 5 gal pot right now. Not fully surprising to me though.......the bigger girl with the extra room for roots, will likely seem a little happier in about 5 weeks but time will tell.
Cheers Growmies and have a great week🙏

Likes
13
Share


@Leanback
Follow
Day 21 of flowering did defoil the lady’s. No hermaphrodite showing up. Did a compost tea today. Corn is sprouting for tea. Did covercrop to get some fresh greens for the hcompost after the run.
The buds are stick as fuck. Looking forward for the next and last defoil in week 5.

Likes
17
Share

@RakonGrow
Follow
Harter ritt diese Dame , alles viel zu schwer das es gleich umknickte beim defolieren .
Hab mal ein getrockneten Bud aus der mitte genommen und Trichom analyse (Videos und Bilder) gemacht . ja viel klar wenig milchig und einige rot . Ergo , zuviel Licht an der Spitze (abstand zum licht viel zu gering) und im Boden zu kalt ist keine gute Kombination .
Likes
16
Share


Likes
23
Share


@adam_pawloski87
Follow
This week went real great , one has been getting flushed and the rest we will start flush Tomorrow! These ladies are doin so amazing! Hope you all enjoy !! Stay tuned for next week! Cheers an happy holidays!
Likes
39
Share


@Hazecat_420
Follow
Se aplicó una defoliación a todas las hojas amarillas y bajas que aún quedaban para ir limpiando un poco lo que no traerá frutos. Seguimos, cada vez queda menos 👽
Likes
4
Share

@JVKdopegrow
Follow
Thriving in the indoor tent. Leaf and node growth all showing well. There is some lower growth in will need to cut but these auto girls are at least 10 days behind so no stress for them.


Likes
39
Share


@BelgianBudtender
Follow
Heya Growmies, this week was pretty eventful
first off, the plant is in flowering in full force and doing really well despite a lot of user error throughout its life!
I mentioned last week I was going to do two things, the plants last major defoliation and turn my DWC into a 2 bucket RDWC.
I have managed to get around to both, I am always anxious when defoliating, scared of taking off too much but this time I really pushed my comfort zone, let me know what you think.
before, in my other grows, I have a lot of larfy buds, I dont want those, I want tight, dense small nuggies, I think one of my bigger problems back then was defoliation amount, I just left too many fan leaves.
RDWC.... Let me just say that I have proven to myself this week that I'm not destined to become a plumber, in my first iteration the drain line was too small, causing the pump to overpower it and overflow the plant bucket, I changed out the hose for some 50mm pvc tubing, which worked wonders, for the first few hours I sprung leaks and had to pull my plant out during her dark period to fix it; no bueno.
All is well right now though, no leaks and everything is circulating nicely at 500 liters an hour. I could probably get a bigger pump, but its fine, I'm going to stop tempting fate.
From here on out honestly, theres not much more for me to do other than go into the garden, pull a fan leave here or there, check flowers for nanners and balls and adjust the water. It's on cruise control now
Stay safe out there growmies, keep growing!
