The Grow Awards 2026 🏆 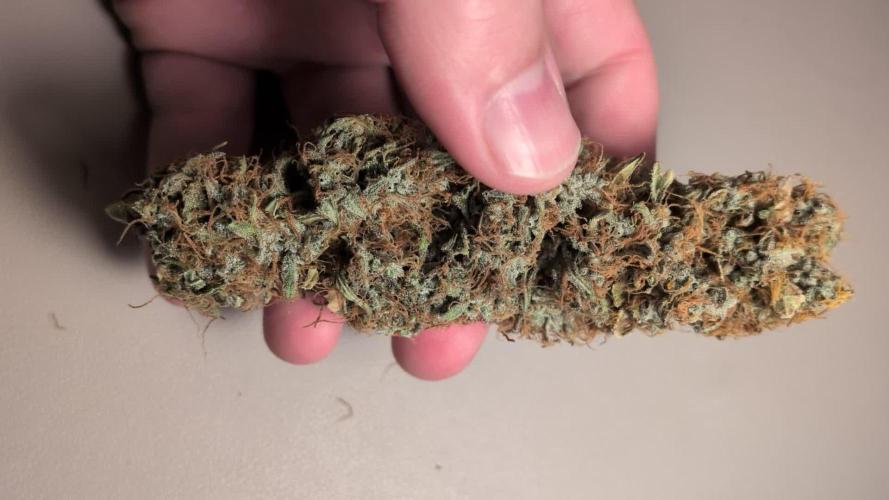


Likes
Comments
Share
@GelatoGandalf
Follow
This grow turned out to be quite a journey.
Originally, this run was meant to be a simple between-grow project, something to keep the season going outdoors, without too much effort. But plans changed, and the Orange Sherbet ended up in the tent, where it took a completely different direction than expected.
She grew big and strong early on, but the LST was tricky. she didn’t respond very well at first, and shaping her the way I wanted took a lot of time and patience. It was interesting to see how she stretched and filled out later, but overall, the structure stayed somewhat awkward to manage.
Throughout the grow I struggled with CalMag and potassium balance. I tried several adjustments, sometimes with high CalMag doses, but it never fully stabilized. It’s still unclear if that came from the strain itself or from the BioBizz line, but it made the mid-to-late phase more difficult than I had hoped.
The flowering time was also much longer than advertised. the breeder mentions around 9 weeks, but in reality this one took closer to 14–15 weeks total. What was supposed to be a quick side project turned into a long, demanding run.
On the bright side, she delivered a very solid yield. a bit over 160 g of trimmed buds plus another 50 g of popcorn, well above 1 g/W. The aroma is lovely after 10 days of curing: creamy, with vanilla and a subtle orange note returning.
However, the buds are airy, not as dense as I hoped. The effect and flavor are great, but visually it’s more on the average side.
Even so, this grow was one of the most instructive I’ve done.
I learned a lot about deficiency management, humidity control, watering and how far genetics and environment interact.
Going forward, I’ll take a break from autos and focus on photoperiod strains again. I just prefer the control and predictability they offer.
All in all: not my prettiest grow, but a very valuable one.
About drying in dry ferm/dry age and regular drying: the material in the bags took a few days longer to dry which is said to be good (regular dry was 7 days, bags was 9 or 10). initially I think the buds from bags look better but now in curing I can't really tell a difference, not visually and not in the nose. Let's see how everything evolves over time but honestly I am not expecting it to differ a lot from regular drying.

Likes
142
Share
@PapaNugs
Follow
Constantly taking leaves off all these girls. Trying to make space for those buds! These are some leafy genetics overall but some are starting to change color nicely for week six of flower! I checked some of the trichomes but they aren't close to ready so I didn't snap any pictures of those. But some good trichomes production from them.
Got the UVB 310 in full effect right now at 4 hours. Will be boosting up to six tomorrow and continue to push for the next two weeks.


Likes
7
Share
@wascanna
Follow
👹 Oni Seed Co.
🍭 Dub Trop BX1 // Dubble Trop x Tropicanna Cookie F1
🍓 Straw-Picanna // Strawberry Bananna x Tropicanna Cookies
🌿 Tropicanna Kush // SFV OG x Triangle Kush
🔥 Sunburn // TKT (Triangle Kush x Tangie) x Tropicanna Cookies
🍁 BLOOM WEEK 3
📅 Day 1
- They're drinking lots now, in full speed.
- Going to top dress tomorrow.
📅 Day 2
- Final lollipop, felt dirty doing it, but from experience they
° would be wasting time on these lowers.
- Top dress with SW-Bloom
📅 Day 3
- Bloomin'
📅 Day 4
- Bloomin'
📅 Day 5
- Watered in EM-1 microbes from StepWell. Not sure why I waited so long.
📅 Day 6
- Watered. Super impressed so far!
📅 Day 7

Likes
40
Share
@xbrico
Follow
Day 50 - All still ticking along nicely. Tank topped up the other night...think I am starting to see the 1st signs of Stretch, 1 week in to 12/12 (well, for the 1st few days it was more 12.25/11.75 but its adjusted now.
Now just tucking and weaving the canopy and attempting to keep things even(ish).
Refreshed the CO2 Milk Jug and thats about it for today.
Enjoy the time lapse of last week (!st week of 12/12).


Likes
17
Share
@Bobo_Zion
Follow
Well we finally got around to putting a gate on the hemp garden and today we are transplanting one of the ladies in the 1 gallon smart pots to a 5 gallon smart pot.
For this process we placed about 3 inches of soil in the 5 gallon smart pot, then placed the 1 gallon smart pot with plant still inside on top of the soil. The next step was to start placing soil around the 1 gallon pot, so that it made sort of a mold. Once we got the soil where we wanted it, we removed the Queen Dream cultivar from the 1 gallon smart pot and placed it in the mold that was made in the soil. Finished up by adding some more soil and then watered the newly transplanted lady. No nutrients added this week.


Likes
65
Share
@MadeInGermany
Follow
Flowering day 80
since clock
change to 12/12 H .
Hey guys :-)
the dr Blooms and blooms and there is still no end in sight 😂.
I'm curious how long it will take this time, but the wait is always worth it 👍.
She was watered 3 times with 1.2 l each (nutrients see table above)
Otherwise everything was cleaned.
Stay healthy 💚🙏🏻
👇🏼👇🏼👇🏼👇🏼👇🏼👇🏼👇🏼👇🏼👇🏼👇🏼👇🏼👇🏼
You can buy this Nutrients at :
https://greenbuzzliquids.com/en/shop/
With the discount code: Made_in_Germany you get a discount of 15% on all products from an order value of 100 euros.
👇🏼👇🏼👇🏼👇🏼👇🏼👇🏼👇🏼👇🏼👇🏼👇🏼👇🏼👇🏼
You can buy this strain at :
https://www.barneysfarm.com/dr-grinspoon-5
Water 💧 💧💧
Osmosis water mixed with normal water (24 hours stale that the chlorine evaporates) to 0.2 EC. Add Cal / Mag to 0.4 Ec Ph with Organic Ph - to 5.8 - 6.5
MadeInGermany
Likes
17
Share
@Lazuli
Follow
The growth went as planned, not too bushy and not mich stretch and fast flower

Likes
14
Share
@ConspiracyFly
Follow
Gorilla Glue Auto day 69 - 4.3.2023
This week it stopped growing and is getting fatter, the smell is more active when I open the tent, it took more water than last week and I added PK 13/14
I also removed some leaves for better light penetration but I didn't undress it because it's cold :)
0,2 Bio-Grow
0,4 Top Max
0,4 Bio-Bloom
0,8 Calmag
2,0 PK 13 /14 Plagron
1.5 gr Pandora Powder MYCOTERRA
Gorilla Glue Photo
I made LST
Regards and see you next week


Likes
7
Share
@alwaysdown
Follow
Throughout the week I top dressed each with 3 tbsp of dry fert and more super soil. Giving em cal mag water also just because my other set of plants want it as well.
Bit of discoloration throughout the canopy, since these girls only got 3-4 weeks left I'm not worried. Might try a different combo of dry ferts with a higher P/K for flowering since they went through veg no prob.
Got another cycle of Mephisto illuminautos on week 1 so I'll post those for my next grow.
Think the Gelato will be ready to be pulled in 1-2 weeks and the NL/LSD in 3-4.
peace


Likes
44
Share
@Cogollo_eu
Follow
**Encontrarás la traducción a español al final de la descripción**
From/Desde: 10/05/19 || To/Hasta: 16/05/19
From day/Desde día: 78 || To day/Hasta día: 84
You can find the Money Maker Diary here:
** Podéis encontrar el diario de las Money Maker aquí:**
https://growdiaries.com/diaries/25667-gorillamakingmoney-gorilla-vs-money-m
-----IMAGES & VIDEOS-----
5 - HomeMade Organic & Cheap CO2 generator (more info in week summary)
9, 10, 11 & 12: The bud on the right is a Gorilla one, the buds in the left or/and in the middle are Money Maker ones.
15 - Same Gorilla plant buds, one affected by CO2 in the roots and the other not.
-----WEEK SUMMARY-----
The smell is more sweet and intense every day, friends that came home turned them eyes into crystals when they see this little babys. The size isn't awesome, but the high ammount of buds full of crystals plus the strong sweet aroma makes them awesome. Buds are growing and fattenning very very well.
This week i added a boost of HomeMade CO2, i never measured the results of this invention so i can't give CO2 measurements. This method is widely used in home aquariums and there is where it comes from. For those interested i'm going to write here more detailed instructions. The 4 liters i've made will last for about 2 weeks.
---NEEDINGS---
- 250 ml Bottle
- 6~10 l Bottle
- 400 g Sugar / l water
- 1 Envelope of organic baker's yeast / l water (CHEMICAL WILL NOT WORK)
- 3 mid plastic tubes 40~50 cm
- 1 short plastic tube 5~6 cm
- 4 tube adapters
- Hot glue to seal adapters
The process of creating CO2 is simple, mix water, organic yeast and sugar in a bottle, and the sugar will free CO2 in the process of fermenting to alcohol due to the yeast.
1. Make a hole in the center of the big bottle cap, insert an adapter and secure it with hot glue
2. Make 3 holes in the small bottle cap and glue the other 3 adapters
3. Link both caps with one of the mid tubes and insert the other tubes on free adapters
4. Insert a short tube in the bottom of the small cap in the adapter that came from the big cap
5. Watch the Video!!
-----WATERING CALENDAR-----
Plants are beginning to drain the pots a bit faster so from now on i will raise the water ammount on each watering day 0.25 l.
11/05/19 - 1,5 l with All week nutrients -(Nirvana & Blombastic) also Big Bud half dosed @ PH6.4 & 2 E.C.
14/05/19 - 1,5 l with Bud Candy, Big Bud, Nirvana, B52, Bud Factor-X, Sensizym & Blombastic @ PH6.4 & 1.5 E.C.
*****ESPAÑOL*****
-----IMÁGENES Y VÍDEOS-----
5: Generador de CO2 casero, barato y orgánico (más info en el sumario semanal)
9, 10, 11 & 12: El cogollo que sale a la derecha es de una Gorila, el de la izquierda y/o el de en medio son de una Money Maker
15: Dos cogollos de la misma planta, uno afectado por CO2 en las raíces y el otro no
-----SUMARIO SEMANAL-----
El olor es más dulce e intenso día a día, los amigos que vienen a casa a verlas se quedan ojipláticos al verlas. El tamaño no es una maravilla, pero la gran cantidad de cogollos llenos de cristales añadido al aroma que entra por las fosas nasales las hacen increíbles. Los cogollos crecen y engordan de maravilla.
Esta semana he añadido un boost de CO2 casero, nunca he hecho mediciones de los resultados por lo que no puedo darlas. Este método es ampliamente usado en peceras caseras y de ahí saqué la idea. Para aquellos interesados dejo aquí instrucciones más detalladas. Con los 4 litros de agua que he preparado yo da para unas 2 semanas.
---NECESITAMOS---
- Botella de 250 ml
- Botella de 5 a 10 litros
- 400 g de azúcar por litro de agua
- 1 sobre de levadura de postre orgánica (LA QUÍMICA NO FUNCIONARÁ)
- 3 tubos de plástico de tamaño medio 40~50 cm
- 1 tubo de plástico de tamaño pequeño 5~6 cm
- 4 adaptadores para los tubos
- Cola caliente para pegar y sellar los adaptadores
El proceso de generar CO2 es simple, mezcla agua, levadura orgánica y azúcar en una botella, y el azúcar liberará CO2 en el proceso de fermentación a alcohol.
1. Haz un agujero en la tapa de la botella grande, inserta un adaptador y séllalo con cola caliente
2. Haz 3 agujeros en el tapón pequeño y haz lo mismo con los otros 3 adaptadores
3. Conecta los 2 tapones con uno de los tubos y conecta los otros 2 tubos a los adaptadores restantes
4. Conecta el tubo pequeño en la parte libre del adaptador del tapón pequeño que viene del tapón grande
5. Mira el vídeo
-----CALENDARIO DE RIEGO-----
Las platas comienzan a secar los tiestos un poco más rápido, asi que de ahora en adelante incrementaré 250 ml de agua adicionales en cada riego.
11/05/19 - 1,5 l con todos los nutrientes semanales -(Nirvana & Blombastic) BigBud mitad de dosis @ PH6,4 & 2 E.C.
14/05/19 - 1,5 l con Bud Candy, Big Bud, Nirvana, B52, Bud Factor-X, Sensizym y Blombastic @ PH6,4 & 1,5 E.C.

Likes
5
Share
@deFharo
Follow
Bienvenidos cultivadores de marihuana! 🖐️ 👨🌾
- Doce semanas desde que puse la semilla de Panamá Red a germinar! 🌱
- Diez semanas desde el trasplante a la maceta final.
- Ocho semanas desde el corte apical
- Cuatro semanas desde el cambio a horario de floración a 12/12H.
- Tres semanas desde que comenzó la floración... a jugar! 😋
¿Qué decir de esta mítica cepa? Ella crece con extrema fortaleza y a la vez con enorme discreción, sólo requiere la justa atención, riegos regulares y profundos cada tres días, yo le doy mezclas suaves y variadas con mis Bio Fertilizantes Orgánicos solubles, ella lo agradece mostrando brotes florales cada vez más bellos. 🌼🌼.
Esta semana he quitado todas las ataduras a las ramas, una recompensa merecida! las ramas están preparadas para llenarse de enormes cogollos y soportar cualquier peso... me estoy desquitando de mi anterior cultivo de esta cepa! 😍 https://growdiaries.com/diaries/249559-zamnesia-seeds-panama-red-grow-journal-by-defharo
Y por fin, hace dos días, la planta, generosamente cedió su esquina super iluminada a otra planta que necesita mucha luz para poblar sus largas ramas:
https://growdiaries.com/diaries/286333-grow-journal-by-defharo
Ahora Panama Red continúa su vida feliz en el centro trasero de la carpa de cultivo, un lugar calentito y bien iluminado... nada puede fallar! 🤣
😁 HASTA LA PRÓXIMA. SALUD Y SALUDOS PARA TODOS!
==============================
PANAMA RED (Zamnesia): "Si te gustan los efectos eufóricos, sociales y creativos, tienes que probar la Panama Red. Esta variedad landrace sativa centroamericana te animará al instante y deleitará tu paladar con un intenso sabor cítrico. "
- Genética: 100% Sativa Landrace
- Tiempo de Floración: 11-12 Semanas
- Hasta 350g/m²
- THC: 17%
https://www.zamnesia.es/10652-zamnesia-seeds-panama-red.html
==============================

Likes
2
Share


Likes
6
Share
@Sup3rNov4
Follow
She is by far the strongest strain I have ever grown flower sites everywhere

Likes
4
Share
@GTools
Follow
Finally it was time to cur them down. There is a nice layer of glassy trichomes and the plants have dense buds.
I am expecting a decent harvest outcom.
Updates will follow drying and curing proceeds
Likes
9
Share
@Piorkeed
Follow
Week 2 (30/01 - 05/02)
During this week I will continue as the first week. Light at 20cm from top of the plants, dimmered down to 30%. I will only add 2ml/l of Bio-grow every two watering days. Parameters for heating/cooling system: 23.5°C as reference temperature, -3°C for heating, +1.5°C for cooling.
30/01D8: -
31/01D9: watering day. Added 2ml of Bio-grow to 1.2l of tap water (approximately 40cl of water each plant)
01/02 D10: -
02/02 D11: watering day. Tap water only (50cl of water each plant)
03/02 D12: -
04/02 D13: -
05/02 D14: watering day. Added 2ml of Bio-grow to 1.5l of tap water (approximately 50cl of water each plant)
Likes
13
Share
@Robeeriegenetics
Follow
Chugging along week six licking my wounds and biding my time all is well though I ain’t mad leasons learned no reason to cry over spilt milk