
Likes
Comments
Share

@eldruida_lamota
Follow
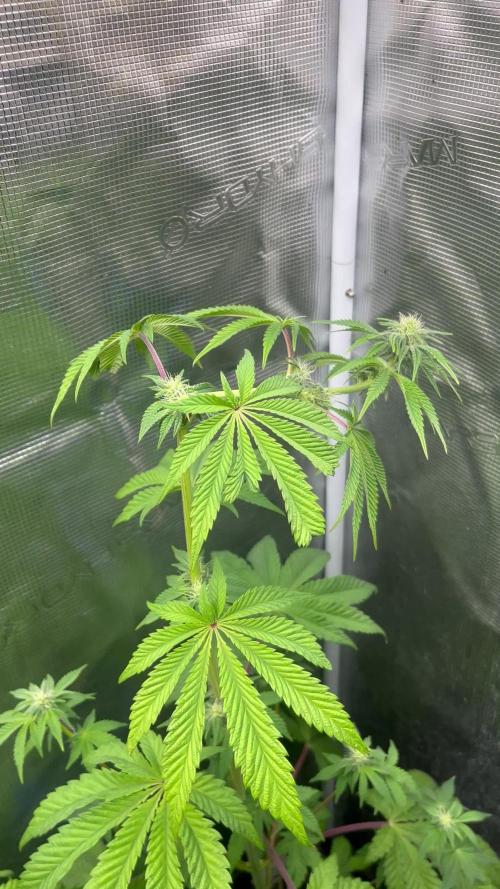
Que pasa familia, vamos con la tercera de floración de estas Pink Sunset feminizadas de silentseeds.
Vamos al lío ,se trasplantaron en macetas de 7 litros definitivamente.
El ph se controla en 6.0 , la temperatura la tenemos entre 24/20 grados y la humedad ronda el 50%.
El ciclo de floración puse 12h de luz, el foco está al 80% de potencia.
De momento van creciendo a buen ritmo y tienen un buen color.
Agradecer Agrobeta por el envío de un kit para la temporada, son unos jefes.
- os dejo por aquí un CÓDIGO: Eldruida
Descuento para la tienda de MARS HYDRO.
https://www.mars-hydro.com
Hasta aquí todo, Buenos humos 💨💨💨

Likes
37
Share


@eezeegrow
Follow
Babies are growing soooo fast. Very happy about this strain! Can't wait for a tasting session... 😉


Likes
9
Share


@GetTheGat
Follow
Well 84 days later ...in Flower its was finally time to Harvest . I sure had my challenges as a beginner and learned a lot by my mistakes and learning about fixing issues and keeping the environment Consistent . I did turn my 600HPS down to 400 as i was my plants were getting light burn and heat burn ..... lets just say i was learning all the way throw . it was exciting being my very first time . I started flowering too late late and they stretched and stretched ... i dont have much space ....lesson learned . I had to train them to grow sideways which did help significantly as did the lower my light to 400 watts ..my space is a square Meter and low ...... it was crazy but I really enjoyed it and there hanging ..... Personally I thought id end up killin them ...lol
Thanks for the advice and comments they were greatly appreciated ... Happy growing .... Hope my next ones are Prettier ,,,,LOL Cheers


Likes
154
Share


@Tropicannibis_Todd
Follow
💩Holy Crap Growmies We Are Back💩
Code Name FBT2311
Well growmies we are at 49 days in and everything is going as good as it can 👌
👉Shes been doing really good , lots of buds and some nice colors and smells 👌💪she's the top of of the lot 💪
Lights being readjusted and chart updated .........👍rain water to be used entire growth👈
👉I used NutriNPK for nutrients for my grows and welcome anyone to give them a try .👈
👉 www.nutrinpk.com 👈
NutriNPK Cal MAG 14-0-14
NutriNPK Grow 28-14-14
NutriNPK Bloom 8-20-30
NutriNPK Bloom Booster 0-52-34
I GOT MULTIPLE DIARIES ON THE GO 😱 please check them out 😎
👉THANKS FOR TAKING THE TIME TO GO OVER MY DIARIES 👈

Likes
7
Share

@NoProbation4Weed
Follow
i decidet to let the plant dry out before harvest to give her some stress. I also reduced the light intensity.
The smell of the Pheno #1 is funkier and louder compared to the other but the smoke will have the final word.
No fertilizer the last 2 weeks of flower.
Likes
15
Share


@GrapevineGrower2
Follow
Well, week 9 of flower in the books and she is done as of this posting on 5/19 (day 63). She finished up well and the trichome development has nice mix of milky with a little amber. She's is extremely frosty and gives off a super strong smell of fruity goodness. She'll be cut down today, so stay tuned for the subsequent harvest report and pics.
All in all, first time DWC bucket grow went well, in my estimation. It's a lot of work, but the results speak for themselves. I learned a lot with respect to monitoring ph, ppm, and ppfd readings, as well as reading my plant for visual cues. I eventually understood I needed daily readings b/c growing hydro conditions can change on a dime, especially for someone new to this growing method. But once I found my stride, the process became a bit easier. An important lesson learned was how much space is needed for hydro vegetative and flower growth. I literally had to move from the original 2x4 tent to the larger 3x3. And that is where she finished up.
First time growing using Ganja Farmer seeds. The genetics are excellent and I can hardly wait for dry/cure to complete, so I can put her to the smoke test.
And that, Amigos y Amigas, puts a bow on this spring's Ganja Farmer Seeds TKO grow.


Processing
Likes
149
Share


@CBD_Sweden
Follow
Hi all the happy people here in GrowDiaries.
This is my second cultivation ever and it will be fun to try a bigger space than my closet grow.
First, I'm just going to say I'm done with the construction of my new growroom.
I put some pictures on the construction here in week one.
The room is 2.14 meters by 1.7 meters and has a ceiling height of 2 meters.
It provides a floor area of 3.6 square meters.
I use a 54 Watt Lightwawe T5 for germination and 2 Pcs 400 Watt HPS lamps.
I have a channel fan that replaces the room air about 40 times an hour to get a comfortable theme in the room, the air enters a fresh air intake from the outside.
The air is purified through a carbon filter to then leave the room to the rest of the basement.
Then I use that heat to heat the rest of the basement.
I will use 8 pcs 15 liter Autopots to grow with and a 100 liter water tank that supplies the pots of water and nutrition.
I will grow completely organically in soil and will watercure my buds to get the best possible medicine for me.
But there are no cultivation rooms to be displayed here, so I continue with what is most important.
Today I have put my seeds in my moisture dome and hope the seeds have germinated within a few days.
I am very excited to see how the new growroom will work and how this Blue cheese Auto from Royal queen seeds will turn out.
Blue Cheese automatic cannabis seeds are a cross of Blueberry Automatic and Cheese Automatic that has been perfected over five years of breeding and careful selection. The result is a feminized, autoflowering strain with superior yield, flavor, and effects to either of its distinguished parent strains.
THC: 16%
CBD: Low
Yield Indoor : 325 - 375 gr/m2
Yield Outdoor: 60 - 110 gr/plant
Height Indoor: 40 - 70 cm
Height Outdoor: 60 - 110 cm
Flowering: 7 - 8 weeks
Harvest month: 9-10 weeks after planting
Genetic Background: Blueberry x Cheese x Ruderalis
Type: Sa 35% In 40% Ru 25%
Effect: Cerebral and uplifting
Climate: Mild
..............................................................................................................................................................................................................................................................................................................................................
Update 2017-08-15. All 4 seeds have germinated and planted in small pots inside the humidity dome.
I'm so glad it worked so well and now it's just hoping they'll start growing and become 4 big healthy girls :)
...............................................................................................................................................................................................................................................................................................................................................
Update 2017-08-16. I have mixed my own soil today. Its 40% sieved peat harrow H2-H4 0-30 mm, 45% sieved peat harrow H4-H6 0-30 mm. 5% sand and 10% of compost soil. And i use 15% of perilite and mix it all together.
................................................................................................................................................................................................................................................................................................................................................
Update 2017-08.20. Nr1 and 2 grow and thrive.
Number 3 just got rid of the seedpod and is folding out the sheets.
Number 4 is a bit shy and can only be seen if you look carefully into the soil.
.........................................................................................................................................................................................................................................................................................................................................
Update 2017-08-21. Nr 1 and 2 is doing well. Nr3 is trying to catch up and Nr4 is still shy.
--------------------------------------------------------------------------------------------------------------------------------------------------------------------------------------------------------
2017-08-23. Transplanted 2 girls from humidity dome and the small germinating pots to 15 liter autopots. The other 2 girls have to wait a little more before transplant to the autopots.
................................................................................................................................................................................................................................................................................................................................................................................
2017-08-27. The girls have settled in to there new home of the 15 liters autopot after a little transplant chock. Now the real week 1 starts for me and the girls.
--------------------------------------------------------------------------------------------------------------------------------------------------------------------------------------------------------
2017-08-28. New pic and movies.
---------------------------------------------------------------------------------------------------------------------------------------------------------------------------------------
2017-08-28. Nr3 is transplanted in 15 liter autopot.
-------------------------------------------------------------------------------------------------------------------------------------------------------------------------------
2017-08-29. New movie of the girls. Its no water for 3 days now for Nr1 and 2 so the roots develop more and match the plant above the soil. The temp controlled fan is awesome, its easy to set what temp you like to have in the room. Right now its 28 celcius. And humidity is 56%.
------------------------------------------------------------------------------------------------------------------------------------------------------------------------------------------
2017-08-29.
Hello to you who read my diary, I just want to say that I am pleased that you have chosen to check in with me and in my diary.
I just want to say that I do this for myself and for a steady flow of my medicine.
Everything you read and see in my diary is 100% honest and I will never distort or beautify anything here.
I document my crops so that I can learn from my mistakes and also to look back at those different crops.
I try to update with pictures every day and with text if something special has happened in the garden.
This is my strainhunt for the best medicine and the beginning of my journey with cannabis and the cultivation of it.
-----------------------------------------------------------------------------------------------------------------------------------------------------------------------
2017-08-30. Cleaned the room this morning, just vacuuming and cleaning with chlorine solution. Im testing the fan to control temp and humidity, it works great.
Added some pics with measurements and movie. Everything is looking great right now.
---------------------------------------------------------------------------------------------------------------------------------------------------------------------------
2017-08-31. New pics and videos.
---------------------------------------------------------------------------------------------------------------------------------------------------------------------------------
2017-09-01. New pics and videos. Gave each of the girls with 2 ml Alg-A-Mic, 4ml Bio-Grow, 4ml Bio-Heaven and 10 ml Formulex mixed in 2 liters of water.
I hope they like it :)
-------------------------------------------------------------------------------------------------------------------------------------------------------------------------------------------------------------------------------------------
2017-09-02. New pics and the girls liked the water and nutrients yesterday.
-------------------------------------------------------------------------------------------------------------
2017-09-03. New videos of the girls this morning. Nr1 and 3 looks great and nr 2 is looking a little funny, maby a little stressed.
Kl. 16.00. Did some defoliation on the girls. Added video.
Kl.. 23.00. New videos, defoliation and leaftucking.
-----------------------------------------------------------------------------------------------------------------


Likes
13
Share

@420DeepGrow
Follow
📆 Semana 4
La floración continúa avanzando con fuerza mientras el estiramiento llega a su fin. Ambas plantas han desarrollado una estructura equilibrada y una canopia uniforme, permitiendo aprovechar al máximo la iluminación disponible.
La planta que demanda más alimento muestra un ritmo de desarrollo superior, requiriendo una nutrición ligeramente más intensa para mantener su crecimiento y formación floral. Ambas mantienen un aspecto saludable y sin signos de carencias.
Los cogollos comienzan a ganar tamaño, los pistilos se acumulan en todos los puntos de floración y las primeras capas de resina empiezan a hacerse visibles.
⚡ EC: 1.7 1.8
💧 pH: 6.2 – 6.5
🌡️ Agua: 21°C
🌫️ Humedad: 42–48%
💡 Intensidad: 1000–1100 PPFD
🔥 Nota de cultivo: Con el final del estiramiento, la energía de la planta se concentra cada vez más en la formación y engorde de los cogollos. Mantener una nutrición ajustada a las necesidades de cada ejemplar ayuda a maximizar su potencial productivo.
Seguimos creciendo fuerte 💪!

Likes
47
Share


@Northern_Ent
Follow
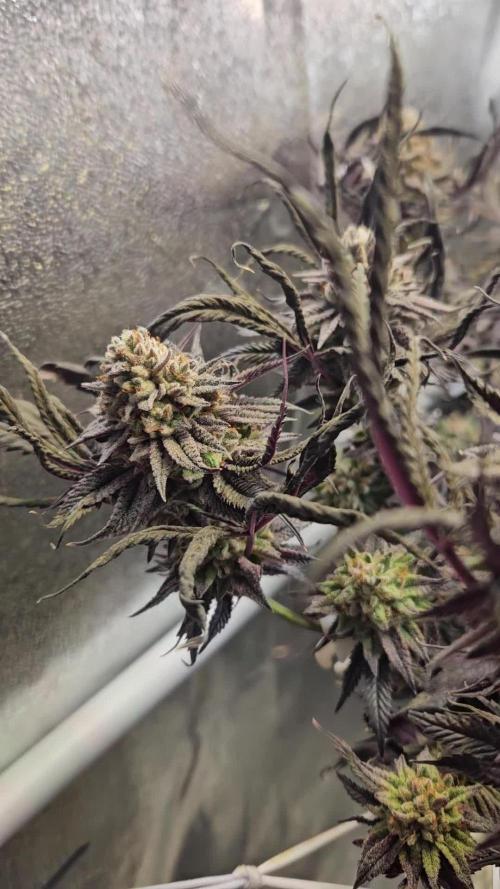
Sep 7: what a great plant. Totally love how it’s going. Flowers keep getting fatter and heavier and she’ll be done before the end of September.
Sep 8: there a tree root sticking up a bit in my yard which means the plant can be tilted toward the late afternoon sun. This is helpful because the sun is getting really low to the horizon already and we’re down to 13 h of daylight. Plus now direct sun is done in my yard by about 6 pm. Indirect light is okay but you really want direct sun at all times.
Videos shows use of 730 nm far red light at dusk. Just a few seconds is all it takes to set the plant into dark mode two hours faster. It’s a bloom booster because you get two bonus hours of darkness or a 26 h day. Very effective but don’t miss a night and you have to adjust the timing each night.
When starting this on July 20 Civil Twilight, as listed on timeanddate.com for my location, was at 9:45 and today it was at 8:40 pm. The red light at dusk is a highly recommended trick if you have daily access to your outdoor plants. Also works indoors, of course, and on autos too.
Also I think it helps ‘stabilize’ the plant by emphatically putting it into dark mode, and therefore less susceptible to stray light to cause a hermie. Have not had hermie problems in four seasons of using the red light so that is my only ‘proof’ but it is true so far, even with taking flash pics before using the red light.
Sep 9: getting heavier and now more branches are weighed down and slumping against the scrog net. Nice problem to have, I know, and without the scrog net some of the branches would be breaking off now.
She’s now officially too big and too top heavy to keep moving around the yard in pursuit of direct sun. Sun is much lower to horizon now and direct sun hours are dropping too.
Sep 10: getting close to done and getting very top heavy. Awesome.
Sep 12: raining today. Has been cool last few nights and some purple colour is just starting to show.
I don’t want to overdo fertilizer near the end, but I decided she is showing K deficiency. I’m out of malted barley but I still have potassium silicate, so I used that and some cal-mag. I’m avoiding kelp and molasses or using more P at this late stage because that can make the dried bud hard to burn and that really sucks. So, potassium silicate and cal-mag it is. The potassium silicate raises the pH and it takes about the same volume of vinegar to get the pH down. A good does of acetate is likely good for the bugs in the soil too. Then a squirt of Dr Bronners soap as a surfactant and that also supplies some biodegradable carbon for the bugs in the soil. Seems to work overall and is cheap.
Apologies for the large number of pics, but she’s so photogenic. 😎
#seedsman420growoff
#seedsmanseeds

Likes
41
Share


@Wicked_Stix
Follow
This is my favorite plant of the 16oz dutch bucket grow. She has grow fast, healthy, and has a beautiful structure. She is putting on some nice tops. She is starting to show some drooping on the top leaves in the evening since being put under the quantum boards. But she perks back up in the morning so I think she will keep chugging along. I'm thinking I will easily exceed 2 oz on harvest if I can see her to the end. Got the nutrient pumping and the lights beaming. Not much else to do from here on out

Likes
4
Share


@B4niTa
Follow
Permanent Jealousy XL Auto sprouted and looks healthy😁 Kept it under 20/4 light

Likes
8
Share


@Designer_grow_pt
Follow
At this point the special queen and kush were sprouting, the ak-47 with 3 weeks and the critical with 1 week
Likes
91
Share


@MrCOCO
Follow
The girls grew 10 cm during the first week of flowering ... So far everything is going well and I am happy to see them 🍃🍃🍃
Likes
30
Share


@DrewbieDoobieNoobie
Follow
I can see the finish line. I started the flush this week 5/2/19 nothing but Harvested Rain Water 25 PPM filled both 5 gallon pots nice and slow to saturate the coco until I had runoff. I checked the drip pan PPM was 1986 I'm sure the residue from the other feedings were still in the pan from weeks past.
I collect a clean sample of runoff today 5/5/19 with a 5 gallon flush on each pot and check that. 1100 ppm I used the Flawless Finish on the 5 gallons to clean out most of the salts let the plants slowly eat up the reserves in the fan leaves. I am seeing the yellow fade of autumn now. will let dry out for 2 more days and Flush again with the Flawless Finish on 5/7/19 PPM 390 I am seeing the fade to yellow on the shorter one the tall one is still green but the PPM on both are at 390. another 2 day dry out last flush 5 gallons of R/O WATER. on 5/9/19 The time-lapse files got corrupted 😥 but I shot a live video of some close ups. Cut of the SCROG and wow are they sticky. the smell is really strong now. Thanks for all the support and advice on this grow. I have to have patience for the chop, all most there.

Likes
23
Share


@NordicCropz
Follow
Day 60 flower on the two most developed. Should be right about done by now, but as you can see nute burn has been a pain lately. Anxious to find out how much longer they'll need to mature. Buds on the smallest one with the fattest flowers look thick, but they are waay too fluffy compared to the other equally developed plant.
I have only fed twice the last 10 days, to try to combat the nute problem. Thinking I should go down from half dose to 1/3 the rest of flowering, with a bit more normal feeding frequency, to avoid starving them in these last couple/few weeks.
Second video is of a small bud I cut off low on the smallest plant. Not mature at all, but it still blew me away. The high was wonderfully balanced. Most of all the taste, was incredible. Even after I dried it for 6 hours on my heating radiator on top of cardboard. Makes me think of how insane it will be when matured, dried and cured like it is supposed to. Just hoping it will fatten up a bit, at least the pistils are starting to come along.

Likes
1
Share


@Ninjabuds
Follow
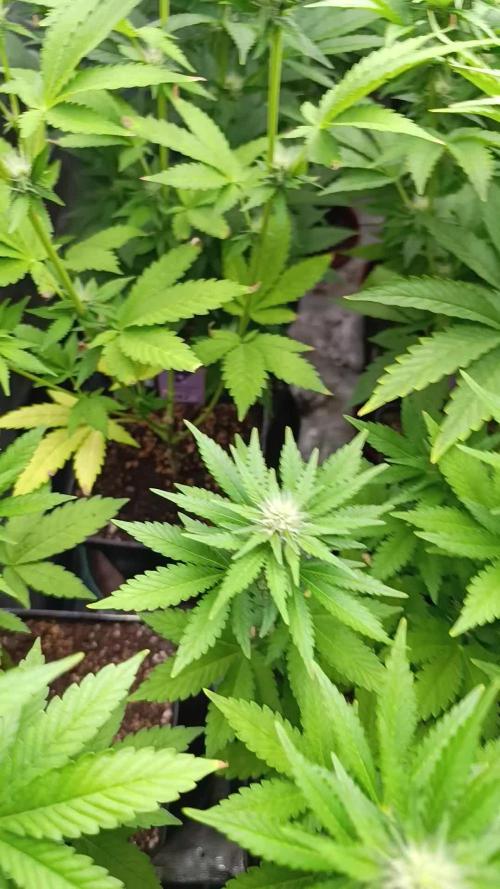
It's been a great week for the seedlings! They've really taken off and are looking strong. I'm planning to transplant them into larger pots in the next few days, so next week's photos should show some impressive growth. I'm so excited to see how they thrive in their new homes! I've been giving them distilled water from the start, and I'm still doing that, but I just started adding 10 milliliters of Fox Farm Big Bloom and 1 milliliter of Fox Farm Grow Big. All of the seedlings are doing really well, and there's not really any visible difference between all the ten strains. I started all ten packs of each strain and kept all the best seedlings, so that's why they're all doing so well.
Likes
10
Share


@tokesly
Follow
Very fast growth. Final comparisons of germinating ~10 seeds. Tropicanna Poison on Top Left is 2nd fastest growth so far right behind Apple Cup (Apple Fritter x Banana Butter Cups) by Robin Hood Seeds. Apologies for the floor gap, I ran out of polyfilm and couldn't be bothered to get another large roll for such a small gap.