The Grow Awards 2026 🏆 


Likes
1
Share
@Old_school_grower_dude
Follow
Day 2; 48 hrs the Purple Star Killer seed's root was long enough to go into soil today. I use Happy Frog soil for seedlings. The soil cup will stay on the heat mat insuring the temp is kept at 75°F.
Day1; 24 hrs and the Purple Star Killer seed has a visible tap root. I'll wait a little longer before putting it in soil. I like to see the root about a quarter inch before planting.
Day 0; Germination, paper towel method.

Likes
120
Share
@NugLife420
Follow
Well, the ladies are definitely ladies. 😀. Hundreds of budlets are forming. The Red Hot Cookies are super ladies. As always I will update throughout the week. 😎


Likes
Comments
Share
@Dr_Zauberer
Follow
Day 50-56
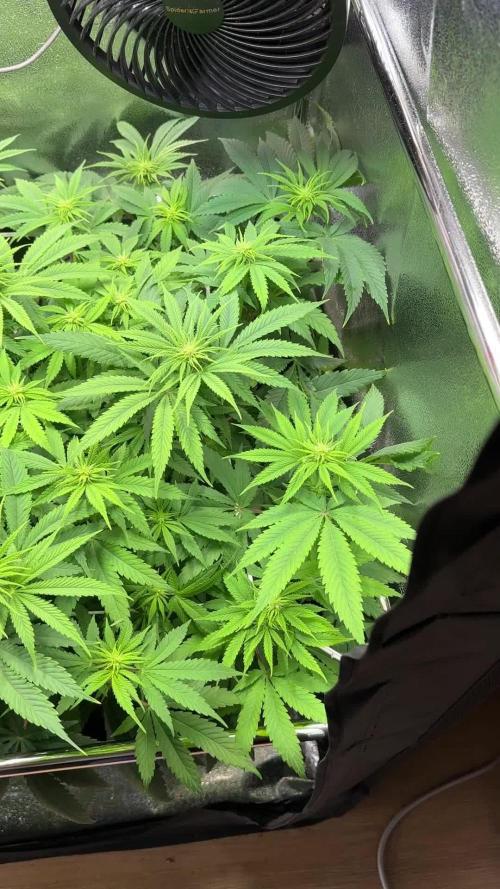
A lot of flowers, the screen is filled with it :) we like to see

Likes
52
Share
@Stick
Follow
She was topped for the last time, 16 apical summits were born 😎. She has been under x2 MarsHydro PAR38 LED bulbs for a week, but I think she didn't like those. She developed some burnt spots, my guess is that IKEA bulbs are safer than MarsHydro ones. Plus, I'm getting sick of those pink-ish lights. I sold my x2 COBs to buy x3 LM301B PCB boards (QB-style, in my opinion one of the best ways to go nowadays). Otherwise she looks great, I'm having hard times trying to keep everything symmetrical but this will be easier as soon as I plug my new quantumboards in the tent. Stay tuned folks 👋

Likes
16
Share
@TheCannaProphet
Follow
Week 6 of flower! Coming into the final stretch and thankfully this catches me up to the present with this journal. All the girl's are really getting thirsty faster and I've upped their daily to 1gl each with half doses of CalMag+ and PH'd to 6.3. I'll be changing PH to 6.5 for the last 3 weeks of flower to help with their autuming off. The WW is getting so resinous it's ridiculous. Keeping nighttime temps @ 60F and mid 70's during the day with 4 hours of enhanced UV via the HLG UV bar. Supposed to help with tricome and terpene production....we'll see!


Likes
48
Share
@AsNoriu
Follow
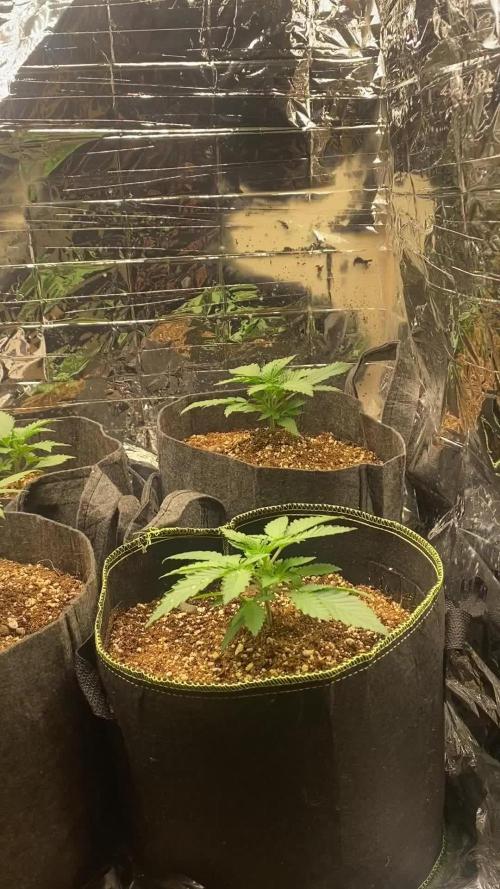
Day 15. Girls got dried up again, but i transplanted them !!! Now in one day they stretched, happy and all will go as diamond ! Think i lost one week at the end of grow with all those hiccups ...
Pots 30 liters, were topped up with Biobizz All mix soil 80% and Biobizz Worm Castings 20% , each girl got 600 ml of water.
Big pots sorted low humidity too , now i have too high even, but exhaust is sorting excess..
Light is working well, but ... coverage for 3 plants is impossible, so for veg i still with help of pot rotation will manage, later ill plug one of my quantum boards as extra.
For two plants TS1000 would be perfect in veg, for flower still its one plants light.
Money wise its a huge grab ! Less than 100£ for 150W with dimmer ... Honestly impressed with it , maybe next week i wont mention it , but .... ;)))
Tent is doing her job too, perfect size for 2-3 plants, even 6 inch fan fitted perfectly !
Seedsman girl is very curly and kush type of leaf structure, i know she is ugly and all stressed, but i see how plant is developing , will be bushy , not a racer 4sure ;)
Happy Growing !!!
Likes
59
Share
@Ganjagrandaddy
Follow
Day 77: As expected , the ladies have continued to pack bud girth on this week and i suspect will go at least another week at the least. They are pushing out so many fresh pistils still even though the LOS girl looks very faded now. she is covered in fresh pistils too so no signs of a ripen yet or withdrawal of the unused ones so let's see if her leaves allow another week !!. I wonder if my LOS has died and needs a total recharge for the next run ( already germed and coming very soon !!!) The #2 is continuing to fatten all her mains out which give her a shaggy appearance all over. She is a good size and showing some fading signs too now.
I never flush , ever , so thisnis a natural dmfast which I am glad to say is a welcome sight now. #3 Is the tallest girl with the nearest looking buds all down her stems. I live the fresh fruit smells she kicks out too. 2 more weeks would make these stellar girls.


Likes
11
Share
@JoeyGonz
Follow
Lots of preflowers and already frosty AF. They are just now turning from pre's to buds.. I am also mimicking insects as crazy as that sounds.. Every other day I cut few leaves off, or slice off some leaf tips.. Besides cold nights I think that's a good way to make them think they have to defend themselves. Haven't had any health issues or insect issues thank God. The two girls I transplanted late are looking good didn't slows down. If anything they looked like they are happier, leaves up and creating tri's all over. About four weeks to go, But once again things are good to go.
Processing
Likes
23
Share
@GrowGuy97
Follow
Wish the buds would have got a little bigger but feel like that’s particularly my fault for a short Veg but overall I am blow away by the outcome for all the seeds to just be random bag seeds! 2 of the plants are drying now 3rd one will be cut tomorrow & the other 2 got probably 2 more weeks! Will do a taste & smoke report and also give a weight as soon as they dry & cure a little bit but honestly couldn’t be happier with my first grow! Thanks for all the support & help along the way & happy growing friends!🤙🏼✌️🏼🌱
Update on 1st plant - dry weight 42g, still smelled pretty Earthy when I put it in the jar but the smell is definitely coming out now, extremely sticky & frosty buds❄️: 1:🏼🙏🏼
Update - plant 2 Dry weight was 40 grams! Extremely happy with the out come this is honestly some of the best bud I have ever smoked! Amazing to me this came from a random bag seed, it has a very citrusy flavor, smells & smokes amazing! Honestly a 10/10 in my book, wish I could knew what strain this was so I could grow it again!😫❄️✌️🏼🌱
Update - plant 3 Dry weight 34g, smells & look phenomenal, the buds are much smaller & had the smallest yield so far but this is by far the best smelling so far! Will have a smoke update on this one soon, stay tuned friends & happy growing!✌️🏼🌱
Update - plant 5 dry weight was 52g it dried a little faster than plant 4 which I will probably jar tomorrow! Will update again with a smoke report soon, this plant brought my total so far up to 168 off 4 plants👍🏼 Thanks for following friends & happy growing! Also the butter I made from the trim was 🔥🔥


Likes
27
Share
@AsNoriu
Follow
Day 78. A bit forced by bud rot chop. Hot and humid summer, not the best ... Girls still ended up nice with almost 0 care.
Happy Growing !!!


Likes
104
Share
@Hou_Stone
Follow
👨🚀👋For the moment I am very happy with my Gelato I find that it grows well.
I'm considering taking cuttings but I only have one grow tent and I'm not sure I can keep the cuttings until my tent is ready to accommodate them. 🤔
I'm doing a little defoliation this week and I'll continue for the weeks to come. This will reduce the humidity in the tent .👌
We will start flowering next week! 🌺👌
------------------------------------------------------------
💧Watering each pot:
Day 24 : 0.5 L
Day 27 : 0.5 L
Day 28 : 0.5 L
I use tap water, adjust the ph to around 6 and water
------------------------------------------------------------
🔥❄️Temperature of the week :
Day : 19-23°C (Humidity : 60-75%)
Night : 14-17°C
------------------------------------------------------------
🚀Equipment of the week ⭐️ :
Light FC3000 Mars hydro. power 95% at 50cm
Extractor 6 inch Mars Hydro. power 1/10. ON 24/24h
2 fans to circulate the air inside the tent. Each on for 30 minutes then off for 1 hour. this rhythm repeats itself in a loop
Heating mat 95x95cm. ON 45 minutes. OFF 30minutes. In a loop. The day only
------------------------------------------------------------
🌎 I created my discount code on Mars Hydro 🌞
Get 5% off with my code: houstone5
By using a code, in addition to getting a discount, you directly support the creator who shares it.🙏
So if you make purchases on Mars Hydro don't forget to enter a code😀
Mine is "houstone5" 😉
https://www.mars-hydro.com/?acc=hou-stone
-----------------------------------------------------
My instagram ❤️️🌱 :
https://www.instagram.com/hou_stone420/
------------------------------------------------------
Thank you for your visit 💚


Likes
6
Share
@Reidy_B
Follow
Everyone is thriving! Things are going fairly well. Had a rough start but now everyone is living their best life! 🤩

Likes
43
Share
@biggreens420
Follow
Got some better shots without light and a little video my cam is a bit shit got a video of trichs also in there girls seem to be flushing well started flushing the quick one later than the others as wasn't as developed. Took the 2 tester buds of very bottom under the plants on the first day of flush to try estimate how long to flush for........last pic and vid before harvest next uploads will be harvest hopefully


Likes
12
Share
@RickSanchez
Follow
its week 3 of flowering and all 4 plants went trough the early stages very well 💚 two plants are building up frost already, i am pretty sure this will be the ones, i'll keep. i took clones before the light flip, so no need to re-veg those beauties 🌱
