The Grow Awards 2026 🏆
Processing
Likes
Comments
Share
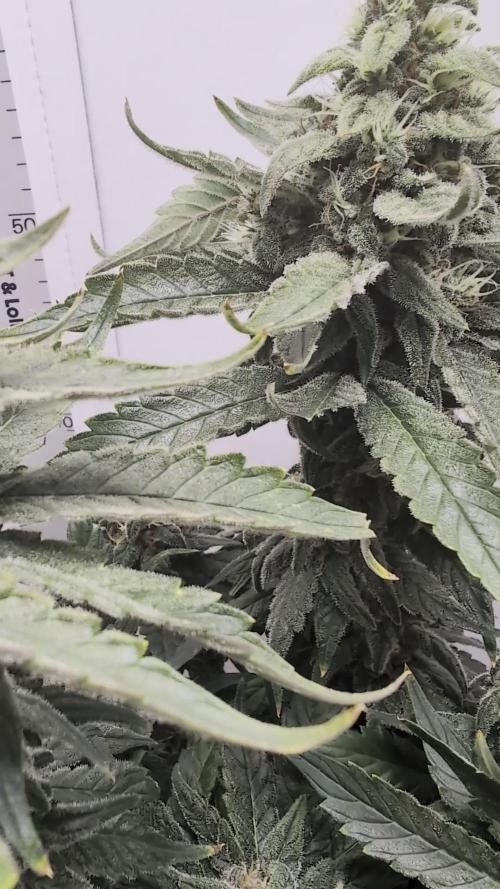
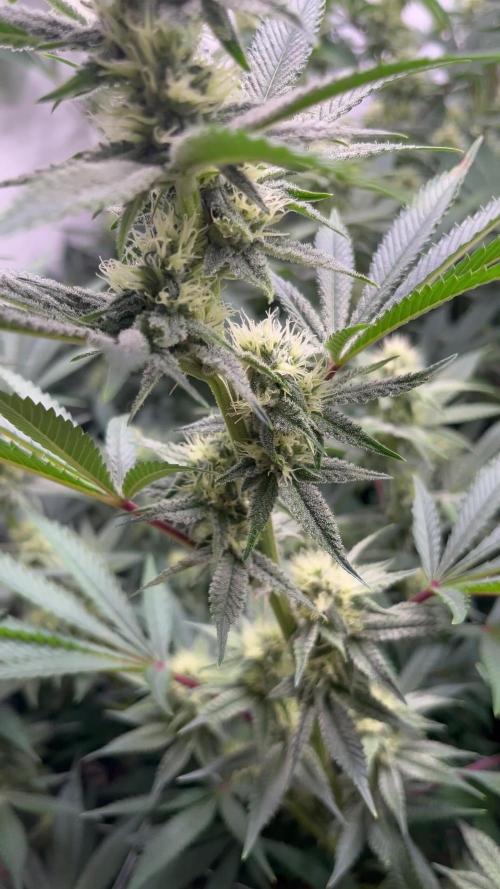
Greetings to all who follow the development of my blueberry. I am very pleased to see you. Comment. Like. A week passed in the normal mode, the head swells in order to strengthen the flowering. I used pesticides of the gibberlinic acid group.
Likes
51
Share
12/3/23 - Day 27 - Hello All! Today I was able to catch the water change as it all happened. I have a video that I uploaded above. Here we are going into week 5. Shes growing fast and her branches are close together. Not much going on other than letting this LEAF box do its thing. I'll keep it updated with pictures as we go along. I still have leftover nutrients from the last grow. The A-nute is getting close to being gone. So I replaced it with the A-Nutes that I had purchased to start this grow. Replacing them is super easy. Another water change day in the books! 12/5/23 - Day 29 - I did some cleaning up on the branches. I removed a lot of the fan leaves. I do plan on cleaning it up a little more but I wanted to give her a moment to recover. However, I am starting to think that it does not matter. So far with both of the grows I have done in this LEAF box. When I trim the plant and I think it's going to cause an slow down, I'm wrong. So far I have yet to see a bad result from trimming her. It's almost like the plant likes it better immediately and starts to stretch out and get bigger. 12/7/23 - Day 31 - I noticed there are pistles already forming. I spoke with someone about how quickly that was and they said that I should wait to flip them to flower. Autos are kind of known to start flower when they are stressed. I forsure stressed her out when I just put a huge trim on her. Ill give it another few days to see if the pistles continues to pop up or slow down.
Likes
16
Share
@Joehydro
Follow
3/10/2019. Start of week 8 and the Tangerine Dream is fattening up it’s buds and kicking out more frost every day. Even though the NYC Diesel is exactly the same age as the Tangerine Dream it looks about a week behind in flower but it’s also a far bigger plant and will definitely take longer to flower out. Final defoliation was done to both girls. I willl update through the week as always . Happy growing everyone ✌️!!! 3/15/2019.. The tangerine dream is really beefing up her buds this week. The room smells like sweet orange candy mixed with skunk fuel from the nyc diesel. For sure this tangerine dream is gonna be a very frosty pheno. The nyc diesel is finally starting to really grow out it’s bud sights so really not much to report on her. Overall everything is looks perfect with both girls. 👍
Likes
2
Share
Que pasa familia, vamos con la cosecha de estas Orange Sherbet Fast Flowering, de FastBuds. Por dónde empezar, las flores son poco compactas pero van repletas de resina y unos aromas bastante dulces y citricos Es muy sencilla de cultivar, es de ciclo corto aunque también si le dais una semana más no pasa nada agradecer se agradece al final. Mars hydro: Code discount: EL420 https://www.mars-hydro.com/ Agrobeta: https://www.agrobeta.com/agrobetatiendaonline/36-abonos-canamo Hasta aquí todo, Buenos humos 💨💨💨
Likes
8
Share
Ciao! Questo è il mio primo EP su Growdiaries sono davvero entusiasta! Oggi 8 febbraio ho messo a germinare le tre piccole di casa Barney's. i semi sono posizionati all'interno di un vassoio da germinazione sto usando un tubo riscaldante e una centralina InkBird per la temperatura così riesco a mantenere la temperatura sui 22/23°C con un RH %80 Sto usando il metodo del fazzoletto umido, spero che in 24/48 ore la radichetta spunterà dai semi! Oggi 09/2/2023 tutti e i tre semi hanno germinato! Successo del 100% Mi colpisce il vigore della Tropicanna Banana! Invece la gelato mi da l'aria che sarà una bella signorina capricciosa! Come si sul dire ogni riccio un capriccio🤣 Ora i semi sono stati inseriti nel soil per la precisione Ligthmix della BIOBIZZ con un aggiunta di micorizze per la precisione Mycos di Xtreme Gardin! Ho nebulizzato con acqua decantata e ph6.3. 11/02/2023 Ed eccoci con il nuovo aggiornamento del Ciclo TheBarney's! Le piccole sono tutte e tre spuntate neo tempi previsti sono davvero felice per la loro vigorosità! La Tropicanna è la Gelato presentano un piccolo problemino nel staccare l'embrione del seme dai cotilodoni, per darle una piccola mano ho nebulizzato a distanza un pò d'acqua. Ho evitato di provare a toglierlo con una pinzetta per paura di danneggiare le piccole plantule, sono sicuro che riusciranno da sole a risolvere questo piccolo fastidio. Ho deciso di accendere la lampada impostandola all'incirca al 20% (60W) a una distanza di 50cm circa. Non ho un misuratore di PPFD per mia sfortuna sarei stato più preciso nel impostare la potenza e la distanza della lampada😓 ho impostato il classico ciclo di luce 18/6. Ho aggiunto un ventilatore oscillante della Secret jardin per smuovere un pò l'aria. Ora con tanta pazienza e amore aspetteremo la loro crescita! Sono davvero curioso di vedere quanto tempi ci metteranno ad entrare nello stadio di Vegetativa! 12/02/23 Ciao a tutti growers eccoci qui con un nuovo aggiornamento sul cultivo TheBarney's!! Le tre piccole si sono allungate un pochino, ho deciso di fare un piccolo refill con terreno e dare una piccola nebulizzata. Oltre a questo le ho tolte dal box di germinazione e aggiunto un umidificatore collegato a una inkbird per mantenere costante un Rh tra il 70% 80%, pian piano abbassero l'umidità fino a stabilizzarla sui 65% 70% di RH. Per il resto nulla di nuovo... Ci sentiamo prossimamente per nuovi aggiornamenti sulle piccoline rimanete connessi e lasciate mi piace🙏💚 17/02/2023 Ecco un nuovo aggiornamento sul ciclo TheBarney's! Le piccoline pian piano crescono, oggi concludono la prima settimana come plantule! Si sono un pochino allungate e per sostenerle o fatto un piccolo refill di soil e ho irrigato con 15ml a testa di acqua con ph6.3 e Herba power (Ammendante) 0.5ml per Litro d'acqua. Per questo aggiornamento è tutto ci sentiamo prossimamente! 20/02/2023 Eccoci con EP nuovo sul ciclo TheBarney's! Le piccole oggi hanno subito un travaso le ho messe in airpot da 3L e irrigato con acqua ph 6.3, ammendante (herba Power) e un estratto di alghe (Herba Sweed) EC 0.45 Esattamente oggi sono 10 giorni che si trovano nello stadio di Plantula, le prime foglie a 3 punte stanno sbucando speriamo presto di vedere quelle a 5/7 punte e finalmente si inizierà con la fase vegetativa! Tutto sommato le vedo in salute hanno un bel colore, il vigore della Tropicanna e della Gelato mi sta sbalordendo! Per ora è tutto! Al prossimo aggiornamento 💚
Likes
154
Share
@FAST_BUDS, Hi all the happy people here in GrowDiaries. This is my second cultivation ever and it will be fun to try a bigger space than my closet grow. First, I'm just going to say I'm done with the construction of my new growroom. I put some pictures on the construction here in week one. The room is 2.14 meters by 1.7 meters and has a ceiling height of 2 meters. It provides a floor area of ​​3.6 square meters. I use a 54 Watt Lightwawe T5 for germination and 2 Pcs 400 Watt HPS lamps. I have a channel fan that replaces the room air about 40 times an hour to get a comfortable environment in the room, the air enters a fresh air intake from the outside. The air is purified through a carbon filter to then leave the room to the rest of the basement. Then I use that heat to heat the rest of the basement. I will use 8 pcs 15 liter Autopots to grow with and a 100 liter water tank that supplies the pots of water and nutrition. I will grow completely organically in soil and will watercure my buds to get the best possible medicine for me. But there are no cultivation rooms to be displayed here, so I continue with what is most important. Today I have put my seeds in my moisture dome and hope the seeds have germinated within a few days. I am very excited to see how the new growroom will work and how this new secret CBD plant from @FAST_BUDS, will turn out. .............................................................................................................................................................................................................................................................................................................................................. Update 2017-08-15. Both seeds have germinated and planted in small pots inside the humidity dome. I'm so glad it worked so well and now it's just hoping they'll start growing and become 2 big healthy girls :) ............................................................................................................................................................................................................................................................................................................................................... Update 2017-08-16. I have mixed my own soil today. Its 40% sieved peat harrow H2-H4 0-30 mm, 45% sieved peat harrow H4-H6 0-30 mm. 5% sand and 10% of compost soil. And i use 15% of perlite and mix it all together. .................................................................................................................................................................................................................................................................................................................................................... 2017-08-21 The 2 sisters are doing great, Nr2 is a bit after Nr1 . Some new pics. ............................................................................................................................................................................................................................................................................................................................................................................ 2017-08-23. Transplanted from humidity dome and the small germinating pots to 15 liter autopots. ................................................................................................................................................................................................................................................................................................................................................................................ 2017-08-27. The girls have settled in to there new home of the 15 liters autopot after a little transplant chock. Now the real week 1 starts for me and the girls. 4 new pics. --------------------------------------------------------------------------------------------------------------------------------------------------------------------------------------------------------- 2017-08-29. New movie of the girls. Its no water for 3 days now so the roots develop more and match the plant above the soil. The temp controlled fan is awesome, its easy to set what temp you like to have in the room. Right now its 28 celcius. And humidity is 56%. -------------------------------------------------------------------------------------------------------------------------------------------------------------------------------------------------------------------------------------------------- 2017-08-29. Hello to you who read my diary, I just want to say that I am pleased that you have chosen to check in with me and in my diary. I just want to say that I do this for myself and for a steady flow of my medicine. Everything you read and see in my diary is 100% honest and I will never distort or beautify anything here. I document my crops so that I can learn from my mistakes and also to look back at those different crops. I try to update with pictures every day and with text if something special has happened in the garden. This is my strainhunt for the best medicine and the beginning of my journey with cannabis and the cultivation of it. ----------------------------------------------------------------------------------------------------------------------------------------------------------------------- 2017-08-30. Cleaned the room this morning, just vacuuming and cleaning with chlorine solution. Im testing the fan to control temp and humidity, it works great. Added some pics with measurements and a movie. Everything is looking great right now. ----------------------------------------------------------------------------------------------------------------------------------------------------------------------------- 2017-08-31. New video of the girls. ------------------------------------------------------------------------------------------------------------------------------------------------------------------------------- 2017-09-01. New pics and videos. Gave each of the girls with 2 ml Alg-A-Mic, 4ml Bio-Grow, 4ml Bio-Heaven and 10 ml Formulex mixed in 2 liters of water. I hope they like it :) ------------------------------------------------------------------------------------------------------------------------------------------------------------------------------------------------------------------------------------------- 2017-09-02. New pics and the girls liked the water and nutrients yesterday. ----------------------------------------------------------------------------------------- 2017-09-03. Video of the girls this morning. Kl 16.00. Did some defoliation on the girls. Videos added. KL. 23.00. New video. ---------------------------------------------------------------------------------- 2017-09-04. The start of week 3. New pics. Im trying to LST the girls. KL 23.00. Added new video. -------------------------------------------------------------------------------------------- 2017-09-05. KL 08.00. Cleaned the room this morning, just vacuuming and cleaning with chlorine solution. KL 12.00. The girls got 2 liters of water each with nutes in it, added a video. ----------------------------------------------------------------------------------------------------------------------------------- 2017-09-06. KL 08.00. The girls woke up after their beauty sleep, the leaves are always a bit down after 6 h of darkness, but they will stretch now when the HPS lamp starts. Everything looks good and I keep trying to tuck the leaves so they get the maximum amount of light where needed. Added pics and video. KL 23.30. Did some LST and leaftucking. -------------------------------------------------------------------------------------------------------------------------------------------- 2017-09-07. This is day 21 from sprouting. I have never tested PH in my grows, when growing organic in soil iv learned that it adapt PH by it self. But im curious by nature so i had to test. Kl 10.00 Tested PH in the soil, it was 6.9 and tested my tap water and it was 6.8. Added video/pics of the girls, its 10 H after defoliation, LST and leaftucking. I think its looking good. Kl 22.30. New pics ------------------------------------------------------------------------------------------------------------------------------------------------------------------------- 2017-09-08 KL 08.00. Good morning, added new video. 2017-09-08. Kl 23.50. Gave every girl 3 liters of water and nutes, added new video. ----------------------------------------------------------------------------------------- 2017-09-09. Kl 21.00. Defoliated a lot today, new pics. --------------------------------------------------------------------------------- 2017-09-10. Kl 08.00. Last day of week 3. New video. 2017-09-10. Kl 23.00. 3 New videos. ---------------------------------------------------------------------------------------------
Likes
7
Share
Likes
37
Share
@Roberts
Follow
I just cut her down like 3 weeks ago. Gd was having update issues. It had pretty purple flowers. They had a nice layer of resin on them. I will update more when I do the smoke report, and have it processed and ready. Thank you Gen1:11, Medic Grow, and Ganja Farmer. 🤜🏻🤛🏻🌱❄️ Thank you grow diaries community for the 👇likes👇, follows, comments, and subscriptions on my YouTube channel👇. ❄️🌱🍻 Happy Growing 🌱🌱🌱 https://youtube.com/channel/UCAhN7yRzWLpcaRHhMIQ7X4g
Likes
1
Share
Creciendo bastante bien Talvez yo no sé cómo hacer el lst pero está aguantando bastante bien está nena En un semana creció bastante!!! Estoy contento Me está aguantando Ok Sábado No sé si el lst ayuda al crecimiento pero siento que va a avanzando mucho... No tengo ni idea de que estoy haciendo ni estaba preparado para hacer amarres Ni tengo idea de cómo lo voy a hacer... Pero realmente quería experimentar ya que veo que todos lo hacen aún que me da miedo romper la planta o estresar la y tampoco se que cortar!!! 😔
Likes
26
Share
🌱✨ Here are our girls in their seventh week! 🎉🍀🌿 These beauties are thriving, and their growth has been incredible! 🌟 I defoliate them every three days ✂️✨ because they grow leaves super fast 🍃⚡, often covering the stems.As we’ve mentioned before, we’re growing them horizontally 🌿🔄 to prepare for the scrog , ensuring we cover the entire perimeter perfectly. This method helps maximize light exposure ☀️🌟 and promotes even growth. They’re absolutely loving it! 💚 As I’ve said, this is the power of soil 🌍💎 and the right fertilizer 🍴🌿—the perfect combo for happy, healthy plants. 🌟✨ Follow our diaries 📔👀 and be part of this journey—you’re going to see some really cool changes in the cannabis culture! 🚀🌸🔥 Stay tuned, friends! 👊💚✨
Likes
30
Share
@BC_Green
Follow
It has been another amazing week of the plants growing. I have been watching as the Fruity Freak leaves become progressively more fern-like, and ornamental as a result! Based on my Banizzle grows, I knew I needed to understand plant nutrients in a more meaningful way if I wanted these plants to thrive. So, I decided to get a soil test (see Ref. 1 below on how to perform a test) to understand what nutrients my plants needed. The report I received advised that I needed to add 200 lbs/acre of nitrogen, 150 lbs/acre of phosphorus, and 190 lbs/acre of potassium (see picture labeled Pic.1 (FYI you can't see these images unless you login to growdiaries)). I then researched what to do with my results (Ref. 2 helped), and I figured out that my nutrient needs of 200-150-190 fall close to a 2-1-2 ratio. I then looked at different types of organic fertilizers (see Ref. 3 and Ref. 4) and considered that I already had a 3-10-5 fertilizer (Vermibloom) on hand. I discovered Dr Earth’s Alfalfa Meal is 2-1-2 and includes beneficial bacteria and mycorrhizae (to promote healthy plant growth and disease resistance). However, I knew I would be low on nitrogen if I only used those two fertilizers. Therefore, I decided to buy some blood meal (12-0-0). I also liked that blood meal is more fast acting while the other two are more moderate. I hunted around for a solid fertilizer calculator and found an amazing tool from the University of Georgia Extension (Ref. 5). I entered all three fertilizers into the calculator, and it kicked out the exact amount of each fertilizer I needed to apply to 1 square foot (see Pic. 2). As I am using 10-gallon fabric pots (that can hold 1.5 cubic feet, but I put stone on the bottom and there’s space left at the top) I decided to use the one square foot application rate as I can always add more later, but I can’t take it away. Not only did I want to understand the nutrients I needed, but I also wanted to understand the structure of the soil (as it was not included in my test results). North Dakota State University has a nice page that discusses this (Ref. 6), and I performed a soil ribbon test (see Video 1) based on this information. I determined my soil to be medium textured (which is great), but I have seen occasional water pooling on the surface, suggesting that it may be more of a medium-fine. This means adding peat moss, coco coir, or other amendments might improve drainage (and plant hydration) and allow for roots to grow more easily. In the long run, I plan to use compost to enhance the soil structure and nutrients. I filled the bottom of my 10-gallon fabric pots with a ½” of pea stone to allow for drainage (Pic. 3). I then partially filled two 5-gallon buckets with topsoil from near where I will plant (but not in an area the roots will reach). I used a digital scale to measure the amount of fertilizers recommended by the calculator (Pic. 4, 5, and 6) and added it to one of the 5-gallon buckets (see Pic. 7). I mixed the fertilizers into the soil as evenly as possible (Pic. 8 and 9). I then poured a two-inch layer of non-fertilized soil, then peat moss, and then fertilized soil (in a roughly 2:1:1 ratio) and blended them together. I repeated this until the pot was full (getting additional soil as needed), and then I repeated the process for the other three pots. I set the filled fabric pots in my garage (Pic. 10) for two days to allow any upset bugs to flee into my garage instead of my house. I then moved the pots (wrapping them in a contractor garbage bag to prevent making a mess) into the room with the grow light. I placed a board on top of the fabric pots to insulate the plants (in their smaller pots) from the cold soil (Pic. 11). Once the soil in the fabric pots reaches room temperature, I will transplant. (Ref. 1) This video shows the method I used to take a soil sample. I didn’t have a field to test, so I took four samples from the area where I will eventually plant outdoors and blended them together. I then mailed my soil sample off to the lab, and about a week later, I received an email with a PDF of my results (included with my pictures this week). https://www.youtube.com/watch?v=N9AwxmFxBwg&t=8s (Ref. 2) This video from the University of Minnesota Extension (many universities have agriculture extensions that can assist you with soil testing and growing information for your area) discusses what to do with your soil testing results: https://youtu.be/HYrkcfE62Pg (Ref. 3) This is a nice article that discusses organic fertilizer solutions: https://www.grow-it-organically.com/npk-fertilizer.html (Ref. 4) This article lists the NPK values of many organic fertilizer solutions: https://www.epicgardening.com/organic-fertilizers/ (Ref. 5) Many websites tout a fertilizer calculator…but this one is hands down the best I have found. If you scroll down to the bottom, you can enter any fertilizer type you want (and the cost, if you want). It will give you the exact blend of multiple fertilizers to solve your nutrient deficiencies (I included a snapshot of the solution I used in my pictures). https://aesl.ces.uga.edu/soil/fertcalc/ (Ref. 6) This is an excellent article that discusses how to evaluate your soil: https://www.ndsu.edu/agriculture/extension/publications/evaluating-preparing-and-amending-lawn-and-garden-soil
Likes
1
Share
In der 7ten Woche wurde Entlaubt um auf die Blüte vorzubereiten. Leider etwas zu wenig, also war am nächsten Tag quasi schon alles wieder voll gewachsen :( Insgesamt lag das Problem in der zu langen Vegetation. Danach lag der Fokus weiter auf Erholung und dem gleichmäßigen ausfüllen des Blätterdachs. Den EC habe ich nach dem beschneiden auf 1,2 gehoben. Voodoo Juice war nach dem Schema dann erstmal raus. Also habe ich auch den Bakterien etwas zufuttern gegeben, damit nicht alle sterben und ich dachte die komplexen Kohlenhydrate und anderen Zusätze aus Bud Candy kommen der Pflanze auch jetzt vorallem nach dem entlauben zugute. Einen Tag nach der Entlaubung habe ich wieder Foliar B-52 ausgebracht mit Break Thru zusammen, um Stress abzubauen und schneller erholen zu lassen.
Likes
16
Share
July 20: smoke arrived this morning to go with our heat wave. Awesome. Extra watering, misting air, and wetting the sides of the grow bags with hose water to keep things cooler and hydrated. So far so good in the heat. Did foliar spray of Extreme Blend and potassium silicate. Also note that for all my grows I use apple cider vinegar for pH adjustment and a Dr Bronners liquid soap as a wetting agent (surfactant). Euphoria is doing great, but to ensure that it finishes early enough for this latitude (53N) where the UV light gets very weak after mid-August, I’m starting the force flowering tonight. Already starting to flower but I want a strong flower set and as much flower growth under strong sunlight as possible. Force flowering schedule is 2-3 weeks of in dark garage at 9 pm followed by 730 nm far red light and then back out at 7 am. The light initiates dark mode 2 h faster so it’s like having a 26 h day. Good trick use as a bloom booster, also moves up the finish 2-4 weeks. So, 10+2 is 12 h dark and 14 h daylight. Might sound bogus but it works. July 21: first night of force flowering caused a big stretch. Notably stretched after darkness in hot garage overnight. Hot outside overnight too but was much hotter inside garage and recorded here as 24 C. Seems okay and high overnight temperature might be ideal at this early flowering stage. Warm overnight temperatures continue for a few more days. July 22: record hot overnight low forecast for tonight of 24 C and feels like 27 C with humidity. Wow, that is really incredible for here and 13 C above historic average. July 26: six days into flowering and she is doing fine. 👍👍
Likes
3
Share
Another week growing strong! Took advantage of the last summer days here in the island to get her some real sunlight, which I can tell she loved by the boosted growth. Nothing like the real thing ☀️
Likes
13
Share
@Stork
Follow
Day 30 Wed Add A&B 5 ml and water PH 5.5 - 5.8 EC 0.6 - 0.7 DLI 18h PPFD Water 24 Day 31 Thu Add water, Ph Up PH 5.3 - 5.9 EC 0.7 DLI 18h PPFD Water 22c Day 32 Fri Add Water PH 5.2 - 5.8 EC 0.7 - 0.6 DLI 18h PPFD Water 22c
Likes
9
Share
Crescendo forte e rápido, nenhum sinal de estresse pelo treinamento diário.💪🏽 As temperaturas vão começar a cair e a umidade tende a aumentar. 🏽
Likes
16
Share
Nur kurzes Update Video vom 08.08.25 Foto vom 09.08.25 Am 09.08.25 habe ich erneut eine kleine entlaubung mit ca. 25% Blattmasse je Pflanze entfernt Am 10.08.25 ist der letzte vegiphase Tag, danach werden die Damen für 36h in Dunkelheit verbleiben.
Processing
Likes
9
Share
Was out to check the plants.... both were very fine. One leaf got som yellow and brown spots on it. Pulled it of
Likes
1
Share
Week 6 of flowering 10/23/24 Changed nutrients to fit week 6 Buds are getting even bigger and thicker. Defoliated a little. Noticed a PH of 4.8 in runoff, same as the late stage of flower in my previous grow. After lowering feed EC, CalMag on max strength, flushing with 0.8ec nutes for 3 days in a row, nothing changed and PH stayed the same. Read in a forum thread about constant low PH in the rootzone when growing in coco. Got great info about CEC, water, nutrients and little chemistry from a detailed explanation. (https://www.icmag.com/threads/recurring-problem-with-low-ph-in-coco.338385/page-2#post-10843765) Flushed plants with tap water + calmag, PH 6.5. Used 120L total for 4 plants in 2 days. 1st day: flushed after lights on, did not water until 2 hours before lights off and flushed again. Runoff PH went up a little, but not to the correct range. 2nd day: flushed after lights on and checked runoff EC + PH, of each plant. Fortunately, PH got corrected to 5.8, and I returned to automatic watering 4 times a day (with 10%-20% runoff). Thoughts: In the last grow, I thought I had a problem because of salts buildup in the media with constantly low PH in late flower. I didn't fully correct the problem till chop day. Same problem here in the same stage of flower without the salt buildup. After reading every forum I could find about the problem, I understood that my bloom nutes were the main problem because of their chemical composition. The coco ability to exchange ions lead to the low PH in the rootzone. It got worse quickly because I did not use any tap water with the feedings, so the PH could swing easily and drastically without resistance. After I looked online for the T.A. feeding chart, I saw they used TriPart Grow till week 7 of flower, the Nitrogen type they are using will up the PH. CocoForCannabis chart that I'm using, has not enough nitrogen to combat the bloom nutes PH down effect in flower. It gets even worse with RO water because there are no minerals that can resist PH down. Now I'm using 30% tap water with rest RO water, T.A. TriPart feeding chart with calmag and silica. Hopefully I have corrected the problem for the rest of the grow. It wasn't easy, because there were lots of variables that worsened the problem quickly. Now I'm checking runoff PH and EC daily. Update on next week :)