
Likes
Comments
Share

@eldruida_lamota
Follow
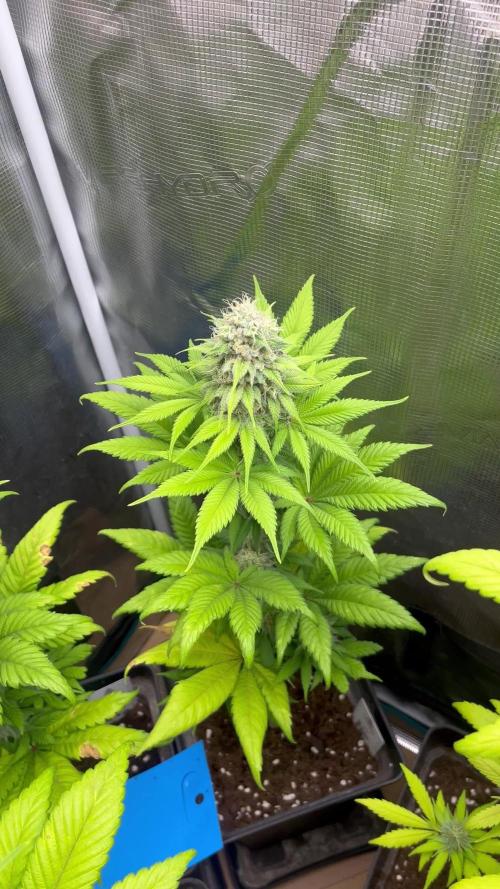
Que pasa familia, vamos con la sexta semana de floración de estas Kiwi x Papaya feminizadas de Mavericks .
Vamos al lío ,se trasplantaron en macetas de 7 litros definitivamente.
El ph se controla en 6.0 , la temperatura la tenemos entre 24/20 grados y la humedad ronda el 50%.
El ciclo de crecimiento puse 12h de luz, el foco está al 100% de potencia.
De momento van creciendo a buen ritmo y tienen un buen color.
La flor está cogiendo forma y ya empezó a tricomar.
Gracias a Agrobeta de nuevo por el kit para esta temporada, unos grandes 🙌.
- os dejo por aquí un CÓDIGO: Eldruida
Descuento para la tienda de MARS HYDRO.
https://www.mars-hydro.com
Hasta aquí todo, Buenos humos 💨💨💨

Likes
49
Share


@masterofsmeagol
Follow
IVE MADE MORE VIDEOS BUT THEY JUST DON'T SEEM TO UPLOAD AND IT'S FAR TO SLOW TO DO IT FROM HOME
6/27 Made last week a five day week to get back on track. It's still overcast and rainy. It's not raining a lot bit it's consistent. Despite the weather the plants are doing phenomenal. I'll update later. It's 1pm. It's been raining consistently since 11. Just a sprinkle but it's steady. I'm going to begun uploading the weeks weather on my diary. I may start a new diary for the plants I light depped as they are flowering pretty good. Rain stopped and it's just overcast for now. I looked at some videos and did a comparison of videos one week ago and videos today and HOLY SHIT! WHAT A DIFFERENCE. Especially the light depped 10th planet. Well everything but that was the most significant difference. I'm astonished at the health and growth despite the crummy weather. Continued to rain. Just got harder. Plants are taking it but it's flooding underneath the pallets a little but it will be fine. The light dep however has me concerned. The 10th planet is looking spectacular. The bigger purple punch I'd looking good too. The smaller one though looks to have a pollen sack coming off one of the branches. Considering its not on the otherside I assume it's not just a swollen calyx. I don't mind chucking it especially if that means I don't hurt my other girls so I want to make sure. I sent videos to a few other growers and I'll add a question on here. Those three plants have been isolated from the rest for a few days due to rain. I have the suspect isolated alone until I can confirm. It sucks cause the light Depp was going good and the6ve all got little flowers.
6/28 Well that fucking sucks. ALL THREE plants I tried to light depp hermed on me. I could see male flowers. Luckily I had been keeping a really good eye on them and it was preflowers mostly. At least I caught it. One or two stamines on each plant. Would've been really easy to miss. Only one had STARTED to elongate into a stem so I think I caught it early enough. Plus since all this rain they've been kept in a different location then my big girls. Glad I did that now. Boy the roots looked good on those plants. I just grabbed the stalk and lifted and it came right out of the pot. I held it there admiring it for a minute. This sucks. At least the real plants are doing good. As far as I know. No male preflowers that's for sure. I've got some feedback from other growers and the videos are a little blurry but I had found a light leak and I'm certain these plants hermed. I know I could've tried to save them but I didn't want to risk it. I compared what I was seeing with Google photos and other websites. Aside from the larger ball with its stem, there were also several little bumps besides developed calyxes that were weaving into little buds. Trust me that I wouldn't cut down my plants if I wasn't 110% sure. I might've been able to "save them" but to me it's just not worth the risk.
6/29 I was second guessing myself pretty hard last night due to some responses I got on my light dep and messages I got from other growets. Made my anxiety horrible but I looked on several video's I'd taken again and I know what I saw. I felt better after that. This was after I researched and waited THREE days until I saw the ball on the stem and the groupings of small nubs under a fresh yellow flower. These plants were flowering good and it sucks to lose them. One MAY have been ok but one was a runt and had all the characteristics of a true hermaphrodite. They were only in 3's and I couldn't risk my harvest for an experiment. Still sucks. Oh well. Sun is starting to come out. Plants seem to be doing fantastic. I have one spot on a leaf that looks like a pillar munched on a leaf so I'll probably get the bt out soon as I have a dry day that I can apply it. I'll have to check the weather. I need to start a nute regiment but the plants aren't telling me they need anything yet.
6/30 I fucked up dates or dodnt do it yesterday or it didnt save right so I'm leaving this blank today is the 1st.
7/1 I have still only watered s couple times and I haven't had to feed. This week I'm going to start nutes. I had some external ersonal situations that have kept me from my plants. I'm hoping to get back on track. I noticed some pillar damage so I'll need to dig out the BT. This morning I saw this giant ground hog by my cage. Hated too but had to get rid of him. Of course some of the blowback landed on the leaves of one of my plants. I tried to clean it as best I could. Better than that fat bastard eating everything in one night. I broke a branch either falling around it or bulling through when I was pissed or I LST it the wrong way and the wind broke it against the tomato cage. Nice big branch too on top. I tried to fix it with duct tape but we'll see. The plants need me to spend sometime with them. I need to clean them up. Apply bt and give them their first feeding. I'll update as I go. They don't seem nutrient deficient by any means but I don't think it would hurt to start the nutes.
7/2 Bags were lighter today and if it wasn't going to rain tonight and tomorrow I'd he watering. Plants look great so soil isn't depleted yet I guess. They're growing rather rapidly. The branch I broke didnt make it. Had an idea it wouldn't but I had to try. I waited on the BT on account of the rain. I may go back over and change my mind and water with silica or a mild nute solution or maybe apply the BT. Depends what time I get back. I have some work I need to do over there. There's a few that I need to clean up the bottoms on. Pest damage is minor and limited to one or two plants and a leaf or two only.
7/3 More rain. It was supposed to rain this morning too but it didn't. We got .33in yesterday and through last night so I thought that was ok. Looking back on my previous diaries I'm doing things significantly different than before. I had used a lot more nutes earlier on. This morning I mixed two gallons of 2tsp of big bloom and fed it to the 9 plants in smart pots leaving the container plants as they have much more water in them. Looking back at other diaries I previously had, WPM and septoria by this time not to mention a shit ton of other pests I was fighting by this time. Since I poisoned where the cagexwas multiple times and sprayed the cage before it was moved I luckily don't have that problem yet knock on wood. I'm planning to apply BT tonight to deal with the moth larvae if there are any. I'm looking at plants around this area and im seeimg SOME septoria and pm on raspberry bushes and burdock so it is around. I made sure my cage is not by any other vegetation this year and is sitting on asphalt with the bags on raised pallets. Good thing I did or I guarantee they'd be flooded by now. I've been seeing multiple complaints from maine growers online (AND THEY HAVE HEALTHY PLANTS!) saying this is the worst year ever. Maybe they need a dose of fusarium oxysporum to keep them humble. This is maine. If you don't like the weather just wait five minutes. Meanwhile I'll be doing my sun dance hoping for sun. "Hard to grow cannabis with no sunlight" said another grower on my forum.


Likes
4
Share

@Susquihanna
Follow
This week I brought my @STRNG seeds tent grow outside for a day/night to cool off.
Because of our extreme temperatures and because my grow tent is in the garage, it is too hot for my plant. I really need to turn on the garage air conditioner, but my husband complains about the electric bill-heheh.
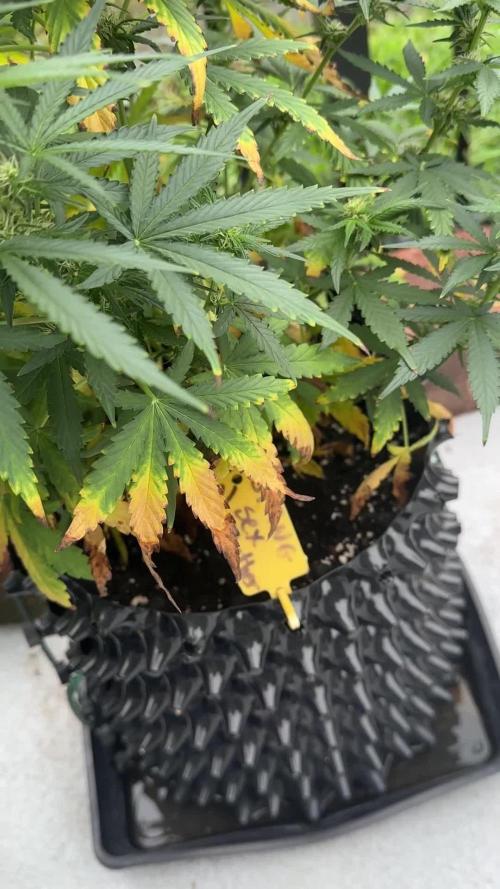
She needed the cooler weather outside and a break from my nutrients I think. She looks a hot mess with all of her yellow leaves, so I defoliated all the ugly ones so she could regain her youth appearance.
It rained a little last night and I included a picture of the the rain water in a measuring cup to show how much it rained. Hopefully, I can correct whatever I am doing wrong and we can continue with a healthy grow. The plan is to turn the air condition on and cool the grow tents environment.
@STRNG seeds Sex Panther is till growing by adding 2 inches to her height and flowering beautifully. We are in our 2nd week of flowering!
@STRNG seeds website says it should be indoor height between 100-120cm. We are currently at 55 cm so we are a little short right now but that could be because it is too hot in the grow tent.
Her buds are beautiful and she looks great. Until next week, Be happy. Likes and comments are always appreciated.


Likes
15
Share


@Shizzlemanizzle
Follow
Been away couple of days
Day 74
Came back and the lady’s exploded. Dropped down the nutrients since day 60 and started flushing on day 68. I’m waiting for the plants to get brown trichomes. But all in all I’m happy if I don’t fuck it up somehow
Day 77
Flushed yesterday the last time. Ppm was 400. Will chop them on day 84, if nothing special happens this is the last Post until before chopping them.
THANK YOU ALL FOR YOUR TIPpS AND YOUR OPINION YOU GUYS ARE GREAT!!!! Happy Growing to everyone !


Likes
104
Share


@SmokingTiki
Follow
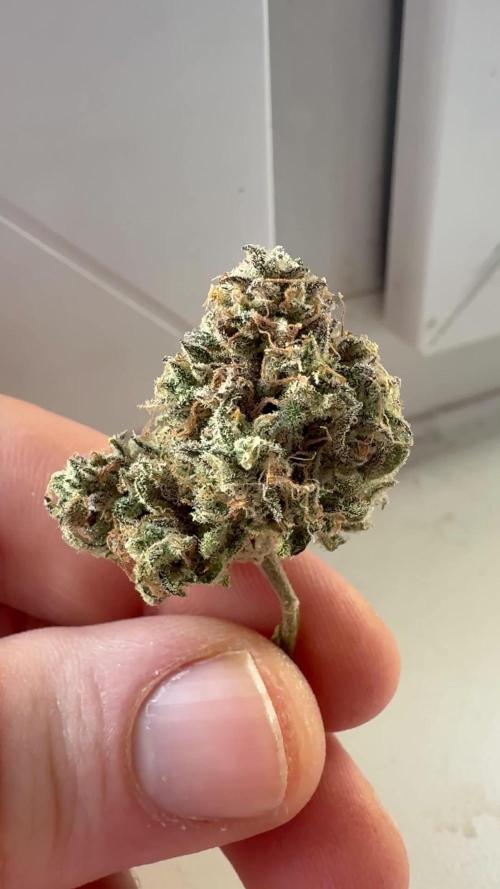
- The trichomes photos have been taken just before the harvest.
- Drying was made at 20°C and around 50% of humidity (4 days).
- Humidity in jar around 62% on the first day, temperature around 21°C.
Veg time : 56 days
Flowering time : 68 days
Total time from seed to harvest : 130 days
Height : 80cm
Pot size : 26l

Likes
4
Share


@Chlavchalash
Follow
we have nici branching and flowering. The plant didnt need an nutrients beacause it is in perfect soil. Still growing wider and higher, beatiful sativa plant. The smell is very exotic, like citrusy, gasy like. Mabye in 3-4 weeks we will have one plant done.

Likes
Comments
Share


Likes
Comments
Share


@The_Lonely_Farmer
Follow
So I received some fastflowering testers from the amazing fastbuds I cannot wait for these girls too show themselves and start growing 🌱
Thank you so much too the fastbuds team I'm very excited too see what they become 🤞 👀🙏
I have not yet decided which nutrients too use between shogun and aptus but I may use both let's see.
hope you will feel comfortable too advise as I go along any comments are welcome.
Any aptus nutrients users please feel free on giving tips as I think I will be using aptus
Stay blessed growmies 🙏🌱💚
Likes
5
Share


@jahredi
Follow
I was under watering quite a bit in an attempt to make sure I didn’t flush out the benes and nutrients of the super soil. Ironically, I might have killed all the benes. Lol.
Either way, they’re getting about 1 gal every other day now. Growing strong.
This plant got some of the most thrip damage. It also had some really strange early growth.
It looks about a week or so behind the other two autos that I planted at the same time...
Just did another spinosad treatment. I haven’t seen any more thrips in the greenhouse since the first treatment 10 or so days ago. Saw a leaf hopper in there though 😡

Likes
1
Share


@DTHGenetics
Follow
The funky one has the biggest new growths coming out of the nodes this is week 6 some ph damage from acccaidental un Ph neem mix that I use I forgot to ph but that was about right after the begging of week 5 doing good now looking less ph burned and the new growths are getting big . Garlic fusion on the left of setup

Processing
Likes
75
Share


@Dedon
Follow
Hi everyone ! 😀
Everything is ok, no disease, no carrency. but 2 ladies don't want to stretch a lot :/ ( the 2 on the corner, bottom left and Top right ) i don't know why. maybe it's the variety. i have 4 Skunk XL and 2 Critical. Maybe these 2 are the critical ( yes i lost them when i plant the seed 😩 ... )
No more pH fluctuation ( i love that )
EC is around 1.9/2.0 and increase to 2.1/2.2 when they drink a lot so i add water with 1.7 ec to decrease it to 1.9/2.0 again
I added 30L of water since i changed the water ( 2 tanks * 20L / i change it the 11/05/18 ) so i'm gonna change the whole solution during the week.
See you next week !
Likes
36
Share


@TaterheadJohnson
Follow
7/7: Transplanted plant to final pot! Roots showed out of tray. Accidentally pulled a root off during transplant 😢.
After transplant I top feed/watered medium with a half gallon of treated water. I mixed 2ml of Rapid Start in 1 gallon water hub. Poured half in half gallon jug then poured half gallon over medium. Added 2 gallons of water into reservoir (1st white line) to promote root growth to bottom and to begin capillary reaction.
7/8: Bumped light intensity dimmer to 30%.
7/9: Left for Vacation.... Praying for my baby!🙏🏿 Going to be gone for 4 days. 😅
***** For this Grow******
“Day Air Temperature” will be the max temp of tent for the week.
“Substrate Temperature” will be the average temp of tent for the week.
“Night Air Temperature” will be the lowest temp of the tent for the week.
Processing
Likes
8
Share


@GrownwithLED
Follow
This is a test-grow of Barbarian, a cross of AK-47 from Serious Seeds with Barbara Bud from from House of the Great Gardener (HotGG) made by Mat, the head-breeder of HotGG, in Canada. I had the honor of getting three test seeds at the Cultiva-Tradeshow in Austria and could not wait to start them after I got home. The two test-plants were grown on soil under HPS and alongside my normal grow of AK-47 plants inside a big Secret Jardin tent and fed with Advanced nutrients.
Likes
24
Share


@NuttyYeti
Follow
She seems ready! Smells so good like pineapple and diesel but also fruit punch. I'm excited to try it! 💚🌱✌️
Likes
10
Share


@Kush_T_Big_Nugz
Follow
Bang on the start of week 5. Snow flurry are not looking too bad, there structure on I think 4 or 5 are decent. There’s 1 mutant that I’m just gonna let do it’s thing.
There short, stout and bushy, quite tricky to Train, as the branches are thick and rock hard, definitely slow in veg as they will be in flower, hopefully it will be worth the wait!!! ✌️🏼
Likes
31
Share


@MrRaid
Follow
Hello everyone my 5x5 grow is starting and here's the details 🍻👍
7x 11l pruning pots/1x airport 10l
Soil: Bio Bizz light mix
Nutrients: Sensi Bloom A&B, Terpinator, overdrive, carbo voodoo juice and maybe some rhino skin
Light: Spider Farmer 4000 Heard good things
about it
Tent: 5x5 BudBox
Water supply: tap water I let sit for 24 hours
Ventilation: 8ich ram fan was gonna get the stealth phresh but yeh got a pillow wrapped on it to reduce noise using 8inchto12inch carbon filter and a 16ich standing fan on day 19 I will be adding 2x co2 bags 🍻🍻🍻 that's basically everything oh my ph stays at 6.5 👍💪🍄
13th December 2019
All 8 seeds sprouted
Plain water ph to 6.3
One of my watering was abit highPH as I didnt check the ph but hasn't done any harm my expectations for this grow realistically I should easy get 20oz of dence buds but I would be happy and content with 17oz but this light I'm using is the best I've ever used very expensive to me £500 for 1 light I know theres more expensive but this is a upgrade for me considering I was using Mars hydro 300 and cheap cheap China led my ak47 grow was done with really bad lights and it looks like it didn't yeild that bad I had to throw my BlackBerry kush and stardawg in the tent hope they dont take to much room lol ik these cookies are gonna grow nice and big under that light 🥂

