Likes
Comments
Share
@Jabbamo
Follow
_______________________________________________________ Mo. 9.3. - 3 Liter pro Pflanze gegossen (ca. 200ml Drain) 1,2 ml / Liter "Calmag" 1,0 ml / Liter "Bio Grow" 3,0 ml / Liter "Bio Bloom" 1,0 ml / Liter "Top Max" Ph 6,3 / 600 ppm _______________________________________________________ Di. 10.3. - Luftentfeuchter in der Dunkelphase AN (45% / Low / Auto) _______________________________________________________ Fr. 13.3. - 3 Liter pro Pflanze gegossen (ca. 200ml Drain) 1,2 ml / Liter "Calmag" 1,0 ml / Liter "Bio Grow" 3,3 ml / Liter "Bio Bloom" 1,1 ml / Liter "Top Max" Ph 6,3 / 615 ppm _______________________________________________________
Processing
Likes
43
Share
the left "nemo" is much further along than "v" on the right. began tapering back on both nutrients, after this last compost tea feed nemo is getting flushed, just RO water and finish by heavy 16. V needs another week to develop then 2 weeks to flush and finish. will probably chop nemp im 2 weeks between day 67-70 of flower, based on trichome color. after initial harvest on nemos tops im going to re-weave "v" tops thru scrog fpr better airflow, light use and allow them to fill and finish with the lower buds of nemo at probably day 77 or so, its slower rolling, much more haze pheno, both leaf shape, bud structure and smell. Nemo is much more blueberry, finishing sooner, smells like blueberry candy and has wider fan leafs.
Likes
8
Share
@Chubbs
Follow
420 Fastbuds Week 3 Cherry Cola Auto This week I decided to do a major defoliation taking off all the bigger fan leafs. This way the lower branches can get a little more light. All in all they seem to be bouncing back OK from it besides being some what droppy but usually after the lights are on for an hour they perk right back up.
Likes
28
Share
@Go4Gav
Follow
Had to trim a little early because of a last minute holiday but got her done .. 16 hours of it 🤦 .. Some massive long buds on them .. rather easy to trim because effort was put in before hand deleafing an tidying up Time will tel now 🤗😁
Likes
15
Share
Likes
290
Share
@Ferenc
Follow
Did she start flowering ? Usually I see the same with pheno ants when I switch off the light for 36 hours to start flowering and after the top is light green. This is how flowering starts. I am not sure about her ? Weather is shit anyways....
Likes
3
Share
Last week of flushing and next week we harvest 😁
Likes
9
Share
they growing healthy, up to the light! 😎 nothing interesting yet... Healthy and evolving plants 😍 added some nettle solution 😅 organic 😋 probably will grow very vigorous until the next next 2 weeks, hope i won't have any problems with them 💪 see you soon!
Likes
175
Share
Day 64 Flower (Day 106) Today is the first day of the 10th week of flower and I put on a powerful headlight and some magnifying glasses and closely inspected the right girl during the dark period, so the colors from the grow lights didn't fool me. Unfortunately, I found another couple of buds with bud rot. Soon I'll have to decide to harvest the plant now and cut my losses even though she isn't done, or I'll take my chances and let her go a while longer. I turned up my extraction fan, installed another circulation fan, and ordered a dehumidifier that will arrive tomorrow. I'm hoping that all those measures will bring down the humidity in the tent (unfortunately, I can't do anything about the temps) and prevent further rot. I will let her go another few days and see if any additional rot pops up. Fingers crossed that it won't. The left girl is just doing her thing, but it doesn't look like she will fatten her buds. I guess all that stress in the tiny tent was too much for her. No matter what the result of this grow will be, it certainly has been a great learning experience. Day 65 Flower (Day 107) Things are looking good for the right girl as I haven't found any more bud rot yet. Turning up the extraction fan certainly helped, not only with the humidity but also the temperature dropped. Not by a huge amount, but I'll take whatever improvement I can get. Today the dehumidifier arrived as well, and I put it in the tent right away. The humidity in the tent has now dropped from the high 60s to a much more suitable mid-40s, and I hope this will be enough together with additional air circulation to prevent any further rot. I looked a bit closer at the trichomes today and found that most have gone cloudy, and I finally found some amber ones (about damn time!). I'm aiming for around 20-25% amber in this harvest as I'm hoping for a relatively "heavy" smoke - one of those frying-pan-to-the-head kinds of smokes suitable for late nights. Day 66 Flower (Day 108) Still no signs of more bud rot. Fingers crossed All I did today was to mix up some more nematodes in water and then feed each girl with 3 liters of it at ph 6.4. I'm not sure it was necessary for my main tent as the fungus gnats seem to have died out by themselves. I put in a new yellow sticky trap yesterday, but it was still empty today, and many dead gnats were lying on the tent floor. I have no real idea why, as I don't use any pesticides, but maybe the gnats really don't like this new low humidity in the tent. In any case, I'm just happy that the little buggers are gone. Day 67 Flower (Day 109) The bud rot is still staying away, and I'm getting hopeful that it will stay gone. All I did today was to give the right girl 3 liters of pH 6.4 water. She was a bit thirsty as I had the irrigation turned off for a couple of days due to the nematodes I gave them yesterday. I've now turned on the system in each tent and will just cruise along until harvest. The girls are already way over time, but most trichomes are cloudy, and I've started to see some amber here and there. Although, not much of a fade so far. Day 68 Flower (Day 110) All I did today was snap a couple of pics. It's all just a waiting game at this point, and I hope it won't take that much longer. I'm ready to cut the girls down and have some time off before the next season is here. I plan to grow a couple of photo CBD girls in my main tent and maybe an auto in my smaller tent. We'll see. But yeah, first, the current grow must come to an end. It looks like the left girl is starting to get her fade on, so there's that at least. I didn't bother looking at the trichomes today, but I'll have another look in a day or two. Day 69 Flower (Day 111) I didn't do a single thing with the girls today except snapping a couple of pics. What I did, though, was to make a smoke test of the right girl. Let me explain: Earlier this week, I had to cut off four buds due to bud rot. Out of those four buds, I saved two small tops after trimming off all rot (as well as plenty more just to be safe). I left those tops on the tent floor, where they dried in only a few days, and yesterday I decided to try a smoke. Naturally, I can't say anything about taste as this weed is dried the worst way possible: fast, hot, and in the light. On top of that, it's not cured either. That being said, holy smokes, batman! This stuff kicks like a mule, which is why I didn't post this last night already. I was too stoned to care. Precisely the effect I was hoping for from this harvest: properly stoned and incredibly lazy. Boom! Day 70 Flower (Day 112) Today was the last day of week 10 of flower. Not much exciting is happening this late in flower, so it is primarily a waiting game at this point. I did remove the irrigation system from the left girl and will hand water her instead. That cheap system I had was too erratic, and I'm better off without it. Plus, I hope that she will be done soon-ish. She will never win a beauty contest due to her scraggly foxtail flowers, but I'm still happy to get something from her considering all the stress she went through. The right girl has been doing fine all week, and no other bud rot has been seen since I fixed her environment. I rechecked the trichomes today, and still hardly any amber in either girl. I'll let them go for another week, but then it is time for the chopping block. This grow already went a lot longer than planned initially, and it is time to bring it to a close soon.
Likes
16
Share
🍼Greenhouse Feeding BioGrow & Bio Enhancer ⛺️MARSHYDRO The ⛺️ has a small door 🚪 on the sides which is useful for mid section groom room work. 🤩 ☀️ MARSHYDRO FC 3000 LED 300W ☀️Also special thanks to VIPERSPECTRA P2000 (200W) & XS2000(240w) LED growlights 🌱 DUTCH HEADSHOP SEEDS: www.dutch-headshop.eu www.dutch-headshop.nl ONE STOP SHOP . 100% germination success on first try! with HUGE seed selection! . Very friendly customer service . Best bio-seed packaging . Sells other products @ best prices: . Nutrients . Vaporizers . Smoking accessories (grinders, cones) . CBD Tinctures . Resin Extracts . Boveda humidity packs . Ziplock bags . Other health supplements such as: . Lion’s Mane Organic Capsules . Hemp Seed coffee
Likes
61
Share
Hello present and future growmies! Welcome to the start of week 9 for Queen Citronella. First things first, please go and check week 8, I update daily and the week is now complete. Day 57: Her majesty is parched and so overgrown in her space that I've decided to give her a haircut. It will hopefully make her easier to move about too. I've fertigated 10l today and performed LST adjustments and significant defoliation. Made a little collage to show the training I did. Day 58: Tried to colour correct photos. Any good? Day 60: Disaster! SOMETHING has gone horribly wrong! The Queen is unwell and now I shall try to figure out why. It seems like heat stress but I don't get how. Alright I think it is heat stress but I am not sure how, the temp hasn't gone above 26 degrees to my knowledge. Two things have changed this week first my house has been about 3 degrees warmer, and second I switched the main tent to 20 hours. I wonder if the additional time and the extra heat in the house has caused it to get too high. I have opened a flap at the side of her tent, and I am going to drop the light in the main tent down to 19h. As well as this I am now leaving a window open when the lights are on. Hopefully I can stop it getting worse but it is all over the plant. :( Okay soI think I have caused nute tox/shock - specifically I think what happened was an accidental big overdose of CalMag raising the EC too high. These symptoms came on way too fast to be a simple deficiency or lock out, and the PH wasn't so far off as to cause these issues. I've treble checked and the temp hasn't exceeded 26 degrees, nor dropped below 17. I flushed her through with PH water today approx 40 litres - until runoff was clear and correct PH. I am not going to nute her for a day or two. Day 62: I have ordered the queen a new tent. 75 x 75 x 200. She's still asleep at the moment but I'll photo her later. She's really taken a hammering from, what I now believe is, nutrient toxicity. Day 62: Her majesty is looking much revived compared with the last few days. I THINK she will be ok. I've made a video assessing the damage. Ouch. Sorry your majesty, please not off with my head! Day 63: Alright I have a new tent for her majesty arriving next week and I've new airflow for the main tent. She seems to have recovered from the burn and is stretching again. End of week summary: First big mistake and first serious issues for Citronella. Sorry about that. However she has now recovered and is growing again. I cannot undo the damage but I think I have halted any further damage. Let's see what happens next week.
Likes
7
Share
@Dairon
Follow
Buenas a todos!! Ya las he pasado al armario donde estarán hasta la cosecha, en este armario hay más espacio y más w de luz, en este hay 300w, lo hago así para ahorrar energía, pues es ahora a partir de la 4º semana de floración cuando va necesitando más lúmenes para engordar los cogollos. Más tarde cuando finalice la 5º semana también pongo una luz UV para que generen más resina. Como veis ahora están más separadas, por lo que correra mejor el aire entre ellas, pero para asegurarme de que no aparezcan hongos lo mejor es prevenir y usar Leaf Coat pulverizando vuestras plantas desde que lo uso no he visto ni bichos ni hongos. Voy aumentando La EC poco a poco, el PH lo mantengo a 6.3 pero lo subiré a 6.5 a lo largo de esta semana, voy alternando un riego con nutrientes, uno con agua solo a 0.45EC Plantas con una buena forma, buenisima distancia internodal, el único fallo es que el tallo es débil, por lo que tendré que poner tutores en el proximo riego aprovechando que está blando el sustrato, ya mismo se empiezan a ver los cogollos!! Saludos!!😃
Likes
11
Share
These girls where a joy to grow and even more of a joy to smoke! It really is a weed that has delivered in every department the colour, the smell, the taste, the yeilds. I'm off to binge watch prime and order an obscene amount of takeaways 👋🏻✌️🏻
Likes
55
Share
High GD community Week 16, Zuchinis all around, tomatoes getting ready on a daily. Cucumbers are getting almost mature proportions. Everything going well. Terra preta Location: center perma garden Surface: 125cm x 105cm Depth: 115cm The hole was dug out over 3 days, it were very sunny days. 😅 Theres mostly loamsand with a small sandloam bottom that was very hard. The sand was also very compressed and hard. The top layer is this grey dusty soil of about 40cm deep. At the bottom theres pure sand thats soft, easy drainable. First step is to fill up the entire bottom with fine chopped wood, progressively using bigger pieces of wood. I try to use some hardwood like oak to for its extra K (potassium = pot ash). A bit of charcoal to. This will take the entire first day, bcs it needs to have a minimal ticknes of pure ashes of around 5cm. Otherwise, after compressing it with the upcoming layers, the ash-line would almost disappear. Not all the wood needs to be burned entirely. Its a first layer with lots of N and K. Bones can be used to in the fire making the NPK complete. But it can be added also as a separated layer. I dont have that much bone material because my 2 dogs, or eating, or burry them somewere. Little warning at the end, be aware of your local laws applied to open fires. 😅😉 After a good burn ive got between 8 and 12cm of ashes in total over the entire surface. A small layer of soil (5cm) is put on top of that. Theres no need to harden out that layer, pressure will to the work and the layers will compress over time into ideal circumstances. On to the next layer!! Next is a layer of the compost, but the part that isnt allready decomposed. Its green/brown/yellow of color. And a bit of everything, grass, weeds, leafs and some thin branches. Another layer soil to cover that up. Now i formed a thin layer of chopped(10mm) wood(beech), just enough to make a thin,almost 1 piece high, layer. On to this i added a complete wheelbarrel of compost(black) with small pieces of still not completly decomposed materials. Lots of worms here. On that, you guessed it, an other layer of soil. I try to have both types of soil in that mix, the almost pure sand and the more grey type. Next, back to the beech. This time the rest of the bag follows. Theres a good layer of around 3cm deep. On this ive layed down some new small woodsticks to make a small fire again. Starting at the center and adding some last branches i found. It turned out really smoky!! Half way the burn ive opend the core of the fire, trying to spread the small pieces of char over the complete surface. After that, i added for the first time some water here. And an other layer of soil again, this is just covering up each time. Max 5cm!! Now we are at the upper half of the pit. Still 50cm to go. Now ive added some compost again, the green/brown/yellow one, with on top of that, a 15 liter bucket with compressed bokashi fermentated kitchen leftovers. Making a layer out of that and some fresh bokashi juice with 10 liters of water to drain those benificial bacteria into to compost layer just underneath it. This layer is almost 20cm tick. Again, yeah, soil, 5cm. Ive bought some blond peat to at to to toplayers. Last 25 to 30cm of soil, is a mix of the peat(20%) and the two other types of soil. First ill do tiny layers of each, last 10cm i try to mix it. And to finish the job, ive took some 100% reused and composed soil with some perlite in it from past use. I havent watered a lot, but the meteo predicts a good amount of water in the upcoming days. The soil that stayed and didnt get back to its original place, ive used to make a new top layer on the rest of the mini field. I havent used clay because it was hard to find or just to expensive. Beside the peat(250l), i didnt buy anything. So its labor intensive, but real cheap. If you dont get a sanction by the community ofcours! 😅😅😅 Feel free to comment and give your toughts. 🙏🌿🌿🌿🙏 Thats it for this week boys and girls, Thanks for reading and passing by and 💚💚💚👏👏👏👍👍👍 for Marshydro leds. Quality/price top! Grow safe buds and feel free to check out my other ladies doing fine thanks! 🙏🌿🌿🌿🙏 Weedseedsexpress!!!! 👏👏👏 LarfxWSE for discount at weedseedsexpress!!! 15% off!!! Zamnesia!!! 👽👽👽 Add OrganicLarF as a code when buying your own MarsHydro LED light and get a nice reduction!!!👽🚀🛸
Likes
16
Share
@GutterHoe
Follow
So as the week ends and I draw closer to harvest(10 weeks of flower 17 in all) of my first ever grow I trimmed dried and smoked a bottom bud that was wasting nutes. Jesus God in heaven it's got a kick already. Send me a like! Make a comment. I'm here alot.
Likes
Comments
Share
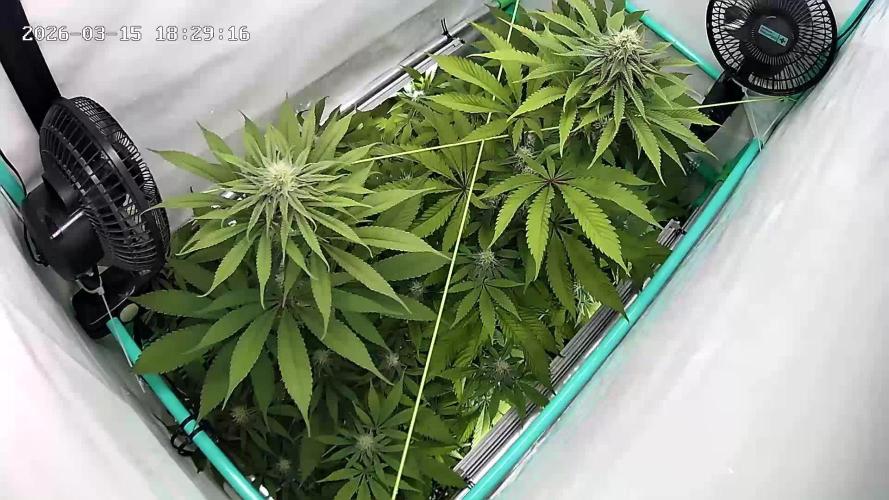
The ladies have grown really tall. All the plants are still in the stretch and are doing really well. I have added another layer of compost and a layer of grass clippings for mulch. I will sort them out with some fresh food this weekend as the first leaves are starting to turn a bit yellow. Bud development is good and the ladies are dealing with the colder temperatures well. The weather is supposed to get warmer again. I think they will get another boost soon and will enjoy a fresh feeding. Happy growing.
Likes
15
Share
~ FASTBUDS TESTER #2201 ~ Well friends, here we go on another 'canna-venture' together! The grow room has had a complete remodel and some upgrades done to it including brand spanking new 4x8 and 4x4 tents and a Trolmaster Hydro X controller along with a new Control Panel. This tester strain is one of six tester strains that FastBuds has graciously provided me with and I'm looking forward to seeing what this girl has to offer when she's grown to her full potential! One drawback of 'testers' is I have little to no information on it other than its number and that it's an autoflower... 🤪 But, it's ALWAYS a blast growing them for me because not knowing a lot allows me to just concentrate on the essentials: Light, Environment, Water, Nutrients and possibly a bit of LST... not complicated, just basics like keeping a constant temperature and RH in the tent at a level that gives a good VPD, watering when almost dry and maintaining proper light levels according to their stage of growth. ____________________________________________________________________________________________________________________________________________________________________________________________________________________________________________________________________________________________________________________________________________________________________________________________________________________________________________________ ~THE SETUP~ ~Initially seeds were lightly scuffed, then soaked for 3 hours in 78℉ distilled water after which they were transferred to moist paper towels laid out in a Jiffy Pellet plastic starter tray with lid. Underneath the tray was placed a Mars Hydro Heat Mat with Controller that was set to 78℉ where they stayed until their tap roots emerged. ~Planted into Jiffy Peat Pellets that were hydrated with distilled water warmed to 78℉ with a 7.0 ph. ~Once roots emerge from the Jiffy Pellet they're transferred to their fabric pots. ~Grown 100% organic in a 4g Gronest fabric pot and a 3g fabric pot by Wraxly filled with Mother Earth 70/30 Coco/Perlite medium and initially amended with Dr. Earth 4-4-4 / Earthworm Castings / Dr. Earth Flower Girl 3-9-4 and Coast of Maine Stonington Blend Organic Plant Food 5-2-4. ~19/5 light cycle for the entire run with supplemental UVA added during flower. Lights are controlled by a Trolmaster Hydro X controller set for a 15min Sunrise/Sunset simulation. ~Top dressing every 3-4 weeks with slow release dry amendments and Earthworm castings. ~Straight water ph'd @ 6.2-6.8 when needed and bi-weekly Compost Tea's. ____________________________________________________________________________________________________________________________________________________________________________________________________________________________________________________________________________________________________________________________________________________________________________________________________________________________________________________ Weekly Updates: 12/15- Here we go into the second week of veg for the FastBuds Tester #2201 girl and she's certainly on a roll! When I checked on her today her medium was still moist so I'll let her go and check her tomorrow. Basically at this point in the run all I have to do is make sure her medium doesn't dry out, fill the humidifier and watch her grow! 🤩 12/17- Yesterday I watered her and increased the amount to roughly 0.25g of de-chlorinated water with 3ml/g of Botanicare Silica Blast (added to begin to help strengthen her branches) and then ph'd to 6.4 @ 74℉. I've also increased the output of the HLG 650R's to 35% which equates to about 230w at the wall which, of course has raised the temp's in the tent so I've also begun to run the A/C unit in the grow room which is keeping the temp's now at 75℉ in the tent. The RH is running around 75-78% RH giving a VPD of .67-.74 which I'll take! 😁👍 Other than what I've mentioned above, all I did was fill the humidifier with distilled water and watched her grow! 🤩 12/19- Today I watered her with 0.25g of de-chlorinated water with 3ml/g Fish Head Farms Fish Sh!t and 1 tsp/g Unsulfured Molasses added which was ph'd to 6.3 @ 74℉. I'm now watering through the bottom, filling the drip pan and letting the plant draw up the water into itself. I am also watering from the top, but only just enough to moisten the medium. She is really starting to take off now, a sure sign her roots are beginning to get well developed, and I'm thinking of going ahead and topping her in the next day or so. 12/21- Well, yesterday I went ahead and topped this girl! Hopefully she won't stress out over this and starts shooting out those secondary branches. Today I watered her with 0.25g of straight de-chlorinated water which was ph'd to 6.3 @ 74℉. I gave about 3/4 of it into her drip pan so she can draw it up into her medium, the rest I applied to the top of the medium just to moisten it. Well there's two weeks of veg behind us now, Week Three of vegetation is beginning and she should really start to take off! 😍👍 😎💚 Thank you for checking out my passion in life! Please visit as often as you wish and I hope you enjoy this journey as much as I know I will! Grow Strong! 💪😎🤙

Likes
4
Share
@Ryno1990
Follow
The Rhino Ryder from @fastbuds is coming along really nice starting to get some buds popping up all over the Strawberry gorilla from @fastbuds is starting to come back from it being stunted for some reason think it mite of been locked out because she definitely doesn't need nutrients that much had to cut her feedings in half to stop nutrient burn
Likes
1
Share
@TTerpz
Follow
Start of week 6 7/25/25 Fed with nutrients: 7/25/25 Fed with nutrients 7/30/25
Likes
27
Share
I'm not sure why but those amber trichomes elude me. I have been waiting patiently but these ladies are still sitting at low amber and mostly cloudy. I'll be harvesting next week so I can get ready for my next run! I'll try to post on time, but I've got a lot of work ahead of me. Thanks for the read and take care!
Likes
8
Share
Last week of growing started, we will switch to flowering at the end of the week. Nothing special was done, simply water as all had seaweed and biogrow already, during flower we will only add some extra PK and some sugars and it should be more than enough!