
Likes
Comments
Share

@all_about_420
Follow
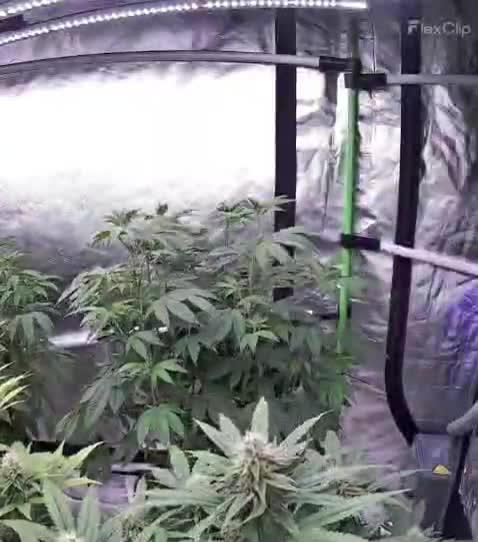
Momentan fokussiert sich die Naughty Dawg vollständig auf die Endreife ihrer Fruchtstände. Die Triebspitzen sind mittlerweile so schwer, dass sie ohne mechanische Hilfe kaum noch aufrecht stehen würden. Ein Blick auf die Details zeigt eine beeindruckende Harzentwicklung: Die Trichome überziehen die Kelchblätter in einer dichten, klebrigen Schicht, während die Buds stetig an Umfang gewinnen. Das tiefe Chlorophyll-Grün des Blattwerks bleibt stabil und versorgt die schweren Köpfe optimal. Geruchlich wird es jetzt richtig ernst – die scharfen Gas-Noten paaren sich mit einem schweren Moschus-Aroma zu einem intensiven Bouquet. Es ist faszinierend zu sehen, wie dieser unbändige Teil meines Gartens nun die Zielgerade ansteuert.


Likes
209
Share


@BioBuds
Follow
At the beginning of this week, I have been fighting the gnats, which are less and less now. Just some watering and gradually lowering the light and going to full power. The Orange Hill Special has been filling out great and I must say, she is a pretty plant. With some manual bending and super cropping, I'm bending the longer stalks sideways and we are off. What I actually do is more of an intuitive hybrid between mainlining (where I bend the whole plant 90 degrees at the third week), LST (where I bend branches outward slightly, without tying), HST / Super crop (where I bend the stems 90 degrees with the clips or manually), after which I keep bending outward to SOG and, put the net over to end in SCROG.
This same method gave me the canopy in my prize-winning Gelato 33 grow. Check it out if you haven't seen it, it was my first experimental accident that led to beta test of Super Soil mixture 0.7, now we are at Alpha version 1.00 and testing great so far if I say so myself. I haven't seen such lush greens in my own grows, only outdoor. They seem uber-healthy and resilient, with very sturdy stems and leaves. Way more resilient than previous strains I tested in the beta soil.
The light is performing, the natural color of it makes everything pop. Mars Hydro has a winner with the SP-3000. Check out their site: www.mars-hydro.com
Thank you @MarsHydroLED for letting me test it, hook them up for a great deal or info on their products!
Halfway through this week, I took the clips out, AND...... we switched them to go into flowering. After a day the stretch is already visible. I had to bend them again after a couple of days. Now we have almost a tent filling foundation for a maximum result canopy of buds.
I was wanting to amend the soil with flowering additions (see recipe in yellow image), but I'm holding it off for two reasons. A/ The leaves are still so green and lush, I think there is an abundance of nutes. B/ @Haoss mentions his suspicions on his OHS grow (@#CannapediaProGrowersCup Orange Hill that very sadly went hermie on him) that nutrition in this phase could have had an influence, after asking what happened to him. I would have loved to see that grow to full harvest. But it makes me a bit cautious. if Haoss (whom I consider to be one of the star growers here) couldn't prevent this, what chance have I?
I'm waiting until the girls start asking for nutrients. They'll show me what they need in their own time. For now this soil is the shizzle (also quite literally) and Im happy with how everything is going. I remember much more hassle and steering in the last grow. This grow, even the Gorilla runt seems happy.
I now water them 3 liters of water / Perma tea mixture every 4 days, every 3rd watering I don't do the tea. This makes for fewer gnats and this soil seems to hold water nicely, also due to the hydro corn.
What I like is there is always some unforeseen circumstance, a tilt of the tables, some battle to be fought which delivers in big harvests or, in worst case, no harvest at all. It makes it more exciting, when your heart is at stake, we pour a lot of love and attention in the ladies.
So with hopes, but not too high, we go into flowering. Thank you all for joining me again in this Orange adventure! I hope you all had great weeks, germed seeds, extreme growth and buds bursting with trichomes!! See you next week!
Hug Bud
PS Sunshine made her first appearance, as she promised on the Gelato 33 grow. She is still a bit camera shy, so her digital alter makes an appearance first, if you all want to see more of her and my other helpers, let me know in the comments. Sunshine will make a real appearance if yall are real nice to her.


Processing
Likes
5
Share


@Ganjagrandaddy
Follow
Day 28: Happy days folks. hope we are all well and sane still.
This week has been a good week for node stacking and starting her frost making it seems. She is a great size to work with now and has responded well to the stripping out of the lower larf and leaf. The airflow is perfect below decks now and allows air to move through the whole canopy and also light to make it through. Her buds are showing her Gelato 41 genetics with their appearance and are identical to the white flame like pistils. She is giving a slight terpene of sweetness and a little diesel too. Her stripping out had my fingers feeling a nice tacky , oily feel to them so she is certainly starting to nurture the budlets. Their golfball appearance is swelling daily and seeing how lose they are to joining up already , holds hope for some long chunky colas. She is approx 3ft now and a good circumference to her too. It is a safe assumption to think she will go the full 11 weeks flowering based on her parentage. The cross of these two strains is so far producing a perfect sized plant for my room and has given me the confidence to dabble in this area in the future I think. Gorilla Zkittelz/Blue Gelato41 is a good X and I know from another seed popped by a friend that Gelato41/Hulkberry creates a 5ft cola'ed monster plant. ( pic in my photos) and I still have crosses of Gelato41 and Cookie Kush , Gelato41 and Phantom O.g , Gelato41 and Orange Sherbet to run !!. I am fortunate to have a lot of these new beans now but I also have some amazing sponsored genetics running and some exciting testers still to do ( 9 more fast flowering strains to put through the wringer and try to identify !.lol) . Well that's another week down and only 7 to go for her. !!!!!!! she has a lot of big stacking buds growing time left. WATCH THIS SPACE !!!!!.
Be safe people.
Likes
16
Share


@Andres
Follow
I would believe this variety again ... I think it could be better ... and do not make some mistakes in it ... I recommend it to all growers ...

Likes
4
Share

@XanHalen
Follow
Chopped, saturated plants with diluted H2O2/water (1tbsp/500ml) with a spray bottle, and then Bud-washed the plants whole like normal in plain dechlorinated tap water at 75F for 20-25 seconds, then hung whole in the drying tent, conditions are 63-67f, 50-60% RH, intake and exhaust @ 50% with circulation fan inside the ⛺️
Until next time growmies! ✌️
Likes
16
Share


@Ensign420
Follow
Introduction - Week 14|07 Summary -
Ensign's log, stardate 9437.65,
Great week of growing! Wow what a good week!
Growth in the main tent has all around been incredible!
Submitted my first submission to the Global Grow Cup! Filmed a video of the solo cup container (marked with the ticket/order number) that will be used for the competition. Also had to fill and prove the solo cup holds 2 cups of soil. Now I need to root a clone (for the first time), transplant her into this cup, and submit my 2nd entry before the 30th of this month.
As far as my first attempt at cloning, have already begun the rooting process! Managed to take cuttings from 3 out of the 6 phenos in the main tent (the first cutting was also my first time topping). Soaked the cuttings for two days before planting them into Coco Coins. So far everything has gone surprisingly well! The clones are now rooting under the propagation dome with the vents fully closed. Will check for roots soon!
At the end of the week, growth was just raging! Was planning on flipping to flower in a week, but decided to begin the first week of flower next week! Thus this is the last week of veg. Plan to flip to 12/12 next Monday!
Onwards to next week!
[START OF WEEK 14|07]
==========================================================
Garlic Budder #1 - WEEK 14|07 - Full Veg Wk5
Garlic Budder #2 - WEEK 14|07 - Full Veg Wk2
Garlic Budder #3 - WEEK 07 - Full Veg Wk5
Garlic Budder #4 - WEEK 06 - Full Veg Wk4
06/03/24 → 06/09/24
This Week's Estimated Goals
----------------------------------------------------------------------------------------------
DLI: ~26 mol/m²/d
PPFD: ~400 μmol/m²/s
VPD: ~1.0 kPa
This Week's Meter Readings & Averages [Lights On: 16:00 - 10:00]
----------------------------------------------------------------------------------------------
DLI: 24.56 mol/m²/d
PPFD: 379 μmol/m²/s
VPD: 0.91 kPa
Soil %: [32.7, 37.6, 37.9, 34.1]
==========================================================
Day 01 - Monday - 06/03/24 - Total Days: 098
-----------------------------------
Daily Averages [~23:00]
- Temps: 80.7°F [27.1°C]
- Humidity: 74.4%
- VPD: 0.90 kPa
- Soil %: [31, 34, 39, 35]
-----------------------------------
- [09:57]: Quick morning check!
--- #1 is looking a bit droopy, but almost lights off (at 10:00) so not concerned.
--- Nice! Mainly wanted to check on #4 and she is looking great! She’s perked back up and looking good!
- [23:08]: Evening check.
--- Wow! It’s a jungle in here!
--- #1 has gotten too big? Nah!? Keep on growing girl!
--- #2 is growing and definitely getting bigger! Growth just looking really weird.
--- #3 has continued to get larger and is looking quite uniform in growth!
--- #4 is growing and looking perky again!
--- Even the original #1 and #2 phenos (in the back) are looking good!
--- Wow! #4 is really getting close to the light.
- [23:14]: Checked down both fill tubes.
--- Both reservoirs were completely dry!
- [23:27]: Checked the Ecowitt soil moisture sensor data:
--- 30% - [CH01 EB1 - Garlic Budder #1]
--- 34% - [CH02 EB2 - Garlic Budder #2]
--- 39% - [CH03 GFP - Garlic Budder #3]
--- 32% - [CH04 FPT - Garlic Budder #4]
- [23:32]: Poured 4 cups of distilled water down EB1’s fill tube.
--- Poured 2 cups of distilled water down EB2’s fill tube.
- [23:38]: Checked the humidifiers.
--- Refilled the 4X4’s humidifier with distilled water.
--- Tomorrow, plan to defoliate and start cloning for the first time!
--- Going to take multiple cuttings from both #1 and #4 for sure, but still deciding on the rest.
--- Getting hyped!
Day 02 - Tuesday - 06/04/24 - Total Days: 099
-----------------------------------
Daily Averages [~23:00]
- Temps: 81.4°F [27.4°C]
- Humidity: 74.3%
- VPD: 0.93 kPa
- Soil %: [29, 35, 38, 32]
-----------------------------------
- [11:59]: Time to film the first entry for the Global Grow Cup!
--- Going to be using BuildASoil 3.0 potting soil.
--- Filming the video using a stand and my phone.
--- This video is mainly to establish the container that the plant will be grown in. Also to prove that the container is a 16oz container and that it can hold 2 cups of soil.
--- The ticket (order) number also had to be written on the cup.
- [12:36]: Done!
--- The video had to be done in one continuous shot with no edits (my original submission does not have the logo).
--- There was also a photo that needed to be shot which shows the cup filled with 2 cups of soil (just like the video, the original image submission did not have the logo).
--- I think I did everything correctly, but also sent an email for verification of submission and validation.
--- Getting hyped!
--- [*smokes a bowl]
--- Going to defoliate today along with for the first-time, going to take cuttings for clones!
--- After a bit of online research, decided to split the cloning process into two days.
--- Today going to take cuttings and will soak them in a solution of aloe for 24hrs. Afterwards will change the water out and use straight distilled water.
--- Then in a couple days, plan to transplant into coco plugs (Coco Coins) for rooting.
--- For optimal results, also be using a rooting hormone (Clonex).
--- Well.. Here goes nothing!
- [17:01]: Evening check.
--- Wow! #1 is looking huge! Her main top is stretching above the lower canopy which is continuing to bush out.
--- #2 is growing along. Growth is gnarly and a bit droopy, but she’s getting taller!
--- #3 is looking great! Still a bit small, but she is continuing to get larger.
--- #4 looks like she needs a watering.
--- Both plants in the back are also looking surprisingly great as well!
- [17:05]: Checked down both fill tubes.
--- Both reservoirs were completely dry!
--- As far as today's defoliation, going to leave #2 and #3 alone and will focus my defoliation and cloning on the rest of the plants.
--- This will be my first attempt at cloning, also going to try topping for the first time today.
--- No pressure Ensign. What can possibly go wrong right?
- [17:27]: Time to start the cloning and defoliation process!
--- Filled a measuring cup with 3 cups of distilled water.
------ Added 3/4tsp of Horticultural Aloe
------ Added 1 more cup of distilled water
--- Mixed the solution and poured an even amount into three separate solo cups.
--- Made sure to mark two of the cups (#1 and #4). The unmarked one will be for any other clones from amongst the 6 phenos (if any at all).
- [17:43]: Time to top and defoliate #1!
--- Using a pair of brand new trimmers (AC Infinity),
--- Gently cut the main stalk to even out the canopy.
--- Then trimmed and cleaned most of the nodes leaving the top node or two.
--- Also trimmed the leaf fingers a bit before placing the top cutting into the cup of aloe solution.
--- Now for the rest of the cuttings!
--- [~45 minutes later]
- [18:32]: Managed to finish defoliating and cutting the rest of the clones.
--- Took two more lower cuttings from #1 (3 clones total).
--- Took 3 lower cuttings from #4
--- While defoliating, decided to try and clone the original #2 pheno as well. Took 4 small cuttings.
--- Similar to the top cutting, trimmed and cleaned each lower node for each cutting before placing them into the cups.
--- Before finishing up the 2nd cutting, I noticed the first cutting (the top cut that was also trimmed) was drooping.
--- So I did not trim and the leaf fingers for the other cuttings.
--- In total there were 10 cuttings taken for potential clones.
--- My main focus was to take cuttings and to clean up all the lower growth from both #1 and #4.
--- Defoliated and cleaned up the back original phenos as well (also trimmed back the cover crop).
- [18:35]: Temporarily placed the cuttings onto the floor of the 4x4 tent.
--- Took the trimmings (about 3 cups) and spread them onto the top mulch of #1 and #2.
--- Time to set the environmental controls for the 3x3 veg tent.
- [18:43]: Within the AC Infinity App,
--- For the Veg Tent [3x3] controller,
--- Adjusted the 'Vegetative [18/6]' Schedule for the grow light.
------ Set the Mode to ‘On Mode’
------ Set the START/END times to 04:00PM/10:00AM
------ Set the MAX to 1
--- The IonBoard S33 is now utilizing around 60.8W (at intensity 1 out of 10).
--- Adjusted the 'Vegetative [18/6]' Schedule for the exhaust fan.
------ Increased the Humidity’s HIGH trigger value from 81% to 87%
--- Adjusted the 'Vegetative [18/6]' Schedule for the humidifier.
------ Decreased the VPD target value from 1.5kPa to 0.8kPa
- [18:52]: Moved the cuttings into the 3x3 veg tent.
--- It begins! I think.
--- Going to let these cutting drink some aloe for a day before switching to straight distilled water.
--- Hmm. Could be the white floor of the 3x3 veg tent, but have noticed the S33 has a whiter spectrum whereas the FC-6500 seems to be warmer in color.
--- Anyways,
- [18:58]: Poured 4 cups of distilled water down EB1’s fill tube.
--- Poured 2 cups of distilled water down EB2’s fill tube.
- [19:06]: Filled a pump sprayer with 5 cups of distilled water.
--- Focused mainly on the straw mulch of #4.
--- But also misted the straw mulch for the rest of the plants a bit.
- [19:12]: Checked the humidifiers.
--- Refilled the humidifiers with distilled water.
- [19:44]: Going to be using Clonex rooting gel before planting the cuttings into Coco Coins (pre-soaked with microbes and aloe). But before that begins, going to transfer the Clonex gel into a squeeze bottle.
--- Gently peeled back the seal on the original Clonex bottle. Just enough make a tiny opening,
--- Then slowly and carefully poured the gel into an empty squeeze bottle.
--- Also removed the sticker from the original bottle and placed it onto the new one.
- [19:54]: Perfect!
--- Instead of applying the gel to the cutting, going to be applying the gel to the Coco Coin.
--- This squeeze bottle will make applying the gel a lot easier.
--- Will take PPFD readings tomorrow.
--- Also will change out the aloe solution to distilled water.
--- I really hope I didn’t screw things up before they could even begin.
--- Don’t die on me ladies!
--- Please.
Day 03 - Wednesday - 06/05/24 - Total Days: 100
-----------------------------------
Daily Averages [~23:00]
- Temps: 81.9°F [27.7°C]
- Humidity: 75.5%
- VPD: 0.90 kPa
- Soil %: [29, 36, 38, 36]
-----------------------------------
- [09:40]: Quick morning check!
--- #1 is looking a bit droopy, but looking okay. Topping is a high stress technique so going to take some time to recover. Don’t plan on flipping the main 4x4 tent to flower for a good week or so which should be enough time.
--- #4 looks great! The defoliation seems to have no effect on growth. Nice!
- [09:41]: Also quickly checked on the 3x3 veg tent,
--- Nice! The cuttings are looking great!
--- No yellowing and they all seemed to have turned up towards the light.
--- So far so good!
- [22:53]: Evening check.
--- #1 is continuing to dominate this grow! She has spread wide and looking incredible!
--- #2 is looking gnarly, but getting there.
--- #3 is getting larger! But still a runt. By far, her leaves are the darkest of the bunch, but she is still growing!
--- #4 looks happy and growing along beautifully! Wow!
- [22:55]: Checked down both fill tubes.
--- Both reservoirs were completely dry!
- [22:59]: Poured 5 cups of distilled water down EB1’s fill tube.
--- Poured 2 cups of distilled water down EB2’s fill tube.
- [23:05]: Checked on the 3x3 veg tent.
--- Ooo yea! The cuttings are still green! Nice!
- [23:07]: Took PPFD readings.
--- The cuttings were around 121 μmol/m²/s which gives a DLI of 7.84 mol/m²/d
--- Nice! These levels are on the lower range for seedlings (~100-300), perfect! I think.
- [23:14]: Swapped the aloe water out to straight distilled water.
--- Going to let these cuttings soak for one more day before planting.
--- Please don’t die girls!
- [23:15]: Checked the humidifiers.
--- Refilled the humidifiers with distilled water.
--- Ooo yea!
--- Tomorrow is the big rooting day!
Day 04 - Thursday - 06/06/24 - Total Days: 101
-----------------------------------
Daily Averages [~23:00]
- Temps: 81.9°F [27.7°C]
- Humidity: 75.2%
- VPD: 0.91 kPa
- Soil %: [32, 38, 38, 34]
-----------------------------------
- [16:20]: Evening check.
--- #1 is a bit droopy, but growth is looking green and healthy.
--- #2 is looking bigger! She’s also looking sort of droopy.
--- #3 is growing along nicely! Looking good girl!
--- #4 is looking great! A bit droopy but plan to water today.
- [16:23]: Checked down both fill tubes.
--- EB1's reservoir still has some water.
--- EB2's reservoir was completely dry!
- [16:23]: Checked the Ecowitt soil moisture sensor data:
--- 28% - [CH01 EB1 - Garlic Budder #1]
--- 36% - [CH02 EB2 - Garlic Budder #2]
--- 37% - [CH03 GFP - Garlic Budder #3]
--- 30% - [CH04 FPT - Garlic Budder #4]
- [16:30]: Using a pump sprayer,
--- Misted the straw mulch of #4 with 6 cups of distilled water.
--- Focused mainly on the straw mulch.
--- Also misted the straw mulch of #3 (in the grassroots fabric pot) a bit.
- [16:43]: Poured 5 cups of distilled water down EB1’s fill tube.
--- Poured 3 cups of distilled water down EB2’s fill tube.
- [16:52]: Checked the Ecowitt soil moisture sensor data:
--- 56% - [CH01 EB1 - Garlic Budder #1]
--- 44% - [CH02 EB2 - Garlic Budder #2]
--- 40% - [CH03 GFP - Garlic Budder #3]
--- 45% - [CH04 FPT - Garlic Budder #4]
- [17:01]: Took general PPFD readings.
--- #1 was around 379 μmol/m²/s which gives a DLI of 24.56 mol/m²/d
--- #2 was around 333 μmol/m²/s which gives a DLI of 21.58 mol/m²/d
--- #3 was around 293 μmol/m²/s which gives a DLI of 18.99 mol/m²/d
--- #4 was around 378 μmol/m²/s which gives a DLI of 24.49 mol/m²/d
- [17:09]: Took the weekly height and light distance measurements.
--- #1 was about 21" tall.
--- #2 was about 13.5" tall.
--- #3 was about 9.5" tall.
--- #4 was about 19.25" tall.
--- Hmm..
- [17:19]: Adjusted the right oscillating fan a bit.
--- Re-angled the CloudRay S6 oscillating fan upwards. Been noticing that the air has been hitting the tops of the plants so easing off a bit (#1 is still getting hit, but she’s huge so not too worried).
- [17:23]: Back to the measurements!
--- #1 was about 9.5" away from the grow light.
--- #2 was about 17" away from the grow light.
--- #3 was about 17.5" away from the grow light.
--- #4 was about 11.5" away from the grow light.
- [17:46]: Checked on the 3x3 veg tent.
--- Cuttings are still green! They do look a bit droopy but no signs of yellowing.
--- Okay!
- [17:55]: Time to begin the rooting process!
--- For my first attempt at rooting, going to be using Coco Coins pre-soaked in saponins, microbes and aloe.
--- To further help with rooting, going to also be using Clonex rooting gel.
--- Filled a measuring cup with 4 cups of distilled water.
------ Added half of 1/64tsp of Quillaja Saponaria Extract [60]
------ Added 1/16tsp of Horticultural Aloe
------ Added 1/8tsp of Mycrobe Complete
--- Mixed the solution thoroughly.
--- Time for the Coco Coins!
--- 10 cuttings means 10 Coco Coins.
- [18:09]: Dropped 10 Coco Coins into the measuring cup.
--- The coins immediately started to expand.
--- A bit too much.. Oops!
--- Poured the solution and Coco Coins into a pitcher.
--- Added 2 cups of distilled water to the solution (now at 6 cups).
--- Great! The coins are pretty much fully expanded, but going to wait a bit longer to fully saturate each coin.
--- [~20-30 minutes later]
- [18:42]: Great!
--- Took the seedling and flood tray from the AC Infinity propagation dome and placed all 10 Coco Coins into the slots.
--- Gave each Coco Coin a quick shake to remove excess solution. The coins were not dripping with solution but still pretty saturated.
--- Arranged them into 3 groups with the cuttings in mind.
--- Also tried to keep the pre-made holes intact.
--- Time to inoculate the Coco Coins!
- [18:54]: Using a squeeze bottle,
--- While keeping the nozzle from making contact with the coco, gently filled each pre-made hole with Clonex rooting gel. Just enough gel to fully cover the hole of each coco coin.
- [19:00]: Time to plant the cuttings!
--- Gave each cup a misting of distilled water. Focused on wetting the top growth with water.
--- Okay!
--- To avoid mixing cuttings up.
- [19:01]: Starting with the original #2 pheno cup,
--- For each cutting,
--- Using a pair of clean trimmers, made a final 45° cut about 1/2" from a bottom node.
--- Then stripped away and scared the protective membrane below the node before planting.
--- Made sure the node was about 1/2" below the surface of the coco.
--- To help with planting, while inserting each cutting, gave the Coco Coin a gentle squeeze to loosen the coco. This also helped to ensure the coco and gel was in good contact with the cutting.
--- Once the cutting was planted into the Coco Coin, made sure to place back in the same spot (made sure to keep the cuttings in their groupings).
--- Once a cup was complete, made sure to keep the label with the group.
--- Re-misted the top growth as needed to keep it wet.
--- Also wiped the trimmers with isopropyl alcohol in between cuttings (plan to use 10% bleach solution for next time).
--- Repeated this process until all 10 cuttings were cut, planted, and in the tray.
--- The coco coins fit perfectly into the tray and don’t reach the bottom. Nice!
--- The bottom air gap is important.
--- Poured a bit of distilled water through one of the empty slots into the bottom of the tray. Just enough to fill the bottom of the tray, but not enough to reach any of the Coco Coins (~1/4cup).
- [19:35]: Placed the propagation tray with cuttings into the 3x3 veg tent.
--- Placed the first layer of the propagation dome on before giving the sides a misting of distilled water.
--- Also sprayed the top of the propagation dome before covering the cuttings.
--- Vents are all fully closed.
- [19:40]: Placed the bar lights onto the top of the dome before configuring the controller.
------ Set the START/END times to 04:00PM/10:00AM
------ Set the bar light’s intensity to 2 (out of 10).
--- Also made sure the propagation light controller’s time was in sync with the Controller 69 Pro.
- [19:47]: Took PPFD readings.
--- The cuttings were around 136 μmol/m²/s which gives a DLI of 8.81 mol/m²/d
--- The PPFD levels are similar to the floor.
--- Perfect!
--- Going leave the IonBoard S33 on during this rooting process.
--- Will check back tomorrow to cycle the air under the dome.
- [19:56]: Checked the humidifiers.
--- Refilled the humidifiers with distilled water.
- [20:17]: Quick night check!
--- Ooo yea! Growth is raging and looking perky!
--- Mainly checked on #1 and #4 which were looking incredible!
--- Keep on growing ladies!
Day 05 - Friday - 06/07/24 - Total Days: 102
-----------------------------------
Daily Averages [~23:00]
- Temps: 82.7°F [28.2°C]
- Humidity: 76.2%
- VPD: 0.89 kPa
- Soil %: [37, 40, 38, 35]
-----------------------------------
- [10:03]: Decided to increase the ambient temp in the 3x3 veg tent.
--- Within the AC Infinity App,
--- For the Veg Tent [3x3] controller,
--- Adjusted the 'Vegetative [18/6]' Schedule for the heater.
------ Increased the Temp target value from 78°F to 82°F
--- Hopefully this will help to keep the veg tent at a more consistent temp.
- [22:26]: Evening check.
--- Ooo yea! The garden is looking incredible!
--- #1 is looking perky and just bushing out! Wow!
--- #2 is getting big! Growth is weird and leaf fingers are huge! Just going to let her grow.
--- #4 is looking happy and growing along like a champ! Nodes are starting branch out and she is turning into a bush!
- [10:28]: Checked down both fill tubes.
--- Both reservoirs were completely dry!
- [22:33]: Poured 5 cups of distilled water down EB1’s fill tube.
--- Poured 3 cups of distilled water down EB2’s fill tube.
- [22:40]: Checked on the propagation dome (inside the 3x3).
--- Ah yea! Looking great ladies!
--- Lifted the top of the dome to let some fresh air in for a bit.
--- Wow!
--- Leaves still look nice and green!
--- So far everything looks great!
--- Just going to continue on!
- [22:53]: Checked the humidifiers.
--- Refilled the humidifiers with distilled water.
- [11:01]: Decided to adjust the humidifier for the 3x3.
--- Within the AC Infinity App,
--- For the Veg Tent [3x3] controller,
--- Adjusted the 'Vegetative [18/6]' Schedule for the humidifier.
------ Increased the VPD target value from 0.8kPa to 1.5kPa
--- The higher VPD level will essentially turn the humidifier off.
--- I won’t be needing the humidifier for a good week so might as well save the water.
Day 06 - Saturday - 06/08/24 - Total Days: 103
-----------------------------------
Daily Averages [~23:00]
- Temps: 81.6°F [27.6°C]
- Humidity: 74.9%
- VPD: 0.91 kPa
- Soil %: [35, 40, 37, 31]
-----------------------------------
- [07:40]: Quick morning check!
--- #1 and #4 are looking perky and happy!
--- Also checked on the propagation dome,
--- All cutting still look green! Hyped!
- [20:02]: Evening check.
--- Wow the garden is raging with growth!
--- #1 has blown up! She has clearly recovered and growth is ramping up again!
--- #2 is stretching upwards!
--- #3 is now the smallest of the 4, but still getting larger!
--- #4 is looking incredible! Wow! Growth looks perky and happy!
- [20:05]: Checked down both fill tubes.
--- Both reservoirs were completely dry!
- [20:10]: Poured 6 cups of distilled water down EB1’s fill tube.
--- Poured 2 cups of distilled water down EB2’s fill tube.
- [20:16]: Checked the Ecowitt soil moisture sensor data:
--- 35% - [CH01 EB1 - Garlic Budder #1]
--- 40% - [CH02 EB2 - Garlic Budder #2]
--- 36% - [CH03 GFP - Garlic Budder #3]
--- 27% - [CH04 FPT - Garlic Budder #4]
- [20:19]: Using a pump sprayer,
--- Misted the straw mulch of #4 with 5 cups of distilled water.
--- Focused mainly on the straw mulch.
--- Also misted the mulch of #3 a bit (in the fabric pot).
- [20:27]: Checked propagation dome (in the 3x3),
--- To cycle the air under the dome, lifted the top off for a bit.
--- Ooo yea! Everything is still green and looking great!
--- Keep on rooting ladies!
--- Oops!
- [21:45]: Checked the humidifiers.
--- Refilled the humidifiers with distilled water.
Day 07 - Sunday - 06/09/24 - Total Days: 104
-----------------------------------
Daily Averages [~23:00]
- Temps: 81.5°F [27.5°C]
- Humidity: 74.8%
- VPD: 0.91 kPa
- Soil %: [36, 40, 37, 36]
-----------------------------------
- [08:18]: Quick morning check!
--- Nice! The main tent is looking great! #1 and #4 are both raging with growth!
--- Checked on the propagation dome (inside the 3x3) and the clones are still looking green!
--- Wow! Everything is going almost too well! Just keep on growing!
- [19:08]: Evening check.
--- Garden is just exploding with growth! Seems everyone has fully recovered from the defoliation and topping!
--- Wow #1 is bushed out and looking incredible!
--- #2 is growing really starting to get large! Growth still is funky, but stoked none-the-less.
--- #3 is starting to fill in the pot! Getting larger!
--- Wow! #4 is getting taller and looks healthy and green!
- [19:12]: Checked down both fill tubes.
--- Both reservoirs were completely dry!
--- Wow the canopy is really starting to get taller and closer to the light. May need to raise it up soon.
--- Absolutely surprised how low the light levels have been throughout this entire cycle. Barely moved the light and have not increased the intensity past 2 (out of 10). Less is really more.
--- Anyways!
- [19:18]: Checked the Ecowitt soil moisture sensor data:
--- 36% - [CH01 EB1 - Garlic Budder #1]
--- 41% - [CH02 EB2 - Garlic Budder #2]
--- 37% - [CH03 GFP - Garlic Budder #3]
--- 34% - [CH04 FPT - Garlic Budder #4]
- [19:19]: Poured 6 cups of distilled water down EB1’s fill tube.
--- Poured 3 cups of distilled water down EB2’s fill tube.
- [19:24]: Checked propagation dome (in the 3x3),
--- To refresh the air, lifted the top off for a bit.
--- Sweet! Still green! Wow!
--- Using a spray bottle, misted the top growth with distilled water.
- [20:35]: Checked the humidifiers.
--- Refilled the humidifiers with distilled water.
--- Wow what a week!
--- Growth has been just insane in the 4x4 tent! All plants have fully recovered and have just exploded with growth.
--- I think it’s time to flip to flower!
--- Also, I’m absolutely baffled about how well the cloning process has been going.
--- So far no issues!
--- Not complaining, but just surprised. Keep on growing ladies!
--- If all goes well, should have fully rooted clones soon ready for transplanting (into solo cups of course).
--- Absolutely hyped for next week!
--- Maximum warp Ensign, Engage!
[END OF WEEK 14|07]

Likes
23
Share


@MyWetPussy
Follow
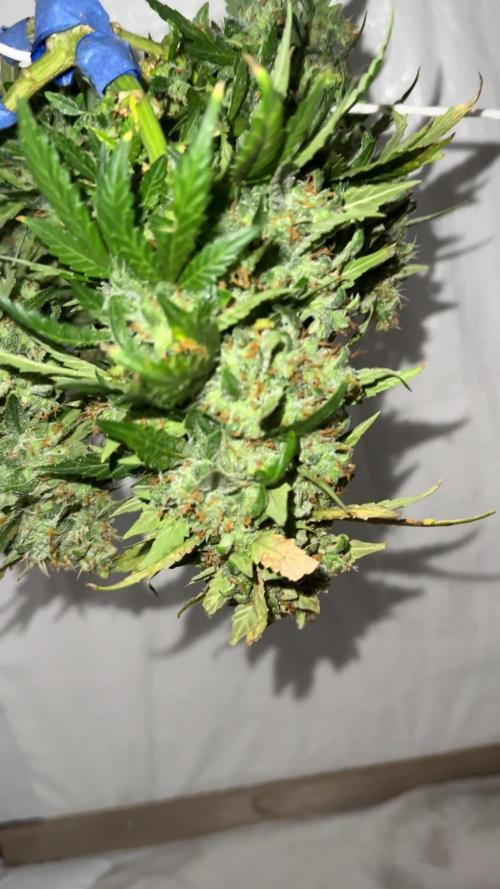
The plant was harvested on the 73rd day. It was hung not as a whole plant but by separate bud sites. Bud sites had the larger fan leaves removed before the drying process. Temps for the drying were 62F 55%RH for 10 days. She then had a quick cleaning of sugar leaves and jarred for cure. Final report will be coming shortly.😍

Likes
89
Share


@SensimillaP
Follow
The journey is over for this lady, she is 1m tall, the buds are smelling crazy good and stacked pretty well, I really wish i had a free tent for this lady to fully open her while still in pre flower but I'm happy anyway 🙌


Likes
101
Share


@DreamIT
Follow
🌴🌞 TROPICAL FUEL BY EXOTIC SEEDS 🌞🌴
____________________________________________________________________________________
🏝️ 26.3 ...
🏝️ 27.3 some more details today but it's still early for serious photos
🏝️ 28.3
🏝️ 29.3
🏝️ 30.3
🏝️ 31.3
🏝️ 1.4
____________________________________________________________________________________
📜 A look at the details of what I'm growing 📜
🌴🌞Tropical Fuel by Exotic Seed🌞🌴
⚧ Gender
▪️ Feminised
➰ Genes
▪️ 70% Indica / 30% Sativa
🎄 Genetics
▪️ Tropicana Cookies F2 “C cut” x Tropicana Cookies F2 #5
🚜Harvest
▪️ 400 - 500 g / m²
🌷Flowering
▪️ 56 - 64 days
✨THC
▪️ 20.0 - 24.0%
✅CBD
▪️ 1.0%
🏡Room Type
▪️ Indoor
🌄Room Type
▪️ Outdoor
🕋Room Type
▪️ Greenhouse
🎂Release Year
▪️ 2020
____________________________________________________________________________________
📷🥇 Follow the best photos on Instagram 🥇📷
https://www.instagram.com/dreamit420/
🔻🔻Leave a comment with your opinions if you pass by here🔻🔻
🤟🤗💚Thanks and Enjoy growth 💚🤗🤟

Processing
Likes
20
Share


@GrimbolTheDruid
Follow
Grow Specs:
Breeder: Mephisto Genetics
Strain: Cosmic Queen F4
Nicknames: Timantha - CQ1
Genetic heritage: Spacedawg From TGA Seeds x Chemdogging F4
Indica/Sativa: 30/70
Est. cycle time: 65-75 days from sprout
Medium: CQ1 = Soil, Mephisto Genetics Super Soil, Worm Castings. CQ2 = Soil, home made Subcool Super Soil variant, worm castings
Lights: 132W actual LED
Update schedule: I will try to send out the updates every Saturday or Sunday.
For more frequent updates, add me on Instagram @grimbolthedruid
Grow Schedule to Date:
Sprout: 3/1/17 (Full moon)
Age: Day 25 as of 3/25/18
Updates/Observations:
- Water only for this last week and next. Soil is very hot so I don't need to cycle any of those nutrients down right now.
- Plants showing light burns on lower foliage but nothing serious yet.
- Trying to keep the soil always slightly moist and never let it dry completely to keep microbes (and by extension the soil) at optimum health.
- CQ1 is still miniaturized and has shown sex so I think she is going to finish very small, if she makes it at all. I am worried the hot soil will burn her down because she wont ever get big.
- CQ2s leaves show a very strong Sativa expression and I love it.
- CQ2 is growing very vigorously.
- All plant showing sex (F).
Worm Feeding:
- This week I fed my worms about a pound or so total of: Banana, mango, dill, tomatoes, carrots, strawberries, aloe filet, green beans, covered in a dash of oyster shell and alfalfa meal.
- I layer down some canna leaves, layer diced up worm food, sprinkle dry amendments (kelp, oyster shell, neem, etc.), layer canna leaves, then replace bedding and they are happy!
- Creating the food layer protected by the green manure gives the worms a nice buffer zone to move freely through eating as much as they want.
- This method is inspired by HerbinFarmer on Youtube. I really enjoy his videos so if you have time, check him out!
Cheers!
G

Likes
49
Share


@masterofsmeagol
Follow
7/18 Plants are looking great. I was able to rearrange the plants so they have a little bit more space and so I can get around every plant. I have small random pest damage (i.e. I caught a four lined plant bug while hunting jpn beetles) but not enough h to warrant treatment. I will probably spray before flower. Sun's out amd plants were praying. I rotated a couple and it only took a few hours for them to "straighten out." I went to look again rhis morning and made the final determination to expand the cage. I'm looking for the 2x4's and the wire in the next couple days. The work that ive done now will but me sometime. I wonder how this rain impacted my soil.
7/19 Plants are looking fantastic. The stretch is starting. One purple punch looks like it's beginning to flower. I think I'm entering the transition period. Jpn beetle damage is evident but not significant. I defoliated a leaf with a a leafminwr or something in it. It's so much easier to get around the plants now. I'm seeing some chunks missing sporadically though. Went to the roses out back and found TONS of jpn beetleson top of each other reproducing. They destroyed that rose bush. I'm going to keep it as a trap plant. My dad's girlfriend wanted to spray it but that doesn't make sense as theflowers are all gone. Dad's grabbing the materials to extend the cage today I think. Right now I can get around every plant but the two big ones in the back. I just cant get to the backs of them and they are huge. Almost reaching the top of the cage. A 4'-6' extension will do wonders in flower. Can't wait.
UPDATE: Dad got the 2x4's and we assembled the extension and attached it. He's grabbing the wire as I type this. This worked out beautifully. I had no idea how big the blueberry cheese in the 50 gallon was! This extension (4ft i think) is PERFECT! Then I can get a little extra wire and pull it out if I wanted to. I think I have another 2x4 that I'm going to use in the middle. Lots of great pics and a video I'll upload tomorrow. Hot af today and humidity still super high. Even the commercial dudes was surprised I don't have wpm l and that judging by some of my plants structure that I may do better than I think. I certainly hope so. I WATERED 3 GALLONS OVER THE WHOLE GARDEN. The blueberry cheese in smart pots were drooping. They drink far more water than tje others. I would've given more but we are supposed to have thunderstorms. I left my back tarp off for the night. It will increase airflow and wind is down. I feel like this is going to be my year.
7/20 I updated and loaded everything on the app but notjing would save. Did it again in the website hopfully this saves
i didnt put it all up. Didn't water the plants today. Bags seemed okay weight wise. Good thing I did the extension yesterday because those three plants were drooping they were so thirsty. I focused most of the water yesterday on those plants that needed it. The others were somewhat dry but still had some weight. Like i said the blc drinks much more water than any of the other plants. I'm impressed with the growth I'm seeing. Especially since I have been being very stingy with the water and I've only fed like twice and that was just the kelp me/you and big bloom in negligible amounts. I'm watching for deficiencies. I'm just not seeing them. I'm picking up the wire and finishing the extension and then rearranging things. I'll update.
UPDATE: WATERED 4 GALLONS CONCENTRATING ON THE PLANTS THAT WERE DROOPING THE MOST. FINISHED ENCLOSURE AND INCREASED PLANT SPACE. TRELLIS WILL GO UP THIS WEEK. VIDEOS WILL BE UPLOADED TOMORROW.
7/21 I should've watered more volume last night. I noticed two plants that seemed much lighter than the rest. After some deliberation I gave them each a half gallon of water. One was the purple punch in the 10 that's huge amd the other was that huge blueberry cheese. I think I'm going to swap places with them, take out a pallet and get some other way to elevate that ONE plant and I'll have even more room. Then I'll add my supports. It's a dream working in there now. I noticed some small interior leaves being used up and dieing. I defoliated them but it was only a couple. I'll need to start nutes at some point. Doesn't need it yet though. I'm going to add some kelp me/you for the heat stress. I need to get the watering down better but it's more difficult when they each have different needs. I kinda have to read the plant. I'd rather be overwatered than underwatered. I tried to upload what I could but some won't.
UPDATE: I went over to clip off some fencing that was doubled up AND just to check on tge girls. Found two caterpillars (small but hairy so they were older not the inch worms and possibly what has been contributing to damage on those plants. Things are spread out so it will be harder for insects to move from plant to plant and I have better air flow. I worry that leaving my tarp off might lead to high winds and plants not able to take it buf I digress. I'll add supports later. Plants are huge and drinking far more water than I've been giving them. When I got there several were drooped right over and dry as a bone. The bags are essentially all roots now. I mixed up 8 gallons of water and split it between the plants. I gave less to the two Co trainer plants that weren't drooping and the 10 I watered yesterday that wasn't drooping but for the most part the ones that needed if got at least a gallon or more. The others a little under a gallon. It might rain A LITTLE tonight too. Oh, and since it's been so hot I added 1/2 tsp per gallon of kelp me kelp you to help the plants deal with heat stress. I also noticed that some of the very bottom interior leaves are being used up. I have a feeling ill need to switch to nutes pretty soon. Plus I need to suppirt those plants if I'm going to leave that tarp off and Gove them air. Took a video. But it won't upload here. I'll have to wait till tomm.
7/22 Didn't have much timevthis morning bit I dod a video. Boy those plants loved that water and that kelp. This morning everyone was standing straight up at attention. Supposed to get rain last night but didn't. Good thing I watered. I think I'm going to up the water next watering and then again to the 10% mark if necessary. Especially with the Blueberry cheeses. I'm noticing that a FEW INTERIOR leaves are showing nute deficiencies so I'm probably going to have to start feeding soon. I'll update later.
UPDATE: Went back over and cut off the extra wire. I'm going to need to water more volume. Specifically on two plants. The two huge blueberry cheese in 20 gallon smart bags dries out much faster than the rest. I'll have to out that on a different schedule or increase the amount given. Next watering will be 1.5 or 2 gallons a plant and it might be tomorrow from what I was seeing. It's super hot and with the added airflow the bags dry out faster. I also went through EACH plant looking for pests and defoliating old leaves that needed it. Plants are still nice and green but a VERY few older interior leaves are showing deficiencies. I know this is Normal especially since they are trying n g to transition to flower. I also saw pest damage on a couple plants. Four lined plant bug. I already found the one on the other plant and killed it but I'm considering doing a spray before flower. I'm thinking either captain Jack as a "catch all", BT which works great but mostly just on pillars or the organocide bee safe 3 in one pesticide. I also have pyrethium and other things. Thus far picking things off manually has been good enough. At the very least they will get an application of BT very soon.
7/23 Held off on watering this morning. Supposed to get thunder storms I DID split a gallon with two blueberry cheese that were the lightest in the 20 gallon smart pots. Thet drink way more. My water volume is going to need to increase. We haven't had nearly enough rain. I'm going to bump it up to 1.5 to 2 gallons each plant which will be 10% for the 20s and a little less for the others. I'm still seeing various pest damage. Nothing bad but I found another couples leaves that were chomped on by a four lined plant bug so I'm debating applying something tonight when I water. I'm also noticing old leaves being used up and some interior leaves showing slight deficiencies. It will be time to start nutes soon. I'll update as I go.
UPDATE: GOT THE FEELING I NEEDED TO CHECK THE PLANTS. SOMETHING DODNT LOOK RIGHT ON THE CAMS. WENT OVER AND EVERY PLANT BUT THE TWO I SPLIT A GALLON WITH AND THE PLANT IN THE 50 WERE DROOPED RIGHT OVER. LIFELESS. I SHOULD'VE WATERED THIS MORNING BUT I DIDNT HAVE TIME. I FIGURED THEY COULD WAIT UNTIL NIGHT. EACH PLANT GOT 1.5 GALLONS AT LEAST. I USED SIXTEEN OR SEVENTEEN GALLONS ON THE GARDEN. I GAVE EACH CONTAINER PLANT ONE GALLON AND GOT RUN OFF FROM BOTH. IM NOTICING SKIGHT FADING IN LEAVES BUT IM NOT INTRODUCING NUTES TO UNDERWATERED PLANTS. I THINK 10% IS GONNA BE TGE MAGIC NUMBER. 2 GALLONS EACH. EVEN THE 10 GALLON SMART POT. ALMLST AS BIG AS THE 30S BUT DRIES OUT QUICKER.
7/24 Plants looked fantastic this morning. Defoliated a few leaves that needed it. Showed my commercial buddy and he said things looked fantastic. Since the soils still holding nutes and I'm not seeing many deficiencies I may hold off on feeding. I'm starting early flower now. I will be using nutes soon. I think ive got the watering schedule pretty much down.


Likes
35
Share


@SantaStone
Follow
🎅 So, as for the smoke after 30 days of harvest day. Biscotti Mints have a high concentration of THC, definitely above 25%, you can feel it.
Beginners should exercise caution.
-The taste, I wouldn't exactly call it mint. It's similar to peppermint, but it doesn't taste like mint, it tastes like flowers. Bottom line, the taste is similar to pepper flowers.
-The effect is only evening, not daytime. It will be good for an evening relaxation or in the company of friends.
-The appearance is something beautiful. Everyone who saw him liked him. Dense, stone buds, green-violet color.
Likes
51
Share

@MadeInGermany
Follow
Hey guys :-) .
Today the plant was sprayed again with neem oil.
There weren't any more trips to be seen after the second application, but to be on the safe side, you did it again today get a cure.
That's why the beautiful dark shimmer on the leaves :-).
She has developed very well this week.
I will give you 7-10 days before I switch to flowering.
This week it was poured 3 times with 1 l each (nutrients see table above)
Otherwise everything was cleaned and, as always, everything was checked.
Have fun with the update and stay healthy 🙏🏻
👇🏼👇🏼👇🏼👇🏼👇🏼👇🏼👇🏼👇🏼👇🏼👇🏼👇🏼👇🏼
You can buy this Nutrients at :
https://greenbuzzliquids.com/en/shop/
With the discount code: Made_in_Germany you get a discount of 15% on all products from an order value of 100 euros.
👇🏼👇🏼👇🏼👇🏼👇🏼👇🏼👇🏼👇🏼👇🏼👇🏼👇🏼👇🏼
You can buy this strain at :
Clearwater Seeds
Water 💧 💧💧
Osmosis water mixed with normal water (24 hours stale that the chlorine evaporates) to 0.2 EC. Add Cal / Mag to 0.4 Ec Ph with Organic Ph - to 5.8 - 6.4
MadeInGermany


Likes
1
Share


@Stevodidge
Follow
Started the flush this week. It felt like the right time. I've got significant nute deficiency in the upper leaves of the main cola now. What is surprising is that since taking away all nutes, several of the buds have shown new growth. I was going to flush for just 4 days as its a DWC, but having seen quite a lot of new growth, I'll probably just leave it a few days longer and see what happens. Checking the plant several times a day now, so it's being very closely monitored.

Likes
3
Share


@RunicKevin58675
Follow
63 days of flowering have passed, according to various colleagues they are 1/2 weeks behind on the swelling. But to me they look squat enough to pick up. Quite evident smell of sweet Hashy. Fed lightly with Bio Bloom but it was more of a rinse. 2.22l per day for 6 days, including 2 days put 1 drop of Bio Bloom in the irrigation
Likes
12
Share


@Jaindoh
Follow
Had some light potassium deficiency and continued magnesium deficiency despite adding the calmag so I doubled up on both of them. Defoliated, topdressed, backed the lights off because one of them is singed.

Likes
2
Share


@Master_Yoda
Follow
This week in my perpetual auto garden all by Tastebudz.
- Purple Punch is in the back left corner &
- Mimosa is in the back right corner.
- Vanilla Frosting is in the front left corner. I hope to harvest her this Tuesday. Flushing with 2 teaspoons per gallon of unsulfured blackstrap molasses 1 gallon total added to the reservoir.
- Peanut Butter Cookies is in the front right corner I hope to harvest her in about 10 to 14 days. Flushing with 2 teaspoons per gallon of unsulfured blackstrap molasses 3 gallons total added to the reservoir.
* FYI The Unicorn burst that I'm germinating is by Gas Reaper Genetics.*
