


Likes
Comments
Share

@DogDoctorOfficial
Follow
LSD Zamnesia Tripping 🙂 | Fresh Frozen, Ice Water & Temple Balls — Week 16 From Seed
First of all…
Yes 😄
We are once again dividing the harvest reports into multiple chapters, and once again we apologize for that. But honestly, there was simply no way to fit:
* harvest,
* drying,
* trimming,
* curing,
* smoke review,
* macro photography,
* fresh frozen work,
* washing,
* extraction,
* and hash making…
…into a single GrowDiaries update without rushing through important parts of the process.
And this part?
This part deserved its own spotlight completely.
Because this week was not about flower anymore.
This week was about resin.
Living resin.
Fresh frozen material.
Ice water extraction.
Patience.
Cold temperatures.
Sticky hands.
And slowly transforming trichomes into beautiful hash.
For everyone joining only now, quick recap:
These LSD girls were grown under 12/12 from seed from the very beginning. Minimal training, mostly natural structure, gentle leaf manipulation, and environmental balance instead of aggressive intervention.
Part of the harvest was dried traditionally and already covered in the previous report.
But another part…
…never got dried at all.
Straight during harvest, selected flowers were removed fresh from the plants and immediately vacuum sealed before going directly into the freezer.
No drying.
No curing.
No waiting.
Fresh frozen.
And that changes everything.
The goal here is preservation.
When flowers are frozen immediately after harvest, a large portion of the volatile compounds:
* terpenes,
* flavonoids,
* aromatic compounds,
* and delicate resin characteristics…
…can remain much closer to their living state compared to traditionally dried material.
This is why fresh frozen extraction became so respected in modern hash making.
It captures a version of the plant that only exists for a very short moment in time.
Alive.
Wet.
Fresh.
Fully expressed.
And honestly?
Opening those frozen bags weeks later felt like reopening harvest day itself 😄
The flowers still looked incredibly resinous even after sitting frozen for weeks waiting for wash day.
Now let’s talk process.
For the wash itself, we used the Bubbleator machine courtesy of Zamnesia , and honestly huge thanks to them for providing it. They knew I wanted to start exploring ice water extraction properly, and they were kind enough to support the journey.
The setup itself is actually beautifully simple.
First:
ice.
Lots of ice 😄
The machine was filled partially with ice first before adding the fresh frozen material inside the working bag.
The flowers themselves were placed inside a closed 220-micron washing bag. This is important because the bag keeps the plant material contained while still allowing the trichome heads to separate during agitation.
After placing the material inside:
* more ice on top,
* cold water added,
* everything submerged,
* and then…
…we waited.
Around 30 minutes or so.
And this step is actually extremely important.
A lot of people think washing starts when the machine turns on.
But honestly?
The wash starts before that.
This resting phase allows the frozen material to:
* slowly rehydrate,
* absorb water again,
* become fully saturated,
* and most importantly…
* become extremely cold throughout the entire plant material.
Why does this matter?
Because trichomes become brittle at very cold temperatures.
The colder everything gets:
* the easier the resin heads separate,
* the cleaner the release becomes,
* and the less physical force is required.
That is also why ice exists under and above the material:
* lower temperatures evenly,
* protect the resin,
* and maintain the cold environment throughout the wash.
Once the water temperature approached near freezing…
…the machine came alive 😄
And honestly?
Watching the water slowly transform during the wash is always magical.
At first:
just ice,
water,
and flowers.
Then slowly:
foam,
cloudiness,
resin separation,
and finally that beautiful milky golden water hash makers love seeing appear.
Meanwhile on the side, we prepared the filter bags.
We did not use every single micron separation individually because honestly sometimes over-separating becomes unnecessary depending on goals and material quality.
Instead, we focused on collecting the grades we actually wanted to work with and enjoy.
And then came one of the most satisfying parts of the entire process:
Collection 😄
Slowly lifting the bags.
Watching the resin gather.
Carefully scraping.
Separating grades.
Observing texture and color differences.
Beautiful creamy resin everywhere.
Some lighter.
Some slightly darker.
Some sandy.
Some greasy.
Every layer carrying slightly different characteristics.
After collection, the resin was carefully freeze-dried.
And this part also requires patience.
First freeze drying.
Then breaking it apart.
Then more drying.
Then more waiting 😄
Depending on environment and conditions, full drying can take several days because trapped moisture inside hash is dangerous long term. Rushing this step can ruin months of work later.
In this case, the process stretched closer to about a week before everything felt properly stable and ready to work.
And honestly…
This is where the magic really started.
Once dry enough, we allowed the hash to rest briefly before beginning the hand-working process.
No extreme heat.
No giant pressure.
No fancy machinery.
Just:
room temperature,
body warmth,
gentle pressure,
folding,
rolling,
stretching,
and patience.
The room itself stayed around 15°C, which turned out to be perfect for working the resin slowly without overheating it.
And this step matters far more than many people realize.
When hand-working hash properly:
* oils redistribute,
* compounds begin merging,
* terpenes spread through the material,
* oxidation starts slowly,
* texture evolves,
* and curing begins transforming the resin itself over time.
You are not simply “rolling hash.”
You are starting a living curing process.
And slowly…
The texture changed completely.
From sandy loose resin…
to creamy material…
to sticky dough…
to smooth beautiful temple balls.
Honestly, seeing that transformation happen in your hands never gets old 😄
Final result?
Three temple balls total:
* two smaller ones from smaller micron collections,
* and one large main temple ball that became the true star of the session.
Final weight:
46.5 grams.( big one )
And honestly?
I was extremely happy with that result.
Especially considering the quality, texture, color, and how beautifully this LSD washed overall.
Once formed, the temple balls were wrapped carefully in parchment paper before being vacuum sealed for long-term curing.
And now?
They rest.
Months.
Maybe longer.
Waiting.
Because the goal here is not “fresh hash.”
The goal is evolution.
Traditional temple ball style curing allows:
* oils to redistribute,
* compounds to merge,
* texture to transform,
* aroma to deepen,
* and the entire resin profile to mature over time.
Almost like aging wine.
Or curing cheese.
Or fermenting traditional products slowly and intentionally.
This is medicine with patience built into the process.
And honestly…
That part alone deserves respect.
We also included:
* detailed process photos,
* collection stages,
* macro photography,
* texture closeups,
* curing progression,
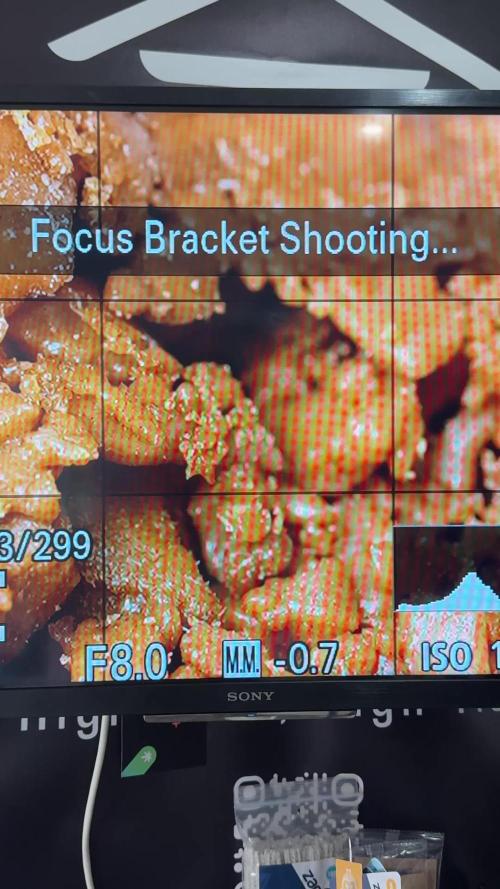
* and multiple stacked macro images showing the resin in insane detail.
Some of these stacks reached:
* 62 frames,
* 87 frames,
* 114 frames,
* and even 152-frame focus stacks.
Because honestly, hash under macro magnification becomes another universe completely.
The textures stop looking real.
Tiny resin mountains.
Oil rivers.
Micro-crystals.
Glossy surfaces.
Soft creamy structures.
It almost starts looking geological instead of botanical 😄
Mr. Baggy of course supervised the entire operation like the professional resin inspector he clearly believes he is.
And next week…
The final chapter arrives.
Smoke review.
Curing review.
Flower review.
Hash review.
Terpene evolution.
Effects.
Textures.
Lessons learned.
Mistakes made.
And final thoughts after this entire LSD journey from seed to cured medicine.
And finally…
Thank you.
To Zamnesia for the genetics and the Bubbleator.
To Plagron.
To F.O.G.
To all the LEDs, gear, and equipment involved.
To GrowDiaries.
To the community.
To the OG followers.
To the new curious visitors.
To the silent supporters.
To the skeptics.
To the lovers and even the haters 😄
To everyone spending time sharing this strange beautiful plant journey with us.
Wishing everyone:
cold water,
sticky fingers,
healthy plants,
beautiful resin,
and enough patience to let good hash become great hash 🌱

Likes
76
Share

@DogDoctorOfficial
Follow
Greetings, my fellow cultivators, and a bittersweet welcome to Week 4 of the Pink Rozay saga. This chapter brings both joy and a touch of sadness as we navigate the unexpected twist in this botanical journey. Our once-perfect queen, adorned with trichomes and promise, has taken an unexpected turn.
Week 4 witnessed the Pink Rozay, the prima donna of the grow room, continuing her floral ballet with undeniable elegance. The Scrog net, a tapestry of green, held the weight of dreams and promises. The Future Of Grow 600W full spectrum LED, a faithful companion throughout, continued to cast its enchanting glow on our botanical star.
However, amidst the beauty, a realization struck – our Pink Rozay, despite her breathtaking allure, had embarked on a journey of self-discovery. A journey that led her to reveal traits of both genders, a twist that, while fascinating, added a layer of complexity to the cultivation tale.
The trichome-laden buds, once a symbol of impending harvest, now stand as a testament to the unpredictability of nature. The nutrient symphony, conducted with precision using Aptus Holland's NutriSpray, K booster, P-Boost, and the entrancing Topbooster, played on, unaware of the unforeseen twist awaiting us.
The Pink Rozay's journey took an unexpected turn, and it is with a heavy heart that I share the news. In the spirit of maintaining the sanctity of the garden and the harmony of growth, the decision was made to bid adieu to our beloved Pink Rozay. Harvest day arrived not as a celebration but as a melancholic acknowledgment of the complexities inherent in the world of cultivation.
To our Pink Rozay – a botanical enigma, a canvas of contradictions, and a testament to the unpredictability of life. May your essence linger in the grow room as a reminder that, in the world of cultivation, every plant tells a unique story.
As I reflect on this unexpected twist, I extend my deepest gratitude to Aptus Holland for their unwavering support and to Future Of Grow for providing the illuminating backdrop to this evolving tale.
A heartfelt shout-out to @Zammi_official , the wizards behind the genetics that brought the Pink Rozay to life in my grow room. As cultivation journeys unfold, unexpected twists and turns become part of the narrative. The Pink Rozay, with all its fascinating complexities, is a testament to the unpredictability of nature.
Though this chapter took an unexpected turn, I want to express my continued belief in the amazing work Zamnesia Seeds does. The artistry of genetics is a delicate dance, and I remain a firm believer in the quality and dedication that Zamnesia Seeds brings to the world of cannabis cultivation.
Thank you, Zamnesia Seeds, for being part of this unique journey. Your seeds may have taken an unexpected route, but the magic they bring to the cultivation realm is undeniable. Here's to the ongoing pursuit of excellence and the vibrant tapestry of genetics you continue to weave.
The Pink Rozay saga, though touched by a tinge of melancholy, remains a testament to the ever-unfolding drama of cultivation. Stay tuned, dear growers, as we turn the page and embrace the lessons learned from this extraordinary chapter in the world of green wonders.
Genetics -Pink Rozay @Zammi_official
https://www.zamnesia.com/7646-zamnesia-seeds-pink-rozay.html
Nutrition - @aptusholland
https://aptus-holland.com/
Led Power @ F.O.G. Future Of Grow
https://www.thefuturofgrow.com/en/online-store/BLACK-SERIES-600-p489093171
As always thank you all for stopping by, for the love and for it all , this journey of mine wold just not be the same without you guys, the love and support is very much appreciated and i fell honored and blessed with you all in my life
With true love comes happiness Always believe in your self and always do things expecting nothing and with an open heart , be a giver and the universe will give back to you in ways you could not even imagine so
Likes
14
Share


@Do_it_Dan
Follow
This girl stinks! I'm happy she's happy say around a week and start the flush! Happy growing and remember stay green 💚🙏✌️

Processing
Likes
18
Share


@GiletJauner
Follow
7 eme semaine tout se passe parfaitement bien, très peu de place quatre pieds
J'ai comparé par rapport a d'autre 7eme semaine je pense être bon, aussi je vais changer d'engrais après cette cult pour GHE pas la jolie bouteille biobizz qui m'a avait été recommandé par culture indoor 11
Likes
8
Share


@CervantiS
Follow
Diy Growbox: 60*60*160 cm
Light: 150w led
Light Cycle: 12/12
Soil: CocoPerlite in diy Hydrobucked
Extractor: 120mm PC vent Running 24/7
Bloom has begon, together with the Sweet Zombie in a small space.
My bro and I are really happy with the results till now with our diy project


Likes
371
Share


@love_2_grow
Follow
D29.
We're at the start of the fifth week of veg, and today, I finally topped the first girl. I should have done it a while back, but I couldn't decide how to train the girls. Due to how tall the first girl had become, I topped quite a bit of her. I left four nodes, applied LST and some minor defoliation, so now I have eight tops in an almost flat canopy. I'll top the second girl later this week before putting in the scrog net.
I noticed how the second girl at the end of the day had drooping taco leaves, indicating that she is getting too much light. I raised the light and will observe tomorrow how she react. This strain seems sensitive to how much light it gets during veg, and I'm curious how it will react once we're in flower.
------------------------------
D31.
The first girl has bounced back from her topping and is looking great. I will top the second girl in a day or two, but since she has greater internodal spacing, I will keep only six branches to have both girls at a similar height.
------------------------------
D32.
I brewed up a quick compost tea using oat flour as the food source. Some people claim that that will result in a fungally dominant tea, so I thought I'd try it out. I also added humic acid and a teaspoon of myco because why not?
Honestly, I'm not sure it is even possible to create a fungally dominant AACT, as the constant water movement will most likely tear the fungal hyphae apart as they form.
In any case, a different food source should promote other bacteria than the molasses I usually use. Diversity is the name of the game in living soil. Well, in life in general.
I gave each girl 2 liters (5% of container volume) of tea @ pH 6.1.
------------------------------
D33.
Today, I topped the second girl. At first, I tried to keep four nodes, but her internodal spacing was much larger than the first girl, so I had to cut her down to three nodes.
Some LST followed the topping to start shaping that flat canopy.
She looked pretty scraggly afterward but had perked up a few hours later.
------------------------------
D35.
We're on the last day in the first week of flower.
All is well in the tent, and the second girl has bounced back from her topping. I'll let them veg for another week or so and then flip them.
I bought a mushroom grow kit to keep in the tent. I figured I'd test it out and see how it works. The mushrooms produce CO2 that the plants love, and hopefully, I'll get some tasty Oyster mushrooms to eat — two birds with one stone and all that.
Yesterday, I gave the girls around 1 liter each of water @ pH6.0, with EM-1 added at 20ml/l, and today the girls got some fulvic foliar spray just before lights out.
------------------------------

Likes
2
Share


@Barzenegger
Follow
Nothing much happened since last week. The foxtailing continues on the NYC and BJ. Mostly white pistils still. Found another banana on the SAD.
It's definitely going to take a few more weeks.

Likes
12
Share


@Smokeyhooch1
Follow
She is really short she is getting ready to start her stretch I'm seeing signs of pre flowering.
She is starting to grow more had to take a few of the inner branches off to thin her out some but she is still thick.
Likes
52
Share


@Salokin
Follow
Hi Growmies,
She seems to have stopped stretching g and the buds started to swell, so next week I have added pk 13/14 to the mix, as well as plant success orca and greenplanet‘s Rezin. I will add ventilation under the canopy this week, as I am getting worried that I’ll get mold down there. Other than that, the terpene profile is super strong already. „Der Name ist Programm“ literally orange and a zesty lime fragrance :D


Likes
34
Share


@Roberts
Follow
I am starting a auto moon rock. I will be growing her in 3 gallons of perlite. My 1 gal one was nice, and I am curious to it on a bigger scale. Figured this may be neat upon finishing. 🤞🏻 for a great grow. Thank you Medic Grow, and Divine Seeds. 🤜🏻🤛🏻🌱🌱🌱
Thank you grow diaries community for the 👇likes👇, follows, comments, and subscriptions on my YouTube channel👇. ❄️🌱🍻
Happy Growing 🌱🌱🌱
https://youtube.com/channel/UCAhN7yRzWLpcaRHhMIQ7X4g

Likes
18
Share


@VI_Cannabis
Follow
July 5 - The girls are still doing awesome. temps are between 21-26. Humidity is 40-50. Still feeding every 24-36 hours with 3L per plant.
July 6 - They are doing good. Showing lots of flower sites now. Unfortunately I did not get any pictures today.
July 7 - Tons of progress since last week. I don't see any signs of any problems, and still no pests! The smell is getting A lot stronger as it starts to flower more
July 8 - Still doing there thing, no problems, temps and humidity is fine. Have been feeding every 24 hours now as they seem to be really thirsty
July 9 - Super happy with how they are doing. No issues yet. Smell is heavier, and tons of bud sites showing up. Only issue is they are growing pretty uneven.
July 10 - Time to get a even canopy! First time doing some HST. I also did some defoliation. One of the stems split open a bit but it seems to be doing just fine. I did he HST and defoliation in the morning, i then took pictures of 12 hours later and everything seems just fine!
July 11 - Everything seems to be a lot more even and the broken stem doesn't seem to affect the growth.
Likes
42
Share

@squalino
Follow
Journal de Culture : Frost 1 (Semaine 5)
Génétique : Frostbanger (F2 Perso) | Système : Autopot 20L
📣 Remerciements
Un immense merci à toutes les personnes qui suivent ce journal depuis le début ! Un merci tout particulier à @MIA_BIOTABS et à Mrs_Larimar pour leurs précieux conseils et leur accompagnement. Merci à tous pour votre soutien !
🛠️ Configuration Technique (Rappel)
Éclairage : Lumatek ATS 300W Pro (réglé à 75%)
Distance lampe/canopée : 75 cm
Climat : Jour : 25°C / Nuit : 21°C
Humidité (HR) : 50%
Tente : 1m80 de hauteur
📅 Évolution & Entretien : Structure et Patience
plante 1:
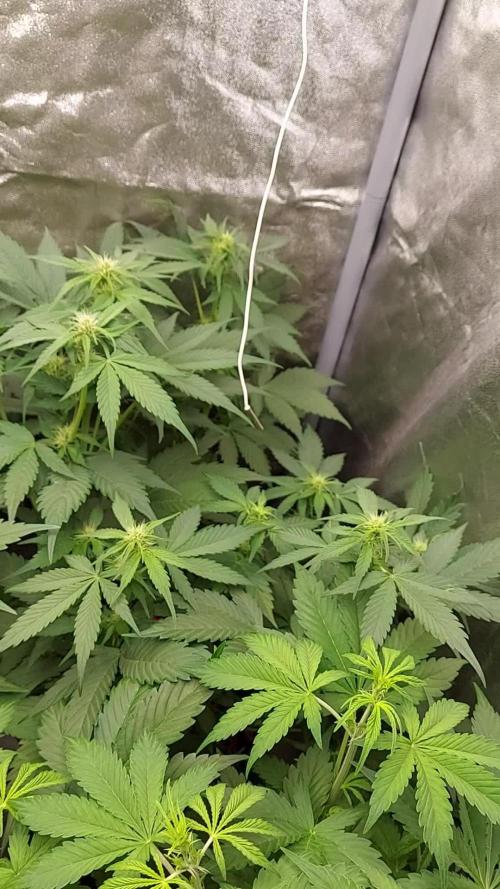
64 centimètres (+31 )
une croissance incroyable
les têtes se développent à toute vitesse
les photos et video parle d'elle même.
me manque de la hauteur dans la tente et de la place .
NUTRITION
que de l'eau Ph 6,3 du réservoir Autopot.
encore 1 semaine et elles auront de la place et je pourrai mieux m'en occuper.
PS:
I NEED HELP
MES AMIS J'AI BESOIN DE VÔTRE AIDE ET DE VÔTRE SOUTIENT .
VENEZ LIKER LE POST DU CONCOUR 《《DRYROCKET 》》S'IL VOUS PLAÎT. J'EN AI BESOIN LES AMIS MERCI À TOUS
Likes
22
Share

@KnightRider
Follow
Hey Cannafam Happy Tuesday,
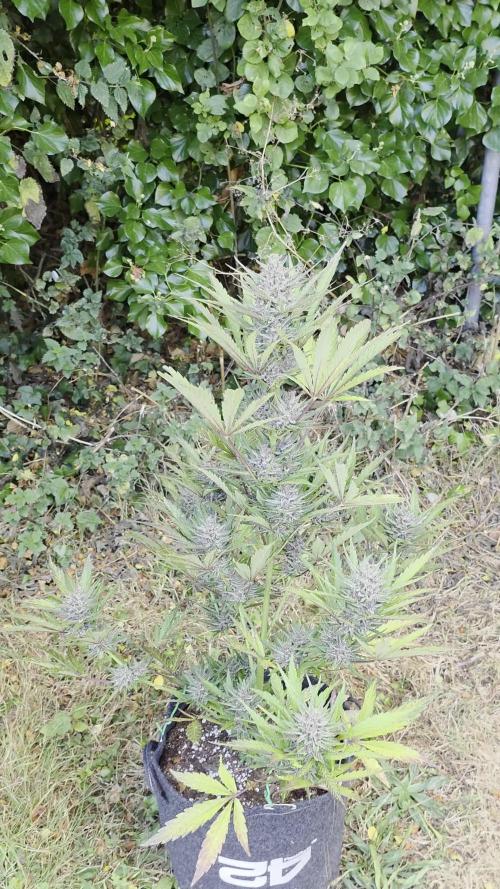
Well weve had another hot week with another heatwave for my Guava girl. Wednesday and Thursday were a scorching 33c in the day 19c at night, Friday 27c day 15c nightime, Saturday/ 29c 18c night and things have cooled off with both yesterday and today 23c. Today weve also had a couple hours of rain which was happily received, as there have been more wildfires and allott of our trees have been suffering from lack of water. Daylight hours are currently at 14hrs 20 minutes.
Budrot has become a concern at this stage due to the humidity shooting up, with an average of 80% for the week and today it was up to 92%! In response ive trained her lower tier of branches down and outwards to create wider spacing between them and the 2nd tier, which will assist with airflow. The upper part of the plant the spacing between buds is better and i've been checking the plant dayly for any adverse signs.
Feed wise ive continued with the green sensation at every watering and she seems absolutely fine with the increase in feed started last week, her buds have been gaining weight this week and shes developing nicely, theres also an increasing amount of frost on her and trichomes are half clear half cloudy. Her smell is still quite a delicate fruit candy smell and this is perfect as she dosen't draw attention to herself immediately.
Overall another really solid week from this gal 😁
Thanks for stopping by and see you soon ✌️💚
Likes
5
Share


@Lagriculteur420
Follow
The two first topped plant show good start of flower but i don't think this will be my best run, i've started tobguve them more nutrients


Likes
9
Share


@TheScouseBotanist
Follow
Found I had a problem with spidermite but caught it jst in time and quickly fixed


Likes
6
Share


@Weedman268
Follow
Week 7 of flower,room is a bit to cold but they are very close to finishing. 👍🏾


