
Processing
Likes
Comments
Share


@GirlGoneWeed
Follow
So last summer a friend of mine grow a Dark Angel Fem seed from Crop King outdoors and turned out the harvest was full of seeds...so I saved 9 of these seeds and germinated to do an outdoor grow this season.
I know chances are I will get hermies just like my friend did but since I have these seeds laying around why not?
Germination: 13h on water cup and 24h later tap roots were screaming to be put on soil... impressive.
Once put n soil seedlings popped out the morning after, seedlings are under a 25w Sunblaster for now, I have been using tap water on a spray bottle to water them.
Thats all for now, stay lit folks!
Follow me on Instagram @GirlGoneWeed

Likes
5
Share

@Green_Zyphoria
Follow
The journey for this lady has come to an end. Just like my last run with this pheno, I decided to chop her at Day 68. She might not be a giant, but the quality is undeniable. The buds look absolutely ripe and the colors are just insane—deep, dark, and beautiful.
The terpene profile is really coming through now: strong Papaya with a nice little gas kick on the finish. For a compact plant, the buds feel incredibly heavy and dense.
Drying Strategy:
Because of that extreme bud density, I’m taking no chances with mold. I’ve split the plant into four main colas to dry separately in the tent. This should give them enough breathing room to dry down evenly.
Overall, I’m super happy with this organic run. Now the hardest part begins—the wait!

Likes
50
Share


@AsNoriu
Follow
Day 58 since seed touched soil.
Sponsored grow
MARS HYDRO TSL2000: 300W, Flower 2'x4', Veg 3'x5'
It's recommended for beginners.
Low-budget & high-efficiency.
Think its more than for beginners ;)))
Plants coped well with small distance, stretch is over, flowers start tu bulk up, some buds will be really nice.
Today raised light to max, so now they have 15 cm quile healthy distance ;)))
Last top up was too powerful with Nitrogen, i see signs of overdose.
Bomb thinnest, smallest, from heat and wind damage has brown pistils here and there , but is stacked !!! Got light signs of nitrogen toxicity. Did small clearing, but she needs more ;)
Day 60. Some more to cut off
Happy Growing !!!

Likes
55
Share


@BodyByVio
Follow
Just got done with trimming the 4x4 @greenhouseseedco Super Silver Haze / @blimburnseeds Silver Surfer Haze tent.
The final yield is exactly 1000g plus some (kind of a lot)that I smoke in the last 2 weeks 😃
Also got 6, gallon size ziploc bags filled with good quality trim for concentrate.
To be honest I was expecting a little more but keeping in mind that this grow I did not supplemented with bottled CO2 I think I’m good with the results.
Definitely I enjoyed a lot this grow and I’ve learned even more.

Likes
9
Share


@Doctor_Torex
Follow
Il titolo lo potrei definire ( meravigliose creature) . Cmq siamo alla quarta settimana è tutto va alla grande, devo dire che per me che vengo dall’idroponica, lavorare con la terra è davvero semplice. Domanda per gli esperti; come vi sembra questa coltura? Devo sistemare qualcosa?


Likes
17
Share


@Fat_Olsh_Farms
Follow
Day 43. Still seems to be stretching. Minor defoliation, general Hydroponics maxigro every other watering til 15% runoff.
Day 47. Chunking up nicely. All 3 of my fastbuds plants are awesome.
Likes
30
Share


@GYOweed
Follow
Just been giving her water till today, megacrop part 1 only and 1/4tsp gal pk boost.
Smells like sweet cucumber mmmmmm.
Day 25 looks good imo.
Got a clone or two of it for breeding.
Likes
30
Share


@3lementa1
Follow
I've been lollipopping the plant. Things are looking and smelling good. I'm trying to maximize the vertical space of my grow room and I think I'm almost at the right height.
I've been keeping the light going at 75% (of 1000w) instead of 50%, which apparently I can get away with in the winter.

Likes
15
Share


@YOZYY
Follow
Watering every two days this watering was a plain water with calMag other than that I give a couple of the plants 2 weeks then I'll see if they ready for the chop.

Likes
6
Share


@Young_agronomist
Follow
23.09.23- 85 день жизни .
Глобальных изменений не происходит , шишки продолжают толстеть и оплакать глаз . Это самое большое растение из тех , которые мне доводилось растить !
На данном этапе ее рост около 180-185.
Сегодня я подвязал и распределил все толстые ветки под лампы , из-за своих размеров они прогибаются под своим весом .
Теперь она получает все 300 w
28.09.23- 90 дней от прорастания !
Изменения идут медленно , цветы растут а листья желтеют . Думаю еще 2 недели и финишь !
Сейчас она очень огромная , а ее цветы размером с бутылку ✨🍁

Likes
50
Share

@AsNoriu
Follow
Day 106. Joe is well behind, trimmed her a bit, catching up, but only 8 days left till harvest, will be week or so too early for normal time i guess... smells of rubbed leaves reminds very specific strain, cant recall yet ... very sticky already, bottoms miss light and penetration a lot ! But bulks ;) i see signs of fade starting too.
Watered today, one more left. No work needed, just waiting ;)
Mars TSL2000 is a bit too far in my mind, but stil gives enough power for Joe to have nicely stacked bottom parts. Good light , no doubts !
Happy Growing !!!


Likes
91
Share


@MrCOCO
Follow
The girls grew up again and are already 110 cm tall. I don't see any problems ... I did supercroping and they are fine too ... We keep going ...🍃🍃🍃


Likes
11
Share
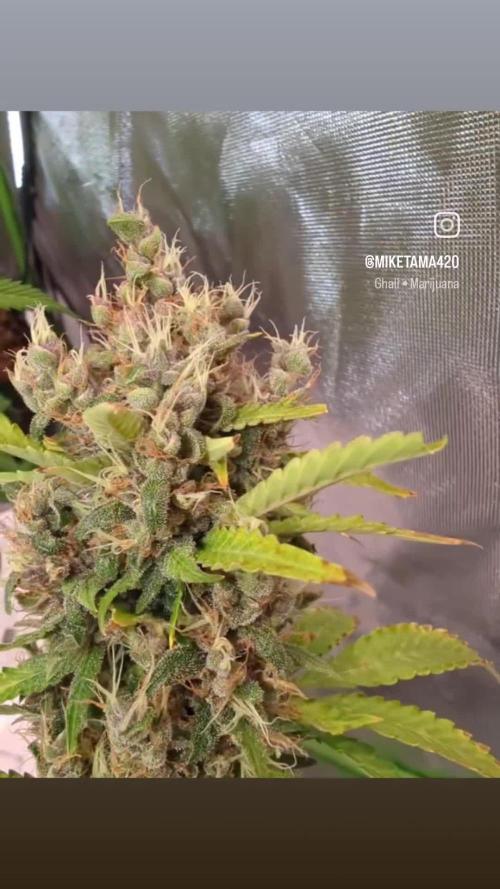

@Miketama
Follow
However, the final look was a total curveball. A severe heatwave hit the grow room right when the buds were already fully formed. Being an Indica-dominant strain with Afghan heritage, she really didn't tolerate that sudden intense heat. To cope with the temperature, she went into survival mode and triggered heavy late-stage foxtailing. Even though the weight was already there, the buds lost their typical Indica compactness and started stretching out with endless new white pistils, creating an airy, Sativa-like silhouette. It definitely cost her a few grams of extra density, but the sheer volume is impressive.
Interestingly, I ran this plant alongside a Sativa-dominant strain in the same tent, and they completely traded places structurally. You can check out how the heat impacted her tent mate in my Pablo Escobar Auto Diary.
Key Lesson: Dense, cool-loving Indica genetics like this one will be saved for winter cycles from now on to avoid late-season density loss. Still, with 570g wet, she is going to provide an incredible, heavy evening stash! 🍁💨
https://divineseeds.net/de/auto-purple-opium/


Likes
12
Share


@valiotoro
Follow
Hello everyone, all good for this week 😎
They grow fast and with a beautiful green colour on the leaves!
In this grow i will be testing out Plagron Nutrients and Mars Hydro FC-E6500
LSD-25 from Fast Buds 🍷🎢
Likes
21
Share


@24Gamez
Follow
Wow a long week, experiment definitely started showing differences but also mistakes were made. First I missed a watering a let them get too dry soil starting to stay a dark color and threw me off... But watered and fed anyway but I think because I was using pH drops to test water (didn't know how easy it is to break the meters) I may have made concentration too acidic or soil turning acidic. I don't think there is any nutrient burn just deficiencies (calcium and phosphorus) but I could be wrong. Ordered cal-mag just in case. One thing I've noticed not sure if it is only because 5 gal pots but plants 1 nd 2 looking massive. I may only use 5 gal pots next time but still early to tell. If anyone wants more info on what I'm trying to test or see something I'm doing wrong plz comment. PS soil is waaaay different than hydro lol


Likes
8
Share


@TeaTime
Follow
Fastberry Auto is truly a gem among autoflowering cannabis strains! Its rapid growth, delightful berry-like aroma, and beautiful purple buds make it a joy to cultivate. The sweet and fruity flavor is a treat for the senses, and the balanced high leaves me feeling creatively inspired and deeply relaxed. A must-try for any cannabis enthusiast, whether you're a seasoned grower or just starting out! -
Likes
18
Share


@Jays_Not_Here_Man
Follow
Still bringing them in and out each day. They are filling in nicely. Also did some LST, bending, twisting and tying down of some side branches. Fed with slightly more than 1/2 dose of nutrient’s recommended