Likes
Comments
Share


@DaSofaSurfer
Follow
So I started in a rockwool cube. This week I put her in SOIL. Unfortunately it seems I'm unable to change the grow medium. So there's that. Anyway...
Her leaves are really light shade of green however this is by no means a nitrogen deficiency. It's either just the genetics of the strain or a pheno.
Ive heard people saying this strain flowers really fast so I was expecting her to flower this week.That did not happen. Kind of a good thing to be honest. Maybe this week however I am in no rush
Anyways...
I how to put her in soil at the beginning of the week because her one inch rockwool starter was completely riddled with roots and could not take another day.
Put her in a 4 liter pot with about 20% perlite and 80% potting soil. Unfortunately I had no microryza for the transplant.
All is going well and just cruising along
I will have to start training her with some LST.

Likes
5
Share


@420DeepGrow
Follow
📆 Semana 7
Las plantas siguen en plena fase de engorde, con los cogollos ganando densidad y peso día a día. La absorción continúa siendo eficiente y la canopia mantiene un verde sano.
Los erizos se compactan y la resina se hace cada vez más visible, señal de que la planta centra su energía en densidad y producción de terpenos.
Los aromas se intensifican y las flores dominan completamente la planta en esta recta final.
Seguimos creciendo fuerte 💪!

Likes
14
Share

@Kirsten
Follow
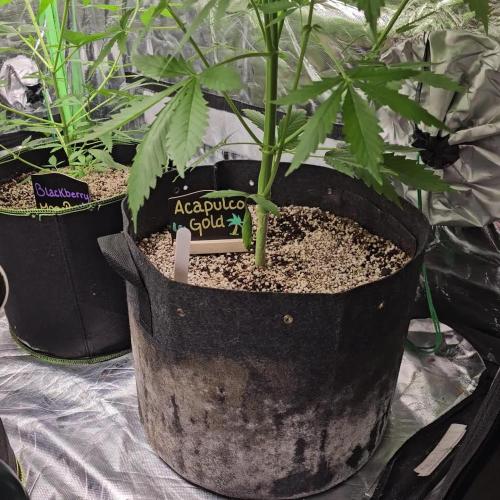
Ok so this week, I'm a little concerned at the height and structure. We all know the typical Christmas 🎄 tree shape. Well, I have an inverted, or upside down Christmas tree shape.
I'm going to need to stake the base, as its very top heavy, and I'm concerned that it will topple and snap the stalk.
Also, I cannot LST the plant as necessary due to the top heavy nature, as well as the extremely thick main stem which will easily snap if I were to train her.
The plant is also suffering from light stress. The leaves are folding up, and down. The leaves haven't darkened up either but this may just be the strain.
I have lowered the intensity of the lighting a few times, but due to being un-trainable, the plant will keep growing into the light.
I'm having a headache trying to figure out what to do with her, so if you have any ideas please let me know in the comments!
Anyway here's what I did this week.
14.7.25:
I watered with 2ltrs of dechlorinated water PH'd to 6.4, containing the following nutrients;
💜 2ml Ecothrive Trace
💜 1/4 TSP Ecothrive Biosys
PH: 6.4
PPM: 365
15.7.25:
I watered with 2ltrs of dechlorinated water PH'd to 6.6 with;
💜 1/2 TSP Mega Crop Part B
💜 1/4 TSP Ecothrive Biosys
PH: 6.6
PPM: 746
18.7.25:
I top dressed with the following organic dry amendments;
As a base for the dry amendments I used:
🧡 Worm Castings - 2 Cups
🧡 Coco - 2 Cups
🧡 Perlite - 1 Cup
Dry Amendments:
💚 Ecothrive Life Cycle 1TBS
💚 Ecothrive Bloom 1 TBS
💚 Ecothrive Charge 1TBS
💚 Diatomaceous Earth 1TBS
I watered with 2ltrs of dechlorinated water PH'd to 6.4 with 2ml Ecothrive Trace.
PH:6.4
PPM: 340.
Thanks for stopping by this week and if you have any ideas let me know in the comments section below 💚😊🍃✌️🌱🙏


Likes
8
Share


@MG2009
Follow
03/18/2022
I have not shown the third clone as much because of training I will start with her this week. Did some wiring wrap around on two branches, and stem cracked, super cropped third branch.
( I ran out of wire had to improvise) I got one clone for this girl starting!
All Girls update I will post pics on day 2. Tomorrow🙏🏻
Ps.
I fed (watered) with molasses, and aloe gel fresh squeezed by me.and organic grown (by me) One tbls (14.787ml) of each in two gallon jug(7.571l) also I layered coast of Maine 5-2-4 one teaspoon per layer one on top as well. I like the extra potassium in this blend as plants can absorb and store more potassium and save for later use (flowering) .
03/20/2022
Here are flowering girls

Likes
17
Share


@Chucky324
Follow
Hello. This is the end of week 7 and the beginning of week 8 of flowering.
I'm a bit bummed about this grow. I've read that you just need to force a plant to flower, that's 12 hours of light and 12 hours of dark for the first 3 weeks (I had a tent inside the greenhouse) and then put it outside and it will continue to flower. I thought that was amazing, so I wanted to give it a try. Well, here we are at the end of the 7th week and it looks like the plants are going back into veg. Last year I didn't do up the tent for the last 2 weeks and everything was fine so I thought I would give this keeping it open after the 3rd week a try. Now I know. I can always turn it into hash, maybe dry ice hash.
Here's another reason I'm bummed about this grow. I've got spider mites. I'm doing my best to knock them down with my hypochlorous acid. I'm spraying twice a week, but had some yellowish looking leaves, I reread the article (I put up a pic of it a few of weeks ago) and found I had to rinse the indoor plants. So after I sprayed the 1/2 strength acid I waited 10 minutes and rinsed with water. Today I can see more mites than when I sprayed before. So next time I'll wait till the 1/2 acid mix is dry before I rinse the leaves and see if that knocks them down more.
If you don't try new things you don't learn. That's what this grow is about, to see if the plants can still keep flowering at my latitude and now that I have mites, to see if the hypochlorous acid will work without killing the plants. Yes, I'm 60 something and still learning. 😃
Be Great.
Chuck.

Likes
8
Share


@DonPerion1983
Follow
So flushed for a week now and harvested all but one plant! Personally think I timed harvest time on a few plants wrong as they seem quite dark! Also picking at fan leaves very late on certainly didn’t help on two of the plants but overall for my first grow quite pleasing but know a lot can be improved on for my next grow! Personally also added canna pk13/14 to late into flowering time
Harvest
2 x sensi skunk fem
1 x auto gsc
1 x auto bcn
Remaining sensi skunk plant is currently in darkness for 72 hours before being harvested!


Processing
Likes
3
Share


@macrocefalo
Follow
The last 100 meters shallow hahaha. The vegetative growth and bud formation are good I believe we will have at most 15 more days for plants # B1 # B2 # B4 # B5. Plant # B3 has small white pistils and, due to its structure, there is no way for it to be a photoperiod so it will have more days than its sisters.
**UPDATE: B3 finally starting flowering with 66 Days
***UPDATE: 68Days flush Plants OK
Likes
35
Share


@Jacks_Pot
Follow
The 2nd week of 12/12 cycle went smooth. 😌
The screen is almost filled up and I saw pre-flowers on all 4 Runtz. A few larger fanleaves that blocked
light for lower shoots were removed.
But i've spotted some fungus gnats 😐, so I've placed a few of those yellow sticky things between the plants.
That was today, so tommorow I'll check if I've caught a few.
Temperatures fluctuated between 17°C (62.6°F) and 23.8°C (74.8 °F).
Humidity stayed between 39 – 68%. The high humidity maxima is because I still spray them once in a while.
The normal levels are between 40 - 50%.
It also got a little bit brighter in the growroom. 😎
The cobs went from 71cm (28 inches) and 236 watt to 70cm (27,5 inches) and 244 watt.
This week I gave them fed tap water once on day 11 of the 12/12 cycle (ph 6,38 – ec 1,39).
The rest of the week was pure tap water (ph 6,37 – ec 0,5).
And I gave them their second CannaCurespray shower. (50ml/250ml)
Just a few more days and I can start counting the actual flowering days.😀
That was the second week 12/12 in a nutshell.
Enjoy your weekend and keep them green! ✋
Do you want to grow this strain?
👉 https://www.zamnesia.com/6000-zamnesia-seeds-runtz-feminized.html 👈
Likes
10
Share


@Garamantes
Follow
The start of cultivation was not at all favorable at temperatures below 10 degrees then came a storm that caused cracks and tears in the leaves ...
The leaves were very dirty from clay and perlite, so I tried to wash them all with a paper tissue.
The weather was not at all kind, so I added Advanced Nutrients- B52 vitamins and Rhino Skin to strengthen the stem and leaf
I often meet different animals on my way through the forest, today I met a newly born young fallow deer

Likes
11
Share


@Mo_Powers
Follow
the weather in germany is still totally changeable. temperatures from 10 degrees at night to 30 degrees during the day. and lots of rain. but it is growing incredibly well for the conditions.
Likes
8
Share

@DutchBarnacle
Follow
Week 7
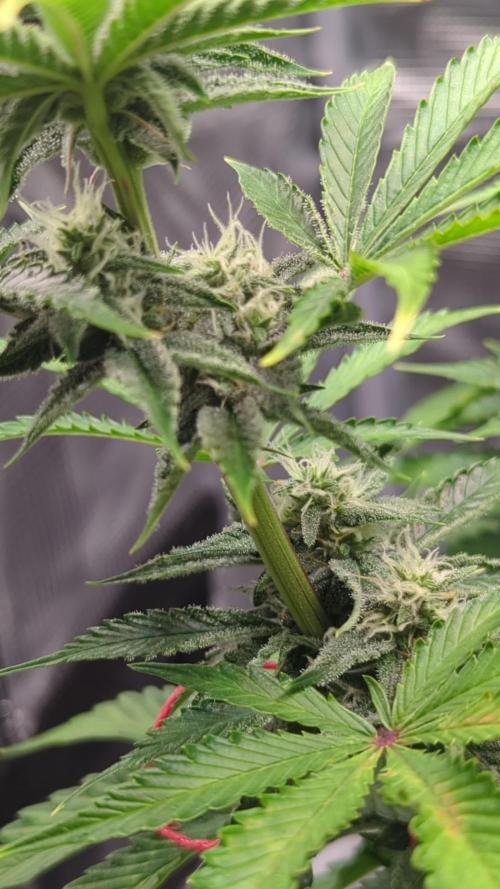
She's still going strong, while Royal Queen Seeds has stated that this strain is ready in 8-9 weeks, I'm wondering whether this pheno will surpass that window. Imagining her not making it to the end of next week is hard, given she's going this strong and her budsites are still in full development.
Her smell has increased and her Cookies Auto genes are coming through. Although her sugarleaves still give off that citrusy scent when rubbed, her actual buds and pistils give this faint vanilla-like cookie smell. Whilst I forgot the exact parent strains she has, I was certain it had to be something 'cookie' like - which turned out to be the case.
I started occasionally feeding her with PH balanced Potassium + CalMag alone, to aid her flower development and to not overdo the amount of nitrogen that's in her regular feed. Also increased the amount of water, adding an extra liter of tapwater after normal feed - in hindsight perhaps it would have been better to pre-moisture with the extra water before adding nutes.
Come to think of it, this might have affected her more than was apparent in week 7.
Likes
2
Share


@Manchu
Follow
Mi experiencia con esta variedad, fue realmente buena. una semilla con mucho vigor, muy resistente a plagas, y con sabores y olores exquisitos

Likes
55
Share


Likes
7
Share


@x_grower
Follow
Last week was very challenging, two girls got really tall below the white light, while the other two below the blurple spectrum ended up being smaller and bushier, both looking fantastic. Last week I also probably went too far defoliating the shaded smaller girl which stunned it a bit for a day or two but its flowering vigorously again. Although the unexpected stretch which led to uneven light coverage overally the platns are looking solid, smelly and sugary :)
Likes
6
Share


@LokalGrenz
Follow
Looking good so far no real issues still just RO water and growers recharge once a week going to use 4-4-4 in couple days I also used it 21 days before I flipped l




Likes
169
Share


@SlowpokeFuegobud
Follow
🍊 🐶 💜 🐘 🍊 🐶 💜 🐘 🍊 🐶 💜 🐘 🍊 🐶 💜 🐘 🍊 🐶 💜 🐘 🍊 🐶 💜 🐘 🍊 🐶 💜 🐘 🍊 🐶 💜 🐘 🍊 🐶 💜 🐘
Welcome to week 12, my fellow growmies!! 💚 💚 💚
I'm back from Catalonia and the girls are still there, waiting for me! 🎉 I missed them like crazy, you might understand. I never missed a person like that. 😬
The water bottles released their water too early, the floor got flooded, and the girls were super dry when I got home. I watered the same night with lights off. I mean the floor was dirty anyway.. 😅
DAY 83
Watered with 2ml bloom + 1ml pk + 4ml growzyme + humics + bigfruits + 2ml calmag 💧
Thanks for stopping by, it's a true pleasure to have you as visitors!! 💚 💚 💚 😘
💜 🐘
______________________________________________________________
About Sour Tangie Dawg cannabis seeds
Sour Tangie Dawg is a sativa dominant cross between the famous Tangie and Chemdawg. Expect a combination of sweet & fruity mixed with a gassy, jet-fuel flavour. The amazing mix of citrus, tangerine, pine and gasoline produces uniquely rich, dank buds. The powerful sativa high is strong, uplifting and long lasting, great for creativity and socialising.
Chemdawg is the parent of OG Kush, all Diesel strain originate from Chemdawg. The Tangie is originally a Skunk hybrid strain but extremely fruity with the trademark Tangerine flavour. This strain is potent with THC-levels over 20% alongside very generous yields of top quality weed, very suited for hash and rosin producers. If you’re looking for a strain to produce the best tasting concentrates this Sour Tangie Dawg is a proven winner! She easy to grow and the perfect choice for SCROG growing due to her growth speed and stretch. We advise switching to 12/12 light when 75% of the net is filled. For outdoor growers the harvest period is early October. Indoors she’s finished after 9 weeks of flower - fast for a sativa dominant strain. We recommend growing in soil with organic nutrients for the best tasting weed.
Get some fantastic genetics here: https://supersativaseedclub.com/ 💜 🐘
___________________________________________________________________________
SETUP:
80x80x180 cm Zelsius
240W Full Spectrum LED IR UV dimmable
DW240H-A6-HS
Heatsink color red
LED Chips:
512pcs SAMSUNG LM301H + 24pcs Osram 660nm + 8pcs Osram IR 730nm + 8pcs UV 385nm
Color mix: 2700K + 4000K
2,8umol/J
Driver HLG-240H-C2100B
Coverage: veg 5x3ft / flower 4x2ft
Product size: 628x205x68mm
Green Buzz Nutrients
Shouts go out to my sponsors @GreenBuzzNutrients, thanks so much for your support! ❤️
If anyone would like to try their amazing organic products, use code GD42025 for generous 25% discount (for orders of minimum 75€) ✨
https://greenbuzznutrients.com/
Biobizz Lightmix
custom exhaust fan 320/270cm³/h
Carbon Active Granulate 240cm³/h
tab water pH 8 - EC 0,25 with Calmag to 0,5
Advanced Hydroponics pH minus Grow + Bloom to pH 6.2
🍊 🐶 💜 🐘 🍊 🐶 💜 🐘 🍊 🐶 💜 🐘 🍊 🐶 💜 🐘 🍊 🐶 💜 🐘 🍊 🐶 💜 🐘 🍊 🐶 💜 🐘 🍊 🐶 💜 🐘 🍊 🐶 💜 🐘

Likes
Comments
Share