






Likes
63
Share


@AsNoriu
Follow
Day 43.
so main change, i lost my mobile and i had really loads of photos and videos of ex grows. i blacklisted it, but still...
from now i will reduce amount of post and updates, it is stupid, but i cant risk ...
Girls all week on diet, looks like only one Gorilla is starving a bit and would need more, but in my plans last watering with molases this time only.
They already had runs with silica only. cal mag only x2.
Think worm castings was an isue, control garden grows really fine, will be my smallest plants ever, they will have 3 weeks in total for veg.
Happy growing and dont loose your mobiles, huge pain ....
Day 48. Gorillas are really nice and i cant denny it, but ....
Cookies are worst experience ever...
They just dont want to grow and show up new issue the second you fight one....
I even made control garden with more than years old beans of Incredible Bulk and bagseed Strawberry Cough. Both strains grow ok, but not Cookie !!!
Thats honestly wrong genetics, unless someone prove me wrong, open for your advices ...
Hard training again, still on pure water diet with calmag or silica or molases as small bonus while no feed for two weeks + ....
Lights are out because training took longer than i wanted. ...
Next week they go to 24 hours darkness and light is changed to 12/12. That was last week of really hard training, now i will wait for green mass of leaves to cover stems and hope they will make some buds ;))
Choose your beans wisier than me ...
Happy growing !!!


Likes
23
Share


@NSCanna
Follow
Buds are fattening up pretty well and I've had to use more rubber garden wire and clips to keep the branches from bending over. Smell is increasing on the Northern Light but still a mild skunk on the Black Devil. Also gave the very last feeding on the plants this week so they will get nothing but water until the chop.
I'm very happy with the microbe populations so I stopped feeding the sugars (molasses/agave) as the plants themselves don't get much out of them; that stuff is just for feeding the soil beasties. I had added some predatory mites several weeks ago to deal with some springtails, and the mites annihilated the population. I did find a developing larva though so there are still some around. Posted lots of microscope videos today.


Likes
10
Share


@Archieballs
Follow
Harvested Banana #1 she had stopped growing and her trichomes were ready her wet weight was 184 grams and dry weight 53 grams.
Banana #2 and Skywalker are still going they are on water only from here on. They both got 5 liters of ph water on day 80.

Likes
6
Share


@k0nz1
Follow
Switch to 12/12. The Stretch ist already kicking. Little LST to get a wider cannopy.
BBP and RJ very bushy with lots of leaves.
LO growing taller with bigger internodial space.
All plants doing Well so far.
Nutrients: Canna vega, calmag, cannazym ph 6.0-6.5
Light 50-70 % by 60cm to topleaves
RH 58-65 %
Temp ~ 25 Celsius
With Power into the Flower


Likes
16
Share


@Ganjagrandaddy
Follow
Flower Day 2: Pog is a star. She is loving the quad style and seems to be putting mains into every space she can. They are forming low down each stem so i am hoping i can keep them developing from below better to fill each stem. She is a good 24 inches now and hopefully finished the stretch at that. I am due at day 7 to give her a defol and clear out the small undeveloped , shadowed budlets. She isnt putting out any smell as such but is starting to try. She is my secret favourite so far but dont tell her cousins !!!
Have a great growing week

Likes
18
Share


@Grower_Of_Persia
Follow
week intel:
everything is perfect!
stresses :
just a little E.C stress around 1.7 once a week
feeding:
i feed them 3 times this week with this order :
day 1 : i feed them heavy with silicate +base nutrients(calcium & micros + Bloom) about 818 ppm - 1.7 e.c to cause a little stress.
day 3 : i feed them low dose of Feeding Booster + Karbo Boost around 382 ppm - 0.7 e.c to let them recover a little but not fully recover still a little stress will caused.
day 5 : i feed them with low dose of Top-Max + B-52 around 250 ppm - 0.5 e.c to let them recover the stresses to get ready for another stress next week.
guide of the week :
know your plant tolerance limit of E.C stress once you saw the very very little yellowing on tips of leaves , that's the sign to don't go further , never reach that limit if you want a high quality buds, in my case tolerance is 1.8 and i'll reach to that level only once a week to cause precision stress , love your plants and have a happy growing!

Likes
2
Share


@OG076
Follow
Es ist die 2 Blüte Woche und die kleinen sind in der vor Blüte und haben einen richtig extremen Schub bekommen nächste Woche werden sie wieder getoppt damit die ganze Energie bzw. Nährstoffe nach oben gehen an der Kopf der Pflanze


Processing
Likes
5
Share


@Ensign420
Follow
Week 02 Introduction
This week has been a bit of a struggle. Had my first experience dealing with slime and brown algae. But I think adding enzymes and increasing the beneficial bacteria helped to fix the issue. Also experienced nutrient burn for the first time. My nutrient solution strength got as high as 671 PPMs. So backed it down to about 430 PPMs during the end-of-week reservoir change. Also cut Hydroguard (expired?), CaliMagic, and Superthrive from this grow. Now she's still stunted, but is starting to recover. Hopefully...
[START OF WEEK 02]
Day 01 - Monday - 08/10/20 - Total Days: 008
-----------------------------------
- [0830]: Still looks a bit yellow. But getting larger!
--- Solution strength was at 248 PPMs.
--- Just topped off with a bit of distilled water
--- PH went up to 6.1 so PH'd down to 5.8
--- Ran the top feed for a bit to wet the hydroton.
- [2130]: She's looking even more yellow now.
--- Even the new leaves are really yellow.
--- Decided to add more base nutes.
--- Added 4ml of Sensi A
--- Added 4ml of Sensi B
--- Now at about
--- Solution Strength went up to 304 PPM.
--- PH was at 6,
--- Also raised the water level a bit more.
--- I really hope it's a nutrient deficiency and not an over-watering issue.
--- Please live!
Day 02 - Tuesday - 08/11/20 - Total Days: 009
-----------------------------------
- [0830]: Looking less droopy. But still yellow.
--- Decided to do a reservoir change.
--- 4.5gal of distilled water
--- 8ml of Sensi Grow A
--- 8ml of Sensi Grow B
--- 8ml of Voodoo Juice
--- 4ml of B-52
--- 4ml of CaliMagic
--- 4ml of Hydroguard
--- 4 drops of Superthrive
--- PH'd down to 5.8
--- Solution strength: 302 PPM
--- Since I didn't want to risk over-watering the rockwool, I did not to do a top feed, may do one tonight after the sleep cycle (lights are still set to go off at 10am and back on at 4pm).
--- As I was doing a reservoir change, I noticed that the tubes and bucket were a bit slimy. Didn't really stink or anything. Is this normal? Maybe due to the Hydroguard and Voodoo Juice?
--- I hope she gets better soon!
- [2215]: Getting larger! But still yellow.
--- Also can see a root growing through the net pot! Tiny little thing but it's there! Will have to start dropping water once more appear.
--- After looking over a few DWC diaries using AN nutes, seems like my solution strength is still too low. Most around this stage average around 500 PPMs with about 4ml per gallon.
--- Top fed for a minute to wet the top of the hydroton.
--- Solution strength went down to 263 PPM.
--- Added 8ml more of Sensi A
--- Added 8ml more of Sensi B
--- Now base nutes are at 16ml for 4.5 gal of water.
--- PPMs went up to 411.
--- Still lower than 500 PPMs, but that's okay.
--- PH was at 6. Not sure if I should adjust PH using AN nutes. So going to not ajdust unless PH goes above 6.1.
Day 03 - Wednesday - 08/12/20 - Total Days: 010
-----------------------------------
- [0830]: Looks like more root growth!
--- She still looks yellow. But leaves are perky.
--- PH was at 6.2 so lowered down to 5.8.
--- Solution strength was at 394 PPMs
--- Since roots are still growing, I decide to lower the water level a bit. Now water level is a bit below the net pot.
- [2200]: Root is getting longer!
--- Slime is returning. Not sure why.
--- Solution strength: 357 PPMs
--- PH: 6.1
--- Decided to add an enzyme along with more beneficial bacteria to hopefully cure the slime.
--- Added 16ml of Sensizym
--- Added 5ml of Hydroguard
--- Added 8ml of Voodoo Juice
--- New solution strength: 430 PPMs
--- New PH: 6.1
--- Top fed for a minute.
--- This slimy residue is really freaking me out! I hope the added enzymes will help eliminate the slime.
--- Going to do a full reservoir sterilization/nutrient change over the weekend. Please survive until then girl!
Day 04 - Thursday - 08/13/20 - Total Days: 011
-----------------------------------
- [0930]: I think the enzymes worked! There is little to no slime now!
--- Although I think the root was also dissolved in the process. It's now just a little stub sticking just below the net pot. The enzyme is also suppose to dissolved dead roots too but guess that root was too weak? Not sure what happened there. But I think the slime is cured!
--- Solution strength went down to 395 PPMs. Decided to add more base nutrients.
--- Added 8ml of Sensi A
--- Added 8ml of Sensi B
--- Added 4ml of B-52
--- Solution strength went up to 598 PPMs.
--- PH was at 6.1
--- As long as the PH is between 5.5 and 6.3, I'm not going to use PH Up or Down. But still will monitor PH levels.
- [1715]: Checked up on her after her nap and shes looking alive but stunted. But no slime!
--- Decided to add some sugars to help maintain the enzymes and beneficial bacteria.
--- Solution strength was at 587 PPMs.
--- PH was at 6.2
--- Added 8ml of Bud Candy
--- Solution strength went up to 671 PPMs.
--- PH also went up to 6.3
--- Lowered water level a bit to hopefully promote more root growth.
--- Top fed for a minute.
--- She is getting bigger, but still looks yellow.
Day 05 - Friday - 08/14/20 - Total Days: 012
-----------------------------------
- [0915]: Leaves look a little burnt on the tips. Still no slime.
--- Going to back off on the PPMs to hopefully fix the nutrient toxicity.
--- Solution strength was at 632 PPMs
--- PH was at 6.3
--- Added/Removed water until PPMs were at 536.
--- PH was still at 6.3
--- Raised water up a bit, then top fed for a minute.
- [2200]: Looking better. Still yellow though.
--- Solution strength: 514 PPMs
--- PH: 6.5
--- Added PH down.
--- New solution strength: 518 PPMs
--- New PH: 5.2
--- PH was kind of high. So decided to PH down. Had to use quite a bit to bring it down. But eventually got it to drop down to 5.3. A little low, but so far, the PH has always gone up so wanted to start it really low.
--- Ran the top feed for a minute to re-saturate the top of the hydroton.
Day 06 - Saturday - 08/15/20 - Total Days: 013
-----------------------------------
- [0830]: She looks stunted. leaves are still yellow.
--- Solution strength: 514 PPMs
--- PH: 5.6
--- Top fed for a minute.
--- Not sure what to do at this point. Going to do another reservoir change soon. Hoping she lives until then.
- [2145]: Looking pretty much the same.
--- A bit of slime has returned. Since I've been diluting the nutrient solution, the enzyme ratio has dropped. So I guess this is expected.
--- Also noticed that slime build up was on the air-stones. Never really checked the stones so not sure how long that has been there. Looks brown too, which can't be good.
--- Going to do an H202 sterilization of the system (minus the net pot) tomorrow so did not add anything.
--- Lowered the water level to below the net pot.
--- Then top fed for a minute.
Day 07 - Sunday - 08/16/20 - Total Days: 014
-----------------------------------
- [0900]: STERILIZATION DAY!
--- Decided to skip today's night cycle for a deep clean.
--- I'm hoping that skipping a night cycle won't be too stressful.
--- Temporarily moved her to a new bucket.
--- Used about a half of gallon of straight distilled water to flush out the net pot.
--- Drained the system and wiped up all the brown sludge. Also removed the air stones and cleaned up all the goo.
--- Filled the system with 2 gallons of distilled water and at least 30ml of food grade hydrogen peroxide (35% strength).
--- Yea its a lot, but since I'm not going to sterilize the system overnight, I went with a really high doseage. Basically I kept adding until I started to see little bubbles start to form.
--- Then I ran the water pump.
- [0915]: Boiled the air stones in tap water for about 10 min. Then reconnected them to the airlines.
--- I let the air stones and hose soak in the sterilization solution for about 5 minutes so the peroxide can absorb into the stones. Then ran the air stone to help mix and agitate the solution.
--- Occasionally, I'd repeat the process of turning the air pump off for a few minutes to let the stones soak.
- [1000]: Covered the top two row of holes of the net pot with some aluminum tape. Hopefully this solves the light leaking in through the hydroton.
- [1200]: Used an old toothbrush and scrubbed the pump clean. Then drained the system.
--- Refilled with more distilled water and peroxide. Again added a lot.
--- Ran system again to sterilize even more.
- [1530]: Drained the system and refilled with distilled water to rinse.
--- Ran the system for a few minutes, then drained and rinsed again.
--- Did this a few more times over about an hour.
- [1630]: Added 4 gallons of fresh distilled water.
--- Added 15ml Sensi Grow A
--- Added 15ml Sensi Grow B
--- Added 12ml of B-52
--- Added 16ml of Voodoo Juice
--- Added 16ml Sensizym
--- Solution strength was at 430 PPMs
--- PH was at 5.6
--- I was going to add Hydroguard, but I think the bottle is expired. Since 2017 or 2018!? I think Hydroguard is good for up to 2 years from the date on the bottle or 6 months after opening. So not going to use from now on. I wonder if this could have contributed to the slime build up.
--- Also removed the CaliMagic and Superthrive too. Going to only use AN products to eliminate the chance of incompatible nutrients.
--- Placed her back in the bucket and top fed for a minute.
--- Here's hoping for the best. Going to let it ride until morning! Please feel better!
[END OF WEEK 02]

Processing
Likes
24
Share


@Spazmagi
Follow
11/23 - Update one day early. I will do detailed measurements tomorrow and update as usual. Slight stretch this week and buds starting to show pistils. High number of bud-sites and tight stacking. Still doing periodic removal of a few leaves here and there from her undercarriage.
11/24 - Added video.
11/25 - Topped off Res (6am) - Almost 1/2 gal
11/26 - Added more pictures
Thanks for stopping by the garden, and, as always, Happy Growing!

Likes
54
Share


@Rangaku
Follow
Pulled the second cherry Cola today and it looks and smells just like heaven , some nice pinks , purples and greens . Plants look to be around 12 oz together but we’ll see how they dry .
Likes
77
Share


@Ukfarmer420
Follow
Light = bloomplus bp2500 250watt actuall draw.
Exhaust is a ac infinity 6inch with digital controller
Inkbird humidity controller with a ram 5l humidifier. Veg only!
Soil= biobizz light mix
Nutes= biobizz using the 10 week schedule at half dose this run.
Heaven =2ml avti vera=2ml
fish shite= 1ml calmag=2ml
All nutes mixed to 1l of water
Ph= 6.4
Room humidity is 60%
Day Temp is 25°c
Over the last week the plants have exploded with growth, I feed them 3x last week and will do the same the week.
I will be performing lst to some of the plants later on in the week.
More pics and videos to come.
Happy growing guys 💪💚

Likes
26
Share


@MiyaguiOkPolilla
Follow
Esta cepa es fenomenal, la saqué a exterior en la última semana y media para aumentar sus terpenos y minimizar la degradación con solo 3 horas de luz directa, 7° C noches y días de 15° C ; me recuerda mucho a Critical Bilbo, un aroma dulce, intenso y muchísimas ventajas de parte de la genética: Resistencia a plagas, podas violentas y entrenamientos de cualquier tipo. Fácil de obtener esquejes y mucha producción de resina 🤤💐.
Me encanta esta cepa en exteriores pero en interior ha mostrado ser más que apta, sólo al final de su etapa ha mostrado algunas flores macho pero creo que es causa del estrés por las bajas temperaturas en sus últimas 2 semanas.
Saludos a todos y muchas gracias por pasar a ver los diarios ☺️

Likes
58
Share


@Legendaryseedthumb
Follow
Super small buds in the 2 girls on the side. But I never ever felt so dense buds!
I started to just feed them water today, they have plenty of stored nutrients in them.

Likes
14
Share


@BudBrewerz
Follow
She's got very thick buds covered with white cristals. She's got a nice full smell (which covers about the whole house now)
Can't wait to have her dried so I can have a taste
Likes
6
Share

@Chucky324
Follow
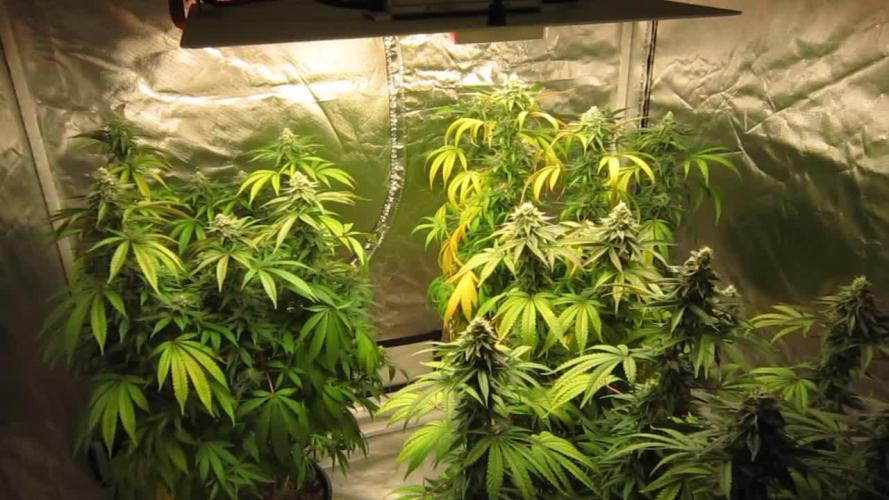
Hello. This is the end of week 7 and the beginning of week 8 of flowering.
Everything is going good in here. I see this strain is hungry. I've got more yellow leaves than I should.
I should have been feeding this strain a bit more nitrogen and I wouldn't have had so many yellow leaves.
It's hard to read the plant signs, sometimes. There will be a few more feedings before flushing starts.
Hey... I've got a 50% off code for UKHTA Seeds if anyone is interested? Won it in a contest, and I won't use it before it expires.
It's a 50% off your first order code, has to be used by May 1st 2026.
They would love diaries made on their seeds.
That's... www.ukhta.es/ to see their strains.
Privet message me if your interested.
OK. Keep Growing Straight.
Chuck.
Likes
17
Share


@m0use
Follow
This was a fun project that was a few years in the making and a year later to see if they would last a season for this upload to happen. Before any of this I would bike aorund town grabbing up all the old Ikea solid pine bed slats that I could find and storing them in the basement. I have a lot of wood down there, any size worked as long as I have enough of them. The hot days to find them were the first and last of the months because that's when people where moving in/out. I also kept an eye on the free section on local online classifieds as well. The entire purpose of this was to recycle as much off the streets as I could before buying anything to finalize the project. In the end I only bought sealer, screws and some takeaway/beers. All the wood was 100% free and salvaged off the streets of Toronto saving it from the dumpster bin.
After collecting all the slats for about 2 years I was playing aorund with them on how I wanted to make this work. I had previously done a little project like this before but I messed it up and the boxes where crap. did not last longer then 2 seasons, they where thin and shallow as well could not grow much of anything in them. I Was talking to my friend who is renovating their house and we brainstormed some ideas on the boxes, I found some designs I liked online and said lets make something like this out of what I have here. We tossed out a few of the design features when looking at them as it would have been wasted wood and extra work not needed. If I had more wood them maybe it could have been an option but simple was the name of the game. They taught me what I needed to know like how the miter saw and sander worked, plus all the other tools I was using. They did help out with a table saw and creating the triangle support joints in the corners, They used some pine left overs they had while making a staircase indoors. I did not feel up to the task of using a table saw given all the relatives I know who have lost a finger to them.
In the end we decided the design would be three boards high and take an alternating pattern on corners. layer one short, layer 2 long, layer 3 short. Went with a galvanized and painted deck screw so it can take the weathering. Ran into some problems like making everything level as some of the boards were warped and other ones had undesired aspects like knots and tacky sticker goo I could not remove. So I used them for the base that will not been seen so much. Clamped everything down and called it a day.
Once it was all done and over with, I then brought them back home from my buddies work garage and started to seal them. I went with a boiled linseed oil as its a food safe option should the wood degrade into the soil I will plant in them. I will need to reapply it to the boxes year after year but the main coat is the most important one and I put it on 3 layers with a good dry in between coats. the inside of the boxes that where coated did not degrade at all as the sun did not hit them so it will not need a new coat just the outside. Overall the end result was very impressive for myself, I've never taken a woodworking class ever and It was a near perfect outcome for me. Heavy Duty Planter Boxes for all my gardening needs. I made a last min decision to add in a plastic liner to preserve the wood even longer and stapled that into the frame. it has held up quite well and may need replacing end of 2nd or 3rd year out in the sun. Used a thick moisture wrap plastic with UV protectors in its formula.
Lets see what I can grow in them this year!
m0use's haus of projects - garden box edition
Likes
Comments
Share


@german_growing
Follow
Really nonflexibal cells - breaks very easylie when low stress trained with Bud Clips
But she recovered every stem break and growing healthy and vigorously
Likes
16
Share


@NMGDOC
Follow
Semana del 3 al 9 de Mayo.
Como puse en la pregunta de la semana anterior, ya vieron que tengo una chica hermafrodita. No tengo otro indoor para ponerla, así que la saqué a otra habitación y le puse la TGL60 a ver que pasa. Las otras tres plantas siguen en el indoor con la TGL 220.
Como estaban con la malla, me costó mucho sacarla del indoor. Tuve que atarla porque las ramas no se sostenían muy bien por si mismas, así que ahora tengo este ramo que cocecharé más o menos el 16 de mayo.
No parecen engordar mucho los cogollos, creo que los insectos afectaron más de lo que pensaba, sobretodo porque estos atacan las raíces.
Las luces estaban a 15cm porque es lo que sugiere el fabricante para este periodo. Consideren que no es el clásico led y ya está. Ahora están a 20cm por miedo a que vayan a sufrir algún estrés lumínico.

Likes
6
Share


@MrBamBam420
Follow
It’s been a long road to this grow. I had a little hiccup and broke some branches by dropping my phone on my plant while recording.