The Grow Awards 2026 🏆 


Likes
Comments
Share
@Cariboo_OG
Follow
Utopia Haze is a rare heavily sativa dominant hybrid (90% sativa/10% indica) strain created through back crossing Brazilian Sativa strains. This tasty little bud took home 1st Place for Best Sativa in the 2008 High Times’ Cannabis Cup and for good reason – with its potent 18-22% average THC level and long lasting cerebral effects, Utopia Haze is one powerhouse smoke. The Utopia Haze high comes on soon after you finish your first toke, hitting you with a strong cerebral lift that infuses you with a sense of hazy relaxation.
Type: Feminised/Photoperiod
Cultivation: Indoor/Outdoor
Flowering Time (days): 70-75
Indoor Yield (g): Up to 650
Feminised Outdoor Harvest Month: October
Feminised Outdoor Harvest Month Week: 3rd-4th week
Aroma: Citrus, Woody, Pungent, Mint
Effect: Cerebral Lift, Hazy Relaxation, Sleepy
Welcome Everyone to the Final Entry of my Utopia Haze Grow !
There is so much to discuss ! I have been extremely busy as of late trying to get this Harvest together, but i am happy to have it here for you now !
I Seriously under estimated the amount of time, help from others, and my own necessary skills to pull this off.. and i still kind of screwed it up lol !
But its worth noting i have never actually done this before and trying to document it during....was extremely hard.
It is next to impossible to work an iPhone with rubber gloves on !
First I want to discuss everything step by step so before you jump straight into the comments on how the end product is so small in "quantity"
Rest assured i am happy with its"quality"...and thats all that matters to me because Life is a journey not a destination! and i have learned so much from this grow that I couldn't be any happy even if i messed some things up :)
But at the very least I hope you read through this entry in its entirety with an open mind and focus more on the process, rather than just the outcome!
I ran out of Ice & i was only able to wash three times..(normally I've heard you should go sometimes 5-6 washes)
Preparation is Key & things will be much better next round :)
Photos 1-22
These are pretty self explanatory but for those of you just tuning in now.. this is what happens to a very happy plant when you don't have the necessary tools to monitor key components of growing cannabis.. Ph, as well as EC levels play a very key role in the outcome of your grow lol that being said I was just able to save this plant by purchasing both tools but that doesn't mean the plant didn't suffer because of the prior events.. This was a Huge reason behind me choosing to turn this harvest into what i would consider
"Solventless Hash Rosin" from "Ice water extracted Bubble hash".
Pictures 23
The idea here is the process of using "fresh Frozen Cannabis" this has been discussed many a time online on such sites as instagram and here on grow diaries as well.. I personally have Never tried the process so i decided to try it out and make a judgement for myself..
Video 24
The Cannabis has now been in the freezer for 72 hours making it very well frozen.. as you can tell i struggled getting it all into the 25u Screen Wash Bag. One thing of note i would do differently is i will de-stem my next batch as i also believe this played a part in the amount of plant matter that escaped through the sieves.
Photo/Video's 25-28
The idea here is "ice water Seiving" & especially with the bags that I am using here that are only have screen material on the bottom portion of the bag it is very important to have spaces in-between the screens to allow the water to pass directly through the screens into the bottom bucket with the least amount of resistance.. because the hash is so extremely temperature dependant if it gets warm on the side of the bag.. it will stick there and not make it to the bottom to become use able product..
29
You do not need to use as much Ice as i used here lol... the idea is to keep everything very cold..i certainly achieved that but at the sacrifice of using so much that i ended up grinding product and producing "contaminants" but in the end they are just plant matter that i would be smoking when i rolled up my joint either way so.. I'm not super disappointed..
But it should be noted that what you want to achieve here is a Layering effect where you have the wash bag between two small layers of ice while the "water current" washes the Trichomes away allowing them to be separated by the screens setup below :)
Before Starting the machine you should allow some time (i.e.;10-12minutes pre soak to allow the product to become saturated) before the first cycle.
By video 32 I have just ran out of ice lol..
Video 33-34
Here I have a tip for you.. to separate the screens that you sieve through.. cut 5 gallon buckets to stretch them across nice and tight.. it'll make scooping your Bubble that much easier ! i learned this from the many "Frenchy" videos I have watched :)
Picture 35
Here in lays the problem for most people.. drying your hash without loosing vast amounts of "Terpenes" whilst also stay ever vigilant against mold !
Thanks to all those videos I've watched on youtube.. id like to think this was one of my most successful parts of this process..
Things to Note; Terpenes start to seriously evaporate at temperatures 68F or 20C
you need to stay as cold as possible whilst bringing the Relative Humidity in the space down into the 40-30% to stay away from that nasty mold !
I used my cold storage room in the basement.. with a dehumidifier running to keep the space at 45% RH & staying at a constant 15c.
All while spreading the hash as thin as possible across parchment paper, on top of the white screens with a fan moving air across both sides of the paper.
Pictures 36-38
These are some macros i took in the middle of my drying session I fell in love with the colour.
Yes i know the black spots are plant material but they will get caught when i bag the hash & squish the oil out.
Thing to Note; at this stage it is important to ensure you 'micro plane" the hash down as fine as you can whilst staying weary of the temperature... any "chunks" will hold pockets of moisture.. that lead to potential problems..ie; mold ...
Picture/Video 39-41
Successfully planed bubble hash ready to be bagged and Squished !
Picture 42
Ive decided to follow Pedro.. from Pedros Grow Room and double bag to be on the safe side so i don't have any blow outs.
So thats One 25u bag inside one 160u bag ! :)
Pictures 43
This is almost 3 grams of the bubble hash from above, already melting in the bag.. this is where i ran into trouble again lol things started getting to warm in the house and i was only able to get one of the three squish's i did on video :( things started getting sticky.
Picture 44
This is basically just a photo of the equipment I'm using; 3x5 LowTemp Cage in the frame I built myself, with a 20Ton bottle jack.
Something to note here is this is an older Lowtemp model with only a single heating zone which is which i have it closed here heating Both sides of the press :)
As well as the importance of having adequate pressure on your plates.. my rig is very overkill for the size of hash bags..lol
Video 45
Here is the lovely press video.. its didn't quite work the way i wanted either lol my directional folding wasn't quite tight enough for a big "drip" :)
&the Press was set to 65°c
Photo's 46-50 are pretty self explanatory :) I had a blow out.. but still managed to pull an 80% return from the hash once squished...& yes it tasted amazing :)
Was it worth it in the end... that could be debated.. for some..i understand..its not your thing, but for those of us that are interested in making our own concentrates.. free from Solvents...
I wouldn't make it any other way :)
If even ONE of you reading this diary finds it helpful to reference for ANYTHING.....even if its "what not to do" ill consider it a success !
Thanks again for tagging along on this garden adventure.. its been one heck of a journey !
Much Love from B.C. Canada,
Until Next time,
Cariboo

Likes
25
Share
@DrGanj
Follow
This plant was a dream to grow, wish I'd taken cuts. Halfway through dry at 7 days. Drying at 55 - 60 % RH and 17 - 19 degrees C. I anticipate she'll be done between 10 - 14 days total dry time and I'll then trim and update weights on this Harvest.
133.75g total after trim. She's a nice smoke, very happy.

Likes
11
Share
@Keep_it_Cleannabis
Follow
She's starting to really crystal up, and the smell is like an amazing lemonade smell. No gassy comes threw like I hoped but it's definitely a unique terp smell. Pritty excited

Likes
2
Share
@Allybearx3
Follow
Little babies literally get bigger everyday, again just been letting them do their own thing, giving them water as needed, want to start lst but not sure how to go about it, any advice? Also want to repot them should I wait another week? Or just repot them now

Processing
Likes
3
Share
@Ogbangbang2981
Follow
right now I'm just waiting on some pollen sacks and some pollen but other than that plant looks healthy as we can see and I also changed my lights and my schedule to 12/12 . Feeding big bloom and tiger bloom with a lil secret ingredient and lots of bat poo noticed a seed think we talked about that before looks like imma plant this seed if my pollen sacks don't kick in on time which time is almost up.al I'm also waiting on my crystal to start forming I see it coming In but has a few weeks to fully brighten up the night recording


Likes
47
Share
@SirDillton
Follow
Day 30 of flower. Master kush strain. Plants in back right and front left. Roughly 30 days left to go in flower.
Lights 1212 par value roughly 1000. I keep lowering my light no signs of light burn yet at 19 inches. Day temp 21-26 night 17-21. Rh% is set to 45-55%. Watering every third day. 4L per plant . No runoff. Every third water I give technaflora nutrients at 1400ppm. Water ph 6.2
Ive learned my plants love a water ph around 6.2. Even slightly altering this to 6.7 you can tell they don’t grow as much. Very excited for the next few weeks as you just sit back and watch them fatten up.
See y’all next week.

Likes
223
Share
@HazeyBobby
Follow
So the story continues... this grow is really an experiment for me to train one plant within my 4'x2' grow space to ScrOG vertically and use the SP250 light on its side. For the majority of the vegetative stage the light will be hung normally above the plant until a week prior to flipping the light schedule and initiating flowering.
The plant passed its seedling stage and has been vigorously growing albeit showing strong signs of over-watering and calcium deficiencies. It's really a transpiration issue which I have not solved yet. Increased distance to light as the plant may be growing too fast for its root mass. From feedback at Coco for Cannabis (CFC), it is a Cal deficiency and a young plant getting used to the grow in coco - quite common and not a sign of over-watering. Measuring run-off EC at each fertigation event as I increase the feed EC to monitor what the plant is doing/feeding.
Fertigation is now maintained at twice a day (at lights on and 4hrs prior to lights off period) to maintain the target EC. Light period is during the night time to better maintain heat/humidity conditions during light off period (which happens during daytime).
-----------------------------------------------------------------------------------------------------------------------------------------------------------------------------------------------------------------------
The grow setup includes ;
- Secret Jardin DS120W tent (120cm x 60cm x 180cm) placed inside the bedroom
- Mars Hydro SP250 LED light
- extraction fan - AC Infinity Cloudline T6 (gives me great control over the environment)
- ventilation fans
- aquarium heater for nutrients solution (for winter use only)
- small oil heater (for winter use only)
- small dehumidifier
- 20L Airpots (as final pots) and 3.5L general plastic pots (for seedling stage)
- Canna Coco substrate mixed with 40% perlite
- GHE Flora Trio as base nutrients and various additives
- pH and EC/TDS meters
- 2x Govee Thermo/Hygro meters (one at canopy, the other at the roots level - these allow for external monitoring and recording)
-----------------------------------------------------------------------------------------------------------------------------------------------------------------------------------------------------------------------
Some strain info from Royal Queen Seeds ;
An amazing mix of genetics background - Its true genetics are unknown. Some say OG Kush is a mix of ChemDawg with a Lemon Thai and Pakistani Kush. Others say that it’s just a special cutting of ChemDawg from the early 90s. The most obvious trait of OG Kush is its strong, unique, very dank, slightly citrus aroma, almost like fuel or strong detergent. The flavour of OG Kush is equally as strong and dank, with a long-lasting aftertaste.
Strong mental and physical high - OG Kush is an extremely strong cannabis strain, with most experienced smokers listing it as one of their favourites. The effect is as strong physically as it is mentally. Though its effect is like an Sativa, the strain's genetics are mostly Indica. The effect is as strong and complex as the flavour. OG Kush takes around 8 weeks to flower and on average the yield is 500 grams per plant.
Big buds with lovely tones - OG Kush is known to stretch slightly during growth but soon starts to fill out during flowering. Generally, it will reach a height of 90 to 160 cm. Its buds are large and dense, lime green clusters covered with a large amount of resin.
Likes
3
Share
@Bread_n_Buds
Follow
When talking about strains of recent times but already legendary and ready to enter the history of Cannabis, Permanent Marker is a name that cannot be missed. It is very famous and many have produced it, we will show you that it is worth growing the one produced by Zamnesia.
In reality, the beautiful seed pack alone would be worth the purchase but we do not stop at appearances and we will show you that that artistic marvel corresponds to a marvel of nature.
Remember that we are growing a plant worked with the techniques indicated and another left to grow without pruning to preserve its speed; in the previous/next diary you will find the other plant of the same variety.
In this diary we find it left to grow straight: we switched to 12/12 light and pre-flowering began a good week ago. The plant is stretching gracefully and very beautiful. We have cleaned everything that does not see enough light, I recommend guys always do it and leave only the end of each brunch in bloom, you decide how much depending on the amount of light you see coming on the brunches and imagine them a little grown.
Comparison is the salt of experience, so the plant in the other diary will be treated very differently, go and see it to compare.
We have started the Plagron fertilization program, we are in 100% organic configuration, the soil is recycled Promix + 1/3 fresh soil + 10% Perlite + RQS Mycorrhizae Mix (4 g in the mix, 1 g under the small fiber pot).
We fertilize with: 1 ml/l Power Roots - 1 ml/l Pure Zym - 1 ml/l Sugar Royal - 3 ml/l Alga Grow
We sprayed 3 ml/l Vita Race foliar fertilizer once a week.
https://plagron.com/it
We always have the excellent mycorrhizae from RQS flowing in the soil.
https://www.zamnesia.io/it/5778-mix-micorrize-easy-roots.html
Try this variety, it is a top strain of recent years very high level of thc ---- // https://www.zamnesia.io/it/12508-zamnesia-seeds-permanent-marker.html
Brief description of Zamnesia // Here is a good opportunity to enrich your genetic library with another award-winning variety: Permanent Marker was crowned Strain of the Year 2023 by Leafly, thanks to its intense aromas, high levels of THC and its physical vivacity. Originally created by JBeezy and Seed Junky Genetics, our team managed to secure a cutting of this modern top cultivar, so you can grow it comfortably at home, whether indoors, outdoors or in a greenhouse. Permanent Marker fits perfectly in any environment!
The whole world of growing and much more is at Zamnesia: just take a look at the site and you will find "all the best that nature has to offer" in various shapes and colors.
-- // www.zamnesia.com
Likes
2
Share
@Bluemels
Follow
Tag 105: Die letzten 2 Wochen beginnen. Ich gieße nur noch Wasser ohne Dünger. Eigentlich würde ich Temperatur und Luftfeuchtigkeit gerne weiter senken, doch da macht mir gerade ein warmer feuchter Herbst ein Strich durch die Rechnung 😤
Die Pflanze hat schon recht helle gelbliche Blätter, was ich schon früh befürchtet hatte. Das Wetter war leider oft einfach zu warm für die Pflanze.
Likes
30
Share
@Ganjagrandaddy
Follow
Hi Growmies.
A good week for the girls this week with plenty of growth now starting to happen. I was worried about the #2 jealousy as she did seem to be lacking something but was too young to mess about with her feed. The Candy Rain was looking similar toonwith an obvious dislike of something in the soil mix. I have begun feeding them with my all time favourite nute , Mega crop. The vibrant green that this non salt based nute helps develop is an excellent conductor for photosynthesis. It has rested so many of my plants over time and bever fails to give them a really healthy appearance. I have seen the recovery with both if the smaller ladies andndont doubt they will catch up with their peers. The Bruce Banner#3 is really going for it with growth and had already pushed 6 nodes out. I have now Fimmed her at her 5th node and plan to quad the lower 4th and 3rd nodes in their l.s.t. I am close to being able to do the same with the Jealousy #1 to. Hopefully by the next update , they will all be underway for their planned growing pattern. I hope your all keeping it nice and green. Stay healthy and free , do not consent or comply. until the next update......
Likes
85
Share
@SlowpokeFuegobud
Follow
🍬 🍓 🍧🍭 🍋 🍹
Hello and welcome to week 2, dearest growmies!! 😘
Sherbet Schwarzenegger is doing great, she will be a big tree as it looks now! 💪
DAY 9
Watered for the first time 💧
DAY 11
Watered with nematodes 🐛 just 100ml of water each plant because the soil was still damp.
Thanks APTUS Holland for supplying me with the nutes for this grow! 🙏 ❤️ I cannot wait to try them!! 🌱 🌞
Thanks @Sweet_Seeds for the beautiful genetics!! You guys rock!! 😘
___________________________________________________________________________________________
Strawberry Cola Sherbet F1 Fast Version®️
This is an ultra-fast flowering, photoperiod-dependent, feminized strain with red flowers. It is also a first filial generation (F1) cross between a photoperiod-dependent elite clone of the famous Californian Sunset Sherbet and the autoflowering strain Strawberry Cola Auto.
Strawberry Cola Sherbet F1 Fast Version®️ (SWS106) is an indica/sativa polyhybrid, although it is predominantly indica. The plants have large, dense buds covered with lots of highly aromatic resin.
This strain has a very pleasant, potent, and complex aroma, with shades of red fruits and cola, earthy and woody hints, and fresh, citrus undertones.
It has a happy, relaxing effect that stimulates reflective introspection, concentration, and insight.
Data Sheet Strawberry Cola Sherbet F1 Fast Version®️
Variety: SWS106
Indica: 80%
Sativa: 20%
THC: 18-22%
CBD: 0,1%
Indoor Yield: 450-600 g/m²
Outdoor Yield: 400-650 g/plant
Indoor Blooming: 7 weeks
Purple Flower: approximately 75% of the specimens
Effects: Stimulating, Happiness, Relaxing
Taste: Earthy, Citrus, Cool
https://sweetseeds.es/en/f1-fast-version-seeds/3237-strawberry-cola-sherbet-f1-fast-version.html
____________________________________________________________________________________________
Setup:
140x70x200 cm Spiderfarmer tent
2x Monkey 16W fans (not oscillating)
1x Secret Jardin 30W
1x box fan 50W oscillating (on lowest level)
LED
Full Spectrum 320W AGLEX AGL-320W-MA
5,6 kg
foldable, dimmable
864 pieces Samsung LH301H
864umol/s
2,7umol/J
full spectrum white + RED 660nm + IR 740nm
wavelength range 380-780nm
covering 3x4ft
APTUS Holland - https://aptus-holland.com 💚
Green Buzz Nutrients https://greenbuzzliquids.com/ 💚
❗ Use code GD42025 for generous 25% discount (for orders of minimum 75€)
Biobizz Lightmix + coco + wormcastings + perlite
Carbon Active Granulate Filter 125/360 cm³/h
PrimaKlima exhaust EC 125-400/240 cm³/h


Likes
45
Share
@masterofsmeagol
Follow
8/1 This wad the most fucked up morning ever. Didn't get much time with the girls. I was able to take a few pics when I got back amd a video this morning. Pillars are still around. I killed a couple but I probably should spray BT. I think we got rain last night. Bags are heavy. I defoliated a little bit more on the interior and found some small yellow leaves. Event horizon is still on point to flower first. I NEED to lst and add supports for flower bit I've got a lot of other things going on too. I'm going to TRY to spray BT tonight if weather permits and I should have the supports up this weekend. At least that's what I'm hoping.
8/2 Quickly watered as I had to fix a flat tire to get my wife to the doctor. Gave most a gallon but closer to 3/4 on one event horizon and the sherb pie. Half g for the 10 and I gave the 5 and the 50 a little water. I didn't give the 50 much. That holds water far longer. I'm glad I got it done. It was 90°+ and sunny all day. Earlier everything looked great. I think I'm gonna go check them and maybe add a few pictures.
WENT OVER AND FOUND THE EVENT HORIZON I GAVE A LUTTLE LESS WATER TO, IN THE BACK COMPLETELY DEOOPED OVER AND DRY. I QUICKLY WATERED A GALLON. I CHECKED THE OTHER PLANTS AND SAW A COUPLE THAT "MIGHT'VE STARTED DROOPING BUT WERE LIGHT SO I GAVE ALL THE GMO'S HALF A GALLON. I WATERED THE CONTAINER PLANTS AND THE ONE IN THE 50. BETTER SAFE THAN SORRY. THEY WERE SUPER LIGHT. SOME ARE SHOWING SOME HEAT STRESS BUT I DONT BLAME THEM WHEN ITS PUSHING 100° OUT. I HOPE THIS PLANT WILL PICK UP BUT ILL HAVE TO WAIT UNTIL MORNING TO SEE. I GOTTA GO EAT DINNER AND IT WAS IN ROUGH SHAPE. CANT BELIEVE THIS. ITS THE FURYHEST IN FLOWER TOO. INTERNET TOO SLOW TO UPLOAD
8/3 This morning it was "maineing" out. Basically like raining but more of an alternating mist. The event horizon that looked DEAD is completely recovered! I'm so stoked. I've had a really rough few days but at least I've still got my girls. After this little bit of rain I'll do the supports and a spray of BT for the pillars. I'm noticing more damage and I don't want them arpund when they can burrow into buds.
WENT BACK AT LIKE FIVE. THE 5 GAL WAS DROOPING AND THE 10 WAS DRY AF. OTHERS WERE ALSO LIGHT. I USED 5 GALLONS ON THE GARDEN AS SOME STILL "LOOKED GOOD" BUT WERE DUSTY AND DRY. I ONLY GAVE THE GMO IN THE 30 A HALF GALLON. DIDNT WATER THE ECENT HORIZON IN THE BACK AND THE GMO IN THE FRONT BY THE DOOR ASXTHE LOOKED GOOD AND STILL HAD SOME WEIGHT TO THEM. THIS WAS ANOTHER DAY IN THE 90s THAT WAS SUPPOSED TO HAVE RAINED. LUCKILY IVE GOT THAT INTUITION AND I CAN CHECK. CAMS HELP WITH THAT BUT ITS BEST TO CHECK A FEW TIMES A DAY IN WEATHER LIKE THIS. FAR TO HOT TO SPRAY ANYTHING.
8/4 Chose not to water as we were supposed to get an inch of rain, then a half in and now it says .1in. I'm going to go over and check on the garden and see what they look like. I took pictures but I'll have to wait to upload them.
WENT BACK OVER IN THE AFTERNOON AROUND 2ISH. GMO IN THE FRONT WAS DROOPY. WATERED THAT A GALLON AND IT WAS UP BY THE TIME I LEFT. THE GMO ON THE END (MY CANARY) WAS SUPER LIGHT SO SHE GOT A GALLON. THE EVENT HORIZON I DIDNT WATER YESTERDAY GOT ABOUT 3/4 OF A GALLON AND I WATERED THE ONE IN THE 10 1/2 GALLON. SHOWERS ARE IN THE FORECAST AND EVERYTHING ELSE LOOKED PRETTY GOOD AND WASNT DEAD LIGHT. AS OF 3 EVERYTHING IS GOOD. I IMAGINE ILL PROBABLY NEED TO WATER SOMETHING TOMORROW. IT SUCKS HAVING TO DO THIS SEPERATELY BUT SOMETIMES THATS HOW IT GOES. I DONT EXPECT THESE 90 TEMPS WILL CONTINUE. ALSO NOTICING SOME FADING AS THEY TURN TO FLOWER. DEF NEED NUTES. AND ONCE THE TEMPS GO DOWN I NEED TO SPRAY EITHER BT OR SPINOSID.
8/5 It Rained last night so I didn't need to water. Everything was nice and heavy. Beautiful day today. Hopfully I can do an app of bt tonight. Weather man needs to get things right. It says we got .005in last night but I heard it and it was way more than that. This is a tiny town.
WENT BACK OVER AND FED. EVERYTHING GOT 1.75 PINTS. THE 10 GOT HALF THAT. THE FIVE A LITTLE LESS. I DEFINATELY NEED TO SPRAY FOR PILLARS. I ALSO HAVE A BIT OF DEFOLIATING ON A COUPLE PLANTS THAT I NEED TO DO. USUALLY I'VE LOST TONS OF LEAVES BY NOW. I JUST NEED TO IMPROVE AIRFLOW. THE TRELLIS WILL HELP WITH THAT PLUS SUPPORT. I THINK I MAY BE ABLE TO SPRAY PISSIBLY TONIGHT (DEPENDING ON WEATHER) AND SUPPORTS AND DEFOLIATION THE NEXT FEW DAYS.

Likes
16
Share
@Chubbs
Follow
420FASTBUDS
FBT2107 WEEK 7
These 2 beautys couldn't be growing any better than the way the are. Both have a bunch of flower sites that are maturing nicely. I did give a light defoliation to the lower nodes on the branches. Could almost say a little lollipoping.
Happy Growing
Likes
93
Share
@PEAKYPLANTERS
Follow
Hi guys, Welcome back to Queen Peaky's Grasslands
This week we will dedicate it to just rinsing the soil to discard all excess nutrients😎
You can already perceive some excellent smells👻
I hope you l
Likes
9
Share

Likes
8
Share
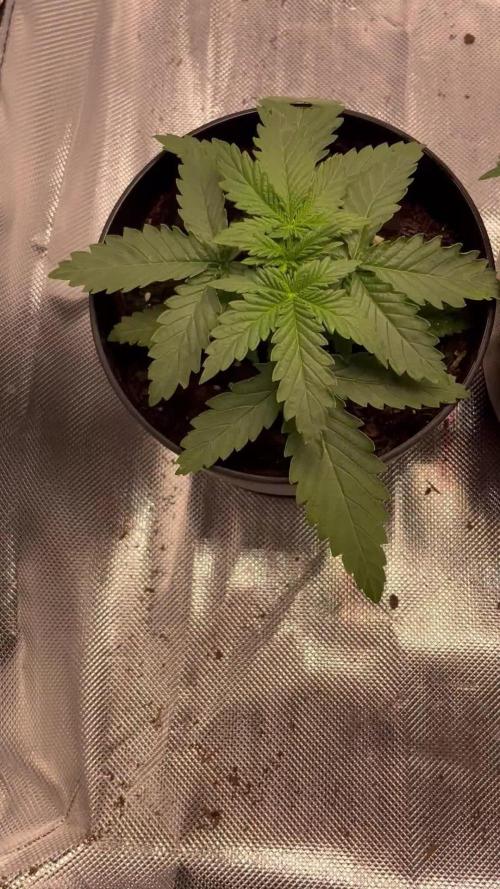
@ChitownCannaChica
Follow
Just trying to keep this lady watered! Been tough as you can see I have some nitrogen and all around deficiency going. Did a top dress with normal feedings. Not easy!

Likes
32
Share
@Ciocanna
Follow
Due to poor drainage or rather the coconut dust that accumulated at the bottom and gathered all the fertilizer.
So, urgently, it was watered, dried, and then watered again until the ppm reached almost zero. In order not to lose the quality of the trichomes, I decided to cut it.


