
Likes
Comments
Share


@CityFarmer
Follow
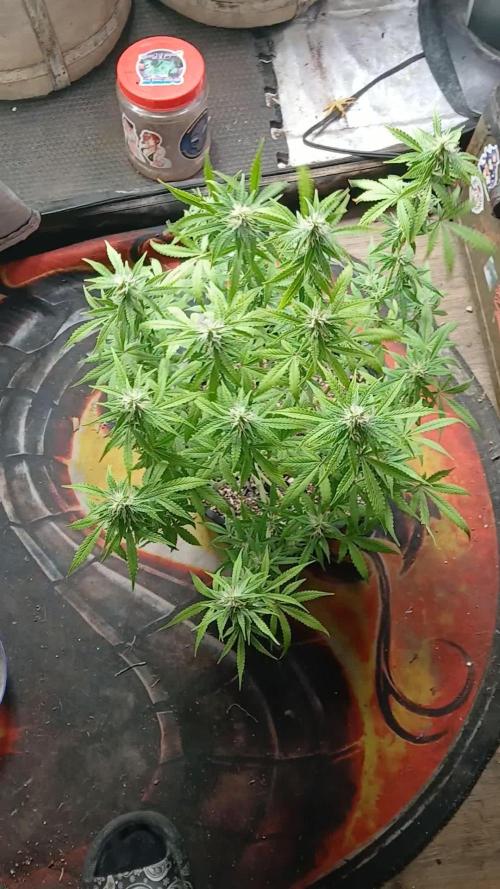
Hello everyone,
Well its getting kinda packed in the greenhouse so all i have for you guys is a little video,
See you guys next week... 🤘🤘🤙🤙

Likes
8
Share


@RainerWinklerGrow
Follow
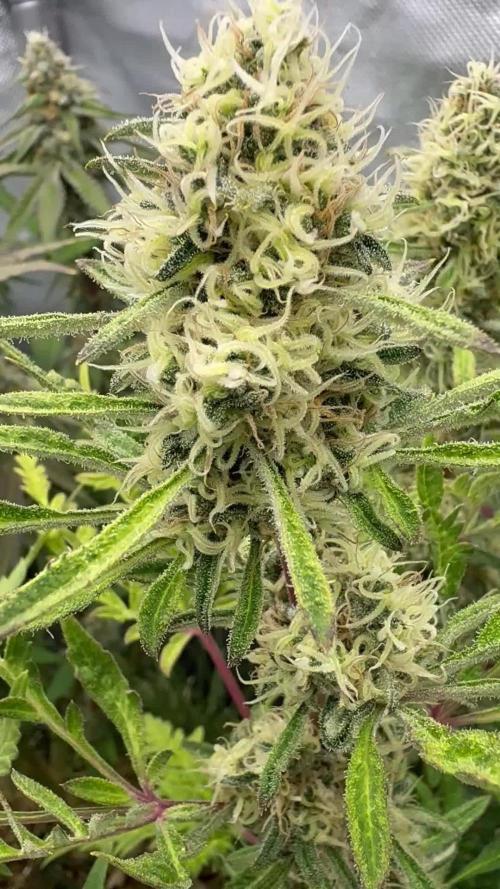
This should be up to week 2-3 of flower, where the Mimosa x Orange Punch, which had the earlier Mutation, started herming on the mutated part, which i noticed a bit too late and it pollinated some of the other buds, i cut all of the affected bud sites of, in the end the furthest away runtz got pollinated but the others luckily barley did and only had like 5-10 seeds in total.


Likes
114
Share


@Tropicannibis_Todd
Follow
💩Alrighty Then Growmies We Are Back At it 💩
Well folks we just finished up the last run and so we are back to do it all over again 😁
So what do you say we have some fun 👈 We got some Gorilla Punch 👊 👊 👊 DAY 56 👉 The Frost 🍦 Is Real 👌 with this one 👍
👉 😳 So I've had a few issues what's done is done , but I think we are on track and she's doing good 👌
I've been experimenting with some new nutrients and ive been having a few issues 🤔 but I think I have under control 🤔
FC4800 from MarsHydro Lights being readjusted and chart updated .........👍👉Added an RU45 too the mix 👍
www.marshydro.ca
👉I used NutriNPK for nutrients for my grows and welcome anyone to give them a try .👈
👉 www.nutrinpk.com 👈
NutriNPK Cal MAG 14-0-14
NutriNPK Grow 28-14-14
NutriNPK Bloom 8-20-30
NutriNPK Bloom Booster 0-52-34
I GOT MULTIPLE DIARIES ON THE GO 😱 please check them out 😎
👉THANKS FOR TAKING THE TIME TO GO OVER MY DIARIES 👈
Would you like to hang with the growdiary community 👉 https://discord.gg/gr4cHGDpdb 👈

Likes
25
Share


@DrGanj
Follow
Spread this girl out a bit using some string and mild LST. She's responded super well and all the bud sites seem to be getting a nice dose from the TS1000 :)
Bit late uploading this week but the pictures were taken back on Tuesday meaning this is still an accurately dated upload.


Likes
22
Share


@Smith420
Follow
It doesn’t look so good. Can someone tell me if i under-watered or over watered? They look sad?

Likes
7
Share


@herbcrusted
Follow
As usual Moscow Blueberry is growing fast and hardy, and the Strawberry Cheesecake is happy in her early flowering stage. She’s starting to smell a good bit, and her terp profile so far smells like sweetened coffee! French Macaron’s growth is speeding up now that it’s gotten the chance to grow into its pot. I’m concerned with Northern Lights, as the new growth is twisted and weird. Hopefully I’ll figure out the cause by the end of the week or it may solve itself once the twisted leaves grow out more.


Likes
26
Share


@SmokeableHobby
Follow
1/17 - Day 62 / Day 35 Flower
Pots felt dry so decided to give them about a half gallon of spring water each. This wasn't enough to induce runoff. Will save that for a bigger watering later this week. Nutrient issues continue to persist.
****************************************************
1/19 - Day 64/ Day 37 Flower - Feeding day
Pots were feeling dry again. After about a week of laying off the nutrients following the flush, I gave them a feeding today with their watering. In retrospect, I probably shouldn't have waited this long to re-introduce nutrients as some of the lag in recovery is probably due to the fact that I flushed all of the food.
The feeding solution consisted of the following:
- 1 gallon distilled water
- 5ml of FF Tiger Bloom (1/2 dose)
- 10ml of FF Big Bloom (2/3 dose)
Adjusted the solution to the following conditions before feeding:
- pH: 6.5
- TDS: 303ppm
- EC: .6
I gave each of the 5 gallon pots about a half gallon each of the solution, followed by enough spring water to induce runoff (approximately another half gallon). I tested the runoff for both of my 5 gallons and returned the following readings;
Z51:
- pH: 6.4
- TDS: 649ppm
- EC: 1.3
Z52:
- pH: 6.2
- TDS: 669ppm
- EC: 1.3
I was encouraged that both plants are close to being within my ideal range and hopefully this means that they will start to show signs of recovery in the next week.
****************************************************
1/21 - Day 66 / Day 39 Flower
I'm growing in an attic space and we've had a drop in temperature over the last couple days, my heating system was working overtime and more heat was rising into the space. I woke up today and the temp in my grow tent was registering in at 87F. I decided to play around with my temperature threshold on my fan controller, reducing the max heat threshold to 80 from 85. What I didn't account for was that I had a low humidity threshold of 30% (which I assumed meant that that fan would stop running if it hit this point). It turns out that my fan actually kicks ON when it hits that threshold... As a result. my fan was short cycling through the night where it would turn on when the heat exceeded 80 (causing humidity to decrease) then turn on again when it hit my low humidity threshold - creating wide swings in my temp and humidity. I'll tell you what, if I don't produce any viable bud this grow, I can honestly say I made up for the loss based on the education I've received.
The nutrient deficiency issues are still present but don't appear to be getting worse. The leaves on my Z51 are pretty pale, it's clear they are starving for nitrogen but I am reluctant to try and address issue at this point. I'm planning 2 more light feedings over the next two weeks so hopefully this will be enough to get them to harvest.
****************************************************
Day 1/22 - Day 67/Day 40 Flower
My girls are really starting to frost up and the colas feel noticeable more dense by the day. I would have thought that the smell would have been stronger by now. Not sure if this is a consequence of my carbon filter doing such a good job or whether the buds are having developmental issues. When I get up close and smell the buds, I get a faint aroma but not the strong sweet and gassy smells that I've read about on other journals.
I watered the 5 gallons today with a gallon of spring water each. My soil is not as airy as it once was and has started to cake up around the roots. I do my best to try and loosen up the dirt, usually to no avail.
I was short for time so I didn't have a chance to test the runoff.

Processing
Likes
37
Share


@Chunkmasta1
Follow
The stretch has started. We are on day 7 since I flipped to 12 12 light schedule. 12/28/2017 was the day we started the lights on 12 hours. I did let her sit in 24 hours of darkness which she seemed to do fine in. I have had to top off the resovouir twice she is a thirsty girl. No stress signs from the increase in nutrients. I will be lowering the amount given after a few day flush in the next week. I only increase for the transition this was something I was shown a few years back by another grower and has not let me down. I will stick to the flora trio by GH. I do not add anything else like bud fatteners as some people call them. I am a firm believer they are not needed. This is just my opinion on the matter.

Likes
27
Share


@RDWCGrowing
Follow
6/6/2023
Week 9- Day 1 of Flower (Day 124 overall) (Day 63 of Flower)
Auto Pilot Day 3.. Just watched them be beautiful. I also did a Trichome check today things are moving along nicely.
6/7/2023
Week 9- Day 2 of Flower (Day 125 overall)
I admit it I couldn't help it there were some blatant offender leaves blocking the light from some of the canopy buds so they had to go..... and when I took them I found a few more in between leaves that had to go.. so long story short some defoliation did happen.. :-)
6/8/2023
Week 9- Day 3 of Flower (Day 126 overall)
Auto pilot re-engaged.. I sat back took some photos and just enjoyed how beautiful this light side and dark side thing the plants are doing The buds are almost as long as my Sharpie. I also applied the last application of my Hermie spray to the clone I took in Apr to reverse it.
6/9/2023
Week 9- Day 4 of Flower (Day 127 overall)
Auto Pilot Day 2... :-) It was check in day today for the grow off. Last check in for the competition. Trichomes are looking great.. did another check today will keep an eye on it just incase I need to cut earlier than planned. Tomorrow Water change day!
6/10/2023
Week 9- Day 5 of Flower (Day 128 overall)
Auto pilot for the Ladies' but Water Change Day!
I added 36 gallons
Mammoth Silica = .5Mil/Gal= 18Mil
Root DRIP = 1Mil/Gal= 36Mil
CalMag= .5Mil/Gal= 18Mil
FloraMicro = 3.8Mil/Gal= 137Mil
FloraGro= 2.8Mil/Gal= 100Mil
FLoraBloom= 4.3Mil/Gal= 155Mil
LiquidKoolBloom= 2.5Mil/Gal= 90Mil
TPS SIGNAL= 3Mil/Gal= 108Mil
ORCA = .5Mil/Gal= 18Mil
Water Temp= 71.2
Tent Temp= 76
6/11/2023
Week 9- Day 6 of Flower (Day 129 overall)
Auto Pilot Day 4... I just enjoyed the nice smell coming from the tent today, and the contrast between light and dark side buds that they did.
6/12/2023
Week 9- Day 7 of Flower (Day 130 overall)
Auto Pilot Day 5. These ladies are looking amazing, the fade is coming in nice purple on plant #3 and really nice yellow on #2.

Likes
24
Share


@CovikLaFlaire
Follow
I found out that my ph was off too, so the plants look ok if we take all my f ups in count.
Likes
2
Share


@Selectamikoo
Follow
Der Samen ist aus haze Gras entsprungen kein breeder. Wahrscheinlich amnesia oder silver haze. Zumindest rauche ich diese Sorten meistens und daher denke ich der Samen stammt von diesen Sorten ab.
Letztes Jahr war es das selbe und es waren Photoperiodische sativa strain.
Falls jemand weiß welche Sorte es wird kann mir gerne schreiben.
Heute umgetopft in seiner endgültigen Größe.


Likes
5
Share

@BasedBuds_89
Follow
So I added a bit of calmag and nitrogen with little to no results. I let the roots soak overnight as well. Im convinced that it's the grow medium, I plant to transplant into a bigger pot with fresh soil to see if it helps the lockout. Im running out of room in my tent lil.


Likes
12
Share


@Greenys
Follow
Week 3/ day 21 big strip, unfortunately I did not have enough time to complete so i will going going back in to continue tomorrow.
Somthing mess up with Journal week date..
THIS IS WEEK 3 of flower
Intake
Run off
PH 5.8
5.9
EC 1.8
1.8
Likes
8
Share


@GYOweed
Follow
This is a long story but basically cloned from custom IBL of a 10 week pheno of Strawberry Sorbet.
All grow kinda slow in veg and mid yield in flower as it makes sativa structured stretchyness with gold balls on her.
I have used some SA and will do another natural steroid and pgr boost in week 2 flower in a week.
Flipped 6/13 I will port update of flower week 1 soon.

Likes
18
Share


@OrganicAutomatic
Follow
Best week of my life🙏
Last week started with gagarin that overall yeiled about 20 dried g soon will scale exactly.
And this week started with gelato #2 that suprise me with a lots of big fat buds at leats 60g dried, but i could tell in about a week or more.
Tomorrow i would harvest the gg.
Update:
Harvest gg on day 85. Smell fruity and glue
Overall about 20 dry g but soon to tell.
On day 86 gelato #1 show amber trichomes and fully clouded.
Seems that #1 yeiled a bit more than #2
And also treated the same and no stress during the cycle.
So there still 3 gelato's and one amazing ww.


Likes
7
Share

@Samsationalseeds
Follow
It's been a couple weeks.I'm going to update the appropriate week account