
Likes
Comments
Share


@buckyfellini
Follow
Probably only a couple weeks left, so I changed the DWC water to just pH adjusted tap water; pistils are slowly changing color, still less than half are turned. Trichomes are crystal clear and the buds are looking frosty.

Likes
15
Share


@HurlinghCultiveta
Follow
Buenas cultivetas!
Esta semana el clima tampoco ayudó mucho 😞 A pesar de que no llovio, se esperan lluvias los proximos dias y las temperaturas aun no son las adecuadas. Solo tuve 2 o 3 dias a pleno sol. De todas formas seguimos con los nutrientes de vegetacion el preventivo de plagas una vez por semana con jabon potasico, aceite de neem y canela en una solucion liquida. A pesar del preventivo sigo encontrando algunos bichos que muestro en un video.
La tecnica deLST parece estar saliendo bien. Espero no estresarla mucho y que de buenos resultados.
Buen cultivo para todos y gracias por leer mi diario!
Actualización 5/10:
Tengo algunos vecinos gatos que les encanta sacar el sustrato de mis macetas... Por suerte no han desprendido la planta pero casi... Las acomode de nuevo y parecen estar bien. No tuve mucha suerte con este cultivo sumado a mi falta de experiencia.

Likes
6
Share


@Cannabis4Crohns
Follow
Continued feeding plant with each watering of 2 litres every 3/4 days. The flowers are fattening up nicely, into some bigish colas, meaning harvest isn't too far away.
Removed some dieing leaves from bottom of the plant. Almost time to stop feeding and start the flushing process.

Likes
2
Share

@Bud_vista
Follow
Welcome to week 4 of my white truffle grow!
Till last week, she’s growing at a great speed. The half snapped branch seems to recover and keep growing fine. At week 4 I will do a little defoliation and maybe hanging in the trellis to the end of week 4. She’s not showing any sign of pre flower yet.
In the mid of Week 4 I installed the trellis and at this work, somehow, one of the very top branches snapped… I’m trying to save this one but let’s see how it works…
Until now, I’m really happy how good and fast this grow is.
Likes
148
Share


@BioBuds
Follow
Greetings my dear Jungletamers,
So a major surprise came when @MarsHydroLED contacted us and asked if would like to try out their new SP 3000 light. Being a fan of Mars Hydro for years, we of course accepted their offer. We are totally in love with this light. I was when I saw it in another grower's setup and was in awe of its output and results.
So with much pride and thankfulness for the presents the Universe bestowed on us, in the form of MarsHydroLEDS offer and the bountiful harvest of the last grow, (which I am thoroughly enjoying btw, such a great weed to have grown ourselves) we start out on a new adventure that we can't wait to share with you.
With many lessons learned from the previous grow, a mighty producing strain in the form of Expert Seeds Gorilla Glue #4, a.k.a Expert Gorilla's and a tweaked super soil mixture, we are setting out to hopefully get over a gram per watt, preferably 1.5.
The Setup
A 4.5 (140 cm) x 2(70) x 6.2 (200) grow tent, giving me a .98 m2 workspace. This space is customized to my needs.
A standing fan will provide airflow through the whole grow, a top fan will help guide cooler air past my lights onto the grow.
3 56 ltr pots will be the home for the plants when they are 2 weeks old, up to then in smaller jars.
The Light
The leading role and star of the show will be played by the Mars Hydro SP-3000, so kindly provided by MarsHydroLED, which we will test and review here and I might say, endorse.
I'm very careful with who I endorse and support these days, but a company with that many wins in design, I'm talking ever since their first range came out in 2009 these guys have been raising the bar for the whole industry, I did not hesitate to support this leading brand.
If you want to compete with these guys, you better bring some quality AND affordable pricing. Why do I endorse the SP-3000 without ANY hesitation?
It is seriously THE BEST light on the market in this price range and size group. It has an enormously effective output in U/Mol and with 30% less energy waste comparing to older LED lights.
Prove me wrong!
And with a company holding a considerable market share selling thousands of units every month, competing on price and quality, one would think that customer service would suffer. Of course, also Mars Hydro is not perfect, but check the sheer amount of people that not only praise the light but also the service received, should the light somehow not perform up to par. It is this dedication to their customer base that made this company have a fanbase... Yes, a fanbase with a website and a wiki.
So if you are looking to buy new lights, check out the END OF SUMMER OFFER at the Mars-Hydro Global Store on Aliexpress:
https://marshydroled.aliexpress.com/ 👈 Check their offers but also their score, they ship from a warehouse near you so you don't have the extra import fees!! Cut out the middleman and have a deal on these lights!!
At the moment I write this in August 2021, the lights are 408,20 euro when sent from Germany to the rest of Europe, that's 40 euro cheaper than the other Mars outlets, BUT EVEN 60 euros cheaper than ordering at a grow store!!
The Strain:
Experts Seeds - Expert Gorilla feminized regular.
Don’t let the name fool you because Expert Gorilla is suitable for growers of any skill level. However, you do need to be an experienced smoker because Expert Gorilla is one of the most potent strains on the market.
Lineage: Chem Sis x Chocolate Diesel x Sour Dubb
Popularity: Extremely Popular
Flavor/Aroma Profile: Chocolate, Earthy, Fuel
Yield: 400 g/m2
Stress Tolerance: High resistance to disease
Potency: 24% THC
Flowering time: 58 - 63 days
The Soil:
Those who saw my Monstercropped Gelato #33 grow (you should see it if you didn't, I'm so proud of that grow), know about my super soil and organic nutrients/ permaculture tea combo that starred in my previous diary.
Because of the great results, we are going to use the same recipe, adjusted some more with some new ingredients that will complete the mix and give an even more sustained super soil buffer.
20% Atami Bi-grow (very similar to ocean forest)
20% Atami worm castings
20% Atami Coco Coir
10% Hydrocorn
10% Peat powder
1 cup Fossil seaweed chalk
1 cup bonemeal
1 cup bloodmeal
1 cup Microlife
3-4 teaspoons of epsom salt
3 cups of activated biochar (activated with our own permaculture tea)
I just made layers, starting with hydro corn on the bottom to aid airflow/run-off. On this I started layering the coco coir, Bi-grow, peat, castings, and amendments in a way that the more mature the plants get, the more phosphorous and less nitrogen they will find. Every time I made three layers, I would mix them by hand. This way we simulate natural soil, which consists of humic layers, composting plant waste, fungal and microbial life, and nutrients from fossilized sources.
The Nutrients
I will start with just adding 6.4 PH water, although this soil should buffer ph itself and regulate, after 4 weeks, I'll slowly be adding:
- Biobizz Grow
- Plagron Alga Grow
- Biobizz CalMag
- Biobizz Flower
- Plagron Alga Flower
- Biobizz Topmax
- Melasses
The Tea
Some of you might remember the permaculture tea from my previous grow, I have a short video in my harvest page showing how we make it), it will star again in this grow.
- (Rain)water
- Comfrey (whole plants)
- Dandelion leaves
- Roots and leaves from the earlier grow
- Minor periwinkle (Finca minor) is a plant we have in our garden, it contains an alkaloid that is associated with increased brain function but also is a light toxin for wee beasties and other unwanted guests like gnats (who hate it).
- When flowering I add some wood ash to this mix
Thank you for checking in on one of my grows again! Thanks for all the love on my previous grow, check it out if you haven't seen it!!
Hug
Bud

Processing
Likes
12
Share


@Fleetwood
Follow
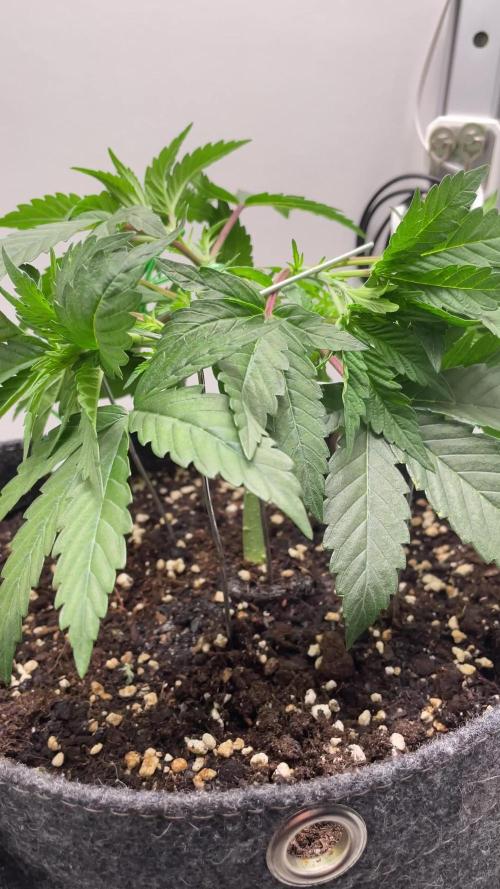
Still fighting with pH. It was 5.5 when I add the plants, but when I check a few hours later, it's already above 6.5
Days 2: I trimmed the bottom fan leaves from Purple Kush to keep them off the ground. I also topped Purple Maroc. pH was still below 6
Day 4: Veg is gone wild..... I have been shoving the large fan leaves on the Autos underneath other branches to allow light in. Red Purps may get topped yet again.
Day 6:. Switched autos to bloom nutrients. Added Purpanator to them. pH set to 5.5.
Topped bottom and mid branches of Red Purps to keep canopy more even.
Day 7: replaced CO2 generator.


Likes
Comments
Share

@PurpleBeen
Follow
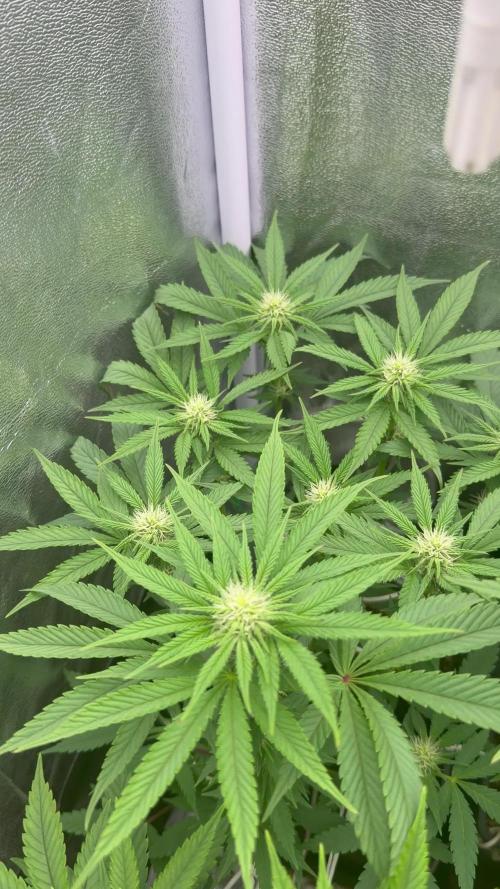
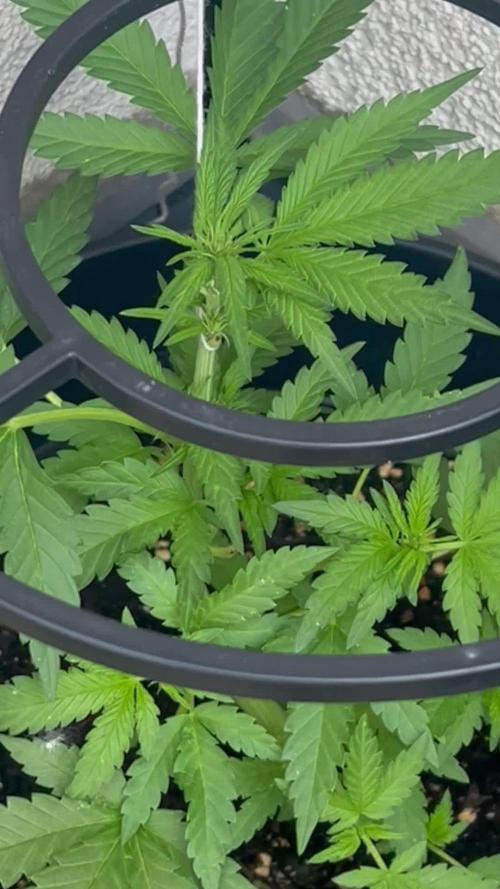
Everything is going well at the beginning of the third week. All the main colas are growing at about the same pace. As for the two plants at the front, they’re doing well too, just a little more slowly.
I’ve started feeding them, and by the end of this week or sometime next week I’ll begin using Monster PK at a very light dose. The light is now at 100%, so we’ll need to be careful not to keep it too close to avoid the risk of light stress or overexposure.
12/12 switches : 12/06/2026
Back: Frosted Grape
Front left: Purple Cookie
Front right: Stick Berry
Watering remains moderate: ~600 mL for the larger plants and ~500mL for the smaller ones, with 1 L being the maximum applied so far.

Likes
5
Share


@CelticSmokey88
Follow
Promoting Mars hydro fc3000 honeslty everyone whouses this light will tell you how deadly it is I germinate my seeds in the soil u this ligjt and have 100% success rate

Likes
16
Share


@GrowerGaz
Follow
Plain sailing this week , just water and sit back to watch the beautiful fade.


Likes
23
Share


@Mr_McNasty408
Follow
12/21/20
Seeing exponential growth now. I don’t want to start any type of training until I am able to take some clones off each plant. Very excited for this grow
Nutes:
Veg A: 0.382g/gal
Veg B: 0.257g/gal
PPM: 140
Water temp: 64°F
pH: 6.0
12/22/20
Nutes:
Veg A: 0.382g/gal
Veg B: 0.257g/gal
PPM: 140
Water temp: 64°F
pH: 6.0
12/23/20
I upped nutrients today just slightly as to not cause any damages/burns.
Nutes:
Veg A: 0.437g/gal
Veg B: 0.294g/gal
PPM: 145
Water temp: 64°F
pH: 6.0
12/24/20
Nutes:
Veg A : 0.874g/gal
Veg B : 0.588g/gal
PPM : 275
Water Temp: 64°F
pH : 5.9
12/25/20
Accidentally vacuumed up two leaf tips when vacuuming up excess runoff 🤦♂️. 1 leaf off both #3 & #4. It was the single blade fan leaf on both so I took off the matching leaf. 2 leaves off each plant for total 4 leaves.
Nutes:
Veg A : 1.53g/gal
Veg B : 1.03g/gal
PPM : 435
Water temp : 64°F
pH : 5.9
12/26/20
Nutes:
Veg A : 1.53g/gal
Veg B : 1.03g/gal
PPM : 435
Water temp : 64°F
pH : 5.9
12/27/20
Nutes:
Veg A : 1.53g/gal
Veg B : 1.03g/gal
PPM : 435
Water temp : 64°F
pH : 5.9


Likes
3
Share

@ElCapo420
Follow
Mittlerweile sind alle in die Blüte gewechselt. Ich habe angefangen ihnen die paar Blätter zu nehmen die über den Blüten sind, und ich gieße jetzt mit BioBizz Fish-Mix & Bio-Bloom. Sonst habe ich nichts gemacht außer bei #1 im schwarzen Topf das LST weiter geführt.


Likes
9
Share


@Luv2Grow
Follow
Day 71 - Starting week 11 and not much to say except I can’t wait to chop her. Just waiting until the trichs are right. Watered her with sledgehammer yesterday and waiting for her to dry out completely before chopping, I’m hoping it’ll be this weekend sometime.
Day 72 - She’s still not ready for a chop yet, opened up the tent and looks like a bunch of pistils showed up so just gonna continue to let her go and she’ll tell me when she’s ready.
Day 73 - Nothing new to update, just letting her go and she’s still not ready for a chop yet.
Day 74 - Still not ready for a chop yet, hoping sometime this week cause she’s smelling amazing and really wanna try her out. Still a few clear trichs in the and not many amber yet.
Likes
13
Share


@Alpha_Green
Follow
Some of you may have wondered:
Why do I use CO2 at average 950 ppfd μmol/m2/s (moral flow)?
The answer is quite simple. Because of lack of space in some regions of my cultivation area, I simply cannot keep the ideal distance to my Sanlight high-performance lamp, due to some height growth of various strains. And so some of the main colas have ppfd values of 1250 μmol/m2/s and even more...
So this is how I manage to achieve and compensate for such high radiation levels even with a CO 2 balance. And I have to say, my strategy to avoid various light stress symptoms works just fabulously. In combination with CO 2 implementation, my babies are simply unbeatably insensitive to light. Thats it!
Beginning of 3rd week flowering:
Again feeding my babies by 36 hours fermented potions of Bio Tabs Kompost Tea PK-Booster (15 g pro Liter) and added:
5ml Orgatrex/Liter
1 Spoon of Bactrex
1 Spoon of Mycotrex
1 Spoon of Mycco-Vital
1 Spoon of Dynomyco
A little tip for those who are interested in small modifications that have a big difference or influence - on the result - effect - beauty - health - taste! Before adding microorganisms or beneficial bacteria or Mycorrizae and Trichodermas, please use oxygen-saturated water. On the one hand, unwanted chlorine gases evaporate and the small world of the microbiome becomes even faster and more rewarding in compost tea to sprout.
Last but not least for this week, I would like to introduce my reasons, why I prefer growing biologically and sustainably.
First of all, it’s something which suits very well in these times/days we are living now. Sustainability is a big need and task for our planet. 🌎 Nature means life. Our home, the air we breathe and everything that surrounds us. Not just today. Hopefully tomorrow as well.
Maybe I'm starting to protect our environment on a small scale, but maybe I can also make a big difference at all.
If you change the way you look at things, the things you look at change...
I thought about what’s the difference, between Mineral Feeding and Super Soil Feeding.
It’s very easy. Biologically Growing is a similar process than the natural soil activities out there in the lap of nature’s. So plants has to work and interact with the microorganisms and microbiomic communities in the soil. So the plants will never get lazy like the lazy ones of mineral feeding growers.
If you grow biologically, you will feed the soil first and the microorganisms will support every parameter next to your plant conditions. And that will generate an unbelievable spectrum of Terpenes and Trichomes you will never forget.
It’s the same comparison, when you daily visit McDonalds and you eat only fast food. How does your body and mind react on this shit for money?!?!
May I invite you to think about it…
See you next week dear Growmies! Have a nice Weekend and take care…
Peace out!
Addendum for Day 53:
At the moment we unfortunately have another winter onset here in Germany. This means that I am forced to take additional heating measures due to structural facts in order to be able to keep the temperatures constant. After all, just tonight the thermometer climbs again to -1 degree Celsius.
In addition, my exhaust air system runs out of my bedroom terrace and I therefore grow winter and summer with the patio door open. Well, sometimes I experience real weather-related challenges. But all in all, no problem...
"Where there's a will, there's a way."
Addendum to pouring out the fermented PK tea: I always administer half a liter of lukewarm aerated water with 3.5 ml of cannazyme per liter to each plant. This means that the "root machine" is not supplied with supplies unprepared and the nutrient solution can thus also be better distributed in the soil. Since I also work with cloth shoes, I spray them evenly moistened everywhere with water that is also warm before pouring them out from the outside. This has the advantage that the moisture stays where it should: in the pot!
... I did the math today ;-) We are still in week 7 until this Friday. And week 8 starts on Friday! OMG... still so much time yeahh!
Today my Fast Buds Sour Jealousy and Sweet Seeds Big Devil and Dark Devil Automatics arrived. I'm looking forward to it.
This time Fast Buds next Time Sweet Seeds. Love them too. Very beautiful genetics.
Today a review video of the beginning of week 3.
At the time of the pictures, I had minor signs of nitrogen excess. (Light peaks first at the crown of the roof and then slightly continuing to the middle section.) I then painstakingly racked my brains as to why this could be. I found that very slight dry spots had formed and therefore the root found small accumulations of nitrogen that caused its problems. But then, when I carefully homogeneously checked the moisture content in the substrate, the problem evaporated again. However, they had not shown any loss of growth rate during this time. Nevertheless, they developed as expected.
They Strawnanas had no problem with that.
In the end, I always have a hard time killing them. But I guess that's the way things go.
We live and die.
We come and go.
But it's not there yet. ;-)
Tomorrow is day 56.
Tomorrow’s updating day!
Can't wait to see their progress.
Have a good time and see you tomorrow… 🏽🕊️
🏽 ☮️🕊️

Likes
7
Share


@eYo4Terpz
Follow
Sie haben in der Vegi 1x Komposttee bekommen und in der Blüte 1x Pro Monat immer am Ende des Monats hin!
Ich nutze mehrere angepasste Rezepte je nach Stadium und Bedarf der Pflanze!
Ein guter Komposttee ist alles!
Ich arbeite außerdem mit 100% Osmosewasser!
BIOCANNA + ZAMNESIA Gute Kombination!
Likes
155
Share


@deFharo
Follow
Bienvenidos cultivadores de marihuana clandestinos y también a los que tienen la fortuna de no serlo!🖐️👨🌾👍
Este es un diario donde semanalmente explico algunas de mis técnicas de cultivo y preparados orgánicos, los cuales llevo experimentando dos años en cultivos de marihuana interior.
• Hay dos componentes absolutamente necesarios para cualquier cultivo y de los que no se puede prescindir: La luz y el agua... hoy toca hablar de agua, homenajear al agua que la montaña y el cielo me regalan para mis plantas de marihuana!! 💧💧💧
Tengo que decir, que hasta el momento, nunca he usado agua con cloro en mis cultivos, mi interés por el agua pura de manantial ya venía de antes, pues yo mismo la consumo habitualmente, el cloro es añadido al agua corriente para hacerla potable y acabar con posibles bacterias o patógenos, pero no distingue entre buenos y malos. Siempre he creído que el consumo de agua pura, ayuda a mantener la micro biota de nuestro sistema digestivo, os podría hablar de las ventajas palpables, pero voy a obviar comentarios escatológicos.
En el caso de mi modo de cultivo, donde baso toda mi técnica en el mantenimiento e inoculación masiva de Microorganismos de Montaña (MM) en el sustrato, el uso de agua pura sin cloro es obligado.
El 03 de julio de 2020, publiqué lo siguiente:
GROWING TIP: Agua!! Mineralizada, viva y estructurada.
La importancia de la calidad del agua para el cultivo es vital para mi, he recorrido los manantiales, ríos y arroyos de mi zona con el medidor de EC y el de PH para conocer las aguas que me rodean, recojo siempre que hay oportunidad agua de lluvia de la terraza de un vecino, nunca me falta agua pura, desecho regar con agua del grifo. Para mi, y actualmente, la mejor mezcla de agua que puedo ofrecer a mis plantas es agua de lluvia 75% con otra de un manantial de montaña de agua alcalina (Carbonato cálcico PH: 9.2) y muy mineralizada (EC: 0.85), esta agua yo mismo la consumo regularmente, consigo una mezcla de agua pura con un EC alrededor de 0.19, me garantizo así el aporte de calcio y otros minerales. En épocas donde no llueve uso agua pura de manantiales y arroyos con EC de 0.3.
Estas aguas las filtro y almaceno a obscuras en mi casa, la cuestión es que el agua parada pierde oxígeno y también desordena su estructura molecular haciéndola caótica. Para poder recuperar esta estructura y oxigenación, el agua debe estar en movimiento como en la naturaleza, yo me ayudo de un agitador magnético para volver a tener agua viva, el agitador crea un vórtice implosivo que en 10 minutos pone las cosas en su sitio y carga de oxígeno nuestra agua, una vez hecho este proceso voy añadiendo los nutrientes uno a uno y sigo agitando hasta el final.
El agua tratada con esta técnica, mejora la asimilación de nutrientes porque favorece el intercambio catiónico e inunda de oxígeno nuestro sustrato y raíces, también con esta técnica se pueden bajar las concentraciones normales de EC en un 30% y conseguir los mismos resultados, prueba y verás!!
------
Hoy tengo algunos comentarios nuevos sobre los diferentes tipos de agua que uso y usé.
- Agua de río: Comencé recogiendo agua de los dos ríos caudalosos que cruzan mi pueblo, buena agua, no hay industrias en su cauce, pero sin embargo las aguas fecales de los pueblos acaban en él. Por lo que, ante la duda, deseche el uso de este tipo de agua.
- Agua de lluvia: Como comenté antes, recogía agua de lluvia desde el desagüe de la terraza de un vecino (PH: 7, EC: 0.07), mucho trabajo, exposición vecinal y explicaciones surrealistas a los transeúntes que me preguntaban, como decir que recogía el agua para mi perro que no podía tomar agua con minerales por tener tendencia a la formación de piedras en la vejiga, en otras ocasiones, respondía con entusiasmo que era la mejor agua para cocinar alubias!! 🤷♂️😎 Definitivamente dejé de recoger agua de lluvia de ese lugar, pues el agua que explico a continuación ya viene con los niveles de EC que yo busco...
- Agua de montaña: Manantial permanente a 700m de altitud, el PH varía según la época del año, cuando en otoño, invierno y primavera hay más lluvia, el PH está en 7, y el EC en 0.25, en verano el PH sube a 8 y el EC a 0,5, esto es debido a que la carga de minerales es mayor cuando no hay lluvias. Según la geología de la zona, rocas cálcicas, arcillas y basalto principalmente, este agua mineral contiene suficiente mineral (Ca, Mg, Si, Al, Fe, K...) para no tener necesidad de usar aditivos como CalMag. Esta, es el agua que más uso para riegos.
- Agua de manantial alcalino: Casi a nivel del mar, muy mineralizada, con menos variación de PH y EC en épocas de lluvia: PH entre 8 y 9.2, EC entre 0.5 y 0.9.
Esta agua la uso de varias maneras:
a) Es el agua que yo bebo.
b) El café y la comida la hago con esta agua.
c) Por su nivel de alcalinidad la uso para los diferentes fermentados anaeróbicos, compensa la extrema acidez de estos preparados y aporta minerales ya solubilizados.
d) Este invierno la he usado para riegos mezclada con agua de des-humificador al 50%, obteniendo agua con un EC de 0,25.
e) Las raras ocasiones en que riego sólo con agua, uso ésta si el cultivo va bien, y si necesitara hacer un lavado de sustrato por sobre fertilización, uso el agua de des humificador: PH: 7, EC: 0.09, que al no contener minerales el poder de disolución es mayor.
- Agua de des humificador: Este invierno debido a las bajas temperaturas, alta humedad relativa y aparición de oídio, me vi obligado a tener funcionando permanentemente un des humificador, y para hacer de la necesidad virtud, he estado recogiendo esta agua exenta de minerales, mezclándola al 50% con las aguas del manantial alcalino, de esta manera me he he ahorrado algunos viajes al manantial de montaña.
Recientemente medí el consumo de este aparato, y casi me caigo de espaldas al comprobar un consumo de 140w, lo he tenido encendido más de 3 meses las 24h del día y en ocasiones he tenido funcionando dos des humificadores! y yo, engañosamente, pensé que no consumían más de 50w... bueno, después del disgusto de saber el despilfarro de vatios, yo, que me he esforzado mucho en los últimos cultivos, acarreando macetas del interior al exterior, por consumir el mínimo de luz eléctrica y que me ha supuesto obtener unas cosechas medio bajas para lo que estaba costumbrado, ahora, en mis nuevos 4 cultivos la luz no va a ser el obstáculo, ya que ahora los des humificadores están guardados, y voy a alumbrar estas plantas con todo lo que me quepa en la carpa, la media de vatios por planta de mi última temporada de cultivos fue de 40w/planta, esta temporada voy a llegar a los 100w por planta... más luz es igual a más masa floral!!🌲🌲🌲🌲
- Agua de mar (for nerds): Yo no me he atrevido a usarla para riegos, pero con el agua de mar preparo Ormus casero con agua del mar Cantábrico, donde separo el sodio y hago precipitar los minerales:
Publicado el 10 de julio de 2020
a) Fuente principalmente de Magnesio, Azufre y calcio para todo el cultivo. El Ormus contiene de un 30 al 60% de magnesio. Yo lo uso sistemáticamente en todos mis riegos, las dosis van desde el 1% al 2%.
b) Contiene más de 70 minerales, la mayoría en modo monoatómico que mejora el intercambio catiónico y la asimilación de nutrientes.
c) Al ser un producto alcalino se puede usar para subir el PH del riego cuando se necesite. Aumenta muy poco la carga de EC.
d) Forma parte de mis componentes en la solución acuosa que preparo para germinación y establecimiento de semillas.
e) Almacenado a obscuras el producto no tiene caducidad conocida.
• Agua de coco (for nerds).
Producto natural rico en azúcares, vitaminas, proteínas y aminoácidos, enzimas citocininas (División celular, crecimiento), ácido giberélico (Estimulación de raíces) y minerales (Ca, Fe, P, Mg).
- Los momentos clave de más demanda de enzimas citocininas comienzan en la mitad de la primera etapa de germinación y establecimiento de la plántula, y al comienzo de la etapa de floración/reproducción. En la última etapa de los cultivos es innecesaria.
- Los momentos clave del ácido Giberélico comienzan también en la primera mitad de la primera etapa de cultivo y las últimas semanas de crecimiento vegetativo, después de estas etapas la necesidad del ácido decae hasta hacerlo innecesario en las últimas semanas del cultivo.
- Yo uso el agua de coco, alternándola con otros nutrientes, sólo en las primeras etapas de la planta y hasta la preflora.
- Las dosis dependen de la carga de EC que se prefiera. Como mínimo aconsejo una carga en disolución de EC de 0,4 o PPM 200.
- El agua de coco natural se debe guardar en el refrigerador, como máximo 4 días, pues fermenta con mucha facilidad.
y esto es todo por hoy... tengo sed! 😁
Hasta la próxima semana...
SALUDOS CULTIVADORES!!🖐️👨🌾💧💦🌞💡
=================================
Likes
7
Share


@Stevoza
Follow
Last 2 weeks were rough.
Had to fight spidermites, high temps (had the AC on for 10hours of the day just to keep under 28 day and 20 night.
Despite all this, the ladies seems to be bulking up now, still 5 weeks to go.


Likes
98
Share


@Tropicannibis_Todd
Follow
💩Holy Crap We Are Back At It And Loving It💩
👉WE R ALMOST THERE👈 3.5 GALLON POT CHOPPED ON DAY 65 👈
Growmies we are at DAY 70 and there just killing💀it👌 The Smell has kicked in and is wonderful 😀
👉We are in full out flowering 💐 and its looking great 👈
So Shit , I gave them just a tad to much nutes on the first few feedings 👈 But I have since fixed it
So I'm helping out with some low stress training 🙃 and some defolation 😳
Lights being readjusted and chart updated .........👍rain water to be used entire growth👈
👉I used NutriNPK for nutrients for my grows and welcome anyone to give them a try .👈
👉 www.nutrinpk.com 👈
NutriNPK Cal MAG 14-0-14
NutriNPK Grow 28-14-14
NutriNPK Bloom 8-20-30
NutriNPK Bloom Booster 0-52-34
I GOT MULTIPLE DIARIES ON THE GO 😱 please check them out 😎
👉THANKS FOR TAKING THE TIME TO GO OVER MY DIARIES 👈