
Likes
Comments
Share


@TokyoStreet
Follow
Plants are cruising through and stacking nicely.
Brewed & fed flowering tea recipe & plants responded with some smell starting to feel up my tent.
Blue Cheese definitely has some funky cheesy & earthy aroma.
Afghan kush smell is the most exciting to smell these days as its aroma is something akin to a perfume.
Can't wait to see what the rest of this week looks like.


Likes
47
Share


@rhodes68
Follow
11/10 Week 7 Long week
Maggie is responding well to treatment, will continue until I see something that says its gone far enough.
I know she needs defoliation but I just hate to take health(ish) leaves when its already stressed. Maybe next week air flow is good.
May add some sulfer to the mix but keeping it as is otherwise, 6.8 PH, 1-2% H2O2 and CalMag in a day or two as she drys.
Brandy... not sure it did as much for her but see nothing that says stop so will continue as the pot drys.
Layla ya got me on my knees... shes my girl. lovely not perfect but has handled things that left other plants stunted and yellowed.
Were she a photo I would have cloned her.
Continuing feeding as I have, may add Karo may not, defoliation continues as needed.
May this continue God willing and the creek dont rise.
Last note - Raised the lights up 4 inches to 22" for better dispersal across the canopy now that its getting used.
Think this strain likes that.
11/11 Looking better.
Did some defoliation on Maggie, nothing stressing and mostly damaged leaves though some were for blocking bud sites
Same on Brandy though less so.
Picking up some chemical bloom nuets so I can continue lightly feeding them through these treatments, the organics are getting blasted by the h2o2
Layla looking her usual lovely self, buds building, her and Maggie get fed today, Brandy still too wet.
11/12
Brandy still not dry enough, may adopt the feeding I set out for Maggie below when it is time.
Changing the treatment on Maggie, for one feed only dropping the calmag and adding two TBS of Epson salts , fish sh!t and recharge to get the bug healthy, and continue the cocotek nuets for the time being, it the only mineral fert I have, to the water at 6.5 PH . Believe the H2O2 has done all its going to do repairing the roots and now I can address the sulfur (i hope) issue. Plant is huge BTW so if I get her producing, yield is going to be huge. IF
Layla just continue as before, the Dr Earth is doing a marvelous job of covering all the bases. Will absolutely use this when I go back to organics.
Had to reset the lights again... Maggie :)
11/13 New Pics of Maggie as she is the only one causing me concern, no feed today still too wet
Defoliated bottom 1/3 of Maggie getting rid of all unwanted under growth. Will continue as it goes. Large leaves looking normal now.
11/14 Feeding time:
Maggie and Brandy - 1 gal at 6.5 1.5 TBS Epsom Salt (decided to hit the middle), 5ml cocotek A&B , 6ml Fish Sh!t holding the recharge for next time.
Layla - 1 gal at 6.5 5ml Cal Mag , 5ml Bio-Bloom, 5ml Fish Sh!t
Getting a bit of height growth on Maggie. Expect more if we are right on this. Decided to hold off a mag/Sulfur foliar until tomorrow if needed.
New Vid posted few minutes post feed. Maggie was a bit dry as she is really drinking
11/15 New Vid
Foliar feed of 1.5 TBS Epsom Salt / gal unPH water on Maggie primarily though also hit Layla and Brandy.
Only the very top of the colas now have the paleness so progress.

Likes
16
Share


@Jazzvet
Follow
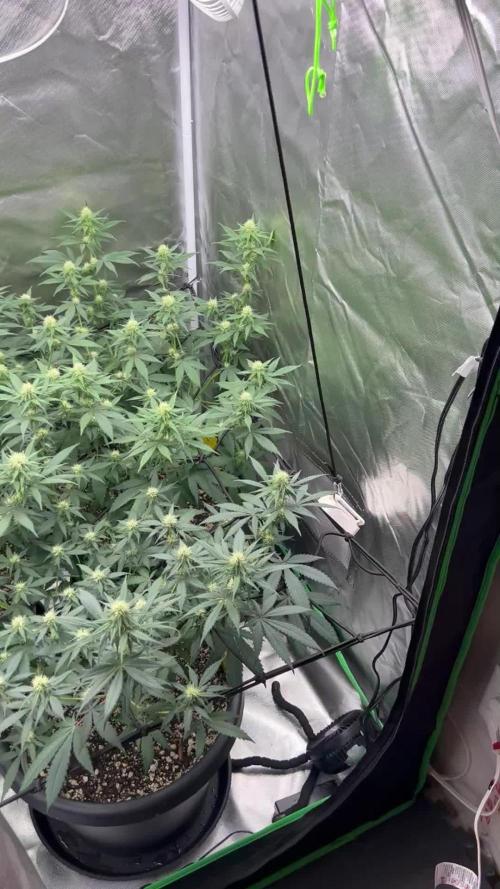
Entering in probably the last week of vegetation, the girl has grown well but with same yellow tips in the new growth. This week I gave 0.5 ml of bio grow per 3L of water and I've increased the fresh air supply on the bottom since the plant is getting the bloom phase. See you next week. Happy growing

Likes
7
Share


@ShiftyGaijin
Follow
Day 43_________________________
- Decided to make the 12/12 shift due to my Caramelino growing enough to risk light burn if it doubles in size during flower. I have the light as high as I can safely put it in my tent with fans constantly on above the lights, and still only have 33” of space from the top leaves.
- That being said, lots of LST will be used to fan out instead of up.
- Flushed out the system completely this time. Before I would drain enough for the water pump to suck in air, but this time I filled with 50 gal of pH’ed water. Then I measured PPM. I stopped when the remainder of the water was 250PPM. Just a little richer than my tap water. Should have been doing this the entire time. Probably wouldn’t have had the nute burn spots that I was getting when I was 1400-1500 after half a week of the plant eating and drinking. Now is sitting just above 1000. I feel the plants will appreciate the break from over-nuting.
Day 48______________________________
- plants are all loving the lower PPM numbers and pushing through the trellis net.
- Plants are all drinking about 5 gallons every 3 or 4 days. Replenishing with pH’ed water when I notice a significant drop.
- Two main shoots are becoming a pain to try to keep at the same level of all the others. LOTS of LST.

Likes
30
Share

@valiotoro
Follow
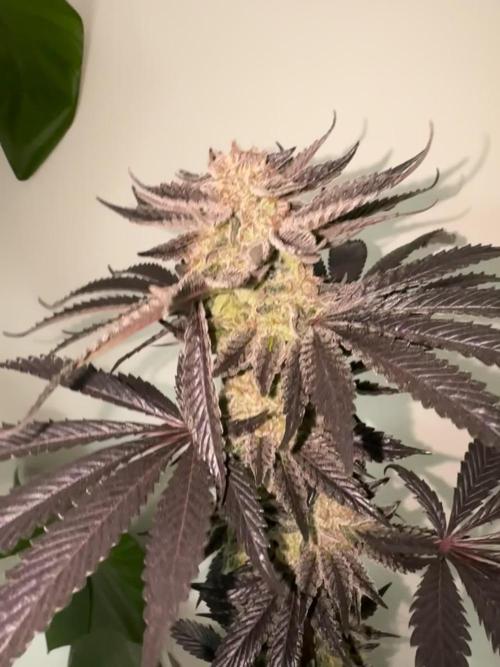
Once again, you don’t need to break the bank to grow real quality. The terps are incredible.🧡🖤

Likes
14
Share

@BudsPerMinute
Follow
Woche 14
Mitte der Woche haben wir FlashClean gegossen um einmal alle Salze und Co zu lösen! Ab jetzt gibts es nur noch Wasser die restlichen Nährstoffe in der Erde und den Blättern muss für die nächsten 1-2 Wochen reichen.
Der Geruch ist auch wirklich sehr extrem wirklich ein Terpen Monster!

Likes
91
Share


@Fire_Farmer
Follow
Week 1 Day 5 Flower
Hi Everyone 🖐️🏻
Thanks for looking in!
I switched to flower 5 days ago and the girls are filling out well each day.
I just today drilled a hole in the floor and inserted an iron rod into it which now pulls the net in a lot tighter and has allowed me to start tucking and guiding branches where they can get the best light and fill the net.
I have supported this with a bit of defoliation to get light to those lower branches and get them pushing growth towards the canopy.
As the next two weeks progress I will continue to defoliate and even remove some lower branches which aren't likely to benefit the canopy and in fact deprive the canopy of some energy.
The roots are looking good rapidly colonizing the tubs, I've had to return them to the trays from the reservoir below several times which is a headache I'm happy to have😂
I may have flipped too early and aren't likely to fill the area but it should still be a heavy crop and if rather have a manageable grow than a jungle.
If it proves way off then next time I grow the same strain using the same method I'll add another week to the veg.
Thanks for looking in GDCommunity and thanks in advance for any help, advice and general support
✌️🏻Peace
🔥Fire
👨🌾Farmer

Likes
7
Share

@Dalepeno58
Follow
Nothing different this week. Plants are still changing fast and looking healthy. Will probably top dress this coming week.


Likes
Comments
Share

@GasoGrow
Follow
It's week 12, and the branches are all being bent downwards to create a wider surface area, allowing them to grow upwards in two weeks for more flower calyxes.


Likes
53
Share


@DogDoctorOfficial
Follow
Hello, my amazing green-thumbed friends! Welcome to the Week 1 flower report for our beloved P.C.R.s. The transition from veg to flower is a magical time, and our plants are already showing signs of their future glory. Let’s dive into the exciting details of this week!
Entering the Flower Stage
Our P.C.R.s have officially entered the flowering stage, and the transformation is already visible. The stretch has begun, and you can see the plants reaching up, preparing to produce those beautiful buds we’re all waiting for. This stage is all about supporting their growth and ensuring they have everything they need to thrive.
NutriSpray Magic
This week, we’ve been diligently spraying Aptus Holland NutriSpray, and the results are phenomenal. NutriSpray is like a spa treatment for our plants, providing essential micronutrients directly to the leaves. It helps with nutrient uptake, reduces stress, and boosts overall plant health. Our P.C.R.s are absolutely loving it, standing tall and proud with their leaves praying to the light.
Nutrient Transition
With the start of the flowering stage, we’ve made some important adjustments to our nutrient regimen. We’ve stopped using StartBooster and replaced it with TopBooster, which promotes flowering and bud formation. Additionally, we’ve introduced P-Boost, a phosphorus booster that enhances root development and flower production.
TopBooster: Encourages larger and more abundant flowers.
P-Boost: Provides essential phosphorus for robust root and flower development.
NutriSpray: Continues to support overall plant health and stress reduction.
Optimal Conditions
Maintaining the perfect environment is crucial as we move into the flowering stage. Our TDS is now at 360, with a pH of 5.9 and a temperature of 21°C for watering. These conditions are optimal for nutrient uptake and overall plant health, ensuring our P.C.R.s have everything they need to produce those beautiful, resinous buds.
Care and Attention
Paying close attention to our plants during this stage is key. Regularly inspecting for any signs of stress or nutrient deficiencies and adjusting care as needed ensures our plants stay happy and healthy. The love and care we put into this process are reflected in the vibrant health of our plants.
In Conclusion
Week 1 of flowering has been all about setting the stage for a bountiful harvest. With the help of Aptus Holland NutriSpray, TopBooster, and P-Boost, along with our careful attention, our P.C.R.s are off to a fantastic start. The excitement is building, and I can’t wait to see how they develop in the coming weeks.
Shout Outs
A huge shout out to @aptusholland, our main sponsor, for their incredible products that keep our plants thriving. Another big thank you to @artgenetix for creating the phenomenal P.C.R. strain. And to the wonderful community at Grow Diaries and all our followers, your support and enthusiasm keep us going. Let's continue to grow together!
Until next time, happy growing, and may your gardens be full with love and green!
Genetics - P.C.R. @Art_Genetix_Team https://artgenetix.world/
Nutricion @aptusholland https://aptus-holland.com/
LED Power @Lumatek and @viparspectra
As always thank you all for stopping by , for the love and for it all, i fell blessed to have you all with me for one more love journey Thank you Thank you Thank you , you guys are great and have been amazing , thank you for everything !
#aptus #aptusplanttech #aptusgang #aptusfamily #aptustrueplantscience #inbalancewithnature #trueplantscience #dogdoctorofficial #growerslove
With true love comes happiness , Always believe in your self and always do things expecting nothing and with an open heart , be a giver and the universe will give back to you in ways you could not even imagine so !
Growers love to you all

Likes
21
Share


@Hydronaut
Follow
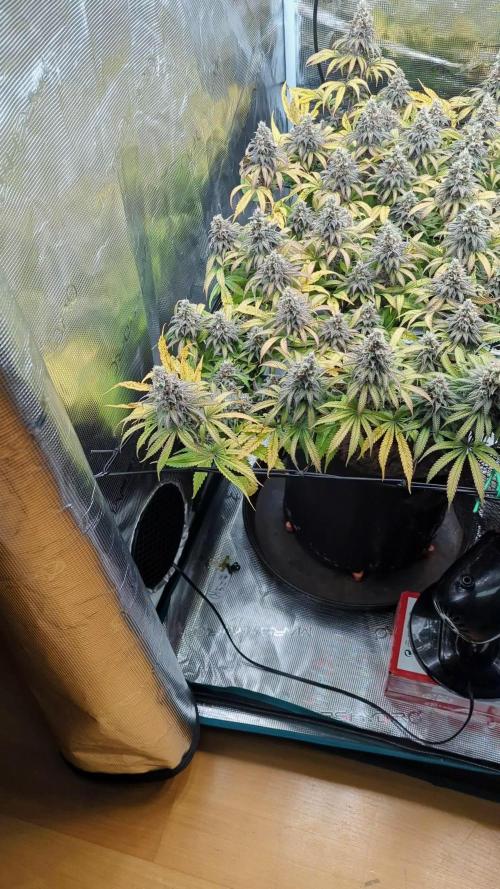
Started my Autoflower journey in soil a few grows ago, and was happy with 2-4 ounces. Using my hydro cabinet with this strain was off the charts compared to soil. Maybe 8 ounces when dried? Time will tell, but this lady put out!


Likes
2
Share


@TheHomeGrowChannel
Follow
Easy growing, decent yielder. I just wish the buds were a little denser but overall still impressed.

Likes
13
Share


@gr3g4l
Follow
Sigo pulverizando cada dia un par o tres veces con agua destilada y regando a ojo las que voy viendo secas cada dos más o menos. No son ciencias exactas y unas demandan más o menos segun fenotipo , el sitio donde están dentro del armario, por el riego anterior por si fué excesivo o insuficiente, etc etc . La idea es regar cuando veo que lo necesitan. regar y dejar secar.
A mitad de semana las cambié a maceta de 5,5L téxtil y las pasé bajo los COB , 4 cri97 4000K y 5cri 97 2700K ,250W áprox.
En estos momentos aumento el riego a 500ml por planta cada dos dias áprox. según.
Armario de doble capa de DM con aislante y las medidas serian 76x76x180. El armario está fuera de casa por lo que tengo que luchar contra las inclemencias meteorológicas añadiendo un par o tres de calefactores de 80W. en momentos de mucho frio o aumentar caudal de extracción y tiempo de ventilador cuando hace mucho calor. Los calefactores van con sensor de temperatura graduado para que el sustrato se mantenga a 20- 22ºC áprox
Esta semana empiezo a regar con agua del grifo , de base 0.4 áprox. y 6´5 de PH.


Likes
52
Share


@Rangaku
Follow
Cherry cola getting some nice fat , dense and colourful buds . Flushed this week and looking to start the potassium this week .