


Likes
15
Share


Likes
12
Share


@Kakui
Follow
Veg3, día de riego, van creciendo bien.
Veg5, riego con 0.9 EC y pH 6.2, great white en el sustrato.


Likes
5
Share

@OnlyBuds
Follow
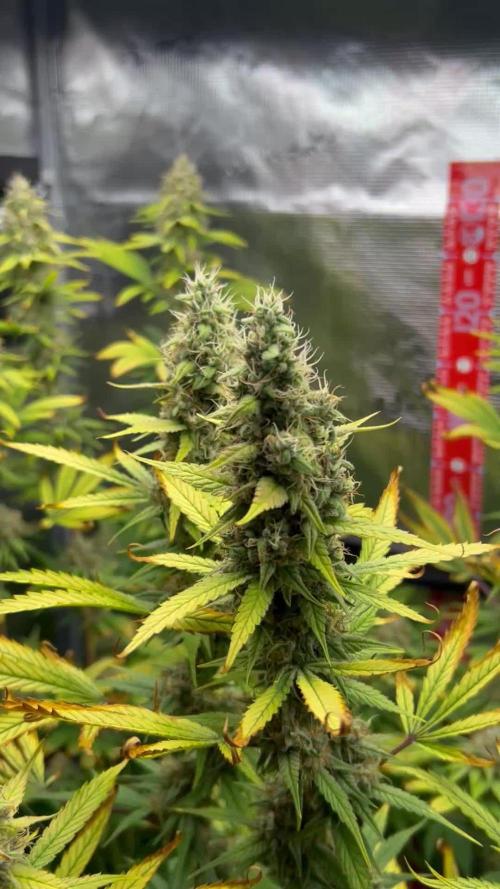
Week 14 – Getting Fatter Every Day 💛🌾
The fade is moving in stronger now, but the buds keep getting fatter and denser every single day. The smell is really good already — loud, sweet, spicy, and pushing more each week.
💧 Feeding (this week)
Watered with:
• 60 ml Bloom
• 60 ml TopMax
• 30 ml EM
• 30 ml Bat Boost
• 30 ml CalMag
• 1.7 g Epsom salt
They drank it well and are still building heavily.
🌱 Notes
Even with the yellowing leaves, bud production is still rising. Trichomes are stacking nicely, and top colas are swelling fast. Everything looks on track for the final weeks.
Stay tuned, muchachos — she’s not done yet.
OnlyBuds 🌱✨
Processing
Likes
10
Share


Likes
5
Share

@Pompeyblue
Follow
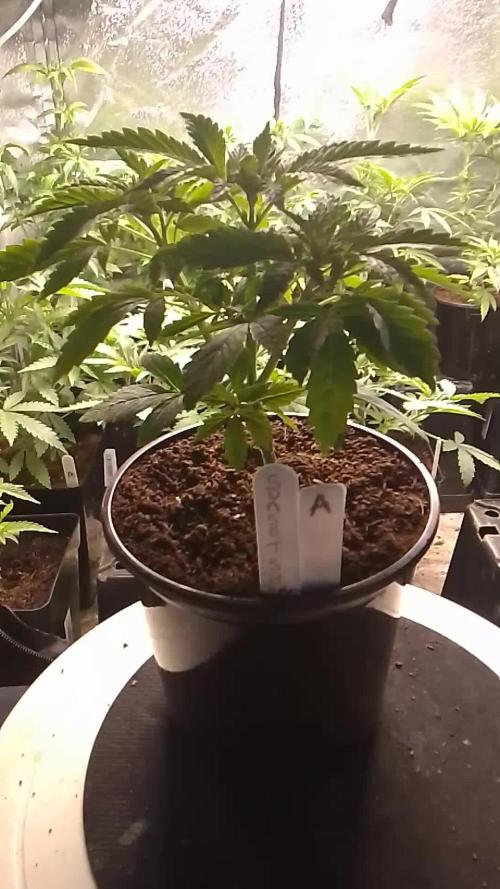
All looking nice 👍 the one in the black pot we now call A 😆 is coming in nice and strong since being moved up a bit closer to the light
B & C are going great guns to

Likes
3
Share


@CannaBossBizz
Follow
Put the seed in a Paper towel and in a Tupperware. Put the Tupperware in tent ON TOP of the lamp. They popped after 15 hours! Super fast. Ladies and Gentleman LET'S GROW! 🤙🏽

Likes
14
Share

@Canna-Lytiker
Follow
Ihr sieht schon es hat sich etwas verändert. Ich bin nun nicht mehr unter meinem privaten Namen hier, sondern mit dem Namen den Ihr auch auf YouTube finden könnt. Der Kanal ist ganz frisch und ergänzt die grow Tagebücher.
Hier werdet ihr aber immer im voraus wissen was gerade mit den Pflanzen läuft auf youtube haben wir ein bis zwei Wochen Versatz. Dafür gibt es dort Sachen zu sehen die ich hier so nicht zeige.
Zurück zum Krieg der Pflanzen...
Der Angriff ist gestartet der Krieg im vollem Lauf die Vorblüte hat begonnen. Die App ist cool fängt an Gas zu geben. Aber die Fat Banana hält gut dagegen. Dafür dass sie fast tot war hat sie nun ordentlich aufgeholt.
Was demnächst spannend wird, die App ist Rudel brauch demnächst blütedünger und die fat Banana eher nicht 🙃🤡
Verpasst auf jeden Fall nicht das youtube special dazu!
https://www.youtube.com/@Canna-Lytiker420/videos

Likes
13
Share


@MT420
Follow
Day 1: Paper towel method was used. Made sure plastic container stayed in a dark and warm place.
Day 2: Seed has cracked but no tail yet.
Day 3: Started to worry seed won’t germinate so top tissue paper was replaced with new dry one. Used warm water to wet the new paper towel. After 12 hrs crack in seed got wider little tail started to appear.
Day 4: Repeated method used in Day 3. Warm water used on new paper towel.
Day 5: Germinated seed placed in jiffy peat pellet and placed in propagator.
Day 6: no change yet. Put propagator in window for sunlight.
Day 7: no change so decided to intervene. Checked to see if seed cracked. Slowly removed the remaining shell. Covered with soil.
Day 8: Seed has sprouted. Put propagator under the sun for 9 hrs, and after it stsrted to open its first leaves.
Day 9: She’s enjoying the sun.
Day 10: Last day in the sun. Soil mix prepared and washed with water (ph 6.5). Transfer to 15L fabric pot tomorrow.
Likes
20
Share

@CampExotic
Follow
Nice fade coming. Looks kinda alien like and not the traditional buds. Maybe the light is too strong?

Likes
12
Share


@ChiTaN
Follow
I am very proud of this girl ! Despite the fact that she is younger than the rest by two weeks, she caught up with her friends in height and even surpassed them :) The giant fan leaves are surprising 😃

Likes
12
Share


@HerbalBlazer
Follow
Now nearly court up so this is around 3_4 weeks flower just finishing stretch here


Likes
4
Share


@TerpeNauta
Follow
Hola Chicos Humos !!
Black Jack Regular con tan solo 2 días de germinada en la tierra , tambien tenemos 3 Afghan de Sensi Seed Regulares con 2 días de germinada en tierra.
Por ahora vamos a ir regando con agua de lluvia con un PH de 5.9
Se viene ese seguimiento Humitos

Likes
46
Share


@Ju_Bps
Follow
Hello my friends,
I hope all's fine for you,
For me all's good
Plant are healthy and buds biggest each day, start to see pollen 😛, and nice smeel.
I've started more than one week
Tera flore and Sugar Royal,
See you next week!
Enjoy 😎😎
Likes
2
Share


@Never96
Follow
My friends raved about this strain. Great taste great high and density was fantastic! Overall five stars and I only did one plant because I only had one seed and I may grow this one again. I always LST my plants and I got almost 7 ounces off of this one with only about six weeks of veg.
Likes
8
Share


@droedel
Follow
learned a lot so far, still a lot to learn.
Merry Christmas!
Giving only water (Spa Blue, it has 6.0ph).
Happy new year all.

Likes
260
Share


@SlowpokeFuegobud
Follow
🐒 🍌 🌴🐒 🍌 🌴🐒 🍌 🌴🐒 🍌 🌴🐒 🍌 🌴🐒 🍌 🌴🐒 🍌 🌴
Welcome to week 6!! 😘
DAY 38
Watered with pH-ed water + humics + fastbuds + growzyme + bigfruits + vitalize 💧
DAY 40
Foliar spray with Nutrispray 💦
DAY 42
Watered with 1ml grow + 3ml bloom + 2ml roots + 3ml humic + 4ml growzyme + 3ml calmag + living organics topdressing 💧
FLOWERINGGGGG!!! 🌺 🌻 No joke, they all pre-flowered (all 4 strains) 4 days after receiving the valerian extract for the first time (also the much younger Donkey!!).
You can get the Fastbuds from Green Buzz, it contains valerian extract. 💚 🌹
Thanks, my growmies for visiting and reading and commenting, I love reading your comments! Mwah! 😘
Thank you, @Kannabia, for sponsoring this grow, aaaaand for the amazing gift pack! 😍 I hope to make you proud! 🧡
Special shouts out to my fantastic sponsor @GreenBuzzNutrients! Thank you for trusting me with your awesome products, I'm a longtime fan! 💚 🙏 Green + juicy growmie hugs to my Greenbuzzers!! 😘
Grower Love everybody!!!11 💚 💚💚💚💚💚💚💚
Wishes do come true, they just take a lot of time sometimes.. ✨
If you wish to try Green Buzz Nutrients, there's a 25% discount code hidden down there in the week comment somewhere.. 😎
__________________________________________________________________
https://www.kannabia.com/en/feminized-cannabis-seeds/monkey-grease
Monkey Grease
At Kannabia Seeds we have put all our effort into bringing out our own feminized Monkey Grease, a cross between Monkey Grease x White Widow, focusing above all on giving it its own personality in flavor and aroma (frankly unmistakable).
Its own personality
At Kannabia Seeds we have put all our effort into bringing out our own feminized Monkey Grease, a cross between Monkey Grease x White Widow, focusing above all on giving it its own personality in flavor and aroma (frankly unmistakable) and, of course, in Highly demanded characteristics, such as high resistance to diseases and pests, and adaptability to all types of growing conditions, making it close and easy to grow to the widest possible range of growers. The result is a really powerful and versatile indica-sativa marijuana seed, with a powerful relaxing effect, ideal for those moments when you want to disconnect from the madding crowd.
Cultivation of Monkey Grease
Which cultivation method would be most appropriate for this variety? Good question… and one that is easy to answer. Its versatility and adaptability make it a true all-rounder, with remarkably uniform results, whether you choose SOG, SCROG, hydroponics or guerrilla growing. Moreover, we invite you to experiment and play, varying the techniques from moment to moment, and to draw your own conclusions. We are convinced that in all cases, apart from minor variations, the results will always be optimal, giving remarkable yields and in a short time.
Attention should be paid to its high bud production, which can be fat, dense and heavy, although its sturdy branches are able to bear heavy loads without major problems. If you are a fan of extractions, our Monkey Grease is also optimal, given its high production of caramelised resin.
If it is already amazingly productive indoors, this variety excels on its own merits outdoors, where it can easily reach 200 cm in height, and can reach between 700 and 800 grams per plant.
It is therefore an easy and grateful plant, which demands little from its gardeners, making do with simple basic care, and with little or no propensity to develop diseases or mildew, or to attract pests (despite its striking aroma!).
Taste and effect of Monkey Grease
Our Monkey Grease stands out first and foremost because of its powerful, strong smell, which is hard to camouflage. A penetrating aroma that unfolds, in a balanced way, on the palate in the form of a wide range of spicy and sweet flavours, reminiscent of wild honey, nougat and cinnamon, and distant notes of milk chocolate. A delicious treat to be savoured calmly, without haste, as a preamble to its pleasant effect: extremely relaxing and narcotic, powerful, ideal for meditation and moments of introspection and meditation.
Don’t be in a hurry with Monkey Grease. It can be your perfect ally to treat those stress and anxiety problems, but for that you must let yourself go, surrender to its charms, especially if you are inexperienced.
________________________________________________________
Setup:
60x60x180 cm Zelsius
Greenception GC4 128W
4 Cluster OSRAM + CREE LEDs (380, 455, 630, 660, 720, 760nm)
6400k (cold-white to cover the basic load during the growth)
2100k (warm-white to cover the basic load during the blossom)
The module groups can be switched individual as follows:
⬤ Module I: growth 1x 32 watt
⬤ Module II: full spectrum: 2x32 watt
⬤ Module III: Bloom: 1x 32 watt
⬤ Module I is optimized for the growth phase. A relatively high amount of blue and white support a dense growth.
⬤ Module II suits for the growth as well as blooming phase. Optimal plant light full spectrum.
⬤ Module III is optimized for the bloom. A high portion of red and an additional infrared push.
Green Buzz Nutrients https://greenbuzzliquids.com/
❗ Use code GD42025 for generous 25% discount (for orders of minimum 75€) 💚
Plagron Growmix
Carbon Active Granulate 240cm³/h
tab water pH 8 - EC 0,25 with Calmag to 0,5
Advanced Hydroponics pH minus Grow + Bloom to pH 6.5 💧
🐒 🍌 🌴🐒 🍌 🌴🐒 🍌 🌴🐒 🍌 🌴🐒 🍌 🌴🐒 🍌 🌴🐒 🍌 🌴

Likes
62
Share


@ButterfliesLittleFarm
Follow
Hello Diary,
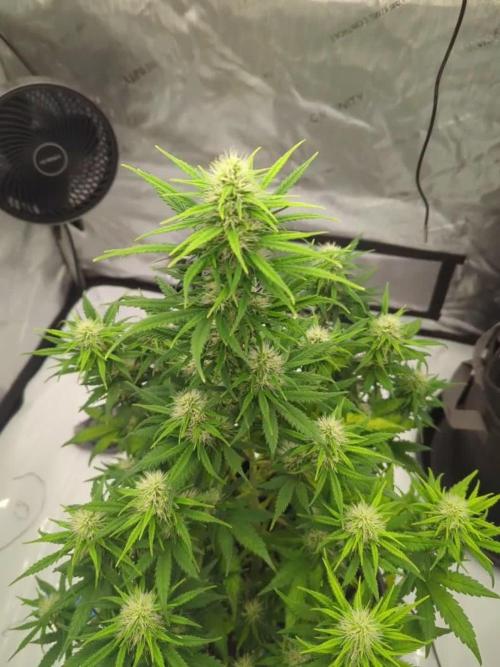
Another week is behind me, Medusa F1 is incredibly fast, as you can see in the photos, already after the third week of flowering it looks quite mature.
The smell is incredible, an extremely strong fruity aroma overwhelms me as soon as I open the grow box.
The first Medusa (on the left in the grow box) is a little smaller and more mature than the second one, so I will probably harvest it first.
But he certainly has another ten days if she continues like this.
The flowers have filled in nicely, they are hard and very very sticky to the touch.
After any work with plants, I need some time to wash my hands and remove the smell.
Watering is more frequent, they become thirstier, but I no longer add any nutrients to them, only clean drained water to which I adjust the pH. on 6.0.
The conditions at the Farm are excellent, the temperature is around 25 degrees, while the humidity is around 40%.
Here's how it looked last week.
02/03/2023. - Day 37.
Watering. I prepared 8 liters of water, let it sit for 24 hours to evaporate as much chlorine as possible, added Plagron's Lemon Kick to bring the p.H down to 6.0.
I watered both plants evenly with that amount.
06/03/2023. - Day 41.
Watering. I repeated the same procedure as four days earlier.
07/03/2023. - Day 42.
Photography for the end of the third week of flowering.
That's all I think for this week, I'm looking forward to next week. See you soon and thank you all for your support.
Likes
Comments
Share

@KasperGrow
Follow
Nutrient issues starting showing up. I used Mels square foot gardening soil mix and the chicken and cow poop has tons of nitrogen so i believe there was too much and started to get nitrogen toxicity..