
Likes
Comments
Share


@TheBudWhisperer
Follow
Medium:
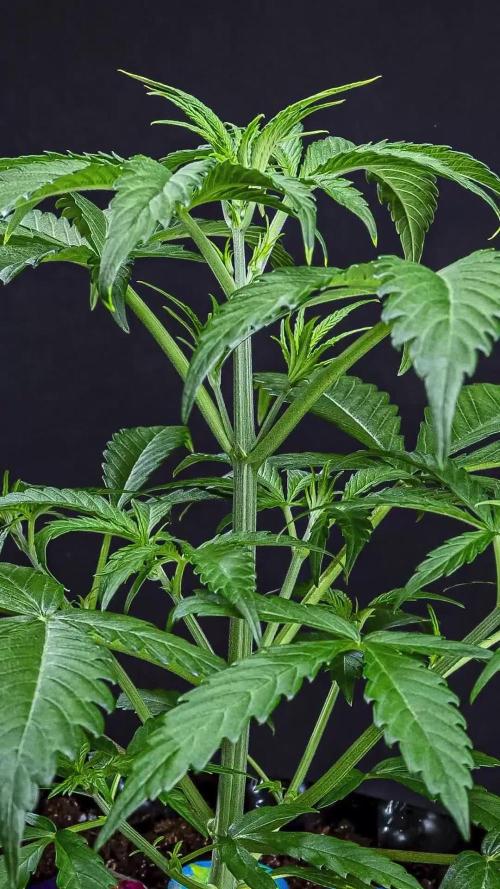
Yep - still gonna beat on the DWC drum. It just gets better and easier every run. Almost religiously changed out the res. every week and this was definitely overkill. Could’ve easily gotten away with every 10 days to 2 weeks. Stuck with peroxide this run again instead of going with bennies via hydroguard or hygrozyme. The results speak for themselves on a 6 week veg. That’s for sure. Still save’n them dolla bills on the nutes too. Minimal nute mixing (as well as simplistic regime) and for what we’re using in each res. - gotta be easily a 50-60% savings on nute consumption vs. more traditional methods. Honestly makes one wonder why organic soil grows are seemingly all the rage. I’ve found terp. Profiles, structure, plant health and of course yields to all be just that much better in straight water. What more can I say, we love our DWC.
Method 🎚️🎚️🎚️
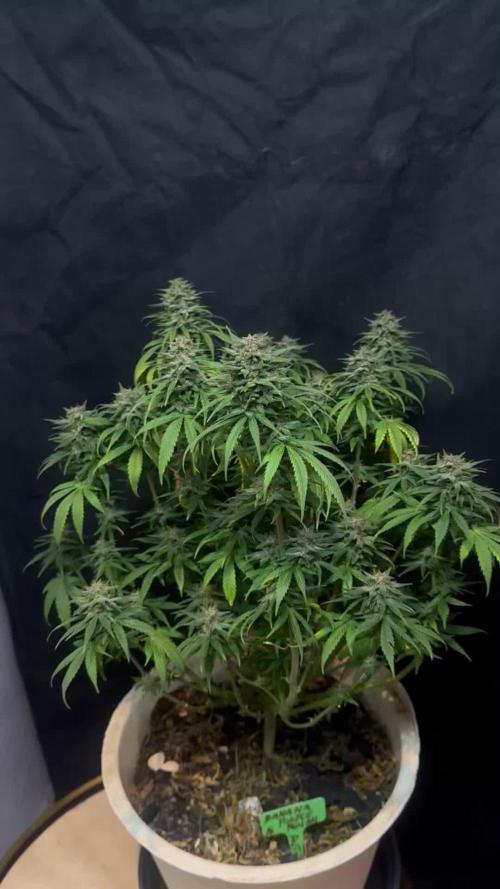
The dueling methods were the whole point of this grow. Our best attempt to illustrate the differences between LST vs. LST/Topping ie. just how significant is the difference in terms of overall production? The truth of this test is a bit of a double edged sword. On the one hand, topping does have a significant effect on overall yield. This fact is regardless of whether or not from seed or clone.That said and when it comes to clones, you still have to be mindful of the drawbacks of further dividing (and thus reducing nug size for) main branches. Our topped clone #2 is a perfect example of this. While the structure demonstrates significantly more branching, the nug sizes are also significantly smaller. As you’ll see in the yield details it does somewhat make up for this through a higher overall weight but it was also a much less manageable plant than #1. Root mass on the topped plant was heavier and bulkier, drinking much more water than its counterpart. And in late flower half the plant was pretty much falling over. While some of this is attributable to the extremely hollow stems (and thus a carbon deficiency), making the most of the grow light proved difficult with the topped plant as bushy as it was. Basic summary - if ur cloning for profit or efficiency, stick with straight LST and grow a whole bunch of em. If I had to do it again I don’t think i would’ve bothered with topping - just for the sake of greater ease🤔🤔🤔. Then again, I’m greedy as fuck when it comes to my yields so I Could totally see myself trying to max everything out and go for broke🤙🤙. 3/5 volume bars for the rating - we accomplished what we were trying to.
Yield/Harvest🌴🌴🌴🌴
Awwwwwe yeah - down to where it counts and these girls were champs💪. While internodal spacing was longer than necessary and overall bud size was smaller than average; these plants pushed out some solid weight👍😎👍. Ran er through a 7 day dry and all jarred up on a slow cure.
Final numbers:
Total yield - clone #1: 5.14oz = 143.92g
Total yield - clone #2: 6.01oz = 168.28g
Approx. est. yield: 600g/m2 divides by 4.8, multiplied by 2 (approx. for 2/3 the cabinets sq/ft) = 250g per 0.41m2
Actual yield: 11.15oz. per 0.41m2 = 312.2g per 0.41m2.
That is some seriously good production right there😎👍😎. The high end avg. for this strain is 650g/m2. When you crush that out to my space and the numbers above, it works to about 270g per 0.41m2. Our actual yield still destroys the high end avg. by almost a zip and a half👍👍👍. The cree cob does it again. Fuck’n jazz hands y’all🙌!
With results like these you could really give the whole grow a 9/10. It’s only an 8 in my book because it’s not my preferred high. Otherwise, any time you’re north of 5+ oz. per plant, it’s a good day at the office👍👍.
Props👊👊👊
No choice but to shoutout Humboldt genetics. These beans have treated me so well and I can’t say enough Good things about the strains this organization puts out👌👍👌. Other than that, thanks to everyone who dropped by for a look and a comment. The convos always good and of course - any questions or enlightened conversation are welcome. Every time I try to take a break from documenting a grow, I end up growing something worth documenting. If your as high as I am right now, you should still be trying to figure out that last sentence.... stay lit y’all. See ya soon on the next one👊👊👊.

Processing
Likes
9
Share


@JakeTheButcher
Follow
It was an interesting week...nice to have something to keep my mind occupied on these girls during this covid-19 epidemic.
2 days after water change last week, my roots started to turn brown and have appeared to stop growing, I first was concerned that it was root rot, but the plants didn't seem to be affected. So I added more UC ROOTS to the solution in hopes that it would help, I noticed white roots shooting out about 24 hours after. I think it may have been the increase in the coco cal that did the damage. They are filling the net nicely and I will be flipping them to flowering this week I think.

Processing
Likes
142
Share


@MadeInGermany
Follow
Hey everyone :-).
The last plants were also placed in the bloom chamber kammer.
Everyone has made great progress this week 🙏🏻.
There is not much to say about this week, I think videos and pictures say more like words 🙈😎.
I wish you all a good start into the week :-) Stay healthy and let it grow 🙏🏻👍


Likes
31
Share

@Cauli
Follow
Chemical Candy was chopped after 88 Days.
The separated branches were hung into a tent to dry for around nine days at 18°C and around 45-55% percent humidity.
After that they were put into a jar and dry trimmed.
Vape Review will follow :)

Likes
17
Share


@Pochogrower
Follow
End of week 5 bloom has been the same. One day full nuts from go box as recommendation, base nut doubled plus: GH silica, AN bud candy and FF Cha Ching at half dose. The Next day full base nut, full dose of Cha ching and beastie bloomz just below half dosage. Plants seem to love it. It does get warm when lights turn on so I have the door open while lights are on. Smell is lovely. Can still smell it even with the carbon filter at full speed. Its a mild smell. Getting very happy with the out come for being my first grow. Still too early for the final out come. Wish me luck.

Likes
19
Share


@cubansoldier
Follow
I guess when I topped the girls I left a little i piece of the cola on some of them so a few of the plants have extra colas growing from the main stem that was topped which is a good thing cause enjoy who doesn't like more colas! They start out looking like mutants but after a while they start looking more normal.


Likes
1
Share


@captaincondor
Follow
she's a beast and has grown really tall just hoping the buds will fill out in the next few weeks, I grew this strain a while back but it looked completley different to this and was half the size, maybe that was because it was grown in soil ??

Likes
30
Share


@coyote2thick
Follow
New nodes who dis?! Well as you can see she’s loving every bit of her last nute feeding. I don’t plan on changing too many things other than the upping the micro/gro/bloom just a bit. Her roots are looking great. No deficiencies on the new growth. She has surpassed her sister in coco soil.

Likes
12
Share


@BusyBeeFarmer
Follow
🌿 Dosidos Week 7 Update 🌿
📉 Slow Growth & Temperature Insights
This week, growth has been a bit slower than expected. I recently got a temperature monitoring system, and it confirmed my suspicion: between 2-3 AM, temperatures drop too low. ❄️ The plant only shows mild stress, but it’s something to keep an eye on.
🌡️ Climate Adjustments
To improve conditions, I’ve moved the plant into the flowering room 🌸, turned on an extra light, reduced fresh air intake, and halved the exhaust airflow. So far, my new monitor shows a VPD of 1.6, which sounds ideal! Let’s see how the night goes! 🌙✨

Likes
6
Share

@Simba732
Follow
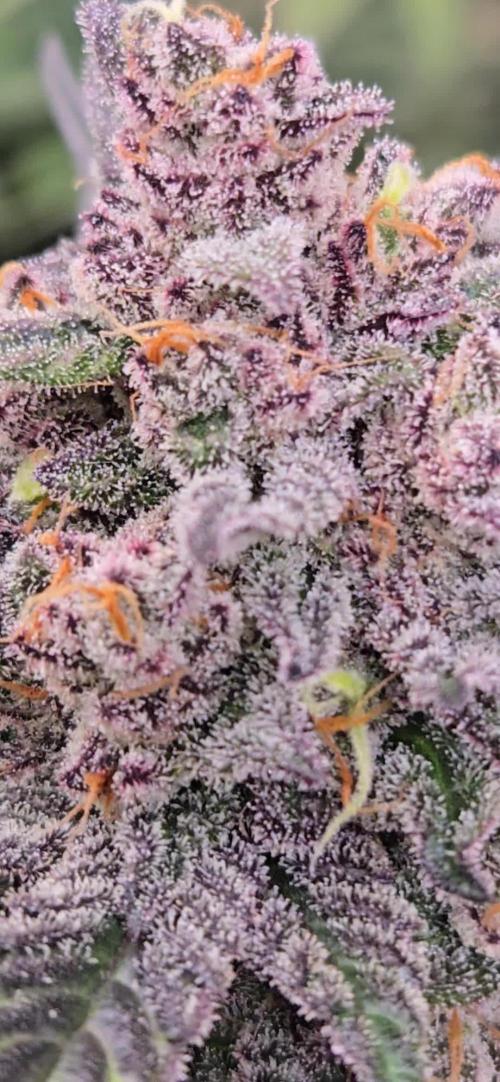
Week 11 has been completed for wa Lady 🍌🍇
She’s taking on weight nicely so this week I removed any of the lowest buds that won’t really make it big either way.
Some shade of purple have started showing out here and there, she’s a cutie indeed 😍
I’m thinking of pushing her for two more weeks, most of the trichomes are still clear and she seems pretty happy with her current conditions.
Onto the next weeks
Happy growing 💚
Processing
Likes
8
Share


Likes
13
Share


@Eldorado_ed
Follow
Progress from last week some of the pictures/videos are 2 days apart you should see the difference in them all in all a busy week so short and sweet happy flowering


Likes
199
Share


@CRiSPrGrow
Follow
Not bad not bad, by the looks of it she'll be a fatty but i just hope that she'll be ready at the same time as the others. What i want to know is how the bbc can predict when i want my harvest but can't predict when my fucking landlady will break in and faff about it my grow room, long story short 46 makes me 👺 anyways, boucing back from a scare nevermind mind her 46 is my focus lol oh my the things we do... enjoy ! 🚀 Induced resin production by dropping the lightschedule to 10/14 almost immediate effects were smelt, loud and clear : candy shop goodness ! this one is gonna be a sweet one ! 👊

Likes
8
Share


@Cannabot
Follow
Smells amazing, looks amazing just a beauty of a plant tbh...drinking loads but I'm just sticking to ppm for now with slightly increasing bloom boost every feed
Likes
7
Share

@Chubbs
Follow
What up fam, weekly update on these ladies. So far they've dealt with the heat like champs. Thankfully I got my AC fixed and it's back up and running. So thank God as we're having a heat wave still with day temps in the high 90's. They're getting fed 16oz of fed daily. It's looking like maybe another week or two before they'll get harvested. All in all Happy Growing.

