
Likes
12
Share

@Bread_n_Buds
Follow
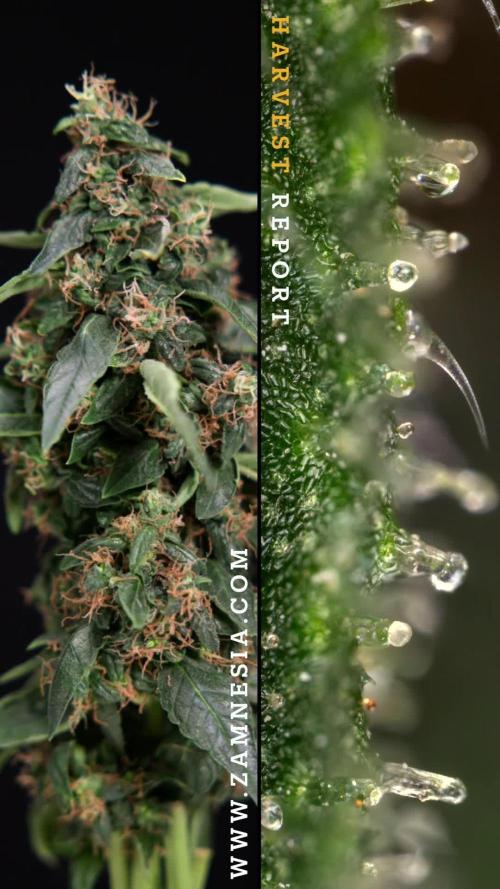
This week you'll find the HARVEST of CBD FIX Autoflowering #2. This plant was treated with a practically "original" main lining, which is naturally applied to autoflowering plants. This means topping the third internode at most, otherwise it will go into flowering.
I think of Green Cure F1 Autoflowering, which when we grew it was more stable and a champion at the 2025 Autoflower World Cup. CBD FIX competed in 2026, but unfortunately, it didn't give us any success.
The plant is beautiful, with beautiful flowers and a sufficiently distributed resin layer, although not the best.
Pot and Soil - This plant was grown in an 11-liter pot with Plagron's BioLight Mix organic soil.
Lighting/PPFD - A Zamnesia Phytonaut 480W LED lamp was used from mid-flowering until fruiting. We achieved a PPFD (photosynthetically active photon flux density) between 800 and 1200 μmol/m²/s, with a cycle of 24 hours, then 23 hours, then 20 hours, and finally 18 hours.
150 mm activated carbon filter
Z https://www.zamnesia.io/it/14526-led-grow-lamp-phytonaut-480.html (National link if Google doesn't work)
Growing system: Zamnesia Ecosystem, fan, extractor, and grow tent, all made by Zamnesia.
Trichhomes: We harvested the plant halfway through the harvest period because we had to send samples to the Autoflower World Cup. We still have a good amount of amber trichomes, starting at 25%. There are still 40-45% opaque and clear trichomes, but with a sativa, it's best to harvest early anyway. Remember, amber is a sign of oxidation and means the plant is transitioning to indica effects, so sativas should not be harvested too late to preserve their daytime effects.
Nutrients: Grown with Plagron Official, a 100% organic base fertilizer, and all recommended additives.
Visit www.plagron.com for growth cycle calculations, product selection, and general information.
All nutrients are available on the Zamnesia website. Also check out the live substrate and the fantastic new Zammi product line.
You can find this excellent strain here:
https://www.zamnesia.io/en/5103-zamnesia-seeds-cbd-fix-Auto-feminized.html
(Google it if the link doesn't work; it's a national link)
Zamnesia Description - Creating the perfect balance of CBD and THC in a cannabis strain is truly difficult to achieve. At Zamnesia, we've always had great respect for our CBD-conscious customers. Thanks to our experience and determination, we now offer you the only CBD-rich strain you should truly consider. The incredible CBD Fix Auto contains incredibly high CBD concentrations of up to 20%, making it truly award-winning. Not content with breaking the mold, this plant also boasts a truly unique THC content of less than 1%!
CBD enthusiasts are true experts in the magical properties of this powerful cannabinoid. If this is your first time venturing into the world of CBD-rich cannabis strains, look no further. Its ability to relieve stress and induce feelings of calm and serenity are just some of the benefits appreciated by CBD users. Its beneficial properties are complemented by seductive herbal and pine aromas. The pungent lemon notes may be familiar to cannabis connoisseurs and hint at this strain's incredible genetic heritage.
Using Northern Lights Auto as a base to perpetuate its autoflowering nature, its best qualities were expressed during flowering. Although the yields are modest (a patient grower can obtain up to 325 g/m²), we are certain that the true essence of this wonder lies in the quality of its splendid buds. Its stability both indoors and outdoors allows it to reach heights of 60-120 cm. Its resilience and ease of cultivation have been further improved thanks to careful clone selection. Savor the delicious and rare essence of this strain. You'll experience everything except the side effects associated with high-THC cannabis strains.
Musical frequencies 432 Hz and 528 Hz
Black music from www.radionula.com
www.zamnesia.com

Likes
21
Share


@Sweetspot88
Follow
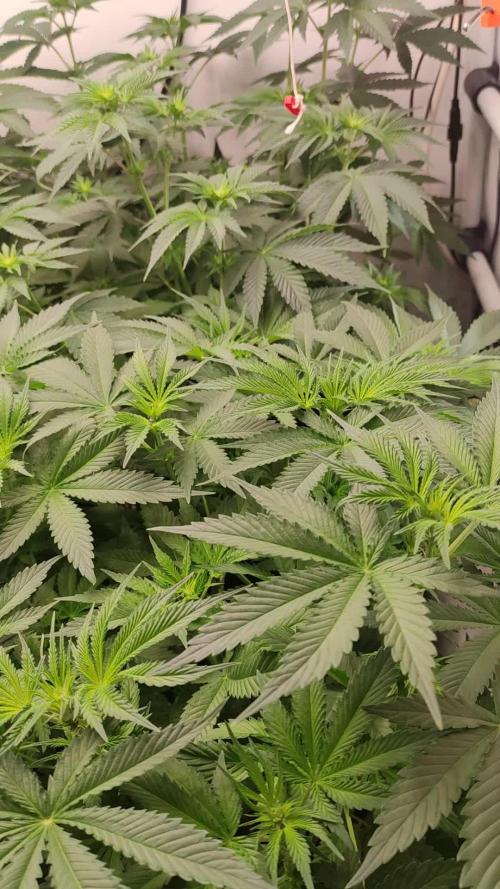
So flower commences this week let’s see how these perform
We’ve had a great veg phase
Here’s to a great flower
So last week we struggled a little with the vpd in the new room we are in range now after a few days of adjustment. This week defoliate and cuttings

Likes
35
Share


@Hiroots420
Follow
16/04/2021
Llego el momento de iniciar temprano un nuevo cultivo de suelo vivo.
Para ello comenzamos armando el sustrato (200L) para posteriormente dejarlo pre mezclado y con su vida correspondiente para recibir a estos 4/5/6 esquejes que van a ingresar.
Se instalo el sistema de riego sensible de Blumat Tropf con sus dos zanahorias y 5 puntos de goteo por cada una, con apenas dos Dias ya observamos como se germinaron esas lentejas que van a producir ese cover crop y alojar a todos esos hongos benéficos de sus raíces hasta esperar que lleguen las plantas.
21/04/2021
Las lentejas ya germinaron de manera correcta, se colocó el mulch orgánico y el sustrato continua con una muy buena humedad por lo que se estima que la vida debajo se está poniendo interesante.
27/04/2021
Hoy sigue a la espera de una nueva luz Quantum Board 240w para este espacio, de todas maneras se colocaron las plantas en el espacio de cultivo para ver cómo queda la dispocion!


Likes
27
Share


@RDWCGrowing
Follow
1/20/2023- So much to do pre grow and over the next 16 days, absolute first order of business is that I have to take down my current Grow---TIMBER-- Then I have a list of things I have to get done in order to be ready to start this grow 1 Feb.
With that said
T - 2 days until start 48 hour Flush
T - 2 days until Start 48 hours of Light
T - 4 days until TIMBER!!!
Items that need to be done before 1 Feb 2023
1. I need to clean the tent out
2. I need to clean the equipment- Proper Sanitization between grows in Hydro is a must!!!
3. I need to get the hole in the ceiling above my tent repaired- For my last grow I had a deep sink installed in my grow room, to make Hydroponics a little bit easier and have a water source in the same room. The seals on the pipes they were installing broke and leaked through the ceiling causing some damage all the way across my grow room, I was already weeks into my grow and couldn't risk them working above my tent and it would have been very awkward positon for them to be working in as well, so have to get this done quickly between chop and germination.
4. I have to install my new light- I was using a Vivosun 4000 and for this grow I am switching up to a Spider-farmer SF 7000.
1/20/23- For this upcoming grow I am working with M/F photo seeds so I ordered 4 Sex determination kits. I recieved my my 4 Sex determination testing kits from Rimrock Analytics today. I will be using these to test my plants at week 2 of Veg so that when/if I take clones I know I am taking them off females. As well as I don't want to accidently pollinate my tent during this grow I am looking for big beautiful buds not seeded buds. :-)
1/24/2023- Harvest of current grow- Started at 2:00pm and finshed wet trim and firt batch into the freeze dryer.
1/25/2023- Next batch into the freeze dryer and cleaning all my equipment for this Grow.
T-1 Day until the workers are supposed to be here to fix the hole in the Grow Room.
T-3 days until I instll my new Gorilla Grow Tent and my New Light Spider Farmer SE-7000 for this grow.
T-7 Days until Start of Germination
1/26/2023- Harvest is done ran through the Freeze dryer and dry tim completed.
1/27/2023- Grow Room repairs completed. Hole is gone Letting the paint dry before I install the new tent.
T-2 days until Install the New Gorilla Grow tent and the new Light
T-3 days until I put the hydro equipment in the new tent
T-5 days until Germination
1/29/2023- Day 0- Final Pre Germination activities
Germination Start T-3 days
The paint on the ceiling was dry and it was time to finish prepping for Germination. I got the following items knocked off my list.
New 4X4 Gorilla Grow Tent is up and ready
New Spider Farmer SE-7000 Light is installed- Thanks Moony Grows for the suggestion and for the Code that got me some money off and free shipping (Moonygrows)!! I turned the lights all the way up to max and set the timer to 18/6 0600-0000. I will keep an eye on the temperature and humidity without my plants and see how hot it gets with the new light.
I put my Hydro system back together and put in 40 gallons of water into it, time to monitor for leaks the next few days.
I Setup my cloning machine for Germination Days 3-11
1/30/2023
let me break down the situation, ROOM in the TENT.. Enough said.. No really I tried putting my exhaust system up in the new tent with my new light, The light is so big corner to corner that it really didn't give me enough room for the lights be be raised, with the exahust hanging the buckets my plants are Starting in are 2 and 1/2 feet off the ground, great for plenty of room for roots but not so great for upwards space for the plant to grow. In a 6' 11 tent with the exauhst in side and hanging that only gave me a little over 4 feet of grow room to play with. My last grow if you saw my diary, anyone could tell I was struggling to keep the buds off the lights. No good, Since space was such an issue I was running my carbon filter inside on the ground but It really needed to be up sucking the heat out not shooting the cool out. With that setup I was sucking air through the filter and pushing it out the tent at a bottom exhaust hole cold out. Wasn't doing me any good for my heat. I was hitting temps of up to 85 degrees. I bought a portable AC unit and have been running it in the grow room to try and keep temps below 85 and I have had to lower the power on my lights during grow also not ideal.. With that said a friend of mine MoonyGrows (Check out his diary) took the time to look at my issue send me a picture of my grow tent setup with detailed instructions on how to suck the air out from the top but putting my filter and fan on top of my tent so no room issue and I am sucking the air out from the top where the heat is instead of pushing the air out from the bottom where the cool is... THANK YOU MoonyGrows For taking the time to help me get this straightened out.. Now I have room and I have the exhausts working right and now my temps with everything at 100% are topping out at 80 this dropped the temp by 5 + degrees at 100% max.
T-2 days until Start of Germination
Prepped my seed tray with humidity dome
Prepped my Rapid Rooter plugs. I Used RO water, and I added a few drops of Hydrogen peroxide to Oxygenate the water. I then PH balanced between 5.7-6.0 the same that they will be getting in the Cloning Machine and when they get to thier final grow pod. I perfere the 5.8x range and I hit 5.84 for these rapid rooters. If you want to see a complete video on the process HowWeedGrow has an amzing video that shows step by step how to do it and explains it better than I ever could including how to plant the seeds. Which I will cover when I get to that step on Wed. https://www.howweedgrow.com/how-germinate-weed-seeds-cannabis-rapid-rooters/
1/31/2023
T-1 day until Germination Start
All set and ready have my Rapid Rooter plugs ready to go have my seeds out.. Have my seed tray warming up tonight. Tomorrow morning right into the Rapid Rooter then strait into the tray. I will spray the dome to start the humidity in there.
2/1/2023
Germination Day!!
Let the games begin!
0600am Put the seeds into the Root Riots. And then put the seeded Root Riots into their first home the Seed tray. I have them under the light 24/7. Sprayed the dome
7:30pm Sprayed the Dome to keep humidity going on the dome.
2/2/2023
Day 1 of Germination
Sprayed the Dome in the morning
Sprayed the Dome in the evening
2/3/2023
Day 2 of Germination
Roots are starting to come out the bottom of the root riot plugs and the heads are slowly popping out of Number 4 just below the surface.
Afternoon- Number 4 has popped up
Evening- Number 3 has popped up as well. Happy Dance!!
2/4/2023
Day 3 - Germination
Surprise Surprise Surprise- all 4 have now poked their heads up.. Happy day!! 100% Germination succeeded.
Now major milestone to track is how many are female and how many are male.
I will take look at the roots this afternoon/evening and see if they have enough root to go into the cloning machine for the next 7 days before they go into their Hydro Pods.
Day 3 - Germination - Evening..
Roots looked good and they were tall enough to make it into the cloning machine.
Now that they are all in the cloning machine I have switched the lighting to veg state 18 on 6 off.
2/5/2023
Day 4 - Germination - Morning
All the Ladies (fingers crossed) looking great stretching nicely and look nice and green, Photo synthesis underway....
UPDATE!! After a very interesting POD cast on FSTS by Dr. Bruce Bugsbee from Utah University, I have shifted my lighting to 24 hours on through seedling and then I am going to shift to 20 hours on the rest of Veg.
2/6/2023
Day 5 - Germination
While Checking on my conditions inside the new tent last night, I found that the Humidity was down to 39 Percent. I added an AquaOasis Cool Mist Humidifier, the reason I selected this humidifier is that I needed one that could be turned on and off utilizing my Inkbird Humidity Controller IHC200 that I have my Pro Breeze Dehumidifier currently running with.
Root structures are starting to get there about 1/4 of an inch.
2/7/2023
Day 6 - Germination
Everything seems on track more roots poking out of each today. They are each getting a little taller as well.
Checked in the evening and number 3 was drooping the Root riot plug on the bottome was dry and the roots were not in the water yet. I raised the water just enough that the longest root that was sticking out is now hitting the water.
2/8/2023
Day 7 - Germination
Everything looked good while checking in on them this morning number 3 is now full up and no droop again.
2/9/2023
Day 8 - Germination
T-2 days until Plant into Forever Pods and we start week 1 of Veg .. :-)
Surprising thing to me is that number 1 and 2 were later in popping then 3 and 4 but the roots are growing longer in 1 and 2.
2/10/2023
Day 9 - Germination
Number 1 and Number 2 are definitely ready for transplant today.. Based on how they were yesterday and where they are today I am hoping by tomorrow 3 and 4 are ready. Today they look to me where 1 and 2 did yesterday.. I really hope 3 and 4 catch up by tomorrow since..
T-1 day until transplant to new/ final home for grow.
Need the roots long enough to have some clay down in the basket to keep the root riot out of the water and only roots in the water..
2/11/2023
Day 10 - Germination
Today they got placed in thier forever Home, 7 days from Sprout and 7 days until Week 1 Start.
PPM- 180 this is water out of the Tap
Temp Water: 70.7
Temp Tent: 77
Humidity: 40% I have a humidifier going 24/7 to try and bring this up.. I also have Humidity Domes on each plant.
2/12/2023
Day 11 - Germination
Sprayed the domes, all are looking good.. Nothing much to do at this phase but Keep monitoring the PH level in the system and making sure they have a comfortable home.
T-6 days until Week 1 start
2/13/2023
Day 12 - Germination
Sprayed the domes, They were looking a little yellow today so I moved the light down to assist. Nothing much to do at this phase but Keep monitoring the PH level in the system and making sure they have a comfortable home.
T-5 days until Week 1 start
2/14/2023
Day 13 - Germination
Sprayed the domes, They were looking a little Florissant yellow today, with what looks like slight burn on the tips, I talked with a fellow grower and we agreed that It was probably that I was drowning them, Yes you can drown you plants even in Hydro, but only early on.. :-) It usually happens with the water being too high, which soaks not only the roots but the medium (root Riot plug in this case). I lowered the water from touching the bottom of the pot to about 1" away. This will probably take 3-4 days to resolve. I will continue my daily monitoring.
T-4 days until Week 1 start
2/15/2023
Day 14 - Germination
Sprayed the domes, continue my daily monitoring they look a little darker green instead of lime green now that I lowered the water levels in the system, so I think that I might have resolved the issue but it will take a few days for recovery to happen.
T-3 days until Week 1 start
2/16/2023
Day 15 - Germination
I looked in on them this morning, 3 and 4 look like they are doing well and recovering nicely. Number 1 not so much it has brown spots on the leaves, this very well can still be a side effect of the overwatering but I decide to go ahead and add Nutes earlier than I was planning just incase. I was going to wait until Saturday but I think intervention is necessary now especially after drowning them early on.
I added 1/2 what I am planning on adding for week 1 start. I also think I am going to adjust my chart to add 1/2 2 days after plant from now on. I don't think it would hurt it to have some Nutes to pull from.
.25ml/Gal Calmag = 12.5ml
1ml/gal GH FloraMicro= 50ml
1ml/gal GH FloraGro = 50ml
1ml/gal GH FloraBloom = 50ml
T-2 days until Week 1 start = I will drain the system and start it over on Saturday with Week 1 Nutes.
2/17/2023
Day 16- Germination
I didn't even want to post today after looking in on them this morning, 3 of the 4 are now showing signs of dronwing.. Brown spots on the leaves, the water levels were still too high.. I drained about another inch out of the tanks.. Will see how quick they recover.. I start week 1 tomorrow and will have to ensure my water levels are at least 1" away from the basket on this round.

Likes
37
Share


@masterofsmeagol
Follow
Week begins 8/12 LAST FEED 2 gallons 8/12 AFTER A RAINING NIGHT.
8/13 I've found what appears to be septoria on a couple plants. Looks like the weather will be OK tonight so I can apply organocide or something similar before dark. I've seen random pillar damage so this will be a two-for. I also should move the middle plant back and utilize my space more. Ph seems on point around 7.3. Higher in some places of the soil. I've noticed what looks like root issues on my blueberry. Winds were horrible yesterday and this plant doesnt hace a vertical trellis for support. Stem was pretty wobbly for a while but the plant seems to be growing fine. Either that or a jpn beetle munched the top of a bud. That's probably what happened. It was in the low 50's this morning. That's a 40 degree temperature swing in just a few days. This grow season has been the most challenging I've faced. Of course it had to happen when personal, family, and health concerns rear their head. Oh well. I can only do my best.
8/14 Went over at 5am to apply organocide to treat WPM or septoria as well as insecticide for pillars. I got there and one of my healthiest plants had been turning a little lime green now it was drooped over just like the larger GDP. This one is a 9lb kush though and they were doing good. Now it looks like it's dead over night. Maybe it's that liquid kool bloom. The soil seemed dry so I watered the plants. It MIGHT have picked ok a little. I'll have to check tonight. If not something is going on at night or in the rootzone and I really don't know what the fuck is going on. I will post updates and check later tonight. Damn. This has been a real challenging year.
8/15 That plant might be overwatered or not be draining correctly. At least I was able to get underneath it and the ground was dry. It was also hard packed dirt so elevating the bag may help. I'm going to wait a few days and see if things improve. This really sucks. I'm getting that defeated feeling. I need to get out of it though as I'm starting to see flower begin. The blueberry is probably the farthest along. I need to remember to take pictures of the newly developing flowers. Granted I've had numerous medical and other issues that have taken me off my game but losing two plants in one year is pretty shitty. I was able to fix things with COVID last year or the year before so I hope I can at least save this 9lb kush plant. If I lose this plant too it will be a substantial amount of cannabis lost. I need to rearrange my cage as well to make use of the extra space. Maybe I could've overwatered that plant that had been in the rain for a long time. I need to get my water routine down pat instead of doing the "lift the pot" method I have been doing. I went to several different commercial growers and got a bunch of crazy answers. Only time will tell. Last night I finished the organocide application on all the other plants except for the two babies and the drooped 9lb kush. Don't want to stress it further. I'll see how it goes.
8/16 Despite the soil drying out the newest disaster (my 9lb kush) is much worse with chlorosis killing leaves. Stalks and branches seem good. Soil smells musty and a little wetter than the rest. It was roofed to the ground slightly. NO water underneath. I stuck my hand in the bag from a bunch of angles. It's like the same thing that happened with the other one. I added to my surveillance. I also smell bleech and I hace an idea this might not be my doing at all. I can't be detailed but I'll find out one way or another. UPDATE. Went back over after the dentist and plants were dry as a fucking bone and droopy. I mixed up five gallons of phed water and watered everything. Even the 9lb kush that is pretty much dead. The soil was dry though. Everyone is saying overwater but I really doubt that. We had some massive rainstorms bur still. I need to review a game cam I have because unfortunately my cams went on the frits for a couple days (and the dogs went wild during that time around midnight) couple nights in a row. I fucking smell bleech. I'm a good dude and don't really have any enemies but we'll see what the game cam pulls up.
8/17 Of course we are getting a shit ton of rain. I watered yestetday because everything was dry as a bone
I watched yesterday as my blueberry was almost horizontal due to the wind. I added several supports to every branch and a few more up the main stalk. That may be what has been happening. The wind blowing so hard it separates the stalk from the roots. My problems started after I took my windbreaker tarp down. I put it back up for this storm. Or maybe it's just root rot. I dont fucking know. I cut all the dead stuff off the 9lb kush thats pretty mucb dead. Its holding on though. I probably shouldnt have watered that but it seemed bone dry. Maybe further down was wet. I dont know. Extra cams are up. I didn't smell that chemical bleachy smell today so it's probably in my head. I have better peace of mind with the night cams up though.and the dogs though. I've had a visitor this year but he left very quickly.
8/18 We got a shit ton of rain last night. No damage though. I spent what time I had in the garden working on the 9lb kush that looked like it was dieing. I'm not giving up on this one so easy. It seems to want to hold on. Despite the severely overwatered medium (due to this storm) I cam see new growth that looks healthy. The branches also seem stronger. I'm cautiously optimistic. The other one straight up died. So I might be able to salvage this. I'll go over later today and check on it. I debated putting it inside for the storm bur I figured I'd let the rain leech out anything in the medium in case it's locked out or something. At least I've got a couple real healthy ones this year. That NYCSA is amazing. That's a strain I'll probably grow again. Resilient as all all. Vigorous and doesn't seem impacted by things like WPM or other fungal ok infections or diseases like some other strains. I got a great recommendation from my buddy to use pots all the same size. It makes things easier watering. I just used what I had this year. I had bigger pots so I wanted to fill them. That tarp being up I think greatly helped with the wind. It's down now so things cam dry out. Still raining bit not yard and no wind. I think that may have played a large role in killing the 7ft GDP. Wind ripping the stalk away from the roots. Or it could've been a million other things. I'll never know. I do know that I have a better mindset, a great set of resources and I'm learning something new every year. If I can br8ng this plant back to life I'm going to be very proud of myself.....and her. Oh and I'm going to buy new tiger bloom. I'll start beasty bloom (hesitant as it has caused lockout in the past) as it goes better with my other nutes than the liquid kool bloom. Plus I started getting portables around tge time I used the liquid kool bloom. That being said, after two weeks I can see buds where there weren't before so I don't know. Next year I'm using seeds and I'm doing things different. I'm STRONGLY considering rapacaps idea about adding a removable roof for flower. The more I think about it tge better it sounds. That and putting wheels on pallets (buddy suggestion) and I could attach my supports directly to the pallet. I've got a lot of work to do that's for sure. Plants look healthy but I needvto him them again with organocide to fight any fungal stuff or pillars that might be hiding.


Likes
12
Share


@Skunkiest_bender39
Follow
It was an honor! Hat Von Anfang bis Ende Spaß gemacht die Dame. Mal Probleme gehabt mit Fäule, nach Kontakt mit Regen! Im Wintergarten untergebracht, musste die Fäule weichen. Ne ohne Spaß, hat einfach aufgehört zu faulen und mega produziert! Denke aber ohne greenhouse eher ein Fall für den Kompost geworden;)☮️

Likes
24
Share


@Finniegrow
Follow
NOTES:
I've flowered my babies for 42 days at the beginning of this week. Keeping EC at 1,4-1,5 / pH at 6,0-6,2 and nutrients as before. I'm propably starting to flush after this week.
Day92 (16.1.)
Took some pictures/videos for the diary and refilled the tanks with 40l of fresh nutrient solution.
Day93 (17.1.)
Day94 (18.1.)
Day95 (19.1.)
Day96 (20.1.)
Day97 (21.1.)
Day98 (22.1.)
Likes
198
Share


@DevilsBud
Follow
New week in supported marshydro grow
FLOWERING TIME
last run i did it under a TS-1000
But this time it will be under the amazing FC-4800 i am so excited to boost up everything and see what i can approve from last run 🤘🏻🤘🏻
Starting to put them in 12/12 schedule they have bin put in darkness for 12 hours and now hopefully let the flowering Begin fucking love this stage 🤘🏻😎🤘🏻
27/10/21
All plants Transplanted in 11L fabric pots added 5gram Easy Roots - Mycorrhiza Mix to soil
Have some ideas for my grow tent
I have my plants on hard plastic pallet
And i ordered plateau with ball bearing
So i can turn my plants around with one spin 😎 basically a huge turntable wikiwki
Will be updated soon happy growings Growmies
visit www.marshydro.eu
for your best gear and use the PROMO CODE: DEVILSBUD
Some info about the Marshydro FC-4800
Superb Quality LED Chips: The whole light is composed of 1206 pcs Samsung lm301b and Osram 660nm chips. More than two times as many LEDs are used to drive the grow lights at low currents and to avoid overdrive. Quality is guaranteed and efficiency is up to 2.8 μmol/j.
Even PAR Distribution and High PPFD Output: The multi-light bar design and the densely distributed light chips enable the LED grow lights to achieve the optimum PPFD required for plant growth over the entire effective coverage area.
Specifically Designed Spectrum: To ensure even plant growth, blue and red light are enhanced on the basis of a full spectrum combination. Not only does this accelerate plant growth, but it also improves the yield and quality of the plants at the same time.
Dimming Daisy Chain Function: The dimming function saves on electricity costs and enables brightness from 10% to 100% for the different stages of plant growth. A single master light can connect up to 30 lights in a daisy-chain system.
Business LED Grow Light: The light's wavy heat sink dissipates heat quickly and the IP65 waterproof allows the light to operate in humid conditions. 180° collapsible feature for easier installation. All these features provide favorable assistance for commercial cultivation.
And some tent info
●【Lock All Light Insid】MARS HYDRO Grow Tent Interior is made of diamond mylar. Non-toxic to the environment, no harm to plants. High-quality 1680D canvas being double stitched, (ALL OTHERS BRAND grow tent is 601D canvas) which is tear-proof for perfect light locking, No light leaks or rips at all.
●【Durability Grow Tent】Stable Metal corner adapters and poles are the trustful supporters of the tent. No rusting nor paint-falling. Quick easy tool-free installation. Carries strong heavy-duty SBS zippers, double layer lining to create a light-proof seal.
●【Easy Observation of your Plants】Special peeks window made by double layers of cloths. Observe the growing conditions of your plants without opening the tent and avoid disturbing plants. The peek window also serves to dissipate heat and ventilate air.
●【Removable Tray Keep Clean】The package includes a removable waterproof floor tray to hold soil and fallen leaves. The tray can be taken out easily to wash. Removable and water-proof makes cleaning easy.
●【Good Ventilation&Fast Assembly】 Circular double-sleeved vent holes with adjustable nylon strap for air circulation by exhaust fan, ducting, carbon filter, or reflector. Better allows proper light, heat, and airflow. Quick tool-free installation. Reinforced by a sturdy metal frame to ensure security and stability, supports up to 140lb. Perfectly safeguard your plants to thrive even in winter


Likes
21
Share


@Sweetleaf420
Follow
Strain very resistant, although I had some problems with this, unfortunately having grown up in Outdoor the bad weather ripped away almost all the sunbathing, the plant weakened and had problems with aphids. Despite this she managed to complete the flowering cycle, harvested not abundant given all the problems mentioned above, but the buds she produced are quality with a scent of blueberry mixed with really strong fruit. Small but compact buds covered with resin 🤙
Processing
Likes
26
Share


@Bakeryguy420
Follow
Here we are guys in the middle of week 4 for some and week 3 for the rest!! Alot of them are going into pre flowering. All 12 confirmed females:) amazing rapid growth they are loving these autocobs:). All smiles everyday gg4 and tangie are stretching so amazing. Lights 24/7 in less then two weeks they will all being going into a 4x8 !

Glueberry Auto · Expert Seeds
Gorrila Glue #4 Auto (Expert Gorilla Auto) · Expert Seeds

Tangie Auto · Fast Buds
Sweet Cream Auto · Expert Seeds

Amnesia Haze Auto · Vision Seeds

Amnesia Gold · Pyramid Seeds
OGesus Auto · Expert Seeds

Royal Haze Automatic · Royal Queen Seeds

Caramella Auto · Custom Breeder & Strain
Rhino Ryder Auto · Fast Buds

Fugue State · Mephisto Genetics
Likes
237
Share


@1Right_Angle
Follow
May 9th
- began today replacing the CMH lite that kicked-off during the night (new bulb is done!) MARS HYDRO to the rescue with a TS-1000 hanging above the kids now. Fine-tuning as we speak
- began mixing a Tea for tonight/tomorrow’s dinner
- LST to begin with a few of the plants this evening
- Defoliated some of the large fan-leaf pairs and now the plant structures can be fortified and shaped
- grabbed 6 clones from the Panama Reds and 2 each from Fighting Buddha and Pine Tar Kush !!! Into the LED Dome
(And i’m out of cubes… profanity)
- some branches get tied down tonight; let the games begin
10th,
- Nutrients fed for breakfast
- how to say this: things are so steady with daily progression
- raised lights again to maintain 2c difference between Room temp / Top-Leaf temp. My Phlizon 4500 is almost topped out in the room, and its running at 50% power. This last blast of growth and transition within the plants, tells me this set-up is going to last Just long enough !!!
Just big enough
- 2 more weeks come on!
- a few more clones taken last-nite; cloudwalker / black tuna / lsd / alaskan purple etc etc PurpsBerry will be last clone taken
- no foliar misting on Food mornings like today; every other day is still the target here in mid-Veg
11th,
- while rummaging through the crop early today, I found what is certainly a Male Panama Red plant. Action taken and trying to secure that new home. Picture 11, 12, 13
- Panama Red #2 removed
- Foliar Misted the Tent at lites-out
- clones treated to a Foliar Misting. Feeding them through their already developed Stomata on the leaves; when they have no roots to uptake nutrients yet. “Thanks Andrew at LegacyMarketFarm for that detail”
May 14
- the one plant i took real pride in FIMming successfully, has also raised the Kilt and declared his Gonads; dammit.
So, he’s gone lol. 2 males out of 38 plants… (txerri bilbo haze, the very first of many seeds produced alongside killer bud to show Male)
- 2 LSD clones appear to be doing well
May 15th
- Foliar Misted after Lites-out


Likes
119
Share


@DogDoctorOfficial
Follow
Let's dive into the third-week update for our resilient Jelousy, the star of our Power Buds journey. This week is nothing short of a pivotal phase in the life of our green darling, so fasten your seat-belts, and let's embark on this exciting chapter together.
Jelousy, our leafy companion, has truly come into her own during this transformative period. Those five-fingered leaves are now the epitome of lushness and vigor. It's as if she's been to the botanical spa, indulging in a little photosynthesis and chlorophyll rejuvenation. The importance of this phase cannot be overstated. You see, during the third week, our plant transitions from her infantile vegetative state into the budding and flowering phase. It's the botanical equivalent of a caterpillar becoming a butterfly.
Nutrient-wise, we've continued our faithful partnership with Plagron Sugar Royal at a steady 1ml per liter. It's like providing our green champion with the secret recipe to success, ensuring she gets the nourishment she needs to thrive.
Now, let's break it down a bit. In this critical phase, our plant is busy laying the foundation for her flowering stage. It's during this time that she's prepping herself to produce those coveted, resinous buds that we all dream about. This phase is marked by a shift in priorities, as Jelousy begins to direct her energy toward developing flowers and, ultimately, a bountiful harvest.
Before we sign off, it's imperative to extend our profound gratitude to the benevolent Zamnesia and Plagron for their unwavering support in making this Power Buds journey possible. Their expertise and generosity are the wind beneath our green wings.
A hearty shout-out to the incredible Grow Diaries community, the heart and soul of this fantastic adventure. Your knowledge and camaraderie keep our spirits high.
To all fellow contestants and growers, may your plants continue to flourish, and your dreams of a magnificent harvest come true. Here's to a week of growth, transformation, and a dash of humor as we journey through the Power Buds contest. Stay green, stay inspired, and keep watching those dreams bloom!
As always, thank you all for stopping by, for the love and for it all. This journey of mine would just not be the same without you guys. The love and support are very much appreciated, and I feel honored and blessed with you all in my life !!!
With true love comes happiness. Always believe in yourself and always do things expecting nothing in return, with an open heart. Be a giver, and the universe will respond in ways you can’t even dream of .
Friendly reminder: all you see here is pure research and for educational purposes only.
Genetics - Jelousy @Zamnesia
Nutrients @Plagron
Light - @viparspectra P2000
Room size - 3x3 - 0,9x0,9
Likes
11
Share


@GREENPHOENIX6262
Follow
*03/01 - Week 8 (Week 4 flower) - Heavy Flower Fuel and Cal mag every other day - 18/6 light till harvest- Colas are getting heavy and terps coming in nicely - Lite defo*


Likes
4
Share

@Zdenda
Follow
Tento týden jsem přidal Ionbeam S16 Full Spectrum LED na boky stanu , aby se světlo dostalo až dolů..
pH 6.3 a Ec jsem zvednul na 1.3 a myslím, že více živin holkám prospívá 😄
Celkově se holkám daří a vypadají zdravě.. jsou vitální a nikde ani žlutý list.. trochu se vytahují, ale né zase hodně.. tenhle kmen se mi dobře pěstuje.. nemám s ním zatím žádný problém. Květenství se začíná projevovat.. Jde to dobře 😄
Likes
12
Share


@FrostRailz
Follow
4 Super 🍋 In middle
added feather meal 12-0-0 for that stretch baby lets go , also watering with molassas for the microbes to eat other than the extradites the roots ooze thats what there working so hard for , but unfortunately this 3 gal pot cant be no till style i need at least a 15 gallon, but were going to do it anyways haha
Last foliar feed for her my own super mix fulvic acid, kelp, yucca, aminos, coconut water, and aloe

Likes
76
Share


@TheFoxFarmer
Follow
While I was away in Mallorca, enjoying the sun and smoking some Sativa Landrace, the girls were given a more simple feed to make things easier for my friend whilst he was taking care of the garden.
The feedings came to around 700ppm (Including 150-190ppm tap water).
As you can see in the video I've been bending her down for a couple of days instead of tying a string to her. It's just a lazy LST that should basically do the same thing.
This girl has really impressed me with her growth and bushy structure. She's responded very well from topping and just wants to carry on.
Every second feed from here on out will also contain Mammoth P for the first time in my garden! 🐺
Likes
11
Share

