
Likes
Comments
Share


@Sti_Cazz
Follow
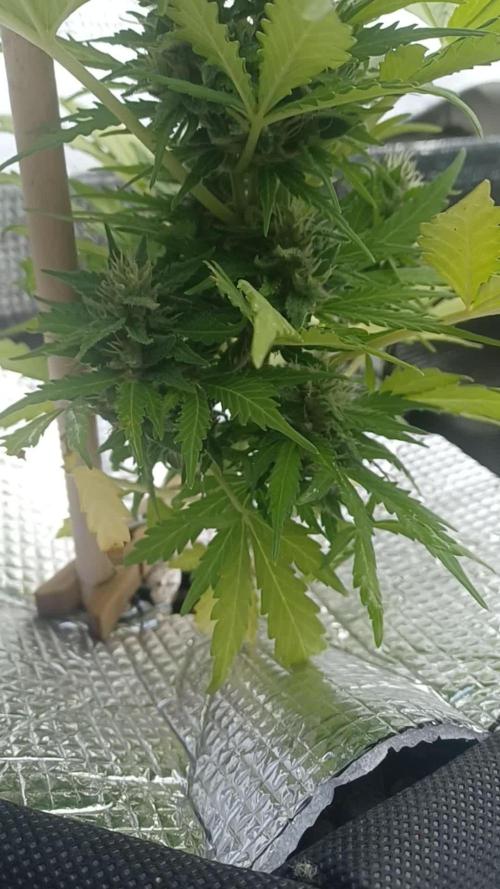
So this week the plants streched like crazy, the NL started to flower too and has actually become taller then the other 2 plants, even though its technically 2 weeks behind. the strange thing is its way more spacious then the packed Diesel.... it'll be fun seeing how they match up in the end!
My new fan and dehumidifier solved the RH issue I had and I crushed it down to under 50% now! Things are looking like they're on the right track.....fingers crossed!
I wonder if there is anything else I can add , nutrient wise... i know I shouldn't overdo it but I'll play around a bit and see.
Got rid of most bigger and medium fan leaves that i felt were blocking the bud-sites from getting light...again, not sure about if I'm going about this the right way, seems counter-intuitive to get rid of so much green but hey ...it helps greatly with lowering humidity and keeps the bottom of the girls nice and ventilated. I actually took off a bit more because it keeps growing shut.
Update: got some big bud and overdrive from my local grow shop... I'll give it a try...


Processing
Likes
1
Share


@420organicpharmacy
Follow
we are known for our legitimacy , discreet delivery ,shipping and vacuum sealed packages and we have tons of customers ordering their medication from our website , currentline we have top grade A rated medications for you all free to visite our site and place your orders
current we have
-vape pen
-cartridges
-marijuana oils
-top garde strains
website...... 420organic-pharmacy.com
or wickr organicphamacy


Likes
38
Share


@Green_Mountains
Follow
Another good week!! I defoliated the smaller of the 2 plants mid-week... I think she is doing very fine.
A small hiccup with the feed that same night. Only a few leaves are showing any sign on nutrient burn. I went ahead and fed them again today.
I plan on watering them in a day or two... they were very thirsty this afternoon!! So, I definitely need to up the watering. I've still been feeding 3 quarts twice a week.
Otherwise, all seems to be going well!!
They are frosting up very nicely!! So exciting!!
Peace!!
Update for grow question: @The8thChevron thanks!!! I pulled them and will hope for the best for now. So close to the finish line. If I see more trouble brewing I will pull the plant. I don't know how to answer directly to you on the grow question.... Thanks again!!

Likes
47
Share


@Staple_1
Follow
Had a massive heatwave pass through, definitely not used to it hitting the 100s in june and the White widow definitely showed stress from it. It’s leaves browned a bit and curled but it seems that plant only has about two weeks left and it should be all good! Gorilla Zkittles buds seem to be the farthest behind everything else and could honestly end up needing an extra week from the rest. Buds are developing color and their true personality! I’m lovin it. Thanks to everyone for the support along this grow journey, and let’s hope we can finish these last couple weeks out nicely!
All photos come from The end of week 6 flower. Tomorrow will be day 1 of week 7


Likes
22
Share


@DeepRootsGrowTrees
Follow
Week #16 GSC By KANNABIA SEEDS
Week #5 Flower
This week half way through the flower stage. You can really see the trichomes and orange color in the buds to the purple contrast in the plant this week. She looking outstanding has smaller really tight dense buds with a aroma that's amazing!! Thank you for stopping by and taking a look!!

Likes
11
Share


@AGrowerNotAShower
Follow
Man! I am definitely hooked on my new hobby. Harvested 96 grams of smokable bud and 93 grams of bud/leaves that I will be using to make dry ice hash. Took a third of that second weight (31 grams) to account for pure bud (which is more on the low end) and added to my 96 grams of good flower to get the 127 grams total. Made plenty of mistakes that I’m sure dropped my yield, the biggest being the lighting situation. Plants grew right into my light and even got bleached. The height of the plants made the outer colas grow past the high light areas, which made the buds very airy. But overall it was an amazing experience. I learned a lot of things, some that I have already incorporated on my second grow. And even with my drop in yield, I still ended up with more than enough flower to last me to my next harvest, so this was a great grow for me. Thanks to everyone who followed, liked, and commented. Your words were helpful and meaningful.

Likes
6
Share


@Jack_Greenstalk
Follow
if i grew this again i'd make a mother plant, take clones and veg for short time and flip sooner then I did this round. Although people say lec 315 can be 18 inches from canopy (exactly where the platinum yeti was when finished stretching) the trichomes were just milkying up at day 66 of flower prob can run this one a little longer then i did to increase yield a bit more to allow buds to fatten out more and go more to amber trichomes.
Smell: Gas ⛽ on jar opening. Ground up has Vanilla 🍪 perfume
Taste: Movie theatre butter 🍿 fuel⛽ baked buttery vanilla cookies 🍪
Medical Effects: night time smoke! crazy couch lock, very sedating, helped me sleep😴 strong pain reliever. narcotic type high, slows thoughts down to clear focus calm. I felt glued to my chair more then any strain I've ever tried before. Great stress reliever
Notes: refer to this one as the "purple pheno" One of the most attractive smelling strains I've ever come across👃👀 when you smell it you want to smoke it. after smoking it you want to smoke more of it... but its pretty potent so this one is likely to end your night once you start on it!😎👌💨😴😴 yielded 23 grams of flower dry
#3 green pheno-
Smell: Lime with subtle skunk & burnt rubber
Taste: Lime peels and burnt rubber
Medical Effects: Very Sedating, stress reducer. slows thoughts down
Notes: stayed green entire grow, yield 22.4 grams dry flower
Likes
62
Share


@Santica_Garden
Follow
............................................... ............................................. ............................................ ............................................

Likes
9
Share


@Smokey_J26
Follow
Growth slowed a little due to lights off temps dropping during the snow we had early December. Not worried about it. For the love of ganja
Likes
13
Share


@XanHalen
Follow
Mar 31
I think things are going very well, one plant has rusty spots, pretty sure its calcium deficiency, will be upping across the board.
Got the runoff ppm to a good spot, will be going back to 800ppm feeds by week 8, 750ppm this week.
I want more stable genetics next time, I am way to new to be dealing with basically 3 different strains, that's what it feels like, and I have very little time as it is.
Thinking of upping PPFD some more, i think the droop of the one plant was just adapting to watering till runoff, I want to see some fattening AND RIGHT NOW.

Likes
25
Share


@PrairieFrostGrow
Follow
******Week 5 Veg - Jan 6 to 12, 2020
This was a week of growth. She grew up and did very well with a couple of her side branches thickening up. She is a very healthy girl but she is not flipping. I wrestled with this weeks journal because I wanted to get it started to show her great growth but all along I was not sure if I call this week a flower week or not. In the end I waited and I am calling it a Veg week😥😥 She is not flipping......freaking wants to though by all signs.......I got a suspicion but I hope I am wrong......I don’t want to run two flower cycles!
IPM spray with Lost Coast Plant Therapy.......recent thrips experience and staying with a preventative cycle💀👻
Some branches are stiffening since the introduction for silica but others are still very pliable. The main stem is still very “bendy” and perfect for LST right now. Too soft for entering flower given the silica. Why?
She has handled the light intensity fine.....she has not been going to sleep early. She has handled the nutrients well given the amount being put in anticipating her switching and wanting the flower dosages.
She is beautiful little girl at first glance but she has some oddities in her growth......keeping the grow interesting she is young Skywalker😎 👍
More detail:
Jan 6/20 - Day 29
- 2L RO water pH 5.7.
- Run-off: 1150ppm, 6.1pH in try from last. After feed 800ppm, 6.0pH
- Pot light today. Wanted plain water but she is feeding
Jan 7/20 - Day 30
= life was busy........nothing done today for watering.
- Pot was the heaviest of the bunch......enough to wait.
- She was more droopy today.......cold in the tent though....75 degrees?????
Jan 8/20 - Day 31
- Feel she is hungry so fed in AM today.
- AM: full feed except no CalMag
- AM run-off 900ppm, 6.2pH
- PM: full feed with CalMag.
- PM run-off 430ppm, 6.1pH
- No time tomorrow morning and pots were not heavy so decided to feed again in evening.
- She is green and happy.......no bud sites though?
Jan 9/20 - Day 32
- Life busy......noting done......heavy feed yesterday.
Jan 10/20 - Day 33
- Water only. 1L pH to 6.0
= IPM tonight so keeping it light today. Hit her tomorrow with full feed.
= She is looking AWESOME today. Up and happy and still no buds😨😕
- Spray with Plant Therapy from Lost Coast for bug prevention. Fortunately no signs of any issues.......and this will keep it that way😁👊
Jan 11/20 - Day 34
- 2L feed. Upped the base nutrients, Dual Fuel, today to 2ml/L. Wanted to break 1,000ppm and see what happens.
- With Advanced Nutrients I am usually over 1100ppm at a similar stage.
- Played with light intensity in the tent today by giving them all more.
- Pulled 2 fan leaves today.
- Limbs are growing funny. Soft and narrow and not typical symmetrical pattern of growth.
Jan 12/20 - Day 35
- huge growth night....side branches bushed out and got taller!!
- Supplemental focus on this feeding.......help root zone again.
- Voodoo and Piranha for two weeks again at the start of flower and promote growth. Sensyzime to help clean up the roots for better uptake.
- she is 13" tall and 18" wide now.
- 4 large leaves removed and two smaller nodes.
Pictures all added 😀.....fought the website for network connections tonight😡.........update the comments tomorrow now👌........cheers!👏

Likes
5
Share


@JohanaEW
Follow
Está semana hice un transplante d 0.5 litros a 4 litros y ajuste los amarres


Likes
12
Share


@gr3g4l
Follow
Finales de la pasada semana y esta lavado de raices. Agua con ácido cítrico y ácido ascórbico.
Corte de los apicales más formados y con mayor riesgo de botritys y el resto seguirá una semana 10 dias más.
Han salido diferentes fenotipos, unos de más skunk y otros de más Critical,
A los 60 dias obté por cortar los apicales y dejar el resto de las plantas para que terminaran de engordar y madurar.
Entonces volví a regar con Bloom Bud y call-Mag -


Likes
57
Share


@Mosquito_Haarlem
Follow
These buds look so yumyum.
Ze heeft niet lang meer te gaan.
Ze ruikt aangenaam sterk spicy.
Ik laat haar nog iets rijper worden, heb nog geen amberkleurige trichomen kunnen spotten.
Verse foto's zullen volgen.
Processing
Likes
17
Share


@Fergie
Follow
Hey guys so here are my c.a ladies I'm loving the smell off these is defo a strong cherry aroma 😀sorry for poor pics my tent is full and not easy to move around . Will be another few weeks I think to get that amber tricomes I am looking for .
Likes
25
Share

@NewName
Follow
Thick flowers 8p gettin a big top 😛
These plants are not bigger than 30cm, crazy!! 🤩🤩

Likes
2
Share


@Lovemabud
Follow
So this was my first grow, way back in 2013. Literally a seed I placed in the ground, hidden behind my water tank and the fucker went out of control. Not too sure if it was taken at 24 weeks, all I know is this plant lived a full life.
I had to tie her down about half way into the grow as she was just getting too damn big.
Fertiliser? Well nothing but seasol and power feed was used. Virtually no love at all was given to this plant, everything was kept simple.
More smoke than I could handle from this crop anyhow, so many ounce bags of weed were given away to many happy mates. Still took a couple of years to vape my way through what I kept. I vacuumed sealed and place in my dedicated dope fridge to ensure longevity.
Seriously a top notch smoke, the taste was amazing, the stoned even better.
I can only dream that my current outdoor grow will get to this size, but being in a pot it will be restricted for sure but still bountiful. How bountiful is yet to be seen. Check it out if u have the time. Seeing the size of this and my current plant, has made me decide that I will no longer bother with autoseeds. The reward just isn't there
I will post harvest videos as well...marijuana porn is what I like to call them 🤣


Likes
44
Share


@Terp_Djiny
Follow
Aufgrund der Höhe, habe ich zu Beginn der Woche an der einen Pflanze HST angewendet und den headbud an einer bestimmten Höhe "umgeknickt". Das hat hervorragend gut funktioniert. Allerdings habe ich den abgeknickten Haupttrieb mit einem seil fixiert. Als ich heute nachmittag in das Zelt sah, lag der Trieb neben Topf und war eins a sauber abgetrennt. Das Seil war nicht unter Spannung gezogen, lediglich als Haltepunkt wenn der Trieb sich wieder aufstellt.
Nunja er ist jetzt ab.
Ausserdem ist eine weitere Pflanze Männlich. So bleiben 4 von 7 die definitiv weiblich sind.
Zum Wochenende gibt es ein paar neue Fotos von den verbleibenden Damen. Bis dahin, grow on.

Likes
9
Share


@TiRobotProds
Follow
4ème semaine de floraison. Cette dame ce porte a merveille ☠️☠️💀 irrigation tous les 3 jours environ 6L, 12L/Semaine.
