
Likes
Comments
Share


@TheBudWhisperer
Follow
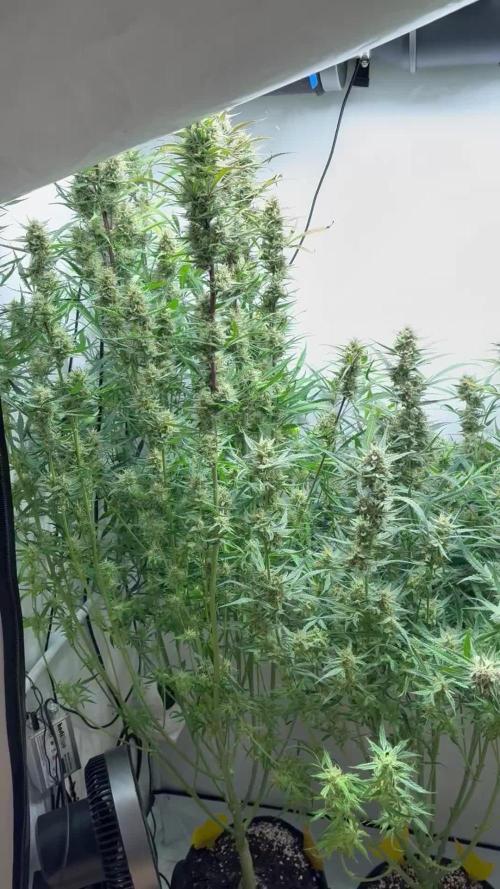
Week 8 of flower is in the books and this show is quickly coming to an end. I said last week we had about 7-10 days and I was spot on at the 10 day mark. I was only wrong about the order. The cheese is ready to chop before the rest and the gorilla cookies, cherry Bomb and lemon haze will follow in due course. The cheese is a beast and it’ll take a little time to get it all run through the bowl trimmer. At least the big one goes first. Her tallest colas have foxtailed like mar, despite the late supercrop. You can tell where the sweet spot for the light is at about 10” distance from the canopy. Any closer than that and the tails begin to show prominently. It’s a good example of just how close you can get to these fixtures with a little bit of prior experience. It’s been noted for the next run😎👍😎. The res. is on an h2o2 only flush for the remainder until the rest are ready to come down. Not a moment too soon either - the pollen chucking project has stalled out waiting for these girls to finish and now that we’ll have a little extra room, we can start running our cuts in the aerocloner🤟. Not long at all now folks. Thanks for tagging along through all this. Learned a bunch about this system and we’re back to hardware mode to make some serious improvements for the next run🤙😎. I love hardware mode😉.
Background/Repetitive Nonsense
The strain line up on this grow is look’n quite saucy 😈. We’ve got 2 FB strains this time around - Gorilla Cookies (seems we always have some GSC cross in the works). Mainly because the colours look stellar and remind me of a sugar breathe we did last year that was 🔥. The other FB is their original Cheese strain... because we already smoked all our cheese... and we really like our cheese...😉. Emerald triangle was kind enough to include a freebie of Lemon Haze. Wasn’t really big on the list but we haven’t done a haze strain to write home about yet so worth a go👍. The last is a Cherry auto from Bomb seeds that we’ve been trying to get to for months. Let’s just hope that she’s not a dud like the last bean.
The new digs for this run are courtesy MarsHydro👊. Their 2x4 single grow tent, paired with a shiny new 240w QB courtesy ViparSpectra.
These folks were kind enough to discuss a collaboration and as a result, here we are to test out the gear with an inaugural run of autos. Each week, we’ll try to expand on some of the benefits of each, as well as any limiting factors or considerations that need attention when pondering purchase.
Already I can say that both are high quality products in terms of overall craftsmanship.
MarsHydro 2x4 Grow Tent:
Excellent construction in terms of durability. Reinforced stitching on the zippers and corners ensures zero tearing. Conveniently placed screen vents and intake/exhaust ports. The ceiling exhaust port only exists on the right side. Perfect for me but not great if you’re running exhaust from the top on the left side (left side wall port makes up for this however). The aluminum frame is rigid enough to support the weight of the lights and accessories. Once you have some weight in the tent, she’s go’n nowhere and you can assemble and break it down in record time if moving or stashing the grow op.
Only limiting factors I’ve noticed is that temp. Control will be an issue for a tent. It just doesn’t have the same insulating ability as a wood cabinet or other permanent enclosed space. No worries, this is offset by a small desktop heater and keeps the environment exactly where desired. The other issue was a production problem - the ceiling vent was accidentally stitched into the corner seams on the assembly line. Again, no real issue - just pulled it out with no damage or fraying to the tent or port👍.
Website link here:
https://www.mars-hydro.com/grow-tent/buy-mars-hydro-grow-tent-24x48x70-2-x-4-cabinet-closet-grow-box-upgraded-diamond-1680d-mylar-for-sale
ViparSpectra 240w Quantum Board:
This thing is sleek and slick in terms of design. Closest comparable to it that I’ve seen would be spiderfarmers line of qbs. They feature the same top-o-the-line components and roughly similar spectrums. Where VS takes the advantage is in the convenience of the dimmer nob which is easily accessible and works great at 50% with no strobing👍. The heat sink is also larger which contributes to lower temps. That’s not a good thing in my case but beneficial for most folks.
I can already say that this will be a great fixture through all stages of growth. Where I know this light will excel will be in the veg. Stage for sure. Dimming function gives seedlings a much better chance of success with the ability to use lower lighting levels early on and the coverage area on a 240w is great. The average grower will find this panel suitable and fitting to their needs in a 2x4 grow space although I’d suggest 2 units if going any larger than that. The total output in this space equates to about 30w/sq.ft. Which is a decent amount of coverage based on power vs. Growprint. Ideal for veg. Certainly but, in flower - I tend to run closer to 50-60w/sq.ft to achieve higher yields. Again, similar fixtures have performed admirably in the past and while this wouldn’t be considered an “entry-level” fixture, I’d recommend that any grower new to the game not skimp on lighting and start with one of these. The price points are a great value for quality LED tech. These days, so there’s little reason to even consider a lesser fixture👍.
I have no detail on limiting factors for this light as yet but have heard that stock branded fixtures don’t necessarily incorporate enough red diodes. I’ve seen no issue myself but confess - I’m no lighting guru.
Website link:
https://www.viparspectra.com/collections/xs-series/products/xs-series-xs2000
***8% discount when using code: “ItBudWhisper”***
Happy to have you along for the ride if you made it this far through my opening rant!!😎🤟😎🤟😎


Likes
18
Share


@BlueSmokeFarms
Follow
Starting week 5... Buds are filling in and connecting. Just gave them another Weekly Top Dust.. Started seeing a little nitrogen problems so i gave them another dose of Nitrogen Boost. Just going to see how things turn out before i start to flush..
Any comments on when i should start flushing???

Likes
33
Share


@Rap_a_cap
Follow
This is my beast. Great plant. No issues. Just 1 week later than Skunky. Cheese smell.

Likes
22
Share

@GermGrowFox
Follow
22. Dezember
Video ist von gestern, die restlichen Bilder von heute.
Wir neigen uns dem Ende zu :)
Alle drei sind sehr unterschiedlich weit in der Reife.
Nachdem ich doch eine milde Maus bin bin ich ganz happy über das Profil der Trichome:
Links: relativ viele durchsichtige Trichome, wenig milchig, Bernstein konnte ich keines finden
Mitte: die kleinste Pflanze die schon früher anfing zu blühen. Sie hat viele milchige Trichome und viele bernsteinfarbene. Durchsichtige habe ich kaum gefunden. Kann mir vorstellen das diese Lady für meinen Geschmack zu sehr klatscht x) aber das gilt es noch herauszufinden
Rechts: visuell gefällt sie mir am besten! Die Blüten und die Wachstumsstrucktur ist wunderschön! Trichome hier sind überwiegend milchig, sehr wenig bernsteinfarben und wenige durchsichtig. So hätten vermutlich alle drei werden sollen 😅 ich werde wohl auf meine klimatischen Bedingungen im Zeöt nochmal etwas Einfluss nehmen müssen damit sich das besser deckelt.
Die Lampe ist aus, die Töpfe furztrocken und der Zustand wird jetzt noch mindestens drei Tage gehalten.
Plan ist um die Weihnachtsfeiertage zu ernten.
Ich stelle mich auf einen langen schnippelprozess ein, da es doch schon viieeeel Pflanze ist x)
Ich update dann wieder sobald es soweit ist.
Euch wünsche ich schöne Feiertage ❤️ geniest eure Zeit ❤️


Likes
3
Share


@MadeInGermany
Follow
Hey guys :-)
It's about time that space in the flowering tent becomes available because the ladies are getting extremely bushy and big 👍😂.
was poured this week 2 times with 1 l.
Have fun and stay healthy 🙏🏻💚
👇🏼👇🏼👇🏼👇🏼👇🏼👇🏼👇🏼👇🏼👇🏼👇🏼👇🏼👇🏼
‘Powered by GreenHouse Feeding’
Copy the link for 10% off all Nutrients 👇🏼
http://shop.greenhousefeeding.com/
affiliate/madelngermany_passiongrower/
👇🏼👇🏼👇🏼👇🏼👇🏼👇🏼👇🏼👇🏼👇🏼👇🏼👇🏼👇🏼
You can buy this strain at :
DJ Short
Water 💧 💧💧
Osmosis water with 0.0 EC. Add Cal / Mag to 0.4 Ec .
Ph with Ph - to 6.0 - 6.4
MadeInGermany

Likes
Comments
Share

Likes
52
Share


@SomeLikeItGrow
Follow
Hello! The girls are in bloom as well, used to spray a little bit CannaBioGen Delta 9, and thinking about a little bit defoliation to give more light for the buds, no a lot of place and looks like the leafs covering a lot of buds, but not sure. Also according to the @DinafemSeeds webpage the California Hash Plant and Critical+ has the same flowering time (45-50 days), but, it looks like a mistake or i don't know, but it seems like California Hash Plant has longer flowering time than Critical+, as you can see on the pictures and video.. Maybe @DinafemSeeds could clarify this for me as well too :) Thanks for following me and have a good grow and no stress to all you guys!!

Likes
12
Share


@russrahl
Follow
27 days into flowering now. These girls are still stretching, hopefully there done now! I was playing with my light rail mover a bit and experimenting with timings and I think this contributed to it. They definitely got away a bit on me. Lol No biggy, just had to weave a couple more branches through the top screen, canopy is not quite as even as I would have liked, but should still be a good harvest. My HPS light penetrates down to the second screen fairly well in most places I think though. I seem to have 2 phenotypes, 3 are stretching up and skinnier leaves, but 1 is staying lower and has big fat leaves. Dropped my nutrients a bit last week and they seem to responding better. Buds are developing nicely and are ramping up daily. Still running my light at 750w, debating on turning my light up to the full 1000w to get more light out to the side buds but I’m already exceeding 75000 lux on the canopy directly under the light. Not sure how this works with my movers, but I think I’m still gonna play it safe for this next week. Happy growing everyone! Cheers💨


Likes
19
Share


@LittleBigTrees
Follow
Stretching has slowed right down , buds are growing . I'll pull fan leaves as I go to allow light through to the bud sites


Likes
22
Share


@420_liquidsun
Follow
I can say I didn't expecting this.. she amazed me, and teach that you can get decent amount of buds in 1L pot also.. this is my first growing in small pot and teachs a lot about using your space..54300
Likes
4
Share


@TheGreenGroomer
Follow
Day 7, Week 7 – Flowering 🌸
It’s Day 7 of Week 7, and everything is on track! The buds are swelling nicely, and the trichomes are glistening under the lights. The grow room has that classic dank aroma, and it’s getting stronger by the day.
I’m keeping an eye on the trichomes as chop day gets closer – I can’t wait! Almost there! 🌿✨
Likes
16
Share


@Bread_n_Buds
Follow
We have passed the month and we are madly in love with all our autoflowering plants, we have two per strain, one worked with a mainlining adapted according to the characteristics of the plant and one that grows straight, we can't easily give up the main cola.
For now we will show you those worked with the techniques that are more interesting to see and later planted earlier to make them finish more or less together with those that will grow straight and fast.
We really like our Green Cure CBD F1 worked with the Main Lining. It has an average interodal distance which allowed me to bend the lateral branches properly and obtain a great shape. I really like it to see.
So topping at the third internode, main lining, no pruning until the third internode and topping them again so we have multiplied the buds adequately.
The application of the techniques is a delicate moment also for fertilization. Topping slows down the growth of the plant a bit and does not make it require all that Grow fertilizer that is normally recommended. So you have to go really slow and understand when to reduce the nitrogen. Better to prepare the soil with fertilizers to mix with the soil probably. The problem is sweeping now that it is going into flowering, the plant has shown the first fluff, declared the sex, and the fertilizer will soon be needed indeed. You have to swell.
In any case everything is under control and I will demonstrate it to you during the flowering phase. Wait for the Uncle BreadandBuds and see what he does.
Remember the cold temperature makes the girls absorb food much more slowly than in summer so be careful to give the right amount and to dry the plant in maximum 2 days or you risk imbalances.
We are always using soil, feeding and all the recommended additives of Plagron 100& organic we have only lowered the amount of grow in this topping phase for the reasons given above.
---- Decide on the right soil and calculate your fertilizer card based on the soil on the official website.
-- www.plagron.com
Try a seed of this variety that drives us crazy..
---- https://www.zamnesia.io/en/10672-zamnesia-seeds-green-cure-cbd-f1-automatic.html
Description Zamnesia // Zamnesia's breeding team has harnessed F1 genetics to bring you Green Cure CBD F1 Automatic. This autoflowering cultivar is easy to grow, accessible and reliable for all levels of experience. Ready in just 11 weeks, growers can expect impressive yields of tasty buds with a clear-headed effect that's ideal for meditative moments.
All the best that mother nature can offer is on ---- www.zamnesia.com

Likes
12
Share


@pek710
Follow
Now is the time for beginning the lst.
Everybody looks great, there's only orange sherbet FF that is too small in my opinion to be bondaged.
I gave a bit too much of fishmix last week so it will be only water for this week.
Still 2 to 4 weeks under neons, got to keep them as low as possible so they can have light on each leave

Likes
132
Share


@Grow4Releaf
Follow
** Mar 27th/28th few bud shots added, checking the trichomes on the purple were getting cloudy so shes moving along. Shouldnt be long for her!***
**Mar 26th- added a few more photos , purple plant is getting close, she's on a water only diet till harvest ***
*25th- Added a few photos using a phone app, gonna try this till the computer is back up ***
Everything going well so far still, still Trying to get my computer and Adobe program up and running right but gonna get some more photos during the week.
So far the purple one is moving well starting to thickin up, and the other jusy stopped getting length and hopefully will bulk a bit.
Buds are crazy dense. Can't wait to show a good video of them once closer to Harvast.
The SMELL is intense off the purple one already. I can't wait !!
It's been ALOT of fun growing out these runtz can't wait to see how the smoke is!! Getting closer tho, got another week before I'll check out some lower buds trichomes then see their progression.
Can't wait tho. Should have my camera and laptop up this week , hopefully.
But besides that's I hope ur all doing well !!
Till next update, thanks for checking this one out !!
Likes
19
Share


@Willy_Balls
Follow
It’s the 9th week of flower and this run is slowly coming to an end. Mimosa is by far the fastest finisher here. In 8 weeks there is around 30 % amber trichomes in the top buds. A little too much for my taste. I ve reduced the ec in the medium of mimosas to around 1.0 and took the drippers out.
Now they will dry out fully in around 1 or 2 days and I will chop. The rest is more or less similar and will go for about a week more.


Likes
35
Share


@SmokingTiki
Follow
- I didn't weight wet buds.
- The trichomes photos have been taken just before the harvest on buds all over the plant.
- The hash ball was a little less than 1cm diameter.
- Drying was made at 20°C and around 50% of humidity.
- Humidity in jar around 50% on the first day, temperature around 20°C.
Veg time : 53 days.
Flowering time : 68 days.
Total time from seed to harvest : 121 days.
Height : 120cm
Pot size : 26l

Likes
99
Share


@BudXs
Follow
The temperature is dirty!!!!
Cant keep it below thirty
what the trich July?, like this it hard to keep em purdy
I got the lights cranked down low
I got the fan on high, bro
But sunny days and constant rays are making me go psycho.
Got that chin held hi tho
Xs aint gon cry, no
Soon my only worry will be: "from which jar of hydro?"


Likes
11
Share


@sanibelisl
Follow
Day 56 for Chem91 and day 54 for the HighLux. Really excited to see the chem finally come around
A huge difference from a couple of weeks ago. She went through her stretch and now has some distance between nodes. At 16 inches she is structured much like an azalea bush
She looks nothing like the traditional Christmas tree shape they you associate with cannabis plants I am hoping she is able to handle the stronger light but we will see.
HighLux! Hello sweetie! Love this plant. So far no issues. She is coming out of stretch and is closing in on 32 inches tall. She has created a terrific canopy, all side branches ended up a couple of inches apart in height. Beautiful. Flowers are getting bigger every day and the early frost is just incredible, it covers fan leaves inches away from the flowers. Started feeding her with General Hydroponics CocoTek bloom A&B for the higher pl values of the Canna Coco A&B line. She seems to love it. She also received a 6 ml dose of King Kola and again she seems happy with the extra pk. I have been giving the a fresh ph’d water flush flush about once a week and again they seem happy with that regime. Will flush the chem91 tomorrow and begin the General Hydroponics CocoTek bloom A&B. There is a short video of the tent at the bottom of the updated ph
Likes
56
Share


@Master_weeda
Follow
Bonjour à tous les padawans et les maîtres jedis
Pour cette semaine 3 au jour 19 ma plante fais 21 centimètres et son septième noeud apparaît je décide donc de pratiquer un LST sur ma plante.
Pour ce j'utilise du fil de fer galvanisé que je plante directement dans le substrat en faisant attention de ne pas endommagé les racines car n'oublions pas que ce qui pousse dessus pousse aussi dessous.
Jour 17 je pulvérise du une solution composé d'une cuillère à café de savon noir mou (marque briochin) dilué dans un demi litre d'eau en prévention d'éventuels nuisibles.
Pourquoi le savon noir mou ?
Savon noir : quelle utilisation pour le jardin ?
Le savon noir est un produit naturel dont les propriétés nettoyantes sont connues depuis l'Antiquité. Utilisé pour l'entretien de la maison et pour les soins corporels, ses vertus antibactériennes et insecticides en font un allié précieux pour le jardinier bio.
Le savon noir est fabriqué à partir de potasse et d'un corps gras de type huils végétale comme l'huile d'olive, de lin ou de maïs.
Produit naturel et biodégradable (s'il ne contient pas d'additifs, comme cela peut-être parfois le cas), c'est un très bon produit nettoyant, pour les sols, la cuisine, la vaisselle, le linge, etc... Très polyvalent, il est également économique, comparé aux multiples détergents classiques du commerce.
Le savon noir se trouve sous forme de pâte molle et brune ou sous forme liquide, dilué avec de l'eau. C'est du savon noir liquide dont on se sert généralement au jardin, car son utilisation est plus simple. Il s'achète dans les magasins bio ainsi qu'en grandes surfaces ou jardineries.
Attention : la recette du savon noir de ménage et celle du savon noir utilisé en cosmétique ne sont pas forcément les mêmes ; les savons noir de ménage (multi-usages) peuvent contenir davantage de potasse afin d'améliorer le pouvoir dégraissant (irritant ou desséchant pour la peau), voire même certains additifs chimiques.
Au jardin, ce sont en priorité les propriétés antiseptiques et insecticides du savon noir qui sont utilisées.
Le savon noir liquide est utilisé pour lutter contre les pucerons, les cochenilles, les araignées rouges, les aleurodes, les psylles et autres thrips. C'est un insecticide de contact ; il tue les larves et nettoie le miellat qui englue les feuilles.
La recette de l'insecticide à base de savon noir (mou pour ma par marque briochin) est simple à réaliser : une ou deux cuillères à café de savon noir mou (briochin) diluées dans 1 demi litre d'eau tiède (dilution à 5 %) ; une fois la préparation refroidie, pulvérisez-la sur les plantes atteintes, en prenant soin de ne pas oublier l'envers des feuilles. À renouveler 1 à 2 fois si nécessaire, pour être totalement débarrassé des indésirables.
Comme il est de mise pour la plupart des traitements, ne pulvérisez pas la solution à base de savon noir en pleine journée, sous le soleil (ni sous la pluie !) ; procédez le matin de bonne heure ou patientez jusqu'à la fin de journée, lorsque les températures sont en dessous de 20°C.
Jour 18 Je corrige mon LST suivant la pousse de ma plante ...
Pour ma par c'est la manière dont je procède mais petit rappel de la technique du LST
Quand commencer à appliquer la technique LST ?
De nombreux cultivateurs commencent la manipulation dés que les plantes possèdent entre 3 et 6 nœuds ou une paire de feuilles. Durant cette première étape de la croissance, le tronc encore flexible est pliable sans risque qu’il ne se casse, même si au fur et à mesure du développement de la plante il sera de plus en plus difficile de le plier. Nous pouvons continuer à guider la croissance des branches durant toute la culture, même durant la floraison, ce qui pour cette étape représente un grand avantage face à la taille, qui n’est pas du tout recommandé une fois que la formation des têtes commence, cela stressera en effet la plante, ce qui aura pour effet de retarder la récolte.
Comment appliquer la technique de guidage LST
Si nous sommes prudents, la flexibilité naturelle des fibres du cannabis permet de plier leur tronc et branches avec une relative facilitée, même durant la floraison des plantes.
En utilisant une corde fine, nous pouvons accrocher la pointe de la plante à la base du pot par exemple ou à un tuteur que nous aurons planté dans le substrat. Nous plierons le tronc avec précaution et nous le fixerons avec la corde, à partir de là, nous pouvons augmenter progressivement la tension de la corde, chaque jour un peu plus, jusqu’à obtenir la position souhaitée. Soyez attentif à la réaction de la plante, essayez de ne pas appliquer trop de pression sur la corde et rappelez-vous que la flexibilité des branches peut varier d’une plante à l’autre.
Pour obtenir de meilleurs résultats, il suffit de suivre quelques règles simples. Pour commencer, nous devons choisir une corde fine mais pas trop pour ne pas blesser les troncs au fur et à mesure qu’ils grandissent et qu’ils deviennent plus gros.
Nous pouvons utiliser des crochets en plastique souple ou de n’importe quelle autre matière flexible pour éviter d’endommager les plantes. Spécialement en intérieur, utiliser des cordons en plastique de couleur (voir les diaries de @Silky) est très pratique pour voir facilement les accroches et faciliter le travail au milieu du réseau formés par les cordes, les tuteurs, les mailles ou les supports que nous aurons dans la culture. Bien entendu, en culture extérieure et surtout en guerilla nous ferons juste le contraire et nous utiliserons des matériaux de couleur qui n’attirent pas l’attention pour que notre jardin reste discret.
Pour stresser les plantes au minimum, la mieux est de réaliser ces manipulations le soir ou juste après que les lampes en intérieur s’éteignent, ce qui leur permettra de se remettre durant la nuit. Normalement, le jour suivant nous pourrons observer comme les pointes des branches que nous avons pliées se dressent de nouveau vers le haut à la recherche d’une source de lumière.
Que la force soit avec vous💪
