The Grow Awards 2026 🏆 


Likes
Comments
Share
@StonedandSteady
Follow
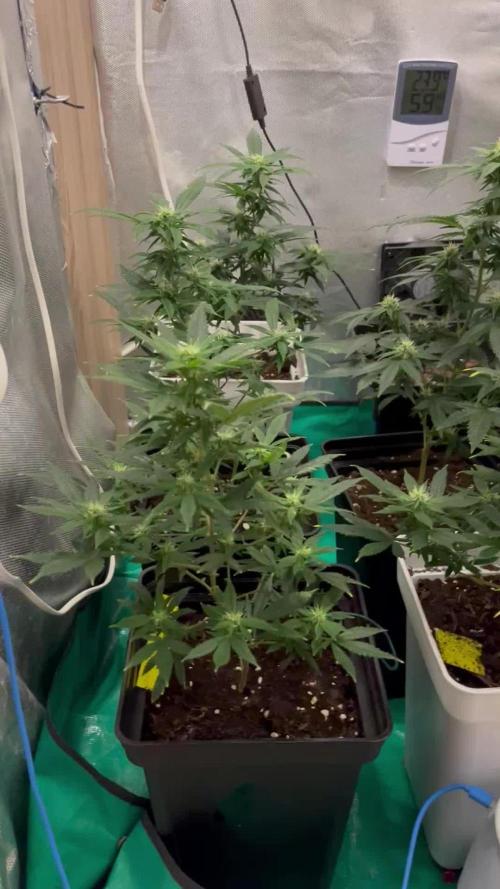
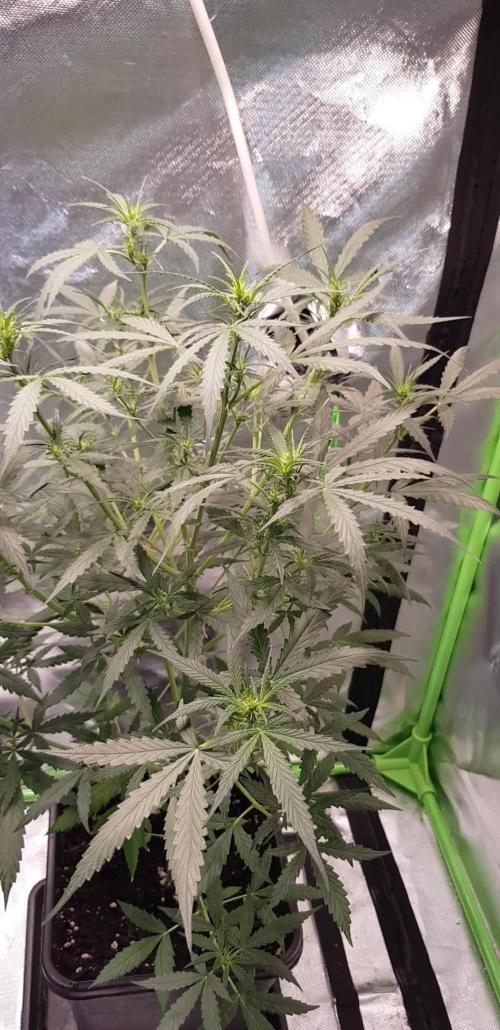
AutoBlueberry 4th-5th W/ Veg breed by #DivineSeeds #DivineSeedsSquad #DivineSeedsBreedingCompany
Origin:Afghani/Thai
Type:50% Indica/ 40% Sativa/ 10% Ruderalis
Flowering:56 days
THC:22%
Harvest:400-550 g/m2
Height:110-150 cm
They were Growing under the #Growatt600w and in my #TopoLite 24×24×48 Grow Tent but I've Upgraded and Updated it to my #OsreeQB100W I'm also using #TNBNaturals #TheEnhancer Co2 Despersal Canister and using thier Ph⬆️⬇️ for my Decolinated Tap Water!
Green and Growing Up Great! She's Growing into her 5th week of Veg! She's Growing in my special blend of ProMix potting mix, a 1/2 bag of Earthworm castings and 2 light handfuls of Diatomaceous Earth mixed Up well for before transplanted! Diatomaceous Earth: Diatomaceous earth is made from the fossilized remains of tiny, aquatic organisms called diatoms. Their skeletons are made of a natural substance called silica. WHAT IS DIATOMACEOUS EARTH?
In a nutshell, DE comes from the fossilised remains of small marine organisms called diatoms. Over a 30 million year period, these hard-shelled algae collected on the bottom of bodies of water, eventually forming into a type of sedimentary rock. Fast forwarding, it wasn’t until around 1836 that a German peasant Peter Kasten discovered the ivory-coloured, powdery substance while drilling a well in northern Germany. Ever since, the usefulness of DE for multiple purposes, including industrial and horticultural applications, has been well-reported. Just sprinkle some diatomaceous earth on top of your soil and watch mother nature's secret weapon work its magic.CONDITIONS THE SOIL
When it comes to growing cannabis, everyone strives to provide the best soil to grow the best plants—but there’s always a way to make it even better. Making the soil a better medium is called soil conditioning, which is exactly what diatomaceous earth does. It works by improving the retention of moisture in your potting soil, holding a large amount of fluid and drying at a rate that’s much slower. This natural soil additive also helps to retain nutrients and allows for better oxygenation of the substrate. NATURALLY CONTROLS PESTS
DE is an all-natural, safe-to-use substance that doesn’t harm the cannabis plant with toxic chemicals. The nature of diatomaceous earth makes it useful against most types of insect infestation you might be experiencing; and unlike chemical insecticides, insects can’t develop a resistance to the effects of DE. So once they’re gone, they’re gone for good. DE is an abrasive. and when used as an insecticide, it gradually scrapes away an insect’s exoskeleton, absorbs the fluids, and dehydrates insects and other critters to eventual death. IMPROVES PLANT STABILITY
When using DE in your soil, it can be especially beneficial as it frees up nutrients so that they are made available to the plants as needed. This works via the silica content of DE being absorbed into the plant tissue, which helps improve the plant’s ability to respond and receive more nutrients as DE activates. This in turn results in greater yields and better stability under small pH fluctuations!
https://divineseeds.net/
https://instagram.com/divine.seeds?igshid=osxe2v7en33v https://divineseeds.net/
Thanks Again to All my Friends, Family's, Teams, Sponsors, Followers and Subscribers!!! Your Genetics are Merry Magnificent, Mega Marvelous and Mighty Medical! Love um!!! I really Can't stress enough how Thankful and Grateful I am of All of you and what you've Shared with Us! Means the World!!! It's definitely a Pleasure being able to Grow with these Phenomenal Grow Lights! Please Enjoy! BudBrothers4-Life! Cheers Famz!!! Much Props and Much Topz!💯🔥 #Osree #GrowStarStore #Growatt #TNBNaturals #TNBTeam #GrowYourOwn #Bliss
https://instagram.com/as420.ca?igshid=1f116alw054wp
The Grow Bags: https://www.as420

Likes
17
Share
@Naujas
Follow
She is much prettier than she was a week ago :) I remembered that I have my first grow light, which is more compact and it will give me more space, so I changed my light, now the girl's side branches get light too:) I add a lot of video memes, because I really want to win Iphone16 pro ;) and those who don't take risks don't drink champagne:) good luck to everyone.

Likes
3
Share
@Raster893
Follow
Entramos la semana con un lavado de raíces ya que cuando se ha revisado la EC estaba en 3 y la hemos bajado a 1,6. Quitados algunas hojas feas y dándole recuperación a la sobrefertilizacion. Esperemos que se recupere bien

Likes
13
Share
@SkunkyDog420
Follow
Hallo zusammen 🤙.
Das war es für sie.
Wir sehen uns in 2 Wochen mit dem Erntebericht.
Bis später 🤙
Sie bekommen 20 % Rabatt bei Zamnesia und der Code lautet GROWITGD.
Sie erhalten 25 Prozent Rabatt in unserem Shop
Mindestbestellwert beträgt 75 Euro
https://greenbuzzliquids.com/en/shop/
Code: GD42025


Likes
11
Share
@DixTheReal
Follow
Giorno 64 - l’ingiallimento su entrambe le piante avanza, spero di tagliare verso fine settimana
Giorno 65 - ho tolto molte foglie su entrambe le piante, le ho girate e cambiate di posizione per farle prendere più luce, domani osserverò nuovamente i Tricomi
Giorno 66 - i Tricomi iniziano ad essere lattiginosi ma ancora molti sono trasparenti
Giorno 67 - procede bene, nulla da segnalare
Giorno 68 - i Tricomi sono quasi diventati tutti bianchi, ancora 2 giorni e taglio
Giorno 69 - sono molto confuso, vorrei raccogliere domani ma c’è chi mi suggerisce di attendere dai 3 ai 10 giorni, l’odore é diventato insopportabile e credo che raccoglierò comunque domani, oggi ho defogliato notevolmente
Giorno 70 - stasera taglio e metto a seccare


Processing
Likes
20
Share
@eldruida_lamota
Follow
Que pasa familia, traemos nuevo diario, en primer lugar dar las gracias a Nara hydro que sin ellos esto no es posible.
Os enseño la primera semana de esta farm cheese de genofarm, una semilla con más de 3 años de conservación, tuvo un germinado en 48 horas sin problemas aparentes.
La introducimos a 0,5 cms en medio del sustrato, una maceta pequeña unas semanas mientras Coje fuerza.
Las vamos a crecer esta vez bajo un led TS-600 de la marca Mars hydro.
.
no olvidéis que comprando con el código an420 en mars-hydro.com obtendréis un pequeño descuento en cualquiera de sus productos.
.
Nos vemos la semana que viene con más familia 💪

Likes
65
Share
@Dendegrow
Follow
Woche 4 bricht an und es läuft hervorragend! Die Orange Sherbet bekommt diese Woche frischen Boden: eine Mischung aus Bio-bizz All-Mix und Greenhouse-Feeding, perfekt für die letzten Vegetationswochen und blüte. Zudem hat sich die Orange Sherbet sehr gut mit dem Backhefe-Buttermilch-Melasse-Experiment entwickelt, was zu einem starken CO2-Anstieg auf bis zu 1500 ppm geführt hat. 💨 Ich bin gespannt, wie sie sich in der neuen Umgebung entwickeln wird. Auf der anderen Seite explodieren die Frozen Black Cherries förmlich in der Hydroponik! 🌱 Die Entwicklung ist beeindruckend, und ich könnte nicht zufriedener sein mit ihrem Fortschritt. Die Blütephase rückt näher, und ich bin gespannt, wie sich alles weiterentwickelt! Ich halte euch auf dem Laufenden! 🚀
Week 4 is here, and things are going great! The Orange Sherbet is getting new soil this week—a blend of Bio-Beth All-Mix and Greenhouse-Feeding, setting her up perfectly for the final weeks of vegetation and . Additionally, the Orange Sherbet has responded well to the back yeast-buttermilk-molasses experiment, resulting in a significant CO2 increase of up to 1500 ppm. 💨 I'm excited to see how she adapts to her new environment. Meanwhile, the Frozen Black Cherries are absolutely thriving in hydro! 🌱 Their growth has been phenomenal, and I couldn't be more impressed with their progress. The flowering phase is getting closer, and I can't wait to see how everything unfolds! I'll keep you updated! 🚀

Likes
Comments
Share
@jporfiado
Follow
Las plantas se ven bien, me hubiese gustado que estén en una maceta mas grande. Intentare hacerlo esta semana aunque no se si sea lo mejor a esta altura.

Likes
14
Share
@Silvadragon
Follow
Greeting! She fine! Decide to do an early LST to start shorting the growing stages.


Likes
29
Share
@DOOBS_N_BREWS
Follow
Day 71- Starting week 7 of flowering with these 2 GDPS nearing the end! I have 2 different phenos but they both formed really dense sticky buds so kudos to MSNL for that. GDP A is a snowy gdp with slight purps but GDP B really shows the purple pheno well and the leave progression is really pretty cool. I will continue to go light on waterings and sledgehammer it 2 more times this week. 💪
Day 73- Another big flush for these girls. Its crazy to see both these plants side by side. I did the same training on each one and changed no feedings up but one obviously was very open and grew HUGE while the other grew very tight and compact but still very vigorously in its own special way ;)
Likes
7
Share
@Learntogrow818
Follow
Some deficiencies due to PH levels too high. Replaced with new PH pen.. Waiting on recovery, should notice difference by the end of the week.. Going to week 12.😓🎋
Likes
15
Share
@Plugged_Inn
Follow
This has got to be one of the best Plants i have ever grown. The Taste and Sweet smell is like A Starburst . Cherry , ice cream . Buzz is Smooth And very high but mellow . 10/10 👌

Likes
17
Share
@HowtoBubatz
Follow
We’ve now reached the third week of flowering, and I’m thrilled with how well my plant is doing!
I adjusted the nutrients recently, and it’s definitely made a difference. The plant seems to be thriving, and the leaves are showing a vibrant green, indicating that it’s getting exactly what it needs.
Even more exciting, the trichomes are starting to form all over the buds, and there’s no shortage of them!
It’s amazing to see so many trichomes developing this early on, giving the plant a frosty look already.
The overall growth is still going strong, and the buds are getting fuller.
I’m really happy with the progress so far and can’t wait to see how things continue in the coming weeks.
I hope this nutrient adjustment keeps everything on track for a great harvest!💚🌱
Likes
24
Share
@Mr_Awesome_Badass
Follow
Wow this week was nerve-wracking. Her roots were well into the toilet part of the pot so it was time to remove all the soil and manipulate the roots for exposure later during the big reveal.
Fingers crossed the makes it. Her being an auto it will stress her into flower but that's okay it's a cannabonsai they are supposed to be small. She still has a couple weeks of growth still so it will be just fine.
The other plants in the shed are getting flipped to flower this weekend she I've put her in the tent with her sisters. Sorry about the blurple but hey.....it is what it is right?

Likes
8
Share
@HitMan_DW
Follow
I'm glad I found GD it's helped me asking the prices of this very First Ever grow... plug.. I learned allot and have started germinating my next set. On to the next One/Week...


Likes
4
Share
@GERGrowDesigns
Follow
Welcome to Flower Week 1 of Divine Seeds Auto Black Op1um
I'm excited to share my grow journey with you all as part of the Divine Seeds Autoflowering Competition 2025. It's going to be an incredible ride, full of learning, growing, and connecting with fellow growers from all around the world!
For this competition, I’ve chosen the Feminized Automatic strain: Black Op1um
Here’s what I’m working with:
• 🌱 Tent: 120x60x80
• 🧑🌾 Breeder Company: Divine Seeds
• 💧 Humidity Range: 50
• ⏳ Flowering Time: 8W-10W
• Strain Info: 21-23%THC
• 🌡️ Temperature: 26
• 🍵 Pot Size: 0.5l
• Nutrient Brand: Narcos
• ⚡ Lights : 200W x 2
A huge thank you to Divine Seeds for allowing me to be a part of this amazing competition and Sponsoring the Strains. Big thanks for supporting the grower community worldwide! Your genetics and passion speak for themselves!
I would truly appreciate every bit of feedback, help, questions, or discussions – and of course, your likes and interactions mean the world to me as I try to stand out in this exciting competition!
Let’s grow together – and don’t forget to stop by again to see the latest updates!
Happy growing!
Stay lifted and stay curious!
Peace & Buds!
Likes
Comments
Share

