
Likes
Comments
Share


@PEANUTBUDDA
Follow
I'm still working out how much water to give, and I've probably under watered. The heat wave has driven the temps up, but these plants are still growing.
Started flowering around day 23. Tied them down to try to get more light to the lower flower sites.
Still haven't decided what to feed during flower, other than Big Bud. Any recommendations are welcome!

Likes
12
Share


@Gram_Solo
Follow
Week 1
Russian Doll - Kannabia
We had a bumpy week with bad soil,
But the comrades pulled through and we have 2 fresh up and running!!
2 more could be en route also tomorrow
Keeping humidity high and light on 30% veg setting
We have lift off!! Here we go!!! 🔥🔥🔥

Likes
4
Share


@Angelgrows
Follow
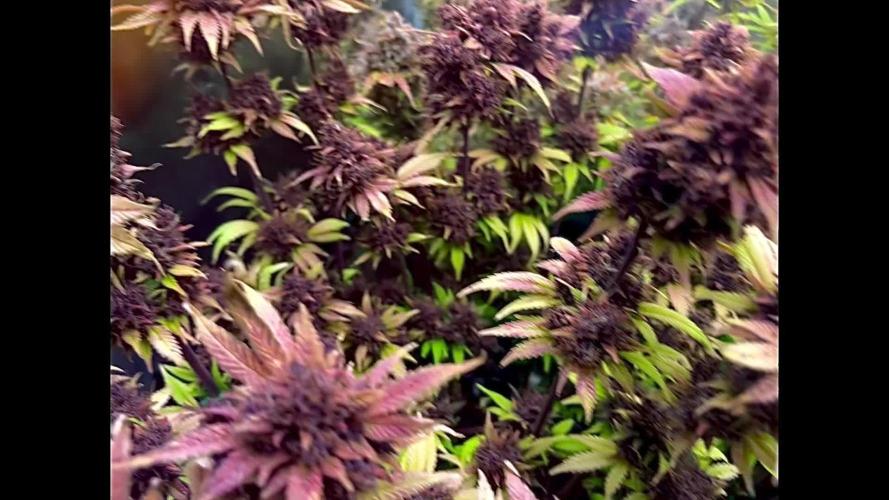
She smells like straight cake! She is super sweet smelling and I can’t wait to try her :) I’m gonna let the main colas cure for a few days but for the rest I’ll be smoking it without curing and so far it’s really good and has me pretty high lol
Likes
6
Share

@CadillacGreen_420
Follow
Week 13 – Ripening is now progressing slowly, as I had expected, due to my choice to provide a light stimulus that isn’t too intense but rather gentler. From flowering until now I’ve maintained 30 DLI and a steady 470 PAR.
In this run, the goal has been to keep the resin thick and sticky. Humidity has been kept between 57–62% max. My lamp is an Omega Pro 300W, which I’m currently running 37% (111 W).
This strategy seems to be working well: resin production has been abundant, and on this point—and not only this one—I’ve completely fallen in love with Gorilla Cookies.
The aroma is exquisite, and the resin… the flowers are covered in ointment-like resin.
The macro shots of the trichomes still don’t show any amber heads, so I believe harvest is probably about 10–15 days away. 🍮🤤
I think I’ll grow only Gorilla in the next run! 🦍👀
P.SThe leaf discoloration happened very quickly! The previous photos are from yesterday when it was still green — today it looks like this. Really interesting

Likes
2
Share


@51sGarden
Follow
Posting this as I’m on the last few days of the 3rd week from germination
Great progress, a lot of roots for such a short period but not too much plant growth, will start watering daily instead of watering every 2-3 days
Topped the girls today (Day 18 from germ) and starting to do mainline on all the Bubba kush.


Likes
14
Share


@J_diaz420
Follow
Mucha humedad vía foliar
primer riego con fertilizante día 8 dosificación muy leve 👍🏻
Likes
40
Share


@SubliminalSociety
Follow
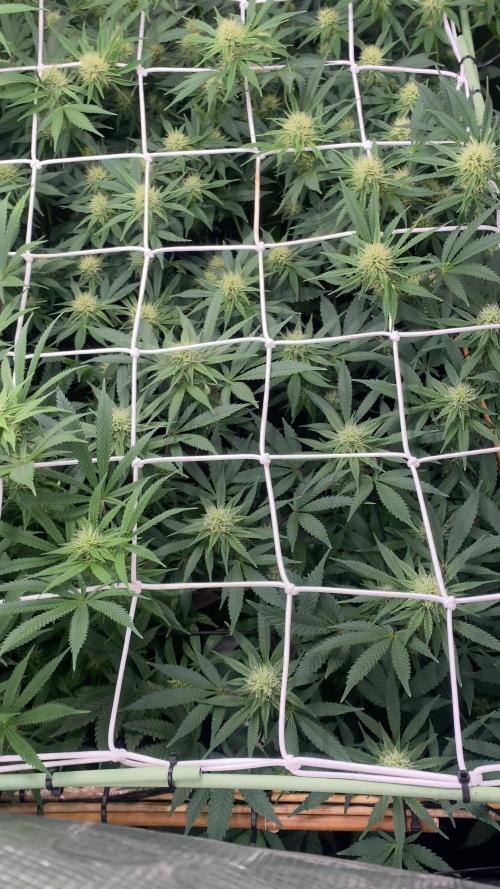
Week 27 - 1 week til harvest
She's so pretty! The colas are really swelling up and looking nice. The weather forecast is looking good for the next days after that we'll get some heavy rains and storms. The wind is already strong but due to my radical defoliation, she's unaffected. So enjoy her beauty one last time. Next week we're going to CHOP!

Likes
20
Share


@MrWolfe
Follow
These lights are a bit hot so I’m gonna upgrade to my Luxx 645s for the rest of this run.


Processing
Likes
71
Share


@ThrashedTV_BakedByGlaze
Follow
Week 1 - 01/01 to 01/08 2021
HUGE THANKS TO @MARSHYDROLED and @VIPARSPECTRALED!
New surge protectors/heavy duty timers/the good cords.
The Purple Lemonade by @Fast_Buds is right on pace, way larger than the LSD-25 next to it but that has to do with genetics. Will give it a week or so for it to really settle in with a root base before cleaning out my 5gal RootPouch pots from the last grow and getting them transferred into their final homes.
I have all my seedlings under the P1500 from Vipar as my veg light for the first few weeks to a month. It's SO nice to not have a blurple anymore, the light is way better in my room and on the eyes. The new diodes had every single seedling grow more in 6 hours than it did in the first 7 days under the blurp LED. The Purple Lemonade sprouted its second set of leaves by the time I woke up from my nap 😂
I noticed a bit of spotting on the Dark Devil in my other diary so I added some Hydrogen Peroxide to the spray bottle and it cleared up. All four have been getting constant spritzing from the spray bottle to keep humidity up.
Have no doubt the new lights will make the plant/overall yield.
Thanks for stopping in! Throw down a like and/or follow so i can return the favour 🙌
--
Check out my Diary of the Year 2020 entry 🙏
https://growdiaries.com/diaries/54258-fastbuds-original-auto-sour-diesel-grow-journal-by-glazedgrow
IG: @GlazedGrow
CannaBuzz: @GlazedGrow
Likes
144
Share


@1Right_Angle
Follow
July 4th
- safely into week 7. Solid growth and development to this point. Lets see how she stands up now that the pattern is laid-out
- last fed on the 30th; 1gal
- next meal is from the Water part of the food cycle; nute - nute - water
- amended the soil with 2” Worm Castings, scratched it in to the soils surface
- pulled a set of leaves off of each branch, exposing the middle nodes. New growth on each branch. Here we go!
July 5th
- rain has fallen, and the plant was partially protected. Wait and see if it has affected tonights Dinner. We are in the water portion of the Meal cycle; Nute-Nute-Water. Posted above
- compost is ready after months. Leaf / Soil mix added to the pot at dark.
July 7
- fed 1 gal of a Grow Microbe, Enzyme and Molasses-based dinner. Full list of ingredients Posted above
- this week is proving to be instrumental in Establishing the shape and kicking the growth into Gear !!! Chunky dinner had to be diluted… lol grow buddy grow
- someone asked about the LST techniques I use: wire, branch bending etc. Inposted 2 quik videos on how the Cali Crasher had acquired and held those curves
9th
- I saw an opportunity to make one more similar move on the plant, with the same style of LST training. Once again I extended the 6 upward facing branches, straight outward; first thing this morning.
10th
- fed 2.5 Litres of Nute cycle. With Grow Microbes oops, looks like we make the water-meal, Next

Processing
Likes
12
Share


@MrRaid
Follow
Day 22 white pistils 👍🌱 only had root juice and bio grow gonna remove root juice and add molasses this week at one teaspoon per litre
she shows that shes not hungry no nute burn yet small signs that she can do with abit less nitrogen I'm not gonna lower my nitrogen at the sametime I'm not gonna up it either she been getting 1l feeds every 48 hours gonna up it to 1.5l keep an eye out for next update 🌱🧞♂️🍾🕹️🎮
I've been training her LST since day 14 and folding looks like shes gonna have some good bud sites 🍾🧞♂️ I've put the light schedule to 20on 4off so he can get rested during flower keep the stress down to a minimum 🤓
Likes
29
Share


@gottagrowsometime
Follow
Welcome to my Slurircane Diary sponsored by MSNL & Spider-Farmer
Week 7, early flip and attempt at reveg into early week 8 but decided I liked the look of her cola potential and decided to throw her into flowering. From the reveg attempt I thought a ratio on/off would be best if it leaned more on the off, so a 13-11 off / on was set for early week 8 and till fattening (when the stretch is over, 'pre flower)
This is a bit of a weird one for me, well more a 1st. I'm not 100% sure. But I do remember this getting 3 13.5hr days as did my whole tent. As my cheap timer ran for an extra hrs off when it was meant to be on. So, put it into a flip. And I tried for over a week to reveg, I'm sure if I pushed on. I would of gotten to reveg. (I'm not sure how long it takes, am very pleased though with this spectrum even without the IR that the flip time is quick. So, after a week 7 was finished. I decided to push on to a 13-11 off/on to induce her. I'll increase it to 13-11 on/off in fattening. Sadly has the pre flip and then attempt at reveg make all her nodes very stiff. And near to LST. After pre flower I'll hard defol and attemp to distance the colas. Surprisingly with her been a dom indica her leafs are very Stavia style. Very thin. Would make an ideal candidate for scrog. She is very healthy and been the most responsive with co2/heat. Although growth was stalled from my reveg attempt, I'm sure i cut a good few CM from her Height by reversing it again. I should of looked up how long it takes to reveg 1st. Lessons learnt. I still have an amazing pheno. (I'm a few weeks ahead in Real Time)
Defoliation
So, this was done lots on this girl. As my plans for her were changed due to poor attention. So, start of wk 7, what I thought was still a few weeks out from me flipping. But, after my abandoned attempt of reveggin. She was in limbo and I decided to risk it with a hard defoliation. (Looks like it was done in pre flower, it wasn't, It was just coming back into veg, but would of taken weeks to get it growing fully again, and at looking I'm happy with it so I pushed again with my Defol to get colas. You can find this on grow weed easy "full tutorial for flowering") am gonna leave her now until she's out of pre flower, she's 35cm or so tall. I don't see putting on much height. As my reveg attempt will for sure hanmer her stretch.
Diet
Was planning on taking Alga Grow off for the last 10 days r so off grow. So, I only had a few days off it, and its on Alga Bloom now.
Thanks to my sponsors from MSNL & SPIDER-FARMER. Just harvested the GranDaddyPurple Auto. (BEST AUTO I'VE EVER GROWN SO FAR, TASTE, SMELL & STRENGHT BEATS ALL PAST AUTOS, BUDS DOWN) will be uploading the weeks on that soon. I've too many diaries. I knew this. So, I plan to do 2 wk updates at a time for 70% of my diaries, so pics and info will be added as those it was a weekly update. Also, I don't put up a harvest wk for a month until the cure.
Thanks to my sponsors from MSNL & SPIDER-FARME, look forward to working with your more. And trying a lot more of your products. #convert.
Much appreciation to all ppl who stopped by and did your thing. Look forward to seen your work if I know you dropped by of course. Either way. Thanks for stopping by

Likes
16
Share

@Diips
Follow
day 29 - 11/12/2025
all looking fine in the tent. didnt have time this morning to feed/water, but i will do it later today once i get home. they will take it, and leave less chance of mold.
stacking nicely, i will gradually raise the light intensity as the days go, to buildup for max intensity.
bless


Likes
9
Share

@BlackForestGrower
Follow
It was a great last run.
It’s been a beautiful time.
My time here done now.
BlackForestGrower out. 🌲✌️

Likes
4
Share


@AustinRon
Follow
OG 4Q24 Flower Week 9
Orangegasm (Fem) [ IRIE Genetics ]
12/12 @ Bolt (Day 21)
Germination: 20 November 2024
#3A Earliest Harvest Date: 9 February 2025
#3B Latest Harvest Date: 19 February 2025
_________________________________________
Start of Week: [Wed Feb 5, 2024 CR2 4Q24 57:F:8:1]
End of Week: [Tue Feb 11, 2024 CR2 4Q24 63:F:8:7]
OrangeGasm Fertigation:
- MAX: EC: [ 2.4, mS] #Ramping Down
- LightIntensity MAX: [ 850, µMol/m2/s]
______________________________________
OBJECTIVES
- Ramp EC from 2.4 - 1.0
- Start rolling off Primer A&B/Silica Skin to Resin Bloom . . .
__
Wed Feb 5, 2025
OG 4Q24 57:F:8:1
EC: 2.3
Notes:
#5 looks like a 60 day plant, if so - consider Saturday Harvest …
Runoff
- [x] Amount: [ 0.125 , gal]
- [x] EC: [ 4.4 , mS/cm]
- [x] EC∆: [ 2.5 , mS/cm] # Fried Yet? ;-}
Harvest Dehu
- [x] Amount: [ 1.5 , g]
__
Thu Feb 6, 2025
OG 4Q24 58:F:8:2
EC: 2.3
Refresh Reservoir
- [x] Amount: [ 2 , g]
- [x] EC: [ 2.3, mS/cm]
- [x] Primer A&B: [ 31, ml]
- [x] Silica Skin: [ 15 , ml]
__
Fri Feb 7, 2025
OG 4Q24 59:F:8:3
EC: 2.3
__
Sat Feb 8, 2025
OG 4Q24 60:F:8:4
- [x] Disassemble, Clean Reservoir and Pumps, Reassemble
Refresh Reservoir
- [ ] Silica Skin: [ 15 , ml]
- Dropping Silica Skin due to (sparse to medium) granular precipitate
- [x] Amount: [ 6 , g]
- [x] EC: [ 2.1, mS/cm]
- [x] Primer A&B: [ 100, ml]
EC: 2.1
@1900 - Clear Manifold Filter. (Mainline should be cleared on 1845 feed
__
Sun Feb 9, 2025
OG 4Q24 61:F:8:5
- [x] Dilute to EC 2.0
- Flooded Tent, 2 Gallons PLUS of Runoff. Happy Plants.
- Shout Out Shop-vac. ;-}
EC: 2.0
__
Mon Feb 10, 2025
OG 4Q24 62:F:8:6
EC: 1.8
HAND APPLICATION
Prepped One Gallon of 12-8-7-5 @ 1.8 mS/cm w/ PhotoSynthesis Plus, SLF-100
Reclaimed Dehu Water, ~2 Gallons
Refreshed Reservoir, 2 Gallons Rooted Leaf Hydro no Silica Skin, EC: 1.8 mS/cm
Reduced watering to 5 min, then 1 - 1 -1 -1 -1 -1 -1 -1
(It’s not like they’ve been under-fertigated)
__
Tue Feb 11, 2025
OG 4Q24 63:F:8:7
EC: 1.7
- [x] EC: [ 1.7, mS/cm2]
- [x] Refresh Reservoir
- [x] amount: [ 2.5, gal]
Runoff
- [x] Amount: [ 0.5, gal]
- [x] EC: [ 3.6, mS/cm2]
- [x] EC∆: [ 0.9, mS/cm2] # Better than 2.5!
PLANT POSITIONS
3 5 1 7
4 2 6 8

Likes
10
Share


@AZMamaBear
Follow
In the beginning of the week she was standing a bit crooked. I will be mainlining soon and I want her central stem to be strong. So I tied her stem to a chop-stick to do a bit of low stress training prior to topping her.
Also hit the hydro store and picked up some Fishsh!t and Recharge. Added that, worm castings and some Down to Earth dry amendments to brew up a compost tea. Gave her a big sip on 3/4.
Likes
85
Share


@Grey_Wolf
Follow
Hi Everyone I hope you all had a wonderful Christmas I know I did 😀 The Peyote Wifi growing in my Super soil mix is getting fairly big now and still has a long way to go.
Where I'm based at the moment the days won't be short enough to induce flowering until February!! That means atleast another 6 or 7 weeks of veg still to go then 10 weeks of flowering. 😲 I have ordered the Blooming supplement from Dr Greenthumbs that is reccomended for Heavy flowering plants like cannabis.
Although the super soil should still have plenty of available nutrients by the time flowering starts it's reccomended that you add the blooming supplement which gives a
rapid boost of P & K to the girls right when they need them. However I wont be needing the booster for awhile yet so in the meantime I'll make up a brew consisting
of fresh worm castings from my worm farm and Black strap mollasses. This will bubble for 3 days and then be fed to my plants along with 1 scoop of Great white Mycorrhizal
powder per plant. Remember if you treat your soil as a living organism then it will remain in top condition and pass on it's health to your growing crop.
Thankyou For looking in on this weeks update please leave a like and I will be back next Year 😄 👊


