Likes
Comments
Share


@herewegrow
Follow
Day 15 - Transplanted WWxBB 1, and SB 1 & 2 to Roots Organics Original in 5 gallon pots. It went smooth and they all perked up pretty quickly. WWxBB2 could use some more time to develop its roots but no more than 2 days until she gets transplanted too.
Day 17 - Transplanted WWBB2 this morning so now all 4 ladies are in 5 gallon pots. Watering .5 L every about every 3 days but will need to gradually increase the watering amount with the root development. Keeping an eye out for topping time!
Day 19 - Starting to see some slight discolorations on a few leaves. Seems too early for the soil to be running out of nutrients and my pH has been consistent as far as I know. Thinking about trying a light does of some FF nutes if it persists. WWBB1 is almost ready for topping.

Likes
22
Share

@TrickzGrowz
Follow
Sehr dunkle Blätter. Sehr frostige Buds. Langsam erkenne ich, dass sie bestimmt kein Highyielder wird. Aber krass wie viele Trichome zu sehen sind!

Processing
Likes
14
Share


@Fre_84
Follow
The three plants are doing well. Fat Banana with topping has recovered strongly and continues to grow. Fat Banana without topping is unstoppable.
A little defoliation applied. Northern Light is now a bonsai! :D
Northern Light - Bloom status - 24/25 cm 08/17 * 08/21 30 cm * 08/24 36,5 cm * 08/27 40 cm
Fat Banana with Topping - Bloom status: 15 cm 08/17 * 08/21 - 22 cm * 08/24 27,5 cm * 08/27 32 cm
Fat Banana no topping Bloom status: 20 cm 08/17 * 08/21 - 30 cm * 08/24 - 35,5 cm (small defoliation) * 08/27 40,5 cm

Likes
6
Share


@sleekneek
Follow
Temps got to 88 degrees as the highest. Night time temps ranged from 70-75 degrees. Leaves show small nutrient burn but nothing major. Still green. Bottom leaves are somewhat yellowing. Light defoliation at the beginning of week 3
Likes
Comments
Share


@cowstick
Follow
Start of Flower
Ppfd avg. 700
Soaked pot until saturated.
Started my Flower Foliar Spray right before lights out. I will Spray plants once a week for 4 weeks of Flower.
Foliar Spray Recipe per 2L as follows:
All Advanced Nutrients Products.
4ml Bud Ignitor
4ml Nirvana
4ml Bud Factor X
10ml B-52
Midweek update.
Second round of foliar spray. Ladies loved the first round, went with a second. Ill do this twice a week until I'm through week 4 of Flower.
Video is right after I sprayed for the 2nd round at 15 mins before lights out. Don't want all the foliar spray burning the ladies now do we.
Likes
10
Share


@Garamantes
Follow
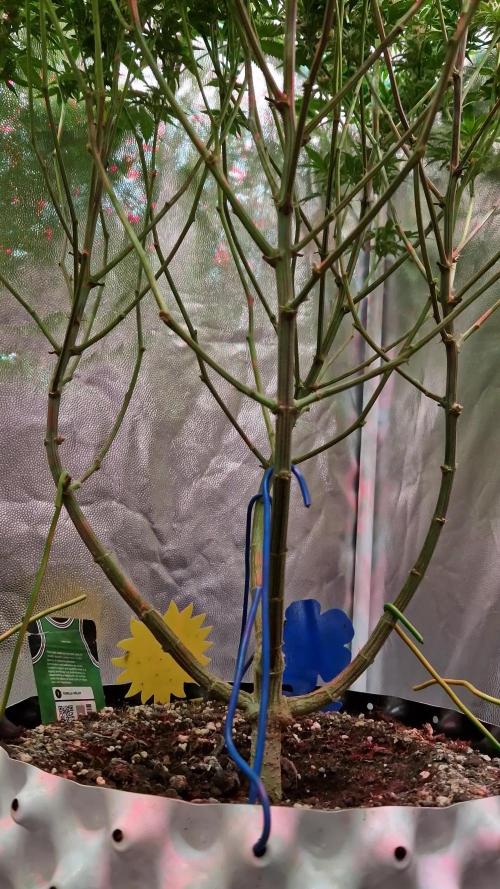
The plants are large enough for low stress training I also decided to add advanced nutrients three-component fertilizer ph perfect
As you can see in the main photo, the lower branches are small and underdeveloped due to the lack of light in the greenhouse
I therefore decided to bend the plant more than is healthy in order to achieve greater development from the lower branches
I noticed that some plants are small and undeveloped, and I saw holes and moles
It was clear that something was eating the roots of the plant from below
While working on low stress training, a mole ran out of the hole and started burrowing to another plant
I really like animals, but I had to quickly decide what to do with the mole
I pinned him to the ground with my foot and stuck a stick behind his head :( that I have as a support for low stress training
I'm very sorry for the mole, I've never killed such a big animal...
May mother earth forgive me...
The next day I saw a vole crawling into a hole near a plant, so I decided to buy a mouse trap
I put a carrot in the trap and the hunt was successful
I am the alpha predator in my garden...
At the same time, while digging holes, I saved about 20 caterpillars that fell down and could not climb out
It turned out that caterpillars are a very rare butterfly that almost never occurs
I really like butterflies, when I take a picture of them on my plants I attach a photo from last season
Likes
7
Share


@Jays_Not_Here_Man
Follow
Not a whole lot of height this week, but some nice leaf development. I may have overwatered them and slowed their growth, we’ll see how they progress 🇨🇦❤️🌱😎💨
Likes
48
Share


@pifflestikkz
Follow
Day 22
22/07/24 Monday
Nothing new to report. Starting to see them beautiful fans appear that's all 😁✌️
Day 23
23/07/24 Tuesday
Feed today, giving her straight all nutes Inc flowering nutes.
I will update the dose as they grow and develop a bigger hunger.
Video updates 💚
Day 24
24/07/24 Wednesday
She was doing a climb, so I have topped her today 😁 she's strong I'm sure she will recover well 🤞
Day 26
26/07/24 Friday
Plain de-chlorinated tap water pH 6 today, 1L.
Day 28
28/07/24 Sunday
Feed today with De-chlorinated tap water pH 6.
She is showing recovery from topping now.


Likes
2
Share


@CadillacGreen_420
Follow
The plants are developing really well! I’m happy with the uniformity I’ve achieved. It didn’t take much work to get it — the growth is compact and moderate in height, exactly what I was aiming for given my available space.
The risers under the pot helped the MilkyWay F1, which is in the smaller pot, while the other three Apollo F1s have shown good overall genetic uniformity, even though, as I mentioned earlier, one of the three is the overachiever 🤓
Apollo #3 is richer, more productive — it’s got an extra gear.
The scent is starting to express itself more clearly for all of them, with delicate, floral top notes reminiscent of linden and jasmine, and deliciously fruity undertones. For now, there’s little lingering scent — no skunky smell at all.
Likes
6
Share

@Lombardy11
Follow
Zdar Bando .
Začínám 6 týden a holky nabírají hezký na objemu.
Hnojím podle deníku 2ml/l od všeho a myslím si že už je to na hraně.
Všechny dostávají stejně 3l akorát jedné se něco nezdá.
Možná už je na ní moc hnojiva.
O proti těm dvoum je pozadu a má menší paličky, při další zálivce změřím ec a uvidím, jestli bude velký rozdíl tak uberu něco na 1ml/l.
Už se těším na výsledek 😁.
Tak další hlášení za týden .

Likes
23
Share


@KarlysCannabis
Follow
Got them in pots on Wednesday, they're happy and growing like crazy. I buried them deeper in the 5g so they're growing out more than up right now. Getting hard to regulate temp and humidity in that tent as it's colder outside.
Likes
20
Share


@Frank_cultiva
Follow
Las hojas están con manchas, creo que fue a causa del último riego con nutrientes, no fui cuidadoso y llegó de esa agua a las hojas... A causa de eso también quiero prevenir una sobrefertilización y está semana he decidido no regar con nutrientes, sólo con Bio up para subir un poco el pH del agua... A pesar de las hojas con manchas creo que van bien con el crecimiento teniendo en cuenta que esta es sólo mi segunda experiencia cultivando.
Se me olvidaba mencionar que las pasé a su nuevo hogar esperando un mejor desarrollo para ellas

Likes
2
Share


@Comfrey
Follow
Drei Eiswasser Spülungen und etwas kühlere Nachttemperaturen haben zwar etwas an der FarbeRichtung bläulich geändert, allerdings blieb das erwartete Purple vollständig aus.
Die Blüten sind sehr klebrig und der Duft ist deutlich aber nicht besonders intensiv.
In der letzten Woche habe ich einige männliche Blüten heraus geknipst und mir sind auch ein paar Samen aufgefallen. Das selbe Problem hatte auch meine Hindu Kush.
An Tag 97 habe ich die Pflanze nach 48 Stunden Dunkelheit abgeschnitten und kopfüber aufgehängt.


Likes
6
Share


@rvabudman
Follow
Graduated, and am off from work for a few weeks, so went overboard on photos. Plant is doing well, leaves are starting to turn yellow (strain trait).
Can't wait for the harvest and being able legally gift my xmas ornaments to my cousins during our "cousins walk" at our family xmas party.

Likes
14
Share


@ScouseCityLX
Follow
Week 7 we can see the beauty behind exotic genetics creation. Strawberry candy terps present heavily at this point.
Likes
33
Share


@Lou_Grows
Follow
So today I started the flush, is the first time I used a product to flush, I have read and basically, the community is split in half about to flush or not to flush, I will see first hand if actually flushing creates a better quality.

Likes
45
Share


@Bud_Spencer
Follow
Hi Grower!
Day 101 Complete
Flower 57
Wow shit the time goes fast now!! Yesterday was the last day with nutrients!!! She looks bombastic and im sure this is a top smoke!! I think she have the last 7-10 days
follow me on Instagram for the best Shoots of all my Strains: bud_spencer_of_herbs
Grown under Spiderfarmer SF-2000
When you want to grow with the same professional Equipment then Checkout this Link
https://www.spider-farmer.com/?ref=budspencer
Discount Code: Budspencer420

Likes
1
Share


@Pestitel
Follow
Amazing experience with the Mix Pack, I will try it again next summer for sure. Love the variety.