
Processing
Likes
Comments
Share


@710_Squish
Follow
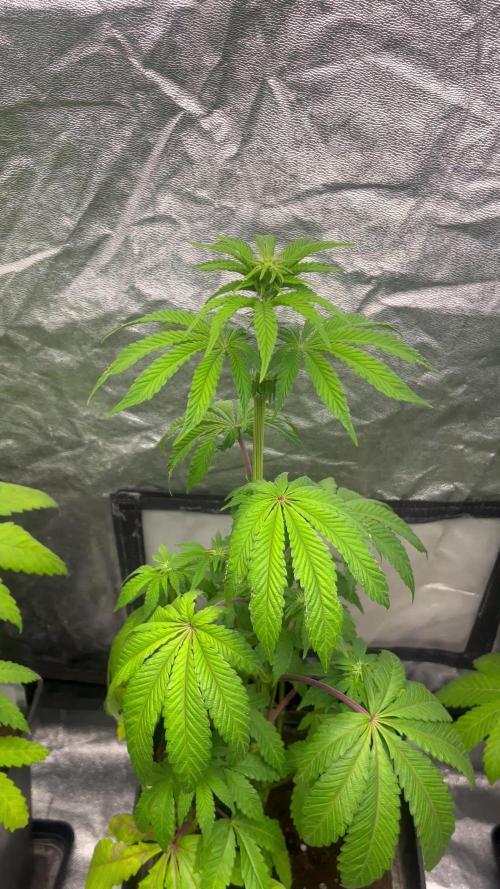
I don't think she is in full flower yet but well on her way. She has taken all the lst and defoliation I throw at her. I added a silica additive since I want this lady to have superman stems to take my torture.
Day 32 - She is really drinking a lot right now. I had to water earlier than expected and will also increase the amount I am giving.

Likes
17
Share


@Elmobud
Follow
So this week I have started to flush the girls as its been 10 weeks now so after another 2 week of flush that's 12 weeks surely they have to be ready but the hairs are still pointing straight out and are still white which is abit weird as this strain is supposed to be a 8 week strain 🤔, Happy Times Happy Growing 😁 🌿


Likes
10
Share


@DyadyaAsya
Follow
1 day of the year 2022! :)
--------
20 hours, glass of water in a dark space.
PH 6.05
EC 0.33
After 20h I'll place the seed into the paper towel.
day 2
--------
after 20h I placed:
seed -> wet paper Towel (liquid from glass) -> added Great White -> placed Towel to the plastic bag -> wrapped in foil -> put in a jar for 2 days (dark place)
day 3
--------
coco buffering by BioBizz CalMag 3.5 ml/l (10L )
The humidity and temperature sensor stop working. Ordered new one
day 4
--------
received new T/H sensor.
Something wrong with new sensor, short circuit of temperature electrical line.
Ask my friend to repair....
day 5
--------
Start of Vegetation period.
Placed seed to small pot.
watering AN Base A + B (0.33ml/l), Voodoo(0.33ml/l), Great White (1/4 tsp)
Manual temperature control, to many activities....
day 6
--------
The plant sprouted from a coconut in 1 day!
watering AN Base A + B (0.33ml/l), Voodoo(0.33ml/l), Great White (1/8 tsp)
Manual temperature control, to many activities....
day 7
--------
My friend finished repair of T/H sensor, I installed it back to the stealth box, everything wok perfect!
Very low H inside the box, around 25%. humidifier from china was broken a month ago :)

Likes
14
Share


@ScouseCityLX
Follow
Week 9, some of the most exciting times during flower, the final stages, all the hard work is done, now it's just waiting for harvest.

Likes
42
Share


@FlorChaquena
Follow
Semana 10 - desde 27/12 hasta 03/01
*Luna Nueva el 02/01*
27/12: hoy realicé aplicación foliar Jabón Potásico. 1L con dos tapitas de producto.
28/12: hoy aplique Top Barrier. 10L de agua con 5ml de producto. Encontré muchas chinches chicas, se nota que salieron del huevo hace poco tiempo, máximo 2 o 3 días. Según me dijo un amigo Top Barrier ayuda mucho al transporte de nutrientes dentro de la planta… veremos que sucede ya que el 30/12 debo fertilizar fuerte con Top Veg y Green Explosión.
30/12: hoy tocó fertilizar con Top Veg y Green Explosión. 2ml+1ml x 1L de agua. En total apliqué 17lts de agua con producto y 5 litros de agua sin producto. El fertilizante lo apliqué con un riego por goteo improvisado; leí en internet que con la manguera para suero hospitalario se puede improvisar algo útil. No hay rastros de plagas por el momento. También ajusté los hilos de varias ramas. Ya que es mi primera vez cultivando una planta en suelo, me surgen dudas, hasta cuando debo seguir atándola? Es conveniente cortar en esta luna nueva los brotes internos mas cercanos al tallo?
01/01/22: hoy es la noche previa a la luna nueva. A las 18.30hs regué sólo con agua, directo desde el grifo. Regué el suelo y las hojas. Increíble lo vigorosa que se la veía después del riego.

Likes
37
Share


@GrownwithLED
Follow
In week 6 my HOMEBOX growtent has filled up so much, that I need to defoliate the plants. I take them out one by one and take off all lower branches (that dont get enough light) and all leaves of the lower part of the plant. I also take off most of the bigger fan-leaves of the top part of each plant, so the light can penetrate deeper into the canopy. I also add stakes and a plant-holder-ring to each pot, so the bigger plants are supported for better growth. You can see the difference in the BEFORE AND AFTER pics above. Two PURPS-plants from BC-BUD-Depot turned out to be male and have been discarded. Into one of the empty spots I put a small plant of BLUE MINT from Mountain High Seeds as replacement. The other spot stays empty. I simply put a tray into the open spot, so the water is not in the light and no algea grows in my autopot system. The watering via the Flexitank-reservoir works very well. Once a week I fill the reservoir with water mixed with BIO NOVA nutrients, following the SOIL-CULTIVATION schedule of BIO NOVA. Since the EC of my tap water is very high (comes out with EC=1,0 already) I can only add a lower amount of nutrients, therefore I use the BIO NOVA schedule at HALF strength. My babies LOVE the light from the EVO4-120 LED-fixtures from SANlight, they THRIVE under it! At this stage my two lamps are dimmed to 80% (=two green lights are ON, on the dimmer at side of lamp) and hang at a distance of 30 cm from the top of the plants. Now after the defoliation the airflow through the tent is much better and the light can also get to the lower parts of the plant. This way the flowering can continue with an enhanced grow of the buds.


Likes
2
Share

@eldruida_lamota
Follow
Que pasa familia, vamos con la segunda semana de floración de estas Barcelona Puff feminizadas de Seedstockers.
Vamos al lío ,se trasplantaron en macetas de 7 litros definitivamente.
El ph se controla en 6.0 , la temperatura la tenemos entre 24/20 grados y la humedad ronda el 50%.
El ciclo de floración puse 12h de luz, el foco está al 50% de potencia.
De momento van creciendo a buen ritmo y tienen un buen color, estaban muy bien enraizadas al realizarle el trasplante se notaba la abundancia radicular.
E de comentar que están con un pequeño estrés hídrico por baja temperatura pero estoy al tanto, a ver si recuperamos rápido.
Agradecer a Agrobeta por el envío del kit gold series para la temporada 🙏.
- os dejo por aquí un CÓDIGO: Eldruida
Descuento para la tienda de MARS HYDRO.
https://www.mars-hydro.com
Hasta aquí todo, Buenos humos 💨💨💨
Likes
2
Share


@Mr_nugs_lover_David
Follow
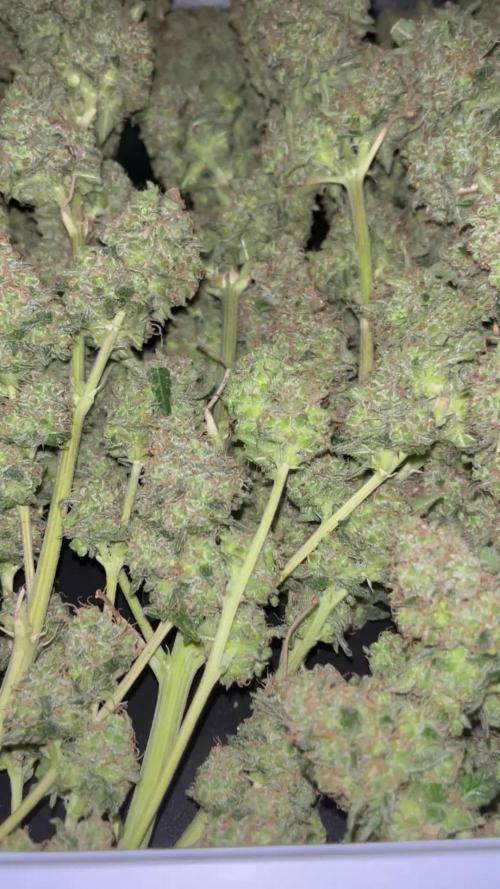
The nuggets are very sticky and compact, they are frosty as hell and the aroma is very strong already. I loved this strain. She's such an amazing autoflowering strain. Very powerful.


Likes
56
Share


@MrGrow
Follow
11.10.2022
130 giorni dalla germinazione al raccolto
70 giorni di fioritura
Raccolto insieme alla maggior parte delle altre varietà della tenda, alla fine della 10 settimana di fioritura.
Pianta forte, con rami allungati ma robusti, cime toste e appiccicose al profumo di skunk, formaggio ed erbe aromatiche
Ottima varietà questa Gushlava, ottima banca semi Nasha Genetics, spero che presto si possa far conoscere anche qua su Growdiaries.


Likes
5
Share


@TheGreenGroomer
Follow
Boom! We’re officially rolling into Week 2 of flower and things are looking dialed in across the board.
PPMs are sitting right where I want them, pH is locked in, and the PPFD is tuned to a T
Since the flip to flower, she’s been getting 3L of water each day, and she’s been taking it in perfectly with no signs of stress or runoff issues.
I did a heavy lollipop and defoliation about 4 days ago—cleared out a bunch of lower shoots and leaves under the canopy, plus some fan leaves up top that were covering bud sites and couldn’t be tucked.
Airflow is much better now, and light penetration has definitely improved.
The magnesium deficiency I had earlier seems to be under control. New growth is looking lush and vibrant.
She’s back on track and praying hard toward the light.
Really looking forward to Week 3 when the buds start forming and the magic kicks in!

Likes
15
Share


@the_big_pink_place
Follow
Everything is going good, this week covers from Dec.4 to the 11th. The plants had a major accident due to me not securing the light and not realizing my kids slamming the fridge would knock it free of the stand, leaves were burnt by led light but luckily the plants were praying and it just burnt the tips of the First Single leaves.


Likes
14
Share

@Rangaku
Follow
Time to chop the mad max she’s been stinking out my whole street 😂another mad strain this mad max from Dutch fem if you haven’t grown these guys genetics yet do ya self a favour and give em a go . It’s all top notch

Likes
16
Share


@Wizardgreen317
Follow
Great growth and , I really picked at the lady’s this week and crazy hydroponic store visit.. was a memorable start of the week . But yeah these advanced nutrients are really expensive and they do a great job just thinking bout switching back to hg and emerald harvest.. but other details this week is that they like the lollipop and de leafing. last day de leafing will be Monday morning . At the middle of the 3 week but to me more like beginning of week three cause I don’t count the first week in flower but yeah looking good great growth and I they smell pretty freaking good

Likes
9
Share


@Thaoneandonly
Follow
Missed a week posting. I feel like the buds are forming slow. I have a lot of leaves that are blocking bud sites but am hesitant to cut too much.
Likes
30
Share


@Ultraviolet
Follow
Hello 👋 and welcome back. I've been really, really stoned for a month or two. I do enjoy a good cleaning. No need to be rushing this one, I've got a lot of stuff to tweak in the grow tent. Give it a good scrub to boot. Added a bunch of organic amendments to the medium and reloaded mineral content. Giving it a few weeks to let everything break down, settle in, and balance out before beginning, I'll be doing a thorough pH and EC prior to placing anything in the final pot and making sure to give it a good till in the top soil once everything is broken down into more palatable size.
Organic fertilizer = organic matter that's still in the process of breaking down.
Mineral fertilizer = salt mineral that's already broken down and ready for uptake in its current form.
Synthetic mineral fertilizer = man-made minerals ready for uptake in their current form.
Synthetic concentrated fertilizer = man-made concentrates that don't exist in nature.
Adding this grow.
500g Horticultural charcoal.
454g Elite Shungite Coal (Fullerene C60).
1kg Spirulina is approx NPK 10%, 100g/1kg (N), 20% 200g/1kg (P), and 20% 200g/1kg (K).
In 1 kg (1000g) of spirulina, you can expect approximately 50 mg to 177 mg of Zeaxanthin.
1 kg of moringa powder, approximate NPK : 4.8% N, 0.5% P, and 1.9% K.
500g Azomite. (Ultimate mineral micro nutrient).
1kg of Gaia green 4-4-4, 1kg of 4-4-4 fertilizer contains 4% which is equivalent to 40 grams of each in 1000g.
500g eggshells, 20grams of calcium per 500g.
Generally, the more organic matter a plant breaks down, the higher the soil's electrical conductivity (EC) tends to be. This is because the breakdown of organic matter releases nutrients into the soil solution, which increases the concentration of dissolved ions that conduct electricity. Roots and microorganisms do not directly compete for electrical conductivity itself. However, they do interact in the rhizosphere, a zone around plant roots where microbes and plants compete for resources like nutrients and water, which can indirectly influence electrical conductivity. Plant roots release exudates (carbon) into the soil, providing energy and nutrients for microbes. In return, microbes can help plants access nutrients, particularly in the rhizosphere, where nutrient availability can be high. Both roots and microbes compete for the same resources, such as phosphorus (P) and iron (Fe). Factors like microbial decomposition of plant-derived chelators and the proximity of microbes to the root surface can influence this competition.
Carbon 60 (Fullerene) can enhance plant growth by boosting microbial activity in the soil, improving water retention, and even increasing plant biomass and yield. It's not a fertilizer, but rather a soil amendment that acts as an ideal companion product for fertilization programs. Studies have shown that fullerenes can influence soil bacterial communities and potentially activate processes like nitrogen transformation in the soil. Some research suggests that fullerenes can increase the availability of nutrients and enhance plant growth. Buckminsterfullerene is a type of fullerene with the formula C60. It has a cage-like fused-ring structure (truncated icosahedron) made of twenty hexagons and twelve pentagons, and resembles a soccer ball. Each of its 60 carbon atoms is bonded to its three neighbors. Shungite coal, particularly the "precious Shungite" variety, is known to contain fullerenes, with a higher content found in Shungite of category 3. The most common fullerene, C60 (also known as buckminsterfullerene or a buckyball), is a well-studied example.
The influence of water-soluble carboxylated light fullerene derivatives on the physiological plant state is not well studied.
The addition of Spirulina is primarily for zeaxanthin, as it contains a lot. But on top of that, Hawaiian Spirulina is cultivated in open ponds using a combination of 100% fresh potable water from Hawaiian aquifers and ultra-pure, deep ocean water containing all 94 trace minerals & elements. It is then gently dried using patented Ocean Chill Drying technology and cold-pressed to ensure maximum nutrient levels. Spirulina, a blue-green alga, is rich in nitrogen, phosphorus, and potassium (NPK), making it an excellent source of nutrients for plant growth. Studies have shown that Spirulina can be used as a biofertilizer, effectively replacing chemical fertilizers, especially for nitrogen with a whopping, NPK of 10% (N), 20% (P), and 20% (K).
Azomite needs no introduction; Just incase, Azomite delivers 70+ minerals and trace elements to boost BRIX, root strength, soil vitality, and yields. Micronized.
Moringa is a highly nutrient-dense plant, often called the "miracle tree" or "tree of life" due to its impressive nutritional profile and potential health benefits. It's particularly rich in vitamins, minerals, antioxidants, and other bioactive compounds, making it a valuable resource for addressing malnutrition and promoting overall health. Containing over 92 verifiable nutrients, Moringa oleifera is found to be the most nutrient-dense plant on earth. As far as we know this is the only place online where we list all 92 (and more) nutrients of the Moringa tree and we list all 46 antioxidants of the Moringa tree too. Deep in the Himalayas is a tree called Moringa oleifera, also known as the drumstick tree, and throughout the subtropics, this tree is cultivated for its amazing health benefits.
This amazing tree has the ability to grow in an array of conditions, and its health benefits are astonishing. The drumstick tree contains a staggering 92 nutrients and 46 natural antioxidants and as it also holds a number of anti-inflammatory compounds. The sheer number of nutrients found in this tree brings it to the top of the superfoods list, and in its native locations, it is said to have the ability to help treat more than 300 diseases and illnesses.
To give you an idea, just a single serving of the Moringa tree contains: 4 times the amount of calcium in the same amount of milk. More vitamin C than 7 oranges. Double the protein and 3 times the amount of potassium in a banana. It's high antioxidant levels can help fight free radicals, potentially slowing down the ageing process and promoting longevity. It is thought to be able to help lower cholesterol levels and regulate blood pressure, due to the high levels of niacin and vitamins B3 and B10.
A serving of 100g of this tree gives:
Over 8g protein
Over 400mg potassium
Nearly 450mg calcium
164mg vitamin C
738 ¼g of vitamin A.
Moringa also contains vitamins B1, B2, B3, B6, B7, A, C, K, E and D. Amino Acids: In addition, it contains various other nutrients, including the following essential amino acids:
Threonine – a nutrient that helps metabolism and prevents fatty buildup in the liver. It also aids digestion.
Isoleucine – good for a healthy brain and helps to give the body natural energy.
Leucine – works hand in hand with isoleucine to increase energy levels.
Phenylalanine – aids communication between the brain’s nerve cells and also helps to reduce hunger pangs as well as increasing alertness and improving memory.
Tryptophan – supports your immune system, and its mood boosting ability helps to beat depression and anxiety-associated insomnia. It also reduces the risk of heart attack and lowers bad cholesterol levels.
Lysine – aids the absorption of calcium into the bones, supports antibodies and regulates various hormones as well as inhibiting the growth of virus cells.
Methionine – provides the body with sulphur as well as helping to lower cholesterol. It also supports the liver, kidneys, and helps keep skin, hair and nails healthy.
Valine – helps to keep the mind calm.
There are other amino acids in Moringa too, which are not essential to the body but are still beneficial in supporting health. These include histidine, alanine, glutamic acid, arginine, cysteine, proline, aspartic acid, glycine, serine, and tyrosine. Moringa seeds contain oils that hold high levels of oleic acid, which may act to reduce inflammation.
https://amchara.com/detox-cleanse/92-nutrients-and-46-antioxidants-in-one-tree-maringa-oleifera/
4.8% N, 0.5% P, and 1.9% K. Moringa can also serve as a natural source of nitrogen, potentially replacing chemical fertilizers.
About 95% of the dry eggshell is calcium carbonate weighing 5.5 grams. The average eggshell contains about . 3% phosphorus and . 3% magnesium and traces of sodium, potassium, zinc, manganese, iron and copper.
1 ppm in water (mg/L) = 1 ppm in soil (mg/kg)
If you use 10 grams of 10-20-20 fertilizer in 4 liters of water:
Nitrogen: (10 grams * 10/100 * 1000000) / 4000 mL = 2500 ppm N
Phosphorus: (10 grams * 20/100 * 1000000) / 4000 mL = 5000 ppm P
Potassium: (10 grams * 20/100 * 1000000) / 4000 mL = 5000 ppm K
In summary, to determine the precise ppm of an NPK fertilizer, you need to know the specific weight of fertilizer used, the volume of water, and the NPK percentages. The general formula and example calculations can help you make these conversions.
Likes
66
Share


@UnorthadoxDude
Follow
Start of week 4, roots coming out of pot so have transplanted on day 22 into final pot.
Plant is pushing out node five at the moment.
Update week 4 day 2: A couple of days ago I dropped the PH to 5.8 from 6.3 and have added in Acti-Vera, a different Seaweed Extract fortified with Iron, and starting today Rhino Skin silica. Just look at the difference in the colouration of this plant in under 48 hours... wow.
Update week 4 day 2: I think I've managed to overwater. Not going to water today.
Update week 4 day 4. She is showing the same pattern as KKA 2 days ahead. After repot she is stretching out her main fan leaves, stem is thickening, and new growth appears everywhere.
Day 25.5 flushed with 30l of PH lowered water then fertigated with 5l.
Day 26: Height: 9cm Width: 18cm Nodes: 6
I have named her Bertha
Day 27: H9.5 W19.5 N7
Day 28: Fertigated 2.5l @ 15:00
.
Day 28: Photo and Measure 00:40 H13cm W21cm N7
Weekly growth data:
From 6cm Height to 13cm +117%
From 9cm Width to 21cm +133%
From 4 primary nodes to 7 +75%
Summary: Really good week for Bertha, she hasn't grown at quite the same rate as Karen, but she's not a million miles behind, I think she will have a big week 5.
Day 28.5: I have changed my mind about training and done a little gentle LST. Why? Well I realised I would have trouble with light levels and the younger plants... so I've decided to try and keep the older two from stretching too tall.
I realise this will mess up height measurements but it'll even out.
Likes
2
Share


@EtnoGrow
Follow
todo muy bien! esperando paciente el desarrollo de los cogollos, conociendo y viendo los puntos de maduracion asi como la fertilizacion ajustando a su maximo que creemos posible para incentivar que los cogollos engorden, ahora en adelante les hare segumiento de la grande principalmente, que es la que cumple con la edad del diario, ya que las otras como se explico en un principio venian recien cultivadas por eso tienen un par de semanas de retraso , tambien hay una hermafrodita, que al detectar como comentamos semanas anteriores aplicamos al tecnica vista de un cultivador mexicano, consistia en romper los brotes de machos las pelotas con el fin de que no vuelvan a salir, dejando solo los pelos estigmas de las hermbras, si bien el cogollo queda maltratado, al parecer se detiene el crecimiento, asi que estamos viendo como rinde ese experimento.
Likes
42
Share


@Ukfarmer420
Follow
Hi guys entering week 7 veg on the scrog grow of strawberry chemdawg og and blackberry moonrocks under the marshydro sp3000.
There very small considering there on week 7 🤔 but now i realised that my light has been on 25% 🤣🤣🤣 now its on 50% until nov 1st when I flip it.

