The Grow Awards 2026 🏆 


Likes
Comments
Share
@Bushleague_Botanicals
Follow
So… 12 cuttings, 2 are toast right off the bat. 3 have rooted, 1 of which was transplanted into 3 gal pot and the two 8 day clones will stay another day in the humidity dome in veg tent (now known as Planck). My flowering tent is called Einstein (don’t judge me!) 😂 I have the vs1000 at 25% in Veg tent and sf4000 at 100% in flowering tent.
I decided that I want feminized seeds from one (2) of these ladies so I’m going to pick two clones, one to get hit with colloidal silver to make pollen sacks and the other to get pollinated. Since both clones are female they don’t have the Y chromosome so they can’t make male seeds (although you could have a herm I guess and not know it. Maybe? Dunno) When the colloidal silver disrupts the plants normal flowering process it makes the plant make pollen sacks but doesn’t change the DNA of the plant so you are only getting XX from the pollen. And the recipient plant is also XX so the resulting seeds are only female. If I’m wrong please correct me…anyone!! What if I pick two clones from same mother?! Hmmmm. Also got to be careful to not pollinate the 7 in the flowering tent (Einstein). Plastic bags over the plant? Separate tent enough? We will see…
I’m naming the clones that root after famous female scientists I admire.
The first one is Ada, after Ada Lovelace, who was an English mathematician and writer, chiefly known for her work on Charles Babbage's proposed mechanical general-purpose computer, the Analytical Engine. (https://en.wikipedia.org/wiki/Ada_Lovelace)
The other two get named when they are transplanted.
For the 7 in the flowering tent it’s just hurry up and wait. Right?

Likes
32
Share
@krok464
Follow
Week 3 ( 28 Jan 2020 - 04 Feb 2020 )
29 Jan 2020, day 15
It's third week for my small grow room :) I'd say everything is fine, like 7/10 fine ;) One plant shows signs of a problem - leaves are twisting. Beside that there is nothing else to be worried about.
I also increased the light distance from the plants and reduced nuts a little. In the same time I switched the light mode to full spectrum. Hope it will do.
Done some LST as well, bended plants away from the light, hoping that it will affect their final height.
Now I'm running three humidifiers :D :D two controlled by higrostat, one on a timer. Keeping optimal Rh is a challenge here.
3 Feb 2020, day 20
Third week is comming to the end. Now it became noticable how much faster than other strains White Widow is :) It outrunned other plant : +speed autos, Cream Caramel and Old Mandarine with about twice their height ! :) It now is a challange to keep all the plants at the same distance from the light like the others. I will try to bend White Widow down a little next week :) Beside that, everything seem to be perfect. Wish me luck!
Will keep ya posted :) Wish me luck and may the luck be with you !


Likes
43
Share
@Master_weeda
Follow
Bonjour a tous les padawans et les maîtres jedis
Pour cette semaine 4 je surveille comme à mon habitude hygrométrie et arrosage. Je peaufine mon LST en stressant ma plante le moins possible. Je combine mon LST avec un pincage d'Apex cela me permettra d'avoir une canopé plus homogène donc une meilleure pénétration lumineuse et par conséquent un meilleur rendement.
Petit rappel sur le pincage d'Apex:
Le pinçage des plantes de cannabis
Proche de la taille d’apex sur le principe, cette technique possède cependant plusieurs avantages, le principal étant de conserver le gros bud central de la plante, d’une production et qualité maximale.
Pinçage des plantes de cannabis
Le pinçage d’apex (tête de la plante) consiste simplement à pincer délicatement la tige du dernier étage de la plante, entre le pouce et l’index, jusqu’à sentir la fibre s’écraser sous les doigts avec un petit bruit critch caractéristique. Si l’espace disponible sur la tige du dernier étage ne permet pas d’y placer confortablement ses doigts, il faudra plutôt pincer l’étage du dessous.
Le pinçage ralentira fortement la croissance verticale de la plante, tout en stimulant le développement des branches secondaires, donnant ainsi à la plante une forme de buisson.
La plante mettra quelques jours à réparer ce pinçage, formant un nœud à cet endroit, et poursuivra ensuite sa croissance de façon normale. Le pinçage peut alors être répété si nécessaire, sur l’étage suivant nouvellement formé, ainsi que sur les éventuelles branches secondaires qui pourraient dépasser l’apex.
Le pinçage est donc une excellente technique pour avoir une belle canopée uniforme de type marée verte. En pinçant régulièrement l’apex des plus grandes plantes de votre espace, durant la croissance et en début de floraison (stretch), vous obtiendrez ainsi facilement des plantes de hauteur homogène en pleine floraison, ce qui facilitera la culture et augmentera la production finale, surtout si vous cultivez simultanément de multiples variétés de marijuana.
Avec un peu d’habitude le pinçage pourra être réalisé aussi rapidement qu’efficacement. En cas de pinçage trop violent qui se traduirait par un apex arraché, cela produira simplement les mêmes résultats qu’une taille classique de l’apex, ce qui ne sera donc pas dramatique.
Que la force soit avec vous💪

Likes
18
Share
@BABS_Babies
Follow
I did a low wet trim, and saved the trimming for butter and oil. I dried in a mesh for 12 days, then kept in mason jars and burped them.


Likes
7
Share
@ArucambaAutoflowers297
Follow
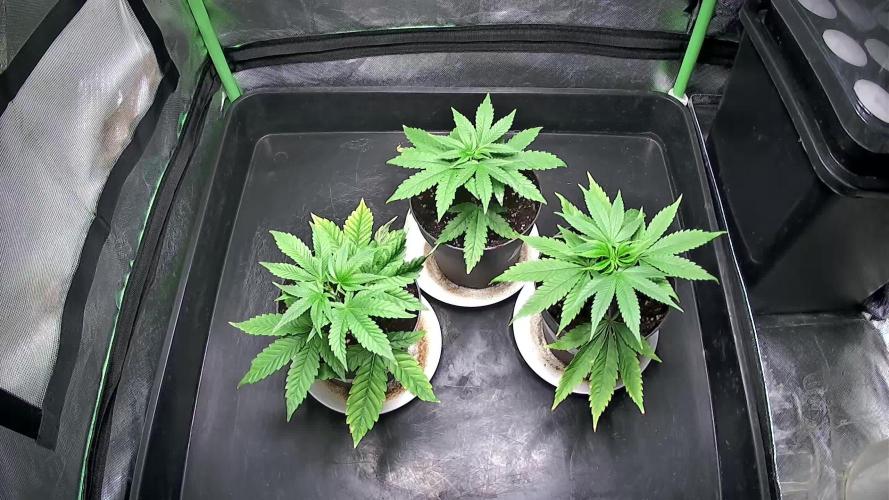
So far the floraflex potpro system has been paying off! My time in the garden went from 90 minutes to 15 minutes and the results speak for themselves.
Since theyre all still in veg im expecting some big girls.
Tried to hop on the no calmag schedule but some didnt take to well to it. So i dropped my dosage back to 3gr per gal of B1 and B2.
New growth looks nice and healthy on the affected plant so i might start raising the dosage

Likes
Comments
Share
@GoodTimesOrganics
Follow
Hi liebe Community 💚 das Blue Cream Haze Outdoor-Projekt neigt sich langsam dem Ende zu.
Auch die herben und wechselhaften Bedingungen scheine der BCH nicht ganz zu schaden. Die Pflanze steht unter absolutem Stresstest und bis jetzt ist dennoch alles in Ordnung.
Klar ist die Pflanze relativ klein und da die Wachstumszeit nicht sonderlich lange war, sind die Blüten relativ klein.
Trotzdem scheint die Pflanze bis jetzt allen Bedingungen zu trotzen. Auch die erste Nacht mit knapp 0 - 1 Grad Celsius hat sie überlebt.
Ich bin top zufrieden.
🌱💚


Likes
15
Share
@Siriuz
Follow
I was very busy and couldn't upload content earlier but here we go
Day 20 and ahead

Likes
2
Share
@gr3g4l
Follow
A los 15 dias terminé deshaciéndome de la nº6 y resitué las plantas dejando en medio la segunda más peque , la nº2.
A los 17 dias una poda de apicales nº1 nº3 nº4 y nº5 . La nº 2 la dejé para que crezca un poco más y así también poder hacer la poda sin dificultad.
A los 19 dias podé el apical de la nº2. La del medio.
After 15 days, I finished removing plant #6 and rearranged the plants, leaving the second smallest one, #2, in the middle.
After 17 days, I performed apical pruning on plants #1, #3, #4, and #5. I left #2 to grow a little more so I could also prune it more easily.
At 19 days I pruned the apical bud of number 2. The middle one.

Likes
5
Share
@AcidBurn_41
Follow
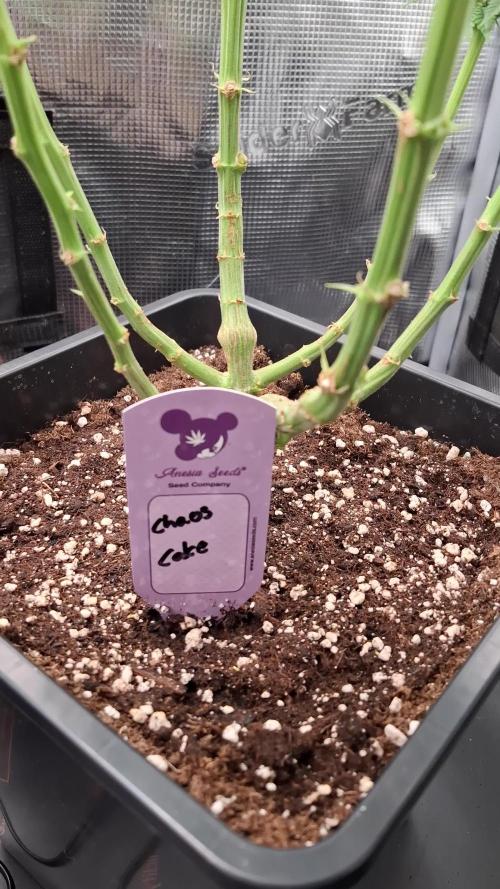
04.12.25
BT#27
Servus Growmie's ✌️
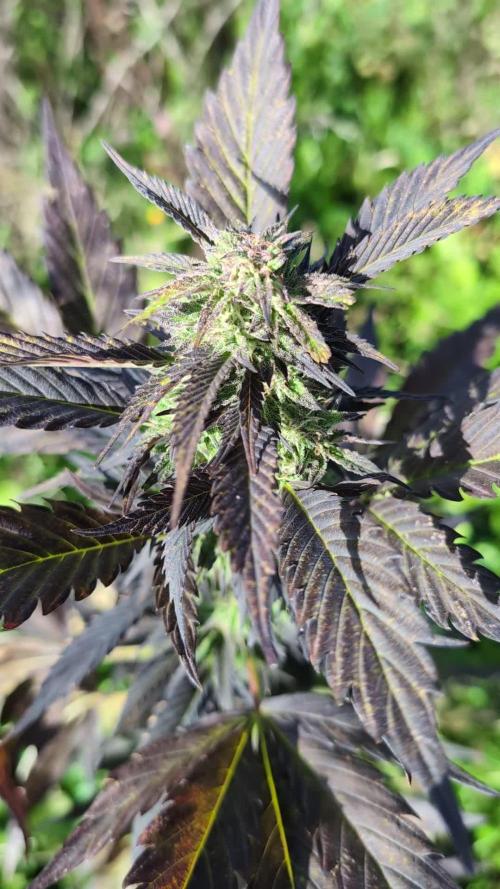
Der Chaos Cake von Anesia Seed's schaut immer schöner aus.
Die Buds nehmen jetzt deutlich an Masse zu Hesi Phosphor Plus liegt jetzt bei 0,5ml/L , Hesi Blüh Complex liegt aktuell bei 3,5ml/L.
Sie versprüht ein sehr sehr süßlichen Duft der Tricome Besatz nimmt rasant zu mit dem Saftigen Grün eine schöne Kombi.
Ab nächste Woche geht der Ph wert von 6,5 auf 6,3 runter somit sind für die Lady alle vorhanden Nährstoffe die Sie jetzt braucht besser aufzunehmen.
Freue mich auf die nächste Woche berichte euch klar mit neuen Updates.
Bis dahin bleibt Gesund and Stay high das Wochenende ruft ✌️
Mögen all eure Ladys Gesund und prächtig wachsen und euch mit schmackhaften Stuff versorgen 🤟
■■■■■■■■■■■■■■■■■■■■■■■■■■■■■■■■■■■■■■
Dec. 4, 2025
BT#27
Hello Growmie's ✌️
The Chaos Cake from Anesia Seed's is looking better and better.
The buds are now increasing significantly in mass. Hesi Phosphorus Plus is now at 0.5 ml/L, Hesi Bloom Complex is currently at 3.5 ml/L.
It exudes a very sweet scent and the trichome coverage is increasing rapidly, which combines beautifully with the lush green color.
Starting next week, the pH value will drop from 6.5 to 6.3, which will allow the lady to better absorb all the nutrients she needs right now.
I look forward to next week and will keep you posted with new updates.
Until then, stay healthy and stay high, the weekend is calling ✌️
May all your ladies grow healthy and magnificent and provide you with tasty stuff 🤟

Likes
9
Share
@NordicCropz
Follow
Day 8. Beautiful looking, and my first Tri-leaf! Got big hopes for this one

Likes
2
Share
@fabialien
Follow
Semana sel 2 de septiembre al 8 de septiembre 8 de septiembre, fotos del dia Jueves 5 de septiembre 2024.
Se regaron con Floralicius plus adicionado con Hidrol-pez + vitaminas.


Likes
8
Share
@Inceptionist
Follow
Double Dunked got harvested 16/11 and I'm planning to let her dry for 14-21 days before trimming and put them in glass+boveda (58%) and grove bags for final cure.
Drying conditions are as follows:
16-18°C
55-60% RH


Likes
45
Share
@AsNoriu
Follow
So, short week , because i just got back.
Girl is fine, two more weeks of heavy feed and thrn flush.
Smells amazing and she will have new tent on my first dayoff.
Next run is pushing her out ;)))


Likes
Comments
Share
@zombikush81
Follow
I start by saying that the genetics of this fantastic and super plant, the only exemplary because I was given after ordering, the first time I cultivated this variety .. I never had any problem from germination at the end of harvest, made grow for 6 weeks approximately with light hours 18/6, then kept in bloom for 10 weeks ...... and from about 10 days to dry with temperatures between 19/20 degrees, and humidity rate to 50% between today and tomorrow I'll make a nice manicure.


Likes
44
Share
@Jays_Not_Here_Man
Follow
We have a stand out! There is one beautiful girl that is showing some beautiful colour, structure, frostiness, and fade ❤️ they are all very dense and frosty but this one girl has stolen the show. I cut their nutrients to almost nothing after running phd water for two waterings consecutively, still a few more weeks to go. I’ll be starting my routine soon if just phd water, but in a slightly higher volume to start breaking up any pockets or salts that may have been forming. Thanks for stopping by, won’t be long! 🇨🇦❤️👊

Likes
49
Share
@DeepWaterGrower
Follow
[DAY 71] - 5/12/2022
- TS1000 30 cm distance - 100% dimmer: 144 watt;
- Light cycle 20/4;
- Height: 80 cm from clay (the other one is 68 cm from clay);
- 23° C - 70% RH during light - 19° C - 75% RH during night;
- EC 1.3 - PH 6;
- Defoliation;
- This week I will try to keep EC around 1.4.
[DAY 72] - 6/12/2022
- 23° C - 70% RH during light - 19° C - 75% RH during night;
- EC 1.4 - PH 6.
[DAY 73] - 7/12/2022
- 22.5° C - 70% RH during light - 18° C - 80% RH during night;
- EC 1.3 - PH 6.
[DAY 74] - 8/12/2022
- 22° C - 70% RH during light - 18° C - 80% RH during night;
- Flush for 24 h with water EC 0 with 3 ml/l Atazyme to clean the reservoir.
[DAY 75] - 9/12/2022
- 22° C - 70% RH during light - 20° C - 75% RH during night;
- EC 1.1 - PH 6;
- Video.
[DAY 76] - 10/12/2022
- 24° C - 68% RH during light - 21° C - 75% RH during night;
- EC 1 - PH 5.8.
[DAY 77] - 11/12/2022
- 24° C - 67% RH during light - 19.5° C - 73% RH during night;
- EC 1.3- PH 5.7.


Likes
21
Share
@DreamIT
Follow
Sponsored by:
AMSTERDAM MARIJUANA SEEDS-💡VIPARSPECTRA💡-💐GREEN BUZZ LIQUIDS💐-🛠️WEDRYER🛠️
29/9 it was a tough month for me but I'm back in charge. We are almost at the end of the cycle and the flowers begin to be large and the pistils begin to color.
__________________________________________
Personal advertising (contains affiliate links)
__________________________________________
🦄 Professional site, exceptional genetics for over 25 years and a new and very nice mascot!
✅https: //bit.ly/Amsterdammarijuanaseeds
__________________________________________
Did you know that Green Buzz Liquids fertilizers are 100% vegan? A complete line of products ready to give the best to each of your plants! Visit the site and see my journals to see how they work 🦄
🤯 And with the code "dreami t" you will immediately receive a 15% discount on your purchases
✅https: //bit.ly/GreenBuzzLiquidsPro
__________________________________________
👀 Are you looking for a good lamp to start with? 👀
🌞Viparspectra has something more than the others, take a look at their site.
⏩ Use "GDVIP" for an extra discount or "DREAMIT3" for an extra 5 %% discount
👀 Search for it on Amazon
✅Amazon USA: https://amzn.to/30xSTVq
✅Amazon Canada: https://amzn.to/38udUVe
✅Viparspectra UE: bit.ly/ViparspectraUE
✅Viparspectra USA: bit.ly/ViparspectraUS
______________________________________________
🌈 Tired of blowing on your weed hoping it dries quickly? Check out the Wedryer website! You will find a well-made accessory that will help your weed dry in just 8-10 days without the annoying risk of finding mold or other annoyances! (no affiliate links)
✅https: //bit.ly/Wedryer_
______________________________________________
📷🥇Follow the best photos on Instagram 🥇📷
https://www.instagram.com/dreamit420/
Backup
https://www.instagram.com/dreamit4200/
🔻🔻Leave a comment with your opinion if you pass by here🔻🔻
🤟🦄💚 Thank you and good growth 💚🦄🤟
