
Likes
Comments
Share


@masterofsmeagol
Follow
I DID A PREVENTATIVE SPRAY OF BT THIS WEEK BUT I DON'T REMEMBER EXACTLY WHICH DAY. I THINK I MIXED AT 3 OR 4 TBSP GALLON WITH SOME DAWN. BONIDE BRAND THURACIDE.
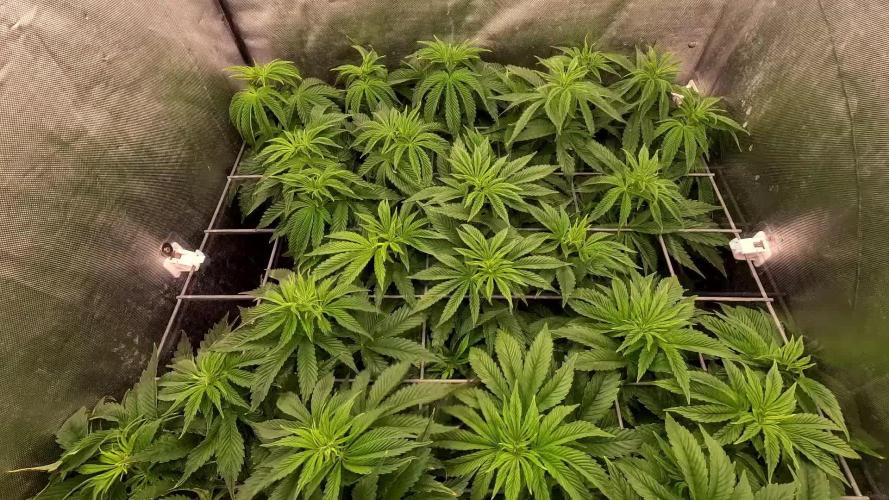
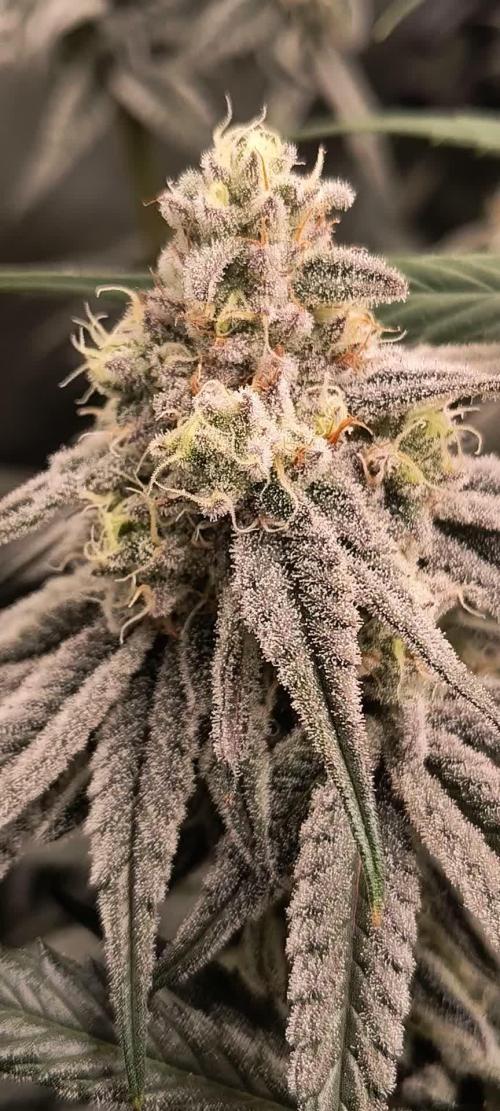
8/30 Fed two gallons to the garden. Watered before and after the feed. Defoliated what was dead. Its scary seeing so many leaves go but energy is shifted to the buds. Buds are ripening but on one mislabeled mystery seed and the wedding cake they look far behind the rest. Wondering how they could possibly finish in the 6 to 8 weeks I have left. If needed I MAY be able to put something in the garage at night. I'd have to RIP the bag out of the ground though which wouldn't be good. I mean some of the plants are pushing ten feet but we use it for heavy equipment. So foggy this morning. Horrible weather. Still fighting PM, possible lockout and ear wigs. We will see how it goes. I'll continue weekly treatment for the pm and I'll find something for the earwigs. I'm hesitant to use the Spinosid in flower.
8/31 Rained last night. Surprise, surprise. Talked to a few other growers and consulted my last year's diary. I had a couple early pheno's last year but things seem on schedule. It's amazing the amount of growth that can happen in a day. Even my ice cream cake has small flowers. Time is running short. Probably six to eight weeks max growing time left. I hope everything finished up nicely. I need to continue monitoring PM and pests. Considering spraying preventative BT tonight. Yesterday I saw the biggest pile of powder mildew and leaf septoria on a tree an hour from my grow. It literally looked like snow flakes on leaves then someone dumped a bag of flour on it. This gives me some perspective and gratitude that the TINY spots I'm treating could be much worse. Weekly treatments until harvest. Hopefully BT or diy green cleaner tonight for earwigs and worms (if they are there).
9/1 Watered thoroughly. Leaves still yellowing. I hope it's senescence. Still need to continue treatments with BT and potassium bicarbonate. Sunny day but rain tonight. Need to add more supports for heavy branches. Will update as I go.
9/2 Rained all night and it's still raining. I'll update when the rain stops. Went back over and added a couple higher supports and defoliated a shit ton. Spent two hours in the garden last night. Too tired for pictures.
9/3 Fed two gallons to the garden and upped Kool bloom to a full tablespoon. I'm thinking about using beastie bloom then cha ching as I have them both. I'm a little hesitant. Wondering what others thoughts are on those products. I plan to spray either tonight or tomorrow with another helping of potassium bicarbonate to help with the WPM. To be honest it seems to work great. I just don't want to go overboard. I wish you guys could smell the pictures. Shits getting fun now.
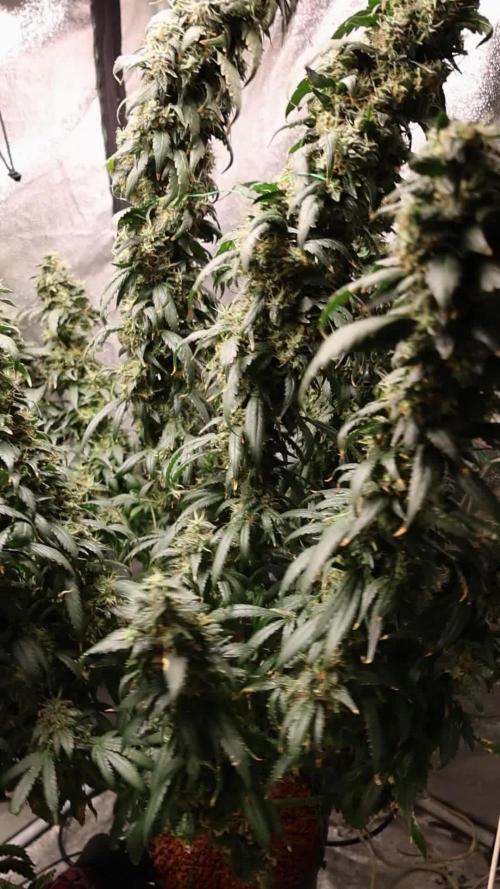
9/4 Had a torrential rain storm with massive wind. No damage. Buds are getting huge. Had to add a few more supports this morning as branches were hanging. If I had room I'd do a second vertical trellis. Unfortunately I do not. I AM able to run string across the cage though which really helps things higher up. I need to put some pictures of my stalks. Legit bigger than soda cans. I wish you guys could smell my pictures. Re-checked all cameras and everything is working good. On high alert. I'd be very surprised if anyone even attempted to rob me but you never know. That's why it's 24/7 supervision until Croptober.
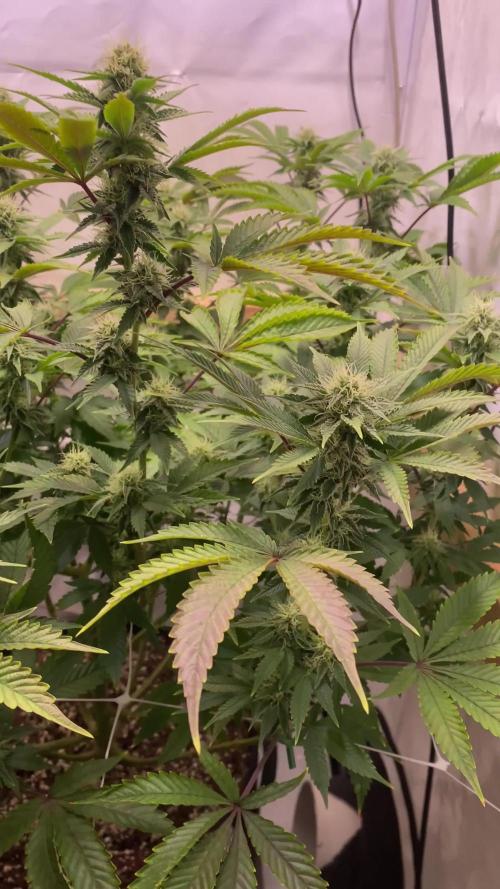
9/5 Lots of sun yesterday but if course it rained last night. Buds are progressing at a rapid rate. Leaves seem to be dropping to soon on the blueberries. I need to do another potassium bicarbonate treatment tonight. Branches are really getting heavy. I'm hoping all this rain doesn't cause bud rot but so far so good.


Likes
25
Share


@MotherNaturesSon
Follow
Waning off CaN to full Jack’s Part A for flowering nutes. Also have floralicious plus and UV bulbs on the way for the late flower. Bit of defoliation, no major problems to speak of overall. Probably will update with a video mid week. Cheers

Likes
9
Share


@Mr_nugs_lover_David
Follow
This lady has developed great! I can see long internodes on her as normal, and she has stretched a little bit looking for that light indoors, but now she has been completely moved outside as she is now a strong plant almost adult ready to give her best! Welcome 2021 outdoor season!!

Likes
41
Share

@gr3g4l
Follow
I couldn't finish, but something is something.
no pude terminar pero algo es algo

Likes
14
Share


@GoldenWeedGrower
Follow
D50/F06 - 20/05/23 - Nothing to report
D51/F07 - 21/05/23 - Added water and nutes EC=1.1 pH=5.7
D52/F08 - 22/05/23 - Nothing to report
D53/F09 - 23/05/23 - Added water. EC=1.1 pH=6.4
D54/F10 - 24/05/23 - Added water and nutes EC=1.0 pH=6.3
D55/F11 - 25/05/23 - Start the week out. I set up a system to feeding Nora during my stay out (I'll take some picture about...)
D56/F12 - 26/05/23 - I leave today, 1 week away


Likes
Comments
Share


@Marbanya
Follow
2024-11-27 to 2024-12-02
The first time I grew Chernobyl, the plant was dense and unruly with thick, lush vegetation. In fact, the plant took up so much room in my tent that I have it to a friend to finish outdoor. It showed signs of bud rot early in the flowering period and luckily, most of it was saved from itself. In addition, the stems of this strain are more hollow and brittle, gaining thickness quickly and making Low Stress Training a difficult task that requires patience when working the branches around the LST clips. I have broken many branches on a Chernobyl plant even when applying care and caution. It requires getting the plant to the shape and size you need early, so that silica can be added to strengthen the branches in prep for those killer nugs.
They are taking about .5 gallons of feed every other day.
Likes
29
Share

@cangrowz
Follow
🍋🍇 Air Lemon x Shishkaberry Anfang Woche 11 🍇🍋
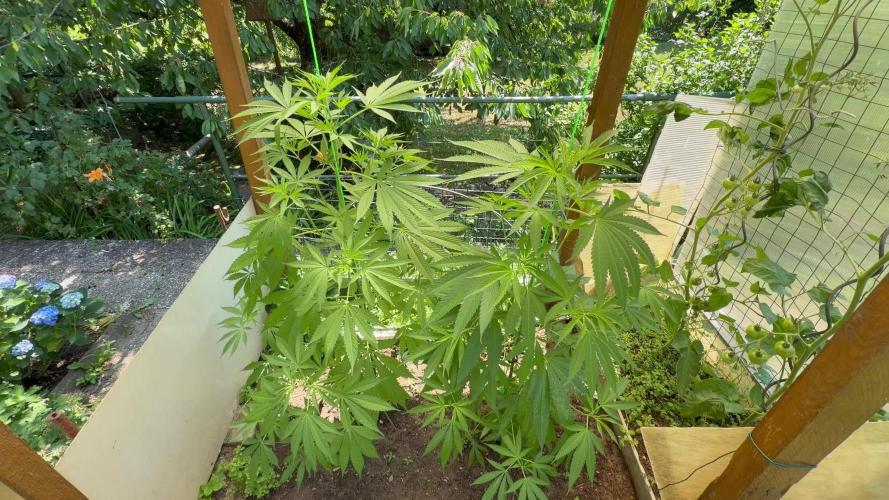
Die beiden Outdoor Damen legen weiterhin ordentlich an Größe zu und entwickeln sich genau so, wie ich es mir erhofft hatte. Nach den kleineren Rückschlägen am Anfang haben sie sich an ihrem Standort unglaublich gut erholt. Ehrlich gesagt habe ich damit schon gerechnet, denn die Position ist für die beiden nahezu perfekt. Sie bekommen dort ideale Bedingungen und danken es mit kräftigem Wachstum.
Mittlerweile haben die Pflanzen fast das Dach erreicht. Nach der starken Hitzewelle mit Temperaturen von über 40 °C und den anschließenden Gewittern werde ich ihnen noch ungefähr eine Woche Zeit geben, damit sie sich komplett davon erholen können. Danach kommt das Dach weg, damit sie auch von oben die volle Sonne abbekommen und ihr Potenzial weiter ausschöpfen können.
Gemessen habe ich sie bisher noch nicht, aber ich schätze, dass beide inzwischen knapp an der 1,70 Meter-Marke angekommen sind. Ich bin mir ziemlich sicher, dass wir die 2 Meter Marke noch überschreiten werden, wenn das Wetter weiterhin mitspielt. Es ist wirklich beeindruckend, was diese extremen Temperaturen mit dem Wachstum machen können. Innerhalb kürzester Zeit haben die Pflanzen einige Zentimeter zugelegt und zeigen einen richtig kräftigen Wuchs.
Der Geruch hält sich aktuell noch sehr in Grenzen, was vor allem am guten Durchzug an ihrem Standort liegt. Bisher ist nur ein leichter Duft wahrnehmbar, obwohl die Pflanzen bereits eine ordentliche Größe erreicht haben.
Ich bin gespannt, wie sich die nächsten Wochen entwickeln und freue mich darauf, euch weiter auf diesem Outdoor Run mitzunehmen.
Vielen Dank fürs Lesen und natürlich auch ein großes Dankeschön an Green House Seeds für die Promo-Seeds zu diesem Run! 💚
Happy Growing Growmies! 🌱💚

Likes
14
Share


@Smokwiri
Follow
Welcome to my Dark Phoenix diary by Greenhouse seed co.
Plant looks good, drinks a lot and grows good, buds are setting now and growing towards golfball size...
Cant wait to see coming weeks development...
Growing with MarsHydro sp3000
60% SATIVA - 40% INDICA
THC: 20-25% CBG: 0,5-1%
CBD: 0%
GENETICS
Trainwreck x Jack Herer
EFFECTS
The effects are a balance of the relaxing body effect from the Trainwreck that can ease some medicinal user, with the uplifting effect from the Jack Herer that will keep your head clear and creative. A good day smoke to keep working.
INDOOR
Flowering Cycle: 56 - 70 days
Yield: Medium - High
OUTDOOR
Harvest: mid-end October
Average Height: 170 - 200 cm
Yield: 700g/plant
PRODUCT INFO
The Dark Phoenix is a cross of the famous California cut Trainwreck that has been a reference during many years for medicinal use for insomnia, pain, lack of apetites, mixed with the equally famous and mythical, Jack Herer.
By crossing the Trainwreck with the Jack Herer we wanted to bring the compactness and amazing foxtailing to the Jack’s smell and amazing production.
The plant grows relatively tall but still moderate for an indoor grow, maybe with the use of topping for the lower spaces, the stretch of the Dark Phoenix is very vigorous during the first weeks of flowering and will produce some strong branches that will catch up on the sides to form on a nice crown effect.
The flowers are as vigorous as the stretch, forming some beautiful and big preflowers early in the flowering, then they will connect together to form some long colas and explode in a beautiful sativa foxtailing bouquet with a very decent yeild and colors that can turn from blue to deep dark black leaves on some plants, a beautiful expression of colors.
The smell of the Dark Phoenix is a must-smell for any sativa lover, the complex mix of flavors of the Jack going from the piney, earthy, and hazy, combined with the pungent smell of the Trainwreck bring some lemony and spiciness to the sativa mix. A great combination for a real explosion of flavors in mouth.
Likes
46
Share


@ernest_twwg
Follow
The veg cycle was shorter than i usually like to have a plant go through, due to time restrictions for the Bubba Cheesecake Diary grow-off, but it still did fantastic in my mind!
Three months in veg under high-octane light and 11 1/2 weeks in flower have let this plant turn into a dreadlocked group of nugs. Three main colas, but lots of burnable flower to enjoy once the dry is finished.
I did a light LST with a decent amount of defoliation throughout the plant's life. I like to open up the middle area of the plant and let as much light as possible hit as many branch and potential flower nodes as possible. This way, i don't need to lollipop as many branches and as much foliage as i would if i didn't do this. Plus, the candelabra look is b-e-a-Utiful, in my opinion.
Light intensity through veg ranged from 40% as a fresh seedling to around 55% the week before i put it into the bloom room. Once it was in the bloom room, the intensity was set at 50% for the first couple weeks to allow for a decent stretch. After that, i think i recorded the light intensity in my diary notes for each week. But, just in case i didn't, I bumped up the intensity by a few percent every 3 days until i hit 100%. Once i got to MAXIMUM POWER, i left it there until harvest.
Water was natural well water that tests out at 7 pH. I always added BuildABloom to the water, never the soil, when i used it. Same with Dr. Earth's 1-2-1 tea concentrate. Other than those instances, it was just straight water that i was giving to the plant.
Grow rooms are both about 4'x8'.
Lights are still budget lights:
-IMVSincere BC100(x3) for veg (Link: https://www.amazon.com/IMVSINCERE-Spectrum-High-Performance-Greenhouse-Hydroponic/dp/B095C2DLH5/ref=asc_df_B095C2DLH5/?tag=hyprod-20&linkCode=df0&hvadid=563646983247&hvpos=&hvnetw=g&hvrand=540375076791862758&hvpone=&hvptwo=&hvqmt=&hvdev=c&hvdvcmdl=&hvlocint=&hvlocphy=9005737&hvtargid=pla-1602626531718&psc=1&gclid=CjwKCAjw__ihBhADEiwAXEazJgD4ugog9JhrBxNShAvyxL7mk9FZTcqD8voe6_dtA20JctuC5Q9qvBoCD7oQAvD_BwE )
Abriselux A1500(x2) for flower (Link: https://www.amazon.com/Abriselux-Dimmable-Coverage-Upgraded-Hydroponic/dp/B08V1FM9V2/ref=asc_df_B08V1FM9V2/?tag=hyprod-20&linkCode=df0&hvadid=507792239689&hvpos=&hvnetw=g&hvrand=17954986133471144655&hvpone=&hvptwo=&hvqmt=&hvdev=c&hvdvcmdl=&hvlocint=&hvlocphy=9005737&hvtargid=pla-1213853152075&psc=1 )
All in all, this was one of the most enjoyable cultivars I've grown inside since i started indoor grows in September 2022. I'm definitely going to try and get more seeds off of my brother, as well as buy some more seeds to pheno-hunt through!
Thank you, @Seedsman , for running this contest. I would have never tried this cultivar out if it wasn't for you giving me a little incentive!
Likes
7
Share


@russrahl
Follow
Almost 2 weeks into flower and I’ve been busy tucking and trimming. Stuffs exploding in growth. Did a second defoliation at day 13 into flower and this time I decided to switch it up and try going opposite of what I normally do. This time I removed a very large amount of foliage and really opened up everything instead of just removing what I absolutely had to. Hopefully I didn’t stress them to much but they didn’t even seem to mind it anyway. Couple days later and didn’t even look like I did anything, except fill more screen out... lol going strong still anyway! Cheers 💨
Likes
15
Share


@Waveform
Follow
Day 33: What an amazing height and bud gain in just 3 days! Lady #1 is 67 cm tall now, her sister a tad smaller. Both still have a great color, and I dared to cur away just the lowest branches and leaves that do not look like they could gain height in time. Really enjoying this strain so far!
At the end of their day, they are a bit dropping leaves, so clearly no hunger for more light. The impressive growth speed continued on their buds: Tallest lady at 70 cm now.
Their next morning shows growth is still at an impressive 5 cm/day as lady #1 with her leaves erected again stretches now 72, the maximum of my previous growth. Pulled the lights as close as possible to the ceiling and hope they won’t make it much more than 1 m. I activated the Sansi 30 W folded wings LED to give them somewhat of a morning and evening light and to add some more light to their overlapping center branches in the middle of "their" day. Sadly that’s causing some interference to the timelapse videos, but I can’t say they’re perfect if it wouldn’t.
Watching the timelapse video of day 34, I have the feeling the additional light rather irritates them. Maybe the interference is not only visible for electronic eyes. I’ll keep it off next day for comparisons.
Day 35 shows stretch speed has reduced indeed and they seem to be concentrating on leaf and bud growth instead. 75 cm, so we are currently at "only" 3 cm/day. Watered them with a HPE/Bud growth mix again last night, about 1 l each.
Well, forget my words about reduced growth. After they recovered during the night, we are at 77 cm for lady #1.
Which measured at 78 with hanging leaves in their day’s evening. I must have missed a day number – day 36 concludes their 5th week. I gave them another 2 l of fertilised water each and will lave them for the weekend again.
Video shows that growth concentrates now more on leaf and bud development than on gaining height. So I guess my 160 cm tent will be sufficient. For a moment I was worried, but it looks like stretch is over. Anyway, time to rearrange the camera next week. Leaves are running out of focus.

Likes
17
Share


@RakonGrow
Follow
+
Day 36
2.5L ...
attentione , dry out ://
Day 37
recovered !!! added some shorts
Day 39
2.0L Pantine
Day 40
Pantinchen dry out , 2.25L , lets see !!!
Day 41
all are verry happy !!!
Pantine needed 2.25L (50% Vega + 50% Flores +25% more CalMag) and running


Likes
6
Share


@420DeepGrow
Follow
📆 Semana 2
El estiramiento se intensifica, con crecimiento vertical marcado y buena respuesta general. La planta mantiene color sano, turgencia correcta y una estructura que acompaña el aumento de altura sin perder equilibrio.
Raíces activas y absorción estable durante esta fase de expansión. Sin intervenciones agresivas, se sigue priorizando estabilidad y control del entorno.
Seguimos creciendo fuerte 💪!

Likes
22
Share


@Elendil
Follow
This week was much more exciting due to much more knowledge gathered about what it is I have do.
First big issue was that my ph levels were off (about 7) got my ph meter. Calibrated and now can di a proper 6.2.
Plants responded right away.
Started feeding once per day :
- 2ml cal max
- 2ml grow
- 2ml micro
- 1ml bloom
These are from Terra Aquatica
At the end of the week started to add liquid worm castings as well
Found out that my coco is not properly buffered. Since it came in bricks and I added only water, so will add 4ml calmag.
The runoff is steady for about 10-20%, except for one plant where its almost 50%. But as plant is the strongest it does not bother me right now.
Made some major upgrades to my DIY grow tent and now it’s more comfortable and less stress to plants.
And my second light came in so things look pretty good.
Unfortently I accidently damaged one of my plants. But as it was the smallest one it didnt looked like it will make it anyway. So will have the opportunity to properly germinate and seed the new one.
Likes
13
Share

@BennyBud2210
Follow
Alles entwickelt sich so wie es soll?🍀🔥
Trauermücken sind nicht mehr sichtbar.
Immer noch ohne Dünger oder Booster unterwegs.
Das einzige was in das Leitungswasser kommt ist Biobizz CalMag und Biobizz PH- ...
Ich denke die Super Lemon Haze wird in den nächsten Tagen eine Düngung mit einem Bloom Dünger bekommen.


Processing
Likes
13
Share


@Cheesefarmer420
Follow
Just finished week 11, and the time has come! Two of the three ladies were harvested on Monday of this week, the last one is still holding on. Posted some pictures of my homemade odor controlled dry box, the thing works great! Hardly any odors escape when the box is closed up, running a humidifier and drying in the basement has given me a solid 55-65% RH and a comfortable 64-70 degrees fahrenheit for a beautiful slow dry. Once the last one is harvested I will Get her hung up and have updated posts And pictures on harvesting/drying and a final end product. Stay tuned!
Processing
Likes
28
Share


@GaiaGreenGiant
Follow
New weekly video uploads and more! See what’s happening in the Cabbage Patch! Day 14 Flower! Plants looking very h@ppy. Can’t wait to get in there and give it’s last defoliation.
Day 16 - She’s stacking up nice! Just need to water when dry. She’s on cruise control!
Day 20 - Defoliation video for ya! Cheers 🍻
