Likes
Comments
Share


@Kushsmoker516
Follow
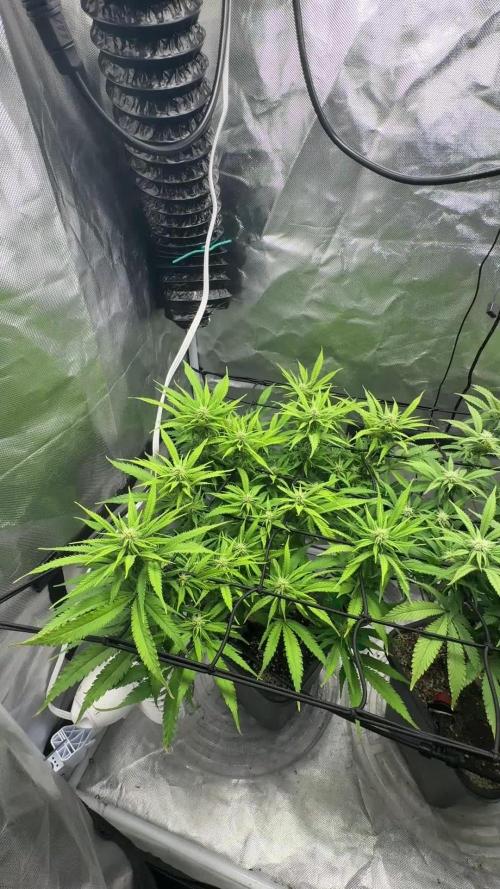
Almost there probably another 20-30 days for blueberry and white widow im guessing while peyote zkittles is taking her time

Likes
52
Share


@Roberts
Follow
FBT2403 has grown really well. She is super frosty and sticky. I switched her to ph water 2 days ago. I will be harvesting her in the next update. Everything has gone fairly well for the grow. She has a really nice profile. She should be pretty potent upon finish. Thank you Agrogardens, Medic Grow, and Fast Buds. 🤜🏻🤛🏻🌱🌱🌱
Thank you grow diaries community for the 👇likes👇, follows, comments, and subscriptions on my YouTube channel👇. ❄️🌱🍻
Happy Growing 🌱🌱🌱
https://youtube.com/channel/UCAhN7yRzWLpcaRHhMIQ7X4g
If anyone needs to purchase fastbuds here is a link for my affiliate program
https://myfastbuds.com/?a_aid=60910eaff2419

Processing
Likes
7
Share


Likes
31
Share

@TrickzGrowz
Follow
Einfach erstaunlich was die Genetiken von SuperStrains drauf haben. Bin echt begeistert wie riesig die Buds werden. Und es ist immernoch kein Ende in Sicht!

Likes
15
Share

@masterofsmeagol
Follow
8/3 Went over to treat the 10th planet that needed water with plant doctor around 10:30. I was in the garden at 6 but didn't have much time. That plant seems to be curled up or "droopy". It DID need water. I defoliated a few sep leaves off it but I didn't see any today. I guess I don't ever really see the leaves "up" or praying like I do with the rest of tge plants. It's starting to flower like the rest though. Today is the day everything is supposed to get its second or third plant doctor dose but I decided to wait until they need the water. I don't think 24hrs will mean much. I've been staying on top of defoliation but I'm seeing some pillar damage. I'd like to spray bt but what my buddy said about spraying with septoria is still in my head. Maybe I can use citric acid. That way it won't "wash away" spores it will just eat them. At least I think. And I hope lol. Birds get most of the pillars but I hand pick some too. I need to pick up nutes. Wondering if I should just get grow big again. I don't use much but plants are switching to flower and leaves are fading. I have big bloom and kool bloom bit neither have nitrogen. I still need some sort of nitrogen. Especially since that could be a deficiency. Not sure if it's the transition or a condition with the sep. I see some interior small leaves bleeding out and some dying. I'm wondering if what I thought was earwig damage years prior was really a combo of sep and they just ate the evidence. I'm super grateful though. I've got some resilient girls and they're doing well. The special kush in flower is gorgeous as well. Looks like I'll have an early plant. Short flowering time on this strain. Smells pungent.
8/4 Treated everything in the garden with plant doctor except the 10th planet I got yesterday. I need to take a closer look at that plant. It rarely looks "happy" like my others. I'll check it again later. 3tsp per gallon and 1gal a plant. The 10s got a half gallon. This seems to be working great. I have some defoliation to do on the tenth planet I was talking about earlier. Everything is in some form of flower. The flowers on that early special kush are getting bigger. I'll update this later.
UPDATE: WENT BACK OVER AT NOON TO TAKE A LOOK AT THAT OTHER 10TH PLANET TO SEE IF IT PICKED UP AT ALL. IT DID. IM GLAD I CAME OVER TO CHECK THOUGH. MAKES ME FEEL BETTER. THE OTHER 10TH PLANET LOOKS HORRIBLE O. FILM FROM ONE ANGLE LOL BUT ITS REALLY A GREAT LOOKING PLANT AND IM USUALLY FILMING AT LIKE 6AM. JIST WANTED TO STICK UP FORCMY GIRL AND HER BAD HAIR DAY. ITS BEEN HIT AND A FEW OF HER LEAVES ARE TACOED. SHE GOT HER FIRST "PREVENTATIVE" DOSE OF PLANT DOCTOR WHICH WAS HALF A TSP/GALLON. IT REALLY SEEMS TO BE DOING SUBSTANTIALLY BETTER. EVERYTHING IS. IM HAVING TO LOOK HARDER AND AM HAVING TROUBLE FINDING LEAVES EFFECTED BY SEPTORIA. KNOCK ON WOOD. IM EXCITED. THIS IS GOING BETTER THAN I THOUGHT. IM STILL GOING TO BE MONITERING LIKE I USUALLY DO.
8/5 Watered the 10th planet I dodnt get yesterday. Looked and didn't see any sep leaves. Phone was dead so I vouldnt do a video. Went back over at like 130pm and did a quick video and checked out the girls. Everything is looking good and transitioning well. I WANT to use a diy Dr. Zymes with citric acid as I've noticed a few pillars. Only reason I've hesitated is because my buddy said not to spray it. But if what I spray it with "eats" it I would think it's ok. But what do I know. Birds get a great deal of them. I watch them on the camera sit on the cage and wait for one to stick it's head up before snatching it up. Still need to get either more grow big or a bloom product with nitrogen. I was able to defoliate that other 10th planet of anything suspect. It's hard work but it's worth it in the end.
8/6 It's like 81 at 4pm. I didn't have time to video this morning but i went back over. WATERED EVERYTHING THIS BUT THE 50 AND THE 10TH PLANET I GOT YESTERDAY. Temps are supposed to pick up soon and it will be in the 90's again. We've had like NO rain. I searched for leaves that had signs of sep to defoliate. I may find one or two but for the most part things are doing great. Overall I'm happy.
8/7 Bought a new bottle of grow big. Wanted to switch to the roots organic teas but I cant do that invthe middle of an already complicated grow. I'll switch nutes next season. I'm noticing some pillar damage. Not much amd I've been hand picking them. I've found a few in curled up leaves. I watered the 10th planet in the front corner that didn't get it yesterday. I hope the watering yesterday will hold them until the morning. I'm still thinking about doing an application of diy Dr. Zymes to clear up any random pests. I'll ask a question and see what other growers on here have to say.
EDIT: MY SPIDEY SENSES STARTED TINGLING SO I WENT OVER TO CHECK ON THE GIRLS THIS AFTERNOON. THE MK ULTRA THAT I LEFT NATURAL WAS STARTING TO DROOP. THE REST OF THE GIRLS COULD WAIT. I MIXED WATER FOR ONE OF THE TENS BUT DECIDED AGAINST IT. I DONT WANT TO OVERWATER AND I THINK IT CAN MAKE IT. I GAVE THE MK ULTRA A FULL WATERING CAN WHICH IS ALMOST TWO GALLONS. IT WAS PUCKING UP BYVTHE TIME I LEFT AND WASNT EVEN ALL THE WAY DOWN. IM GLAD I CHECKED.
The ONLINE cannabis community can be such a joke. There ARE good groups but this places sucks. I put a question up as PART of the research I was doing and ive received some dumb answers but this was aggressive too. I had it figured out prior to reading the answer but it caught me off guard. I decided that since Im able to keep it suppressed with what im doing (leaf septoria on a couple of plants) than don'tchange it. I've dealt with it before and kept it suppressed but not nearly as well. It was a yes or no question really. Stated for outdoor experienced growers as I was looking to avoid the copy paste/ look how smart I am bullshit. I just have an anxiety disorder and like to hear numerous responses before I act. I figure it out and log on and I get some smart ass response from an INDOOR grower. When I SPECIFICALLY asked for EXPERIENCED OUTDOOR growers (as the question is unique to the outdoor environment and indoor growers seem snobby and seem to get jealous when they see my massive plants a quote what they just searched on the internet). I can read shit on the internet as well and had prior to posting. I'm sorry if my success with a product (that you are unaware of "but can't see how it could work" (despite not knowing the active ingredients by your own admission) and lots of hard work have prevailed. When I have to ditch a plant it's 1/4 to a full elbow. Not an 1/8th. So I won't be burning shit. I hate when people say that. There are cases for it but many new growers have been led astray with stupid advice like this. ESPECIALLY if everything is going GOOD! If a plant was less than perfect I'd put it in my concentrates bag. Not much fits through a 25 micron screen. But by all means burn your plants. I have no idea how I have ZERO wpm this year but I would hear shit like this for a couple leaves "with gravel on them" on a 10ft tall plant that yielded like a pound. So I don't know why I listen or why I even responded. Even if it WAS wpm I would've kept it and washed it. It must be nice to be able to work 20 weeks on something numerous times a day put a bunch of money in it and when you hit flower burn it because you don't want to do the extra work. You can easily tell the people that don't grow outdoors. It's a completely different game. But since I've already written it I'm leaving it. One more thing. You didn't even know what the active ingredients in my product were. How can you make ANY statements about the efficacy of ANYTHING without knowing what it is? You said "unless it's a bunch of silica" that provokes an immune response. It's not silica hun. I've been hunting for years for something that works. Go back to your closet.
8/8 The Lion's Gate Portal. Watered everything but the mk ultra and 10th planet upfront I got yesterday. I was going to feed but I ran out of time. I may still feed today I'm not sure. I found a couple septoria leaves on that pink kush that has "some" soil from last year in it. That is a mistake I won't make again. I'm checking a few times a day and defoliating anything suspect. The girls are looking good. I'm proud of them. Very resilient. They've withstood pretty much everything nature can throw at them. HAIL, torrential downpours, 30mph winds, disease and still they are thriving. There's really no way to explain the feeling that I get when I come to the garden in the morning and see everything looking good and smell that familiar odor. Serenity I guess. Pure serenity. I'll update if I feed or do anything else.
EDIT: WENT BACK OVER AT LIKE 5:30 since it was over 90°. Everything was fine waterwise though. Caught a HUGE grasshopper and found a pillar the likes I've never seen. It was a scary looking bastard! Looked like one of the worms from tremors and it almost seemed like it had some silk around it. It opened its mouth when I went to grab it. It was brown but neon green when I squished it. I need to find a good mulch. They say that helps with septoria. I defoliated a few leaves while I was there. It's close to the time for app of plant doctor. I decided to not feed. I saw a couple leaves that had SLIGHT nute burn on the tips. I'll observe and treat accordingly.
8/9 I decided to not feed this week. All new growth looks great and I noticed SLIGHT burns on tje tips of a few leaves so I figured I'd back off this week. Boy that early special Kush keeps getting bigger. It's going to be nice to have one plant ready long before the others. I'm wondering about my other 10th planet. The one that's had all the plant doctor treatment is doimg fantastic! The other not as much. It's droopy more often than not and doesn't really have many leaves effected by sep. What it LOOKS like is that beat curly top virus. The plant was one of the largest but it's much smaller sister has surpassed her (by far) and looks extremely healthy. I think I may move the plant out of the enclosure. It's a big plant and maybe after it's gotten treatment it will improve but I'm not sure it's worth the risk. It's spaced pretty far from everything else but still. Has me worried. I was reading that like 90 something percent of cannabis coming from California is infected with a virus. Don't remember where I read it but it wad a reputable source that was cited. Looks like I'm not doing ethos outdoors again. I may do some indoor this winter if external things come


Likes
3
Share
@Guerrilla_grower777
Follow
Best autoflower ever,you might not like the flavour because everyone has his own preferences but nothing beats this one in terms of potency

Likes
9
Share


@FrostyCloudzz
Follow
Flush flush
Bigger buds buds
Let’s prepare harvest :)
Did the full cycle from the advanced nutrients feeding chart , know I flush and prepare the harvest , planing a late harvest for more cbn and relaxing high - and little bit other terps
Today 16.02.2025 - blooming starts at 20.12.2024 - D59

Likes
6
Share


@santos45
Follow
I have noticed the two bigger Plants the EC was lower then the recommend and the soil PH was around 7.0. I have this weekend given more Bio grow for just this two plants and PH the water at 5.5 to lower the PH as the Advance silica when in the flex tank the PH goes up very quickly. I have change to only give Advance Silica when top feeding.
Flashed one of the plants as PH was 7.6 and EC 2.4 today.


Processing
Likes
39
Share


@Belverde
Follow
Ola 🙂... the two sisters grow up very well ... first time I try them.. the seeds were given to me by the boy from the grow shop, after buy some Barney's seeds ..
With them, under the 205 BD LED light, there is also the sister, who can actually find in the diary SUPER SOIL LED (if you want to see the differences) 😉...
5th week started by giving him a nice lunch based on banana macerate (10 days to macerate), about 0.5 in 1.5l h2o ..
pH I never check it when I am using a ready-made soil .. the water I use is quite good and does not contain chlorine (fundamental in organic) .. it has a pH always around 6.5 / 7.5 and is ok ... afterwards I only gave h2o to drink for once, again without letting it come out of the bottom of the vase .. two days after treacle-based sweet like the past week .. this time I gave 1 teaspoon apiece (they will be about 5ml, I think, but that's okay) in 1.5l h2o ... time after still water .. and today, Friday 27th, I finely chopped a bit of barley malt and I made a top dressing, wetting with water in mix with 3ml topmax for 3l h2o, to increase the malt action ..
I see just one or two thrips every now and then, but I'm under control .. I have not used anything to drive them out .. only the fan always on and the humidity left slightly higher ... They start to smell good and very sticky too ..
I don't know how to describe the aroma at the moment .. sweet .. but complex .. we'll see .. hi, thanks for the time 🙏 and tell me if you like it ... See you next week😉✌️


Likes
3
Share


@bigsmoke42069
Follow
Great strain, would recommend.
Nice smoke/vapor, friends love it, stupefying and euphoric, no heavy couch lock like heavy indicas.
Taste great in The Mighty vaporizer, citrus with a hint of pine.
Likes
7
Share


@GothBotanical
Follow
This week marks the end of Week 10, and Do-Si-Dos Auto is deep into her final ripening phase. Trichomes have shifted to mostly cloudy with a few ambers starting to show, signaling the early harvest window. Her fade is well underway with noticeable yellowing and some purpling on the fan leaves and bracts — all expected at this stage. She experienced one dryback early in the week that caused temporary leaf droop, but she perked back up quickly after a good watering. Temperatures peaked at 86°F with humidity holding around 45%, keeping the environment within range. Buds are dense, frosty, and continuing to swell. On the final night of Week 10, she was watered with Cal-Mag (1 ml/gal) and the auto-watering base was refilled. Harvest is likely coming within the next week depending on trichome development.
Likes
8
Share


@Chubbs
Follow
420 Fastbuds Week 5
Cherry Cola Auto
What up grow fam.
Weekly update on these girls starting week 2 of the flower cycle. So far all has been OK with keeping up the same routine. One of the plants I will say is an absolute mutant for some reason. Just not responding to anything I've done to try and help it out. I'll keep up with what all the other plants get because they seem healthy and happy. The other plant is doing well growing and producing preflowers. All in all Happy Growing
Likes
19
Share


@PariaGrow
Follow
Luego de un par de semanas full trabajo me dediqué a ordenar un poco el jardín, revisar las plantas, reubicar algunas y realizar una respectiva poda de algunas hojas para que llegue luz a todos los brotes.
Algunas finalizando la tercera semana de floración, otras en su segunda semana de floración.
Está costando mantener los parámetros, ya comenzó la primavera por lo que aumenta la temperatura en mi espacio, pero se está logrando.
Se ha aplicado riego de Organic Bloom de B.A.C + Nirvana de Advanced Nutrients a partir de la segunda semana de floración. En dosis bajas para ver cómo andan.
Muy fuerte el olor dulce que están dejando todas, luego las revisaré mas detalladamente para especificar un poco los olores de cada plantas. La cantidad de resina es impresionante.
Likes
31
Share


@buddha61
Follow
10/14 - A new week of flower begins. Watered today with just short of a gallon of water. Look forward to see what the next couple weeks bring, and hope that they start to show signs that they want to work on a finish.
10/17 - Looked back at the flower picture posted yesterday, caused me to take a closer eye in the tent. Appears the Chinook Haze is starting to purple around the flower fan leaves, at the most extreme edge, and barely visible when just looking at the plant.
10/18 - Watered today, just under a gallon.
10/20 - Week 8 is down. I have noticed a couple hairs starting to turn color, and emphasis on couple, as it isn't many. Still looks like a while to go for her.

Likes
7
Share


@El_Bottanico
Follow
Hello everyone.
Another week passed, gave her water and some enzimes on day 33, I noticed some leaf intervenal discoloration, not too concerning in my opinion. Maybe the enzimes were too much or some nutrient lock out due to a somewhat excessive fertilization. Any opinion on this issue?
I think will go on with plain water to the end I think, hoping the problem will sort out itself. What do you think?
Other then that I think buds oare forming fast and fine, she's putting out a little resin and smell now.
Ciao 😊