
Dinafem's Ocean Grown Cookies


VEG
Custom Light Emitting Diodes/120W
Custom
FLO
Custom Light Emitting Diodes/200W
Custom

Sphagnum Peat Other
Custom

Perlite
Custom

Vermiculite
Custom
Indoor
Room Type
LST
weeks 4-10, 13
Topping
weeks 4, 6
11 l
Pot Size
Start at Harvest
G
Germination6y ago


18 hrs
Light Schedule
21 °C
Day Air Temp
6.5
pH
65 %
Air Humidity
21 °C
Night Air Temp
11.36 l
Pot Size
50.8 cm
Lamp Distance
Nutrients 4
Epsom Salt
0.264 mll

15-0-0 Hydroponics Calcium Nitrate
0.555 mll

5-12-26 Hydroponic
0.911 mll
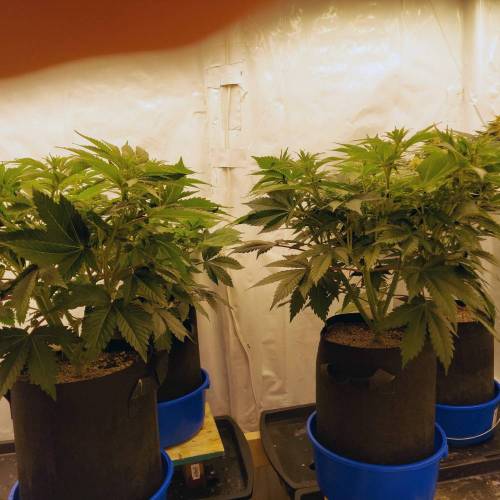
NobodysBuds Summary - A solid first week. Planted them, they germinated, and the sprouted. A chunk of substrate was wedged under a cotyledon on #3 and it is a little upset about that. I think it will be fine, but maybe a bit smaller than the others. The other three can compensate.
First part of mini pheno-hunt. I want a cookies strain in my stable. OG Cookies and Blueberry Cookies will run 4x at a time and after 2nd run i'll decide between the best 2 of each... no obligations. I don't care about a name. I care about taste and potency, so if they are both amazing and unique, keeping 2 "cookies" strains is no problem for me.
Daily Notes - From now on these will be a screenshot of a digital clipboard. Merely days of vege / bloom / how many days since last watering etc.. and then notes.
p.s. Thank you Dinafem for your generosity. I promise not to treat the rest of the grow like that burnt cotyledon, lol.
Edit: 2 grams of dynomyco with each seed.
20 likes
3 comments
Share
2
Week 2. Vegetation6y ago


18 hrs
Light Schedule
21 °C
Day Air Temp
6.5
pH
65 %
Air Humidity
21 °C
Night Air Temp
11.36 l
Pot Size
45.72 cm
Lamp Distance
Nutrients 3
Epsom Salt
0.264 mll
15-0-0 Hydroponics Calcium Nitrate
0.555 mll
5-12-26 Hydroponic
0.911 mll
NobodysBuds Did this diary a bit different than past. Day 1 was the day i planted it. While it won't be multiples of 7 for vege or flower growth, it will be 7 day increments between updates as always. Four plants sprouted within 2 days of each other. The oldest is setting the calendar, #1 coincidentally.
Weekly Summary
So, we are at 10 days above ground in the pictures. #3 has improved and should be perfectly fine. Growth is all very similar relative to time of sprout and mishap with speck of substrate toasting one cotyledon and one of the initial serrated leaves. These will transplant before next update -- even #3, i bet.
Glad I got some Dinafem seeds when I did. Hope they pull through and/or reincarnate as I am not 100% familiar with what is going on. Some Blueberry Cookies will follow at some point. Good luck Dinafem, if there is any to be had.
19 likes
comments
Share
3
Week 3. Vegetation6y ago


18 hrs
Light Schedule
22 °C
Day Air Temp
6.5
pH
50 %
Air Humidity
21 °C
Night Air Temp
11.36 l
Pot Size
45.72 cm
Lamp Distance
Nutrients 3
Epsom Salt
0.264 mll
15-0-0 Hydroponics Calcium Nitrate
0.555 mll
5-12-26 Hydroponic
0.911 mll
NobodysBuds #3 is clearly impacted by the early damage. Going to chug along and see how it goes. If it doesn't go into the bloom box, i can keep #2 from the GPFV redux crop. Bases are covered to utilize space and throw something out if needed.
The rest are incredibly consistent with each other. It is difficult to determine which has been above ground longer at this point. Some blemishes on leaves, but i expect those to wrok themselves out. Some ripples in single-bladed serrated leaves. Overall, they are very happy and healthy plants. The new substrate and better watering habits have meed vegetative phase like clockwork for vigorous growth. Expect the from-scratch mix to be just as fruitful.
Smooth sailing ahead for my garden. It's nice to have some confidence after a rough 6-9 months. Excluding the recent mold issue, the changes i've made have had significantly positive impacts. Routines are rounding into shape given new variables.
Short-term intended changes:
I might start making a ~100x stock solution of part A+epsom and part B -- or whatever carrying capacity of my tap water allows. This would greatly reduce weekly manual labor and only requires a bit of rudimentary algebra.
Long-term changes needed:
Push-button or automated watering setup. With a stock liquid of each nute, mixing a 20-50gallon tank wouldn't be so difficult. No impact drill needed to stir, for example. even the drainage could be pumped out instead of dumped.
edit: For some reason it is listing Advanced Nutrients. I've never used this product. I don't buy products with cartoons on the labels.
21 likes
1 comment
Share
4
Week 4. Vegetation6y ago


18 hrs
Light Schedule
22 °C
Day Air Temp
6.5
pH
50 %
Air Humidity
21 °C
Night Air Temp
11.36 l
Pot Size
45.72 cm
Lamp Distance
Nutrients 3
Epsom Salt
0.264 mll
15-0-0 Hydroponics Calcium Nitrate
0.555 mll
5-12-26 Hydroponic
0.911 mll
NobodysBuds Moving along nicely. Topped this week. Removed top 2 leaves when it became apparent i could not keep them out of the way. In the few days since it's really filled in those gaps. Still bending out the longest growth so nothing gains apical dominance.
The top two buds will need to be tied horizontally at some point. They will regain dominance, assuredly. This is the first time i topped it when i actually wanted to the last 3-4 grows. This will be more representative of future behaviour while shaping 4 plants for a 30x30 area. ~3 weeks of vege growth for this particular plant. GP definitely grew more vigorously, but that differnce has no negative impact on perpetual garden as it all fits in regard to vege time required.
23 likes
5 comments
Share
Used techniques
LST
Technique
Topping
Technique
5
Week 5. Vegetation6y ago


18 hrs
Light Schedule
22 °C
Day Air Temp
6.5
pH
50 %
Air Humidity
21 °C
Night Air Temp
11.36 l
Pot Size
45.72 cm
Lamp Distance
Nutrients 3
Epsom Salt
0.264 mll
15-0-0 Hydroponics Calcium Nitrate
0.555 mll
5-12-26 Hydroponic
0.911 mll
NobodysBuds Another strong week. #1 and #2 look like a better structure for me. Spreading out perfectly and ready to be topped, yesterday. Due to need for clones, this is being delayed a bit longer. The growth the last 1-2 days has been more vigorous. Should have a nice ~7 node cutting from apical meristem fork. Nine colas will remain. I'll shape them as needed to make a good square shape.
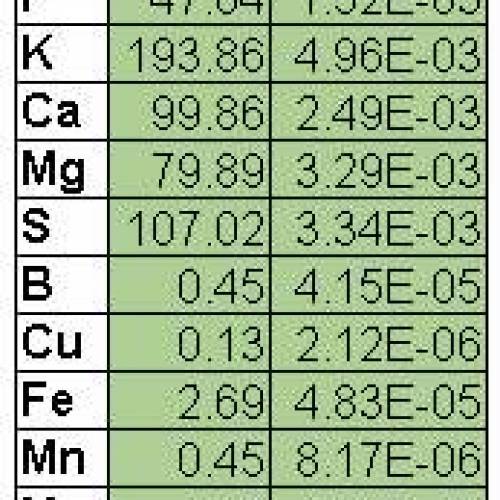
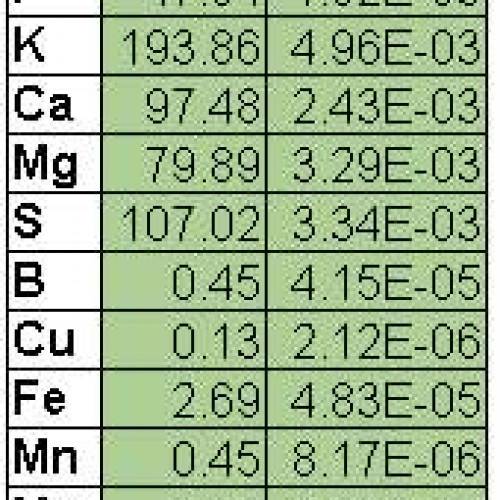
#4 has some issues. It is not as happy with my feed or my substrate. Some ugliness to leaves, but minor as of yet. This could also be why it is a bit stockier.. May need to pull out the old leaf chart. Could be too much Mg or S. Mg fits better with darkness of leaves.
Probably label the next week as boom, but will be a mix.
These are 31 days above ground and 35 days from sowing.
24 likes
2 comments
Share
Used techniques
LST
Technique
6
Week 6. Vegetation6y ago


18 hrs
Light Schedule
22 °C
Day Air Temp
6.5
pH
Weak
Smell
55 %
Air Humidity
21 °C
Night Air Temp
11.36 l
Pot Size
45.72 cm
Lamp Distance
Nutrients 3
Epsom Salt
0.264 mll
15-0-0 Hydroponics Calcium Nitrate
0.555 mll
5-12-26 Hydroponic
0.911 mll
NobodysBuds 38 completed days since sprout. Add another ~4 from sowing. (i'm within one going by memory)
Another productive week. Still learning to be consistent and precise about how I prune these plants to prepare for bloom. I used #3 as a guinea pig since it is the least happy of the 3. You can see i slightly improved process for #1 and #2. I'll be testing various number of nodes before entering 12-12 to eliminate as much pruning as possible later on. If i can avoid lollipopping or at least a significant portion, this reduces stress on plant during a more important time of life cycle relative to impacting yield.
Each axillary shoot was topped. A fork from apical meristem was used for a clone. I've delayed flipping to 12-12 by 3-4 days due to excessive butchering. Sometime this week they will enter the bloom box.
After being spoiled by insanely vigorous growth with GP, the OGC are still a very nicely structured plant. I think the difference with #3 is nutrient realted, a.k.a. self-inflicted. If i get it in order and it is the 'winner' of the three, i'll have to reconsider nutrient mix in future. This also plays a role in choosing a winner, as quality of buds are unlikely to be drastically differetn... ease of growth is a big concern. Having 4-6 donors that can all handle the same mix within reason is definitely a benefit worth seeking. Potency and taste of any meaningful stratification will easily supercede that convenience.
______________________________________________
Addendum -- How I clone
Get things ready:
- a cup of 6.5pH water
- some garden snips
- a cutting area / board
- a razor blade or equivalent
- Small sized planter. 16oz cup works well. Opaque. Assume 1/2gal or less is fine. Becomes difficult to water properly with larger pots
- root hormone (optional)
Size up the plant. If you don't need the growth remove the entire limb and cut to size later. Immediately place into cup of water. Repeat for as many clones as you need to take. Before i choose, i try my best to find something i can bury more than 1 node and have at least 3+terminal bud above ground (3.5? 4? depends on how you count). Sometimes that's just not an option, oh well. Until you get more familiar with your process, i'd hold off on any pruning or clipping at this stage.. but i often clip off the lower leaves and axillary growth so it sits in cup better. At least the bottom 2 are safe bets, especially if there's a need to re-size it too.
Plant cells differntiate based on a few factors. One of them is light. Bury a portion of the plant, even if you bend somthing down abnormally, it will eventually grow roots if shielded from light at all times and some sort of wet-dry cycle of substrate. Heck, just wrap soemthing opaque around a node woth some papertowel inside so you can get it moist and dark, and it will grow roots up in the air, too. You could theoreticalyl do this before taking a clone and have roots the moment you put it in substrate.
So you got your clones and you're sitting at your cutting board. A pile of root hormone is out so you don't contaminate the entirity. Throwing out excess should just be expected. It's cheap, no worries. Trim the clone up. Don't leave much leaf material behind. Most lower nodes will be shielded and stretching, so you probably want to remove those too. This is when i slice at 45-degree, just below a node. Do not mutiliate a node! At this point it should be the size of what you'll plant.
Using a toothpick or pencil, size up the length you want to bury, then place the cutting into the cup of water again. I'll get a hole ready that is a proper depth. I like using a toothpick and slightly rotating around. The hole diameter at bottom is cone-like and somewhat loose. I can feel the stem squishing into it -- not the stem squishing, lol.. no vascular damage! make hole larger or deeper, if it doens't fit. Don't try to ram it in there. The point is a snug fit. Can press from around edges to close the gaps. Watering at end will finish the job. No large air gaps. That's what perlite or vermiculte will provide while tamped down. *but that's later... The hole is ready before it is needed.
Everything is ready, so I'll quickly scrape a few superficial strips below lowest node and dunk back in water -- i prefer to scrape less than more. Top layer only and if you dig into vascular tissue, that's 2 layers too deep. Tap off excess water so the root hormone does not cake onto the stem. Dab it into hormone on each side and knock off as much as possible. A light dusting is all you want - flick it like a cigarrette, knock it on top of something, whatever it takes. If it is caked on, you'll have to scrape it off gently. Pop it into that pre-made hole. Feel gentle resistance as it reaching bottom and tamp down soil around it. Hold it as upright as possible while doing this. Less work later for the plant to correct its orientation, which by gravity it will.
Provide darkness and keep it moist, and roots will grow. I may water slightly before 1" dries, but a wet-dry cycle is essential. 16oz cup is good for 6-9 days depending on humidity in my parts. This is low-maintenance. Takes zero space in garden.
First day may notice some droop. Usually before 24 hours they will look respectable again or at least improved. If you leave too much leaf material, they'll continue to canoeing and droop to conserve water, limit transpiration - these will make it too for the most part. Keep it out of intense light, most importantly. A simple led bulb in your living room can work. The only key here is preventing flower phase. So, provide enough hours of ambient light. Without roots, it can make use of very little light and only if it cannibalizes itself.
Things to watch for:
- If you see yellowing leaves, you are providing too much light.
- If the stem gets mushy, it's probably not going to root *excludes intialy droopiness. Mush after a few days or longer is really bad.. likely dead.
- Plant perkiness -- Should improve intially, then start reaching extra hard for light when it starts to get some roots.
- After it starts reaching, wait to see some visible growth before acclimating to intense light of your vege area.
Acclimation to strong lights will take 1-3 days. Pop it in there and check it every hour or so... When it droops, remove it. Doing it once or twice is probably sufficient. Let it recover and try the next day. It should quickly handle it for longer periods of time. By third day it likely won't droop anymore. Start at 1/2 to 1/4th strength. AFter first day it can handle it, raise it ~4" at a time (or lower light, depending on context) and if it ever stretches, skip the 4" increments and go full strength ASAP.
Within another week or less it'll be ready for transplant. The time that seems to vary most is initial root growth. Once they perk up that second time and show initial grwoth, tehy all seem to move along at similar rates.
Humidity dome early on will potentially speed up the process, but not required. Whether i know it is ready for bright lights within 7 days or 14 matters not, because it doesn't take up space in garden and that timeframe will be consistent per clone-line. So, it is very easily planned for. 7 days before space available in tent? 14 days before space is available? It simply sits out on a tabletop for 7 days longer and works like clockwork if treated the same way each time.
As long as you take a cutting from a healthy donor, it really is as simple as planting it into some substrate. 45 degree cut, root hormone... not even needed.
Do remove excess foliage. It only slows the process down.
19 likes
4 comments
Share
Used techniques
LST
Technique
Topping
Technique
7
Week 7. Flowering6y ago


12 hrs
Light Schedule
22 °C
Day Air Temp
6.5
pH
Weak
Smell
50 %
Air Humidity
21 °C
Night Air Temp
11.36 l
Pot Size
40.64 cm
Lamp Distance
Nutrients 3
Epsom Salt
0.264 mll
15-0-0 Hydroponics Calcium Nitrate
0.555 mll
5-12-26 Hydroponic
0.911 mll
NobodysBuds #1 is nearly perfect -- even canopy, middle shoot is catching up quickly, well-distributed resources all over. Really like the way this one grows. Good taste and as potent as others, this is the winner. #2 is slightly uneven, but more than good enough. I could put a bit more effort in and fix that, if motivated. Need to work on "#3" a bit more. Fairly splayed out, but may want a bit more space between colas.
Less than a week into bloom and should get a good amount of height between now and end of vegetative growth. Some shaping still required to ensure a neat/organized canopy to maximize yield.
21 likes
1 comment
Share
Used techniques
LST
Technique
8
Week 8. Flowering6y ago


12 hrs
Light Schedule
22 °C
Day Air Temp
6.5
pH
Weak
Smell
50 %
Air Humidity
20 °C
Night Air Temp
11.36 l
Pot Size
40.64 cm
Lamp Distance
Nutrients 3
Epsom Salt
0.264 mll
15-0-0 Hydroponics Calcium Nitrate
0.555 mll
5-12-26 Hydroponic
0.911 mll
NobodysBuds Keep bending them a bit each morning. Central shoot has nearly caught up on #1 and #2. #3 is shorter and i'm trying to caox it to stretch out a bit - 4-6" lower than rest of canopy. The clones from #1 is already begging for a transplant. Other 2 are not showing any roots, but handling low-intensity vegetative lighting. Unless they both taste like @hole, #1 and #2 are the frontrunners to be kept for at least a 2nd run.
Relative to size, these plants seem to drink more. Attribute some of that to winter, but the box is generally 45-50% RH, which isn't so bad considering rest of the house is probably 30-35% RH.
All in all, it was a good week. Feel good about 8-9 colas per plant moving forward. Seems like it'll utilize the space well without causing major microbial risks.
Horizon:
Really looking forward to this harvest. This will be my first cookies strain i've ever grown. Dinafem Blueberry Cookies are on the way too. As soon as i work through the Anesia seeds / Advanced Seeds I bought last Spring, I'll run 4 of those. A couple PEV strains will piggyback with Future #1 and Gorilla Blue, since they came as a 2-pack. Wasn't going to make their little competition, so they got delayed a 2nd month. The first month's delay was due to being sent to the wrong country, BWAHAHA. White Gelato sounds interesting, either way.
24 likes
2 comments
Share
Used techniques
LST
Technique
9
Week 9. Flowering6y ago


12 hrs
Light Schedule
22 °C
Day Air Temp
6.5
pH
Weak
Smell
50 %
Air Humidity
20 °C
Night Air Temp
11.36 l
Pot Size
40.64 cm
Lamp Distance
Nutrients 3
Epsom Salt
0.264 mll
15-0-0 Hydroponics Calcium Nitrate
0.555 mll
5-12-26 Hydroponic
0.911 mll
NobodysBuds By next Sunday, should be staking along stems. Expect another 5-7 days of vegetative growth at most. It is about to get exciting. Has a unique smell. After bending stems can smell something different. It's changed slightly over the last week or so.
Tufts currently at terminals for 2-3 days. Vegetative growth will wind down as flower production ramps up in earnest.
27 likes
4 comments
Share
Used techniques
LST
Technique
10
Week 10. Flowering6y ago


12 hrs
Light Schedule
22 °C
Day Air Temp
6.5
pH
Weak
Smell
40 %
Air Humidity
20 °C
Night Air Temp
11.36 l
Pot Size
40.64 cm
Lamp Distance
Nutrients 3
Epsom Salt
0.264 mll
15-0-0 Hydroponics Calcium Nitrate
0.555 mll
5-12-26 Hydroponic
0.911 mll
NobodysBuds Good flower development this week. Some last stretch is occurring. Beleive this is partly due to giving a bit too much light, again. These plants definitely need less - OR, it is environmental due to dryer, cooler winter air impacting how much light eh plant can handle.
I also forgot i had added 40mins to the lights a couple weeks back. So, that in addition to any less optimal conditions has caused some light burn at an intensity that should not cause light burn based on previous experience. I've raised the lights about 1.5" and dropped back to 12hours of light per day. In the meantime the plant has had some healthy, good stretch and #2 has shown obvious signs of recovery. #1 is being a bitch about it. I am 99% sure it is light caused, the left half of the plant it looking better and i rotated and shifted that to a less intense area of the box. That half of the plant is recovering faster, so I raised the lights a bit more this morning (final .5" of 1.5" adjustments lately).
Other than that self-inflicted problem, all things are going well. Whether due to slightly better handling of this problem or simply genetics, #2 is filling out the best of all three. #3 is a stocky piece of shit with which i didn't do so well. #1 may just be a bit slower than #2, but if the trend continues, #2 may be the 'keeper' as long as it smells good.
25 likes
6 comments
Share
Used techniques
LST
Technique
11
Week 11. Flowering6y ago


12 hrs
Light Schedule
22 °C
Day Air Temp
6.5
pH
Weak
Smell
40 %
Air Humidity
20 °C
Night Air Temp
11.36 l
Pot Size
40.64 cm
Lamp Distance
Nutrients 3
Epsom Salt
0.264 mll
15-0-0 Hydroponics Calcium Nitrate
0.555 mll
5-12-26 Hydroponic
0.911 mll
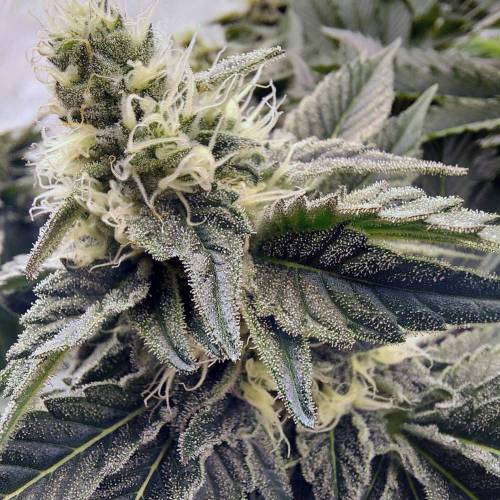
NobodysBuds She's a beaut, that number Two. Wow, is it stacking up nicely. As long as #2 doesn't smell or taste like a turd bucket, it's defintely the winner. 9 colas and all are rock solid. I took extra picks of the stalks on #2. It'll be featured from now on. #3 is still a tine thing. Gave 1/2 dose of ferts last 2 of 3 feedings. Caused a Mg deficiency or something on lowest leaves, but it's a thick canopy and robust, otherwise. No worries on any of these plants.
Says "5 weeks" of bloom, but notes clearly show this is only 31 complete days and 32nd is in progress. These look like 9-week varieties so far based on rate of development. I like to see the trichomes forming nice and early. they are starting to spread out more as you can see in some of the macro pictures.
#1 has more aroma than #2, yet not strong by any means. #2 doesn't have much smell at all, yet. I do smell simiar when i bend/shape things based on what sticks to my hands.
Can't get over how well #2 is filling out. It's going to be soild stalks of buds from top to bottom of bud zone. Already lokoing sticky AF. It looks even better in real life. I can't do the stalks justice with pictures. I should have taken some video. Hope these plump by 42 days, because i don't want to wait 10 weeks for harvest. Super cereal..
23 likes
2 comments
Share
13
Week 13. Flowering6y ago


12 hrs
Light Schedule
22 °C
Day Air Temp
6.5
pH
Weak
Smell
40 %
Air Humidity
20 °C
Night Air Temp
11.36 l
Pot Size
40.64 cm
Lamp Distance
Nutrients 3
Epsom Salt
0.264 mll
15-0-0 Hydroponics Calcium Nitrate
0.555 mll
5-12-26 Hydroponic
0.911 mll
NobodysBuds 45 flower days completed.
#1 has started to fill in respectably, but #2 is still the tops in that regard. Still only a mild aroma from either plants. You can see the initialy stages of stigma coloration beginning. That's new this monring. As of last night there were only a few here and there. Starting to see more plump too.
Really looking forward to these... said it before more than once. Thought the sugar would pile on to fan leaves more based on how early i saw it. I don't smoke fan leaves, so in the end that matters not on its own. The stalks on #2 are really nice. Pruning off some likely larf later in flower seems to be all benefit from my perspective, even if yield is a gram or 2 lighter overall. No crowding is a good thing.
Oh, #3 is an afterthought at this point. I cracked a major stem while LST. Taped it up. Leaves haven't dried and died in days since, so i feel okay about it so far. These look further ahead, but i think it's a false positive due to nutrient issues. This plant is not immaculate like the other 2.
28 likes
4 comments
Share
Used techniques
LST
Technique
14
Week 14. Flowering5y ago


12 hrs
Light Schedule
22 °C
Day Air Temp
6.5
pH
Weak
Smell
40 %
Air Humidity
20 °C
Night Air Temp
11.36 l
Pot Size
40.64 cm
Lamp Distance
Nutrients 3
Epsom Salt
0.264 mll
15-0-0 Hydroponics Calcium Nitrate
0.555 mll
5-12-26 Hydroponic
0.911 mll
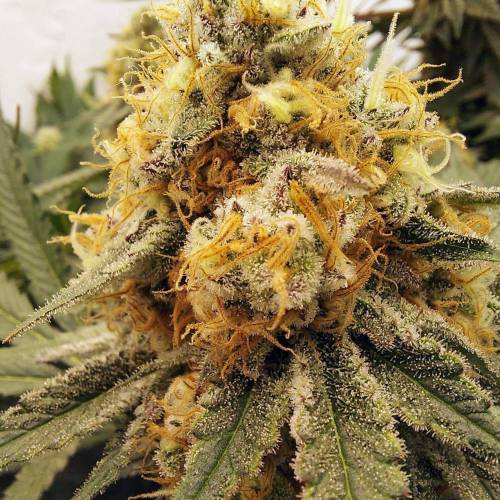
NobodysBuds Can't wait for these girls.. #1 and #2 seeds are beautiful and #2 is still leading the pack in every physical attribute i care about. Thought they'd be a bit more bud-like by today, but the development is consistently progressing, nonetheless. Getting some good frosty rails on some of the smaller fan leaves.
#3(4) is fugly and a turd bucket. Bunch of leaves, small nugs, et al... I defoliated a second time, which i rarely do this late in bloom. I was worried about microbial growth as it nears the end. Good thing is it almost done. I don't like it in my bloom box. Eugenics is practiced here! It's okay for plants, but not humans. Other good news, taped up branches haven't dried out, so some vascular tisue must be providing sustenance.
Thanks @SweetSeeds for the digital microscope, via Sweet Seeds Cup - GD Edition contest. I lost this package somehow, but now it can be put to good use. I have a propensity for such things, lol.
the macro shot is of #3 plant. It is not an especially good model, but it has been cut down and accessible for this scope at the moment.
24 likes
3 comments
Share
15
Week 15. Flowering5y ago


12 hrs
Light Schedule
22 °C
Day Air Temp
6.5
pH
Weak
Smell
40 %
Air Humidity
20 °C
Night Air Temp
11.36 l
Pot Size
40.64 cm
Lamp Distance
Nutrients 3
Epsom Salt
0.264 mll
15-0-0 Hydroponics Calcium Nitrate
0.555 mll
5-12-26 Hydroponic
0.911 mll
NobodysBuds #2 is nearing end. Irrigation needs are drastically different than #1 at this point.
#1 is surprising me with some frost lately. If it goes longer, potentially could overcome #2 in this regard.
#3 is hanging upside down, presently. Some bits of buds that were stuck to removed fan leaves and from errant snips were smoked. Despite noticeably fewer trichomes, the potency was surprisingly good. I liked the heady high. I think i'll start harvesting earlier than in the past. I like the buzz much better. It doesn't put me to sleep.
First plant with nice frosty rails on some fan leaves. This is only my 2nd consecutive grow using methods i am surpremely confident in. I think it is showing well. Nonetheless, i still feel like i have my head up my ass at times. Just had 9/9 clones die and no idea why... usually have ~100% success, even if an oddball stalls occasionally. So much to learn.. so easy to make mistakes with only a dangerous level of knowledge.
21 likes
1 comment
Share
16
Week 16. Flowering5y ago


12 hrs
Light Schedule
22 °C
Day Air Temp
6.5
pH
Normal
Smell
30 %
Air Humidity
20 °C
Night Air Temp
11.36 l
Pot Size
40.64 cm
Lamp Distance
Nutrients 3
Epsom Salt
0.264 mll
15-0-0 Hydroponics Calcium Nitrate
0.555 mll
5-12-26 Hydroponic
0.911 mll
NobodysBuds Okay, well harvest is done. This was a full week of bloom, so i will post harvest pics all at once when appropriate. They are hang drying. I cut each limb below fork, so they simply rest in place and balance out.
These plants are awesome, but not perfect. Leaf monsters for sure, but gooey and expect some potency and taste out of these. I haven't spent that long removing fan leaves in a long, long time. Hoping for 1/2 lbs from these 2 plants. The #4 plant was harvested a while back and that's some poopey weed i won't even include in the final weight, but 30-40g nonetheless.
I have my lights listed as 200W, but they are probably running closer to 180w. That would be around ~1.5g/w which is what i want as a minimum once i gain a bit more consistency and experience. Since i did not make good use of space, I should be able to exceed 1.5g/watt very easily in future. This crop was 1 plant short and had 1 mutant.. I did not fill space properly.
for 360w-400w in 12.5sq ft., I'm thinking a full run instead of 1/2 box could hit 600-700grams. 2g/watt is within reach with the right genetics. 1.5g/watt is a good minmum expectation.
I left the plant in 62-64F for 12+ hours on harvest day. I didn't wake up early enough to pull it from the light. I wanted it to go back through a dark period and harvest with as little photosynthesis occurring as possible. In that time the leaves turned purple. It does not take long, lol. It got extra gooey too. I am not saying this as an argument for or against light deprevation at end.. the real answer requires equipment most of us do not have to understand the actual benefit, if any. THC% may incrase, but if it is only due to the plant losing mass, which is inevitable if you depreive it of light, that would increast THC%, but not mass of THC in plant.. merely greater proportion of total because the plant is losing mass faster elsewhere. So, it's a complicated question that requires more than tunnel vision on the trichomes or other external appearances.
FYI - Harvest week is coming in ~3 weeks from this update, give or take. It'll be dry after ~14 days, but want to give this time for a good taste report. It deserves the respect.
21 likes
5 comments
Share
16
Week 16. Harvest5y ago
Happy Harvest Day!


9/10
Rated
This girl sure frosted up nicely. Easy to grow. Had 2 good plants with slightly different end result. One is about 75% of the other yield with less secondary coloring. Both are a bit hairy, but maybe had i gone a few days longer that would have been reduced? Even so, went 66.X days, probably closer to 67. It is not cured, but going with 9/10 due to extra leafiness. Think this would do better with fewer colas and more plants in same area. I left more at bottom per usual with first run. This too could have sucked a little from the top but overall benefits yield.
Nugs are dense. 32oz jar about 80% full has 45grams in it. I bet i can fit 50-55g in a quart mason jar. Taste hasn't come through yet. Smooth so far. I'll update that in a couple weeks. Some exotic colors in the buds as you break it up, but could have also been due to the recent cold weather recently. Potency is great. A good heady-high.
145g
107g
40-50g from third plant that was total trash. Leaf monster x3.
A good chunk for a 30"x30" space considering wasted floor space with only 3 plants, one being a tall dwarf, lol. Fully filled with best pheno #2 could push 350-400g with ambient CO2 and strong lights (about 55-65 g/ft^2 or about 600-700g/m^2)).
Show more
Translate
Spent 100 days
Ger Veg Flo Har
1100 g
Bud wet weight per plant
250 g
Bud dry weight per plant
1
Plants
0.58 m²
Grow Room size
Normal
Difficulty

Happy
Positive effects
Day air temperature
Air humidity
PH
Light schedule
Night air temperature
Pot size
Lamp distance


NobodysBuds Hoping these taste great... Got super frosty. I'll update this later with taste. Nugs are super dense. A 32oz jar can easily hold greater than 50grams.
I've removed some weight from what was weighed because it wasn't fully trimmed. Sugar leaves falling off due to genlte jiggling of jar before burping. I am sure to be overshooting. UPDATE -- 250g There was more trim than expected. Now, leveled out in jars and curing. I'll get some pictures/macros of the buds once taste presents itself.
Potency - Nice and strong. Good heady-high. Happy to sit on the couch or not.
Taste -
Yield - With pheno #2, 650g per m^2 is a fair goal to have in future. Small, dense nugs and some decent top colas. With a self-inflicted loss early causing wasted space in bloom compounded by a dwarf plant & #2 with 75% yield, i still hit roughly 500g/m^2. An additional 20+% more just from unused space and 50-80 from cloning a higher yielding plant.
temp:
So far, #1 smells better. Hint of peppermint? Fruity? We'll see how it progresses. #2 looks a lot better, but doesn't smell as good, yet. it's getting burped 1x a day and closer to 2/3rds full than 3/4ths once they were fully trimmed. Already killed the #1 clone, because the yield was 75% with similar age and structure. It was big enough to be noticeable by the eye at harvest with fan leaves removed. Anyway, haven't smoked any of #2 recently to know of taste.
27 likes
10 comments
Share
Equipment Reviews


53 comments
Sort by
popularity
popularity
newest
oldest

DreamOn commentedweek 46y ago
Nice job, looks great!
Good luck further and have fun! 🌱😎
likes 7

FreshCoastOrganics commentedweek 136y ago
Those stalks are fat as hell!!
likes 6
FreshCoastOrganics commented6y ago
@@NobodysBuds, She most definitely is!
likes 6

SwedenX commentedweek 46y ago
Looking great! Nice work and happy growing!
likes 6
SwedenX commented6y ago
@@NobodysBuds,👍👍👍
likes 5

DeaneR commentedweek 145y ago
Homer Simpson voice "mmmmmmmmmm.....cookieees!" Looking marvelous! very nice👍
likes 6

Ferenc commentedweek 136y ago
Good Luck @@NobodysBuds
likes 6

Miss_Greenthumbs_Garden commentedweek 96y ago
stunning !! x
likes 5
Miss_Greenthumbs_Garden commented6y ago
@@NobodysBuds, Most welcome 💚✌️🏽
likes 3

Ned_Grows commentedweek 06y ago
Sounds good mate, two awesome strains coming together to create something special 👌. Looking forward to see how they turn out 👍
likes 5
Ned_Grows commented6y ago
@@NobodysBuds, Definitley 😁👍
likes 5

MrJones commentedweek 145y ago
👍Look at your Plants GO! They Are looking Great!👍
likes 4

hanzo385 commentedweek 135y ago
Looks fantastic. I love when those pistils get real thick like that.
likes 4

Canamatoes commentedweek 116y ago
Nice notes 🙏👍
likes 4
Ferenc commentedweek 106y ago
👊
@@NobodysBuds
likes 4
MrJones commentedweek 66y ago
Great Cloning Comentary my friend - you Rock!
likes 4
Ned_Grows commentedweek 56y ago
They are looking really good mate, I can't wait to see how the flowers are going to look
likes 4
Ned_Grows commentedweek 46y ago
Looking good mate
likes 4
Ned_Grows commentedweek 36y ago
It seems we are experiencing the same outcome, the damage to the Cotyledon at the start must be the reason.
likes 4

PsGrowers commentedweek 106y ago
Love your work man so precise, keep it up👍
likes 3

Frenchie commentedweek 106y ago
The plants look really good and healthy. I can't see the light burn on the picture though. What are we supposed to see exactly?
likes 3

L_Tetragrammaton commentedweek 106y ago
They look super happy! Great work 👍
likes 3
Frenchie commentedweek 96y ago
It's looking really healthy, looking forward the coming weeks.
likes 3
Miss_Greenthumbs_Garden commentedweek 86y ago
looking lovely my friend 👌🙂💚
likes 3

the end.
Enjoying this diary? Follow for more updates!


Prefer the old Diary view?
Go back to the old Diary view