
Processing
Likes
Comments
Share


Likes
36
Share


@UnorthadoxDude
Follow
The grow ended on day 100 from seed.
The latest trichome check showed plenty of amber on the buds, so it was time for her to come down.
784g/27.66oz wet - anticipating perhaps 5-6oz dry - time will tell.
Overall this grow has gone pretty smoothly.
Update 14/6/25:
----------
Final yield was 4.815oz (136.5g) dry.
Likes
22
Share


@bypado_farm
Follow
Day 57:
Watered each plant with 1L with nuts
1588 ppm, 3380 us/cm, 3.3 EC (purple punch, strawberry banana, wedding Cheesecake)
1690 ppm, 3595 us/cm, 3.5 EC
(gorilla cookies)
2 different feedings for the 10 plants
Day 60:
Watered each plant with 1L with nuts
1563 ppm, 3325 us/cm, 3.3 EC
Day 62:
Watered each plant with 1L with nuts
1726 ppm, 3712 us/cm, 3.7 EC (purple punch, strawberry banana, wedding Cheesecake)(I gave them more than usual, by mistake)
1528 ppm, 3525 us/cm, 3.5 EC (gorilla cookies)
2 different feedings for the 10 plants
Day 63:
Watered each plant with 1L with nuts
1563 ppm, 3325us/cm, 3.3 EC (purple punch, strawberry banana, wedding Cheesecake)
1523 ppm, 3301 us/cm, 3.3 EC (gorilla cookies)
2 different feedings for the 10 plants
Day 65:
Watered each plant with 1L with nuts
1518 ppm, 3210 us/cm, 3.2 EC (purple punch, strawberry banana, wedding Cheesecake)
1359 ppm, 2891 us/cm, 2.9 EC (gorilla cookies)
2 different feedings for the 10 plants
Next feeding I will start to flush some plants, 1st week with flawless finish, 2nd week clean water, 10x the pot, 150L each
Day 67:
Watered each plant with 1L with nuts
1379 ppm, 2908 us/cm, 2.9 EC (1 purple punch, wedding Cheesecake)
1250 ppm, 2687 us/cm, 2.7 EC (gorilla cookies)
285 ppm, 606 us/cm 0.6 EC (3 strawberry banana and 2 purple punch) (2L each)
3 different feedings for the 10 plants
Started to flush all the strawberry banana and 2 purple punch with flawless finisher. (1st week flawless finisher, 2L each, 2nd week clear water, 150L)

Likes
26
Share

@MrGrowDiarie
Follow
Day 77
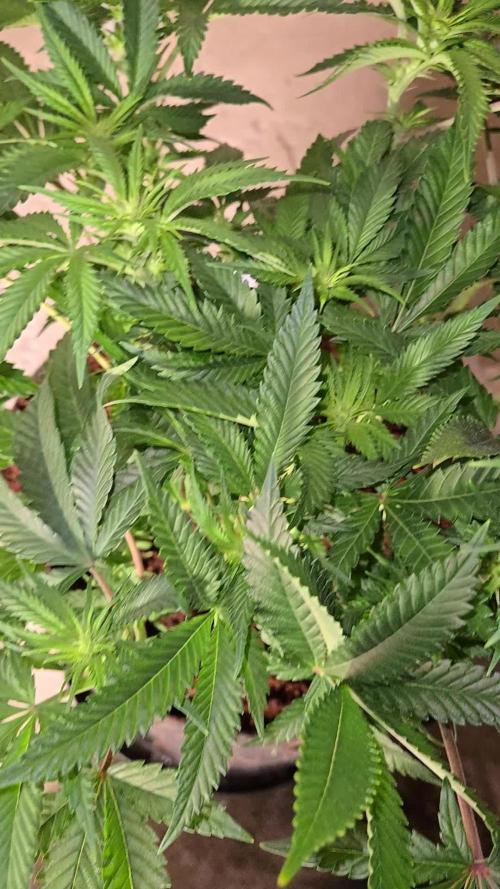
This tall plant displays strong vertical growth with a sturdy central stem and several well-developed side branches. The leaves are broad and evenly distributed along the stem, showing a consistent deep green color that indicates good health, The upper section has vigorous new growth, suggesting the plant is actively developing. The pot appears adequately sized to support its height, and the soil surface looks well-maintained. Overall, the plant has a healthy structure, balanced proportions, and appears to be thriving under its current growing conditions.
Likes
1
Share


@Filiaes
Follow
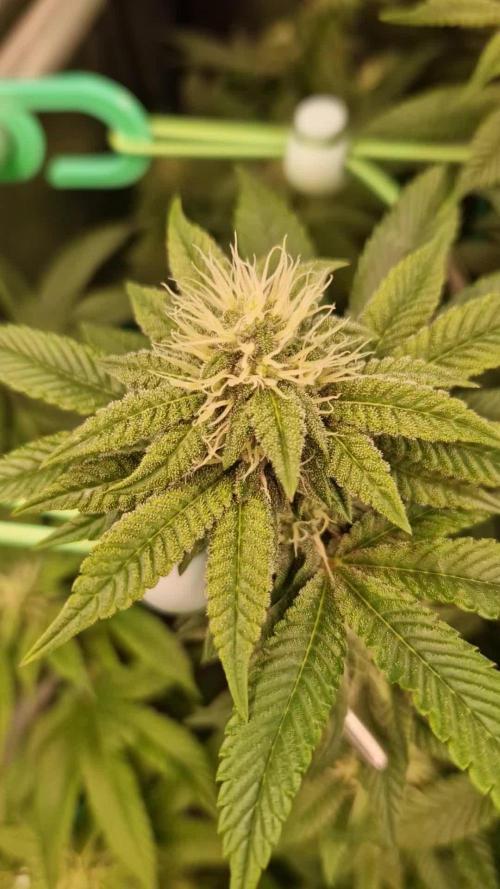
05.01 Happy new year! The official time of bloom, regarding to the breeder, is done (8 Weeks). I checked the trichomes and still see some clear and mostly cloudy trichomes, amber isn't really shown yet so I think they will need one to two more weeks. I will reduce my nutrient scheme now, check next week for the scheme if you are interested. Beside that I reduced the Light to ~650PPFD for the last ripening process.

Likes
Comments
Share


@LokalGrenz
Follow
Cal mag and besides that everything looks so Kay so far
Added some bloom 6/25
Likes
24
Share


@SaulGoodman420
Follow
Hot dry weather, so having to water every other day. Harvesting the StarDawg this week :)


Likes
7
Share


@NOLOGIK
Follow
Fantastik
we have finally arrived at the harvest: thanks to fust bud, for the good and strong seeds, the plants grew in 80/85 days, each plant has buds, hard, full of resin, the smell is very strong, the shape of the plant is of the classic type. a huge bud in the center, and all other slightly smaller branches. I grew up with 24/24 light, I didn't want to practice any form of stress, I just let nature take its course.
2/05/2023
_____
after 2 weeks and a few days, i can say that this plant is the bomb! its power is immense it relaxes you and when it serves it makes you creative a nice 10/10 to genetics
Likes
22
Share


@TheReefinery
Follow
Week 18 done and dusted!! Week 10 of flower!! 🌸
They're ready!! There's enough milky/amber for my liking and they're currently on day 4 of zero water so they'll be pretty much bone dry!! 🏜️
I've turned the LEDs off for their 2 days of darkness!! 🌃
And once that's up I'll give the bottom of the tent a quick clean and take everything out except the extractor fan and a small dehumidifier then 14 days of drying!! 🍂
Catch you next week for another update!! 🍋🍇🤙
Likes
15
Share

@TrickzGrowz
Follow
Sehr gleichmäßige Bud-Bildung an allen Trieben, aufgrund der gleichen Höhe. Mindestens genauso frostig wie die Schwestern im Zelt. Man kann einen Erdbeer-Terp erahnen, aber ganz deuten kann ich es noch nicht.
Likes
43
Share


@Hashy
Follow
********************************************
Week 10 mid flower (flower week 4)
********************************************
Light cycle=12/12
Light Power=155w 65%
Extractor controller settings
High temp= Day 26c, Night 20c
Low temp= c
Temp step=0c
High Rh= Day 50%, Night 55%
Low Rh= %
Rh step=0%
Speed max=10
Speed min=2
Smart controller settings (during lights on).
Lights on=9.00am
Top fan on=+22.5c
Top fan off=-22.0c
Dehumidifier on=+50% and -26c
Dehumidifier off=-50% or +26c
Smart controller settings (during lights off).
Lights off=9.00pm
Dehumidifier on=+55% and -20c
Dehumidifier off=-55% or +20c
VPD aim=0.6-1.6
DLI aim=30-45
EC aim=0.2-2.0
PH aim=6.0-6.5
NPK(14.3/16.2/43)
💧💧💧💧💧💧💧💧💧💧💧💧💧💧💧💧
Method= Autofeed 6 drippers.
Feed=Flower Nutes.
Neutralise=0.1ml/L
Bloom=4.0ml/L
Silicon=1.0ml/L
Calmag=0.5ml/L
Pk=1.0ml/L
Boost=2.0ml/L
Volume=12L
Easy Ph down= 0.125ml/L
Ec=2.1 PH=6.7/6.8
Runs=17
Run times=4min (276ml each)
Gap times=16min
Total runtime=68mins (5.0L each)
Total flowrate= 138ml/min (69ml/min each)
Auto start time=10.00am
Auto stop time=3.24pm
💧💧💧💧💧💧💧💧💧💧💧💧💧💧💧💧
********************************************
********************************************
📅21/7/24 Sunday (day 64, day 22 flower)
📋 away
📅22/7/24 Monday (day 65, day 23 flower)
📋away
💧
Method= automatic
Feed=water
Volume=20L
Ec=0.2 PH=6.6/6.7 (PH D=0.013ml/L)
Volume left=11L Est
Volume used=9L (138ml/min) est
Volume each=4.5L (69ml/min) est
Runoff.
Total runoff=0.2L est
Ec=PH=/
💧
📅23/7/24 Tuesday (day 66, day 24 flower)
📋away
📅24/7/24 Wednesday (day 67, day 25 flower)
📋away
📅25/7/24 Thursday (day 68, day 26 flower)
📋away
💧
Method= automatic
Feed=water
Volume=11L est
Ec=0.2 PH=6.6/6.7 (PH D=0.013ml/L)
Volume left=2L Est
Volume used=9L (138ml/min) est
Volume each=4.5L (69ml/min) est
Runoff.
Total runoff=0.2L est
Ec=PH=/
💧
📅26/7/24 Friday (day 69, day 27 flower)
📋 Arrived home before lights out.
H=98cm D=16cm Dli=65.7 Ppfd=1521
Raised light to maximum hight.
H=98cm D=17cm Dli=59.4 Ppfd=1375
Did a defoliation.
Checked bucket.
Volume left=4L
Volume used=16L
Volume each=8L
Runoff.
Total runoff=0L
Drip system should have done an extra 2L but at least each plant got 4L per watering.
📅27/7/24 Saturday (day 70, day 28 flower)
📋Hot day.
H=98cm D=17cm Dli=48.5 Ppfd=1122
********************************************
Weekly roundup.
📋This one is superb and only stretched an extra 4cm this week, there isnt much room left between tops and the light, she looks great. Grown fine while I was away and starting to bulk.
Take it easy.
Back soon.
********************************************
Likes
14
Share


@Curbyourenthusi
Follow
********************************************************************
START OF WEEK
Went to the grow store and wound up with an AC Infinity EVO6. It should be a nice light for the future, and when my warranty replacement comes back, assuming that won't be an issue, it'll be nice to have a decent back-up. That's the bright side, but I am a little bummed about laying down the cash with ten to 14 days left. That part is the kick in the nutes. Fine, moving on.
As for the grow, it's plowing forward. These plants are doing all the things we want them to do right now. They're getting fat, they're getting sticky, and the fade is fading away. Some branches may call for some last minute support, but for now the sucked-in tent walls will continue to suffice. The feed is still at 1100ppm and pk boosted, but the plan is to finish this week around 750.
********************************************************************
END OF WEEK
Day 63 of flowering has arrived. I've backed off the nutrients. We're now sitting at 850ppm with about 6-8 gallons in the system remaining. This should equate to a Thursday refill with no feed, and then a Saturday or Sunday chop. VPD has been running a touch high this week, but that's not a concern. It's staying in the ideal range for most of the lights on period, and then trailing up in the last few hours to around 1.7-1.8. No biggie. The new light is really nice, but it runs hotter than the combo of the S22 and S44 (500W total), and that's with the EVO6 driver outside of the tent. This also isn't a big deal. The max tent temp is around 84, and before that wouldn't get past 82. Not a huge difference, and potentially better for the plants with the additional heat. I've got two CO2 mushroom bags in there, so more temp should mean more production at that level.
I'm excited for this grow to finish and I'm looking forward to sampling the variety. I'm definitely using half, if not more, to make bubble hash. I'm probably just going to run it all together, as opposed to having runs for each pheno. I'll sample the tops independently, and smash rosin by pheno, but I'm not sold on isolating the hash. Seems like triple the work, but I've got a week to make further considerations, so we'll see.
This will be my last grow until I sell this place and move into my next place. I'm going to miss growing. It's brought me a ton of peace by giving me something to anticipate, study, and take pride in. It's such an enjoyable hobby. I'll miss it in the time being, but I'm grateful that I won't need to step foot inside of a dispensary in 2024. Big win there! Everyone should grow their own.

Likes
5
Share


@TerpNoobster
Follow
Week 2
Some buds are forming, need to defoliate and lollipop shortly. Starting to smell. Had to supercrop a few of them, they recovered over night. Still stretching but it's manageable now. Back 2 on the left are a lot lighter in color almost yellow, not sure what's going on there, different strains but still. ..there still praying in the morning don't look sick but still something is off.. gonna check runoff on next watering. Any advise questions or concerns would be much appreciated.

Likes
104
Share


@SmokingTiki
Follow
I defoliated the 3 plants to give some light to all the branches.
I broke one branch of the Cashew Kush during the watering. I inadvertently pulled on one of the string used for LST with the bottle cap. I also noticed that another branch of the Cashew Kush broke because of the LST, but the tip is still attached to the rest of the branch. I already broke 3 branches of this poor Cashew Kush so far, sorry little plant 😞 I also almost completely broke one branch of the Jack Herer but since it was still attached a bit, I've tried to fix it with some tape and wire. I already did that in the past and it worked but this time the extremity of the branch did not make it 😔
I'm now watering every 2 days. No fertilizer yet.
Due to increasing humidity before defoliation, I put the fan ON 18h/day again. Humidity was around 65% before the defoliation and 62% after. For the last days of the week, I set the dehumidifier to 50%.
I slightly reduced the light intensity from 75 to 70% to try to reduce the light burns of the top leaves. Next week I'll set the lamp to 12h/12h.
Plants heights at the end of the week :
-------------------------------------------
Blackberry Cake : 25cm
Jack Herer : 32cm
Cashew Kush : 32cm


Likes
17
Share


@TreeFarmerCharlie
Follow
Day 21 of flower (day 72 since germination). The plants have continued to grow at, but the vertical growth slowed down mid week, and I think it is done not. One stem on the middle plant grew past the lights, again, so that stem got supercropped a second time. I found a couple more pollen sacs on the right plant on Tuesday, but I think they were just missed on the first round of plucking, so I removed them. I haven't seen anymore since and I've been checking the full length of every stem. I received a roots organics dry amendment sample pack from Aurora so I top dressed each pot with 1TBSP of Phos Rock and 1TBSP of Super Phos Rock (I only used both because I didn't have enough to feed a full dose of just one). Each plant was also fed 700mL compost tea, today, that was brewed for 24 hours.
Likes
50
Share


@DogDoctorOfficial
Follow
Week 5: Transplant Time & Root Power!
Oh man, this was one of those weeks! We transplanted all five phenos into bigger pots, and let me tell you, they’re thriving! (Check out the complete video episode for all the details 😉).
The girls are looking amazing, all pretty much the same size for now, so I don’t have any favorites yet—but let’s see what the future holds!
For photos, I used both my Nikon P900 and Sony A6000, with a bunch of lenses and filters to preserve the true colors—these LEDs are powerful!
Current Setup & Conditions
This week, they’re still chilling with their sisters in the big tent, but in about a week, they’ll be moving into the TrolMaster ecosystem for even better environmental control.
Watering: pH 6.06, EC 0.96
Temperature: A bit cold , but it is what it is. We’re facing some freezing outdoor temps (as shown last week in the frosty veggie garden pics!), yet these Runtz are holding strong like true champions. 💪❄️
Nutrition: Still on the Aptus Clean Program, with:
Regulator
System Clean
RO Water Conditioner
All-in-One Liquid
Root Development: The Real MVP!
Let’s go deep on roots! The mycorrhizae in the Pro-Mix soil has been working its magic, and I’m still boosting them further with a touch of Aptus Holland Mycor Mix. The root development on this transplant was insane—super white, healthy, and ready to explode with growth.
What Are Mycorrhizae?
The word “mycorrhiza” comes from Greek:
• Myco- meaning fungus
• Rhiza- meaning root
Mycorrhizae are a type of beneficial fungi that form a symbiotic (mutually beneficial) relationship with plant roots. These fungi extend far beyond the root zone, creating an underground network that helps plants absorb water, nutrients, and improve overall health.
This is not a single species but rather a whole category of fungi, mainly divided into:
1. Ectomycorrhizae – Live on the outside of plant roots, forming a sheath around them. Common in trees like pines and oaks.
2. Endomycorrhizae (Arbuscular Mycorrhizae, AMF) – The most beneficial for most crops and cannabis. These penetrate root cells, forming structures inside the roots that exchange nutrients.
Where Are Mycorrhizae Found in Nature?
Mycorrhizae naturally occur in forests, grasslands, and undisturbed soils worldwide. They play a crucial role in maintaining ecosystem balance by helping plants access nutrients from the soil.
In a natural environment, plants are constantly forming relationships with these fungi. However, in modern agriculture, excessive tilling, chemical fertilizers, and fungicides have reduced their populations, making supplementation necessary in many cases.
How Do Mycorrhizae Work?
Once mycorrhizae colonize a plant’s roots, they start forming an underground fungal network called the mycelium. This network extends the plant’s reach into the soil, acting as a second root system.
Benefits of Mycorrhizae:
✅ Enhanced Nutrient Uptake – Mycorrhizae help plants absorb phosphorus, nitrogen, and micronutrients that would otherwise be unavailable.
✅ Improved Water Absorption – The fungal network can reach deeper into the soil than roots alone, helping plants survive drought conditions.
✅ Stronger, Healthier Roots – They promote thicker, more robust root systems, reducing transplant shock.
✅ Better Soil Structure – They produce glomalin, a protein that improves soil aggregation and helps retain moisture.
✅ Natural Pest & Disease Resistance – Healthy plants with strong mycorrhizal relationships tend to be more resistant to soil-borne pathogens.
How Mycorrhizae Help in Cannabis & Gardening
In controlled growing environments, using mycorrhizae is a game-changer. Since cannabis relies heavily on phosphorus, the enhanced nutrient uptake provided by mycorrhizae is especially beneficial.
Best ways to apply mycorrhizae:
• At transplant – Dust roots with mycorrhizae powder or mix into soil.
• As a soil drench – Some liquid formulations allow fungi to colonize even after planting.
• Mix into your growing medium – Using pre-amended soil like Pro-Mix HP Mycorrhizae ensures roots have early access.
Pro Tip: Mycorrhizae need living roots to survive! Avoid using synthetic fungicides or excessive chemical fertilizers, as they can kill the fungi.
Think of mycorrhizae as a natural root booster. They’ve been around for hundreds of millions of years, helping plants thrive in all conditions. By using them in cultivation, you’re mimicking nature, ensuring your plants grow stronger, healthier, and more resilient.
When used correctly, mycorrhizae can increase yields, improve plant health, and reduce the need for synthetic inputs—making them a must-have for any serious grower!
Can’t wait to see how they’ll look in the next transplant!
I made a few changes to my improvised photo studio, including a pink background for now—because why not? Let’s keep things fun and full of color! 🌸📸
Massive gratitude to all our sponsors and of course, a special shoutout to Zamnesia, Plagron, and Grow Diaries for making this amazing cup happen. 🙌
And to the community—followers, supporters, lovers, haters—I love you all! ❤️ Let’s keep pushing forward, learning, and making this grow legendary!
Stay Tuned for More!
Next week, i may be moving them into bigger pots and getting them into their final environment. You won’t want to miss this next stage!
See you all next week—stay tuned, keep growing, good luck to all and let’s make history together! 🚀🌱
Genetics - Runtz https://www.zamnesia.com/6000-zamnesia-seeds-runtz-feminized.html
Nutrients - Plagron https://plagron.com/en/hobby
- Aptus Holland https://aptus-holland.com/
Controls - Trol MAster https://www.trolmaster.eu/
LED - https://www.futureofgrow.com/en
LED - https://www.thinkgrowled.com
Soil - https://www.promixgardening.com/en
Germination - Cannakan https://cannakan.com/?srsltid=AfmBOopXr-inLXajXu3QFgKXCXXos4F1oEvScjMKIB5MR5dk8-GJ-F49
DOGDOCTOR 15% off
Smoking Papers - https://ziggioriginal.com/
Terpene saver - https://grovebags.com/
As always thank you all for stopping by, for the love and for it all , this journey of mine wold just not be the same without you guys, the love and support is very much appreciloved and i fell honored with you all in my life
With true love comes happiness Always believe in your self and always do things expecting nothing and with an open heart , be a giver and the universe will give back to you in ways you could not even imagine so
As always, this is shared for educational purposes, aiming to spread understanding and appreciation for this plant. The journey with nature is one of discovery, creativity, and respect. Let’s celebrate it responsibly and continue to learn and grow together!
Growers Love To you All 💚
#EternityGrowCup #RuntzHunt #GrowersLove #CannabisCommunity #AptusHolland #ProMixSoil #TrolMaster #Zamnesia #Plagron #ZiggiPapers #Grovebags


