
Likes
Comments
Share


@ohserp
Follow
defoliating this week and going to begin cutting off the nutrients ive been giving them. Plant 2 is ahead of the others currently, with a super citrus smell coming off of it. It smells like dank oranges. It smells super clean, very excited to see the progress they make this week. They grow up so fast 😄

Likes
Comments
Share


@AcidBurn_40
Follow
14.04.25
VD#35
Guten Abend zusammen ✌️
Der Caramba geht es wunderbar man sieht direkt das sie richtig bock hat.
Heute gab es wieder ne Ladung Nährstoffe von Hesi TNT Complex 4ml/L Hesi PowerZyme 2ml/L
Hesi Wurzel Complex 5ml/L Hesi SuperVit 0,2ml/L
Jetzt darf sie noch 2 Wochen in der Vegiphase verbringen dann noch neue Schuhe 30L dann erholen und ab in die Blüte.
Bin gespannt was Sie uns noch zeigen wird es kann nur schön werden.
Bis nächste Woche mit neuen Updates bis dahin bleibt Sauber and Stay High.
Mögen all eure Ladys Gesund und prächtig wachsen und euch mit schmackhaften Stuff versorgen😁
■■■■■■■■■■■■■■■■■■■■■■■■■■■■■
14.04.25 VD#35
Good evening everyone ✌️
The Caramba is doing wonderfully, you can see straight away that it is really keen.
Today I gave it another load of nutrients from Hesi TNT Complex 4ml/L Hesi PowerZyme 2ml/L
Hesi Root Complex 5ml/L Hesi SuperVit 0.2ml/L
Now it can spend another 2 weeks in the veg phase, then new shoes 30L, then recover and off into flowering.
I can't wait to see what else she will show us - it can only be good.
See you next week with new updates until then stay clean and stay high.
May all your ladies grow healthy and splendid and provide you with tasty stuff😁


Likes
7
Share

@Mannirumpel420
Follow
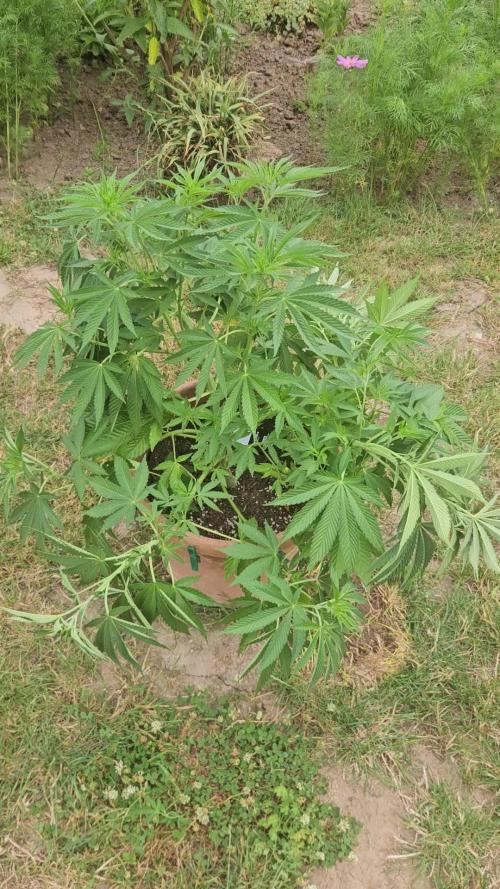
Sie wächst unaufhaltsam und ich habe sie nun supercropt,um die Fläche besser auszunutzen.Ich werde sie bald in einen größeren Topf stecken müssen,da sie schon durchewurzelt ist.

Likes
6
Share


@gabigarcia
Follow
It is already the fifth week of vegetation and they are incredible, the autoflowering ones above all are beautiful and it is also noticing how the critical x are growing little by little. ! (Any questions, or any advice you can give me leave it in the comments, I also speak Spanish)

Likes
5
Share


@Drtomb
Follow
Plants are looking awesome. Skullcap is extremely frosty, the whole tent reeks and no hiccups. I've noticed that the (14) pineapple express #2 seems to be less dense of a bud cola, its looking like the (15) Pineapple express #2 is the better version. If it doesn't tighten up this one's out of the running. I already got rid of the skullcap mom, great quality, but not the quantity I wanted to see.


Likes
54
Share


@rhodes68
Follow
3/18 Week 12 Day 33/Flower
Have a Norto virus in the house so being brief
All looks good no changes at this time waiting on buds to say when
Tricones 80% Milky 20% clear with no amber so at least a week to go before flush
3/19 Pics
Lot happened overnight, looking like end of week for flush.
Will continue PK for one more day as time for the last push here now as upped nuets about 200ppm.
PK ends Friday, nuets will drop back 200ppm at the same time.
Flush begins 3/24 Tuesday... 08:05 PDT ... 😏
3/21 Day 36/Flower
Ended PK dropped CT to below 900ppm
On track for flush mid-week which will be real close to Fast Buds estimate of 45 days.
3/22 D 37/F
Pics
Just waiting for the ripening and flush day next week.
Trics pretty much all white now, still no amber but that will come during flush.
Will be dropping nuets to half Monday on last feeding.
3/23 D38/F
Last feeding at half strength but tossed in a dose of Recharge just to see if it matters. doubt it would but it needed using as it hitting its effective date.
Flush begins tomorrow morning
3/24 D39/F
Flushed each using 10 gallons PHed tap water and 5ml/gal flushing agent.
Pics and vid
3/25 D40/F
Runoff @235ppm about 80 ppm over the water ppm so looks like the pot is empty and we can cease the FloraKleen those roots are stripped and I am no rush on this flush.

Likes
8
Share

@MadeInGermany
Follow
Hey guys :-)
The lady has developed very nicely this week 👍.
They were planted in their 8 liter pot where they can now really take root again.
Depending on what time is left in the vegi phase, you might be trained :-) .
Otherwise everything was cleaned and checked.
Have fun and stay healthy 💚🙏🏻
👇🏼👇🏼👇🏼👇🏼👇🏼👇🏼👇🏼👇🏼👇🏼👇🏼👇🏼👇🏼
You can buy this Nutrients at :
https://greenbuzzliquids.com/en/shop/
With the discount code: Made_in_Germany you get a discount of 15% on all products from an order value of 100 euros.
👇🏼👇🏼👇🏼👇🏼👇🏼👇🏼👇🏼👇🏼👇🏼👇🏼👇🏼👇🏼
You can buy this strain at :
Clearwater Seeds
Water 💧 💧💧
Osmosis water mixed with normal water (24 hours stale that the chlorine evaporates) to 0.2 EC. Add Cal / Mag to 0.4 Ec Ph with Organic Ph - to 5.8 - 6.5
MadeInGermany
Likes
20
Share


@adam_pawloski87
Follow
We are in Flush !! Was giving them GH Flora series + rapid start + cal mag
Likes
52
Share


@GYOweed
Follow
Tipped and pruned fan leaves they were huge!
Rub smells like candy.
Will flower it in a week or so.

Likes
52
Share


@Santica_Garden
Follow
Posted a quick video showing how the ladies are looking at the end of their 1st week of life. So far so good. Any questions just ask guys.
Happy Growing 👍🏾🔥💚🌱

Likes
23
Share


@dataTwiiix
Follow
06/04: Début 3ème semaine jusqu'à présent je suis content de moi, c'est ma deuxième culture. La première a été assez mouvementée et cette fois-ci je me sent plus à l'aise par rapport aux arrosages par exemple. J'ai choisi de ne pas utiliser du allmix par exemple pour pas risquer de brûler mon plant lors de l'engraissâge etc.
06/05: Aujourd'hui "tie down" des branches les plus basses. (LST j 0) + Arrosage à l'eau clair 400ml ainsi que toping des branches basses.
06/06: j'aperçois les premiers pistils la phase de pré-flo est sur le points de débuter je vais augmenter la luminosité petit à petit dans les jours qui viennent pour arriver autour des 70,000Lux en phase de flo.
06/07: je vais revoir mon planing d'engraissage et ajouter un engrais de flo. et du CalMag agent toutes les deux semaines, quand au GHE essential une fois par semaine en foliaire.
06/08: le filet est placé depuis ce matin, maintenant on attends l'étirement floral pour le remplir.
06/09: arrosage +/-500ml avec engrais, j'ai tenté de descendre le filet pour palliser le plant et commencer à diriger le branche dans les trous du filet mais j'ai changé d'avis car je le sentais pas, je préfère attendre le stretch et utiliser le filet quand les branches l'atteindront naturellement.
06/10: finalement j'ai fait un topping hiers soir car le fiming ne semblait pas prendre et le cola continuais a monter et a chaque nouveau noeud j'avais chaque fois que deux branche donc j'ai préferer le topping certaine branche latérale on déjà rejoint la hauteur de deux branche obtenue grâce au topping. je suis étonnée par la vigueur de cette variété qui se remet rapidement de tout stress!


Likes
3
Share


@Papabro2k
Follow
Going to give her just water for a week or 2 now she seems like she’s done enough now
Likes
5
Share


@Funkyfreshgreens
Follow
New Pots and soil using the bio bizz line.
Topped banana blaze looks to be recovering well, orange bud looks ready this week Topped at some point.


