Likes
Comments
Share
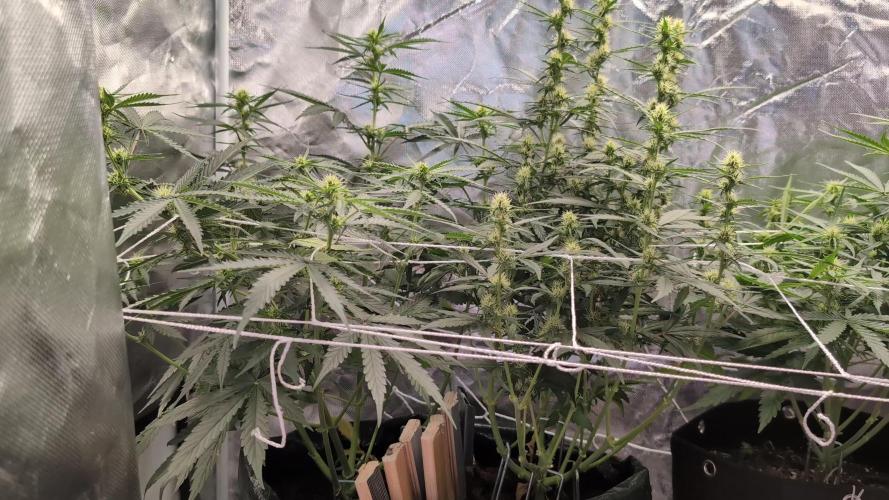
Flowering day 3 since time change to 12 / 12 h Hey guys . My cutting heating broke 3-4 weeks ago, which was fixed immediately and everything went wonderfully. Now, 3 days ago, the central heating broke down in the entire room, so that at night I only have temperatures of around 13 degrees :-( . One or the other lady is slowly starting to see a phosphorus blockage, as this can no longer be absorbed at temperatures below 15 degrees, like many other nutrients :-( . A friend looked at the heating yesterday and came to the conclusion that a real company had to do it, which is by no means possible for a stranger to enter my room. I quickly ordered heating mats for all the boxes so that the ladies could at least get warm feet. That's all I have this winter full can do . Let's hope everything will be fine ๐Ÿ™๐Ÿป. As soon as the heating mats are attached in the coming days, I will post them in the pictures. Now for the update. Despite the severe cold, the ladies are still doing well and have made good progres . The ladies only had to be watered once this week, each time with 1 l, because it absorbs the water very slowly because of the cold and I don't want to overwater it. I took every single plant in the pot to take a close look at their roots. These are snow white and look very healthy ๐Ÿ™๐Ÿป. It was also the last time neem oil sprayed so that the last trips are finally gone. Otherwise everything was checked and a lot of planning was done, like I do with the heating mats. Since a friend had the same problem in one winter and the heating mats got 10 degrees plus on the pots, I am very confident that it will at least bring something for the last cold month ๐Ÿ˜ƒ ๐Ÿ™๐Ÿป. I've started flowering even if some are still a bit small, but otherwise they'll get too wide from training and end up taking up space :-) until then have fun and stay healthy ๐Ÿ™๐Ÿป ๐Ÿ‘‡๐Ÿผ๐Ÿ‘‡๐Ÿผ๐Ÿ‘‡๐Ÿผ๐Ÿ‘‡๐Ÿผ๐Ÿ‘‡๐Ÿผ๐Ÿ‘‡๐Ÿผ๐Ÿ‘‡๐Ÿผ๐Ÿ‘‡๐Ÿผ๐Ÿ‘‡๐Ÿผ๐Ÿ‘‡๐Ÿผ๐Ÿ‘‡๐Ÿผ๐Ÿ‘‡๐Ÿผ You can buy this Nutrients at : https://greenbuzzliquids.com/en/shop/ With the discount code: Made_in_Germany you get a discount of 15% on all products from an order value of 100 euros. ๐Ÿ‘‡๐Ÿผ๐Ÿ‘‡๐Ÿผ๐Ÿ‘‡๐Ÿผ๐Ÿ‘‡๐Ÿผ๐Ÿ‘‡๐Ÿผ๐Ÿ‘‡๐Ÿผ๐Ÿ‘‡๐Ÿผ๐Ÿ‘‡๐Ÿผ๐Ÿ‘‡๐Ÿผ๐Ÿ‘‡๐Ÿผ๐Ÿ‘‡๐Ÿผ๐Ÿ‘‡๐Ÿผ You can buy this strain at : https://www.exoticseed.eu/de/hanfsamen/hippie-therapy-cbd Water ๐Ÿ’ง ๐Ÿ’ง๐Ÿ’ง Osmosis water mixed with normal water (24 hours stale that the chlorine evaporates) to 0.2 EC. Add Cal / Mag to 0.4 Ec Ph with Organic Ph - to 5.8 - 6.4 MadeInGermany
Likes
4
Share
@SWITCH420
Follow
Hi folks, I'm coming here to start the process of ending this grow journal. I harvested about three months ago and the weed is definitely cured. Photos are about to come โ€” I'm doing a real studio photo shoot for those buds, they deserve it! While waiting for the shots, I made some pretty damn dank hash temple balls using the iced water extraction method (solvent-free) with my little washing machine. It's a mix of the 8 strains I grew here โ€” never ideal to mix different kinds of resin... but man, this is some serious dedicated work, so I'm making myself happy with that 14g shiny temple ball in the end ๐Ÿ˜‰ Here are a few details about my process for you guys (and don't forget โ€” you can do it with fresh material! Fresh frozen is always tastier. Also, the drying process is much more efficient and faster with a freeze dryer, but... you need the budget for that. I don't, so I go with the air drying method โ€” check it out below): 1. Get your dry trim, then cure it properly for at least a month (I did 3 months). Smell it โ€” mmh, sweet, dried to perfection. โœ… 2. Freeze it, delicately wrapped in a freezer bag. 3. Let a large amount of tap water sit for at least 24h to remove chemicals like chlorine, then use it to make plenty of ice cubes โ€” don't be shy, especially if you're not working in a cool environment. 4. Prep your washing machine: add trim between two layers of ice, fill up with clean water (as much as you can, large vortex is better than a smaller one), then make it seat for 30 min (45 min for thicker buds) the time that the dried green material gets wet again. 5. Prep your filtering tools: catch bag, different mesh bags, spoon, etc. 6. Wash as many times as you can before green contaminants appear, as these lower the quality of your hash โ€” don't hesitate to go up to 8 to 12 washes if the resin still looks clean! Important: each wash has its own specific duration, and they get progressively longer as you advance through the process. Frenchy Cannoli (a true hash legend) provides a detailed timetable for this โ€” from as little as 30 seconds to 1 minute for the first wash, all the way up to around 25 minutes by wash 8. Make sure to follow that schedule rather than using the same duration for every run or running it too long the first wash !! It could breaks to quickly your precious material before you collect all the trich's and the quality would be lower in the end. 7. Collect the wet resin in the mesh bags with a frozen metal spoon, make patties with the resin, and let them sit over some towels in order to drain as much water as possible (place a tissue made for hash collecting over the towel). 8. When the patties are a little dry to the touch, wrap them as they are in the tissue and place them in the freezer for 48h or more. 9. With an iron strainer, microplane your patties over the biggest flat surface you can get! It's important that your micro pieces of hash dry widely and don't get too compacted. Any failure in the air drying process will nucleate rot, ruining your hash in the end and making it a poor product โ€” eventually something to throw away. Sad when you think about all the phases of the process to get to this point! 10. So, in order to air dry properly, you must โ€” it's not optional โ€” lower the RH of your dry room to 35% or slightly below, never above and let it dry as long as needed until the material feels like dry sand. For myself, I found 10 to 15 days is ideal. The room must be very lightly ventilated (not directly on your resin!) and in complete darkness โ€” the goal is to preserve all those delicious terpenes! Ideally, temps around 60ยฐF or 16ยฐC 11. Now that it's dry, collect your resin with a large thin spatula! Make a little mound between two layers of PaperHash, boil some water, and fill up a wine bottle with it! โš ๏ธ From this point on, to avoid exposing your carefully dried resin to a more humid environment โ€” which could ruin all your hard work โ€” everything must happen in the same drying room. Keep working at 35% RH until your temple ball is tightly and airtight wrapped in PaperHash. (And don't forget to drink water โ€” it's dry in there! ๐Ÿ’ง) 12. Start to slowly press your resin. Magical moment. Finally.... 13. Press 3 times for 10 to 15 minutes in order to really decarb your hash โ€” because that's what it's all about! Between each press, try as best you can to shape a patty... until the final press, when you'll be able to form that magical shiny temple ball (it only shines with gloves on, guys ๐Ÿ˜„) 14. You are now allowed to try it โ€” for quality control purposes only, of course! 15. Because you want to age your hash for the sweetest 5-star smoking experience: wrap your temple ball in a large piece of PaperHash โ€” if you can get that brand it's ideal, or another kind (check https://thepressclub.co) as long as it's organic! 16. Place the wrapped temple ball in a glass jar and store it in a dark, cool place. 17. Wait a minimum of 3 months before opening it. 18. Open, smell, touch โ€” you'll be amazed. Roll it up with some weed or tobacco or both (I do both) / Or get a Hooka... you are smoking some true primo aged hash made by yourself! Taste the difference and realize all the path from choosing the seeds online until this first amazing puff ... ๐Ÿ™ I want to credit my inspiration for making this kind of hash to the great Frenchy Cannoli, who has shared all his knowledge through amazingly rich tutorial content that you can find online with a bit of searching. ๐Ÿ˜‰ Peace Frenchy ๐Ÿ•Š๏ธโ˜ฎ๏ธ
Likes
13
Share
Ooooooweeeeeee theyโ€™re all doing so good even the extras that I threw in flower with out cloning are doing great .. in just 2 more weeks Iโ€™ll throw the donor plants into flower
Likes
Comments
Share
todo bien buena aplicacion para no olvidar por q semana voy y poder hacer lo seguimientos
Likes
28
Share
@xmackobox
Follow
Bien pues el domingo 15/05/22 hice defoliacion con 66 dias desde la germi. Hoy lunes por la noche, las pongo ya a 12/12 y que empiecen a florecer. Considero que estan robustas y fuertes para la etapa de flora. Me lie con stories y videos y se me paso hace fotos detelladas para aqui... lo siento, os dejo las stories y fotos de esta maรฑana Creo que vamos a ver buenas cosas aqui :D Son 10 Tropicanna cookies con 48 dias desde la germinacion y 5 MAC, 4 Bannana wafflez y 1 Apple friter con 67 dias desde la germi. Hoy lunes 16/05/22 por la noche las paso a 12/12 Todo de GBSTRAINS abonado con BOOM NUTRIENTS bajo los paneles LED de GBLIGHTING GB THE GREEN BRAND
Likes
21
Share
Day 68 - April 18, 2021 (Day 1 - Week 3 Flower) Kicking off day 1 of week 3 in flower. Worked on Canopy for F1, F4, F5, F8 most of the day. Ladies were thick. Starting to see some flowers forming. :) Inspected each closely and all are female with no signs of hermis. Remounted camera for timelapses and shouldn't have anymore movement on future videos. Foliar Spray (9:00PM): * ~1 Gallon RO Water (EC 0.05) * 5ML Liquinox Iron & Zinc * 5ML CalMag+ per Gallon * 0.5ML Mills Nutrients Vitalize per gallon * PH 5.85 * EC 0.64 Watering: 010:00AM-10:08AM ~0.25 gallons per pot 02:00PM-02:08PM ~0.25 gallons per pot 6:00PM-6:08PM ~0.25 gallons per pot 8:00PM-8:08PM ~0.25 gallons per pot Reservoir: * tested 8:45PM * 1.87 EC * 6.05 PH (Reducing PH ~6.0) * 73.22F Lights: * Gavita LEDs On 12-hours (10:00AM - 10:00PM) ** 10:00AM Lights On (100%) * Gavita LEDs Off 12-hours (10:PM - 10:00AM) * UV Bars On 8-hours (12:00PM - 8:00PM) Air control: 70F-82F (79F AVG) (Lights On) 66F (Lights Off) 65%-70% (69% AVG) humidity (Lights On) 65%-80% RH (Lights Off) ~1353PPM CO2 (Lights On) ~680PPM CO2 (Lights Off) Day 69 - April 19, 2021 Watering: 010:00AM-10:08AM ~0.25 gallons per pot 02:00PM-02:08PM ~0.25 gallons per pot 6:00PM-6:08PM ~0.25 gallons per pot 8:00PM-8:08PM ~0.25 gallons per pot Reservoir: * tested 8:45PM * 1.49 EC * 6.19 PH * 73.94F Lights: * Gavita LEDs On 12-hours (10:00AM - 10:00PM) ** 10:00AM Lights On (100%) * Gavita LEDs Off 12-hours (10:PM - 10:00AM) * UV Bars On 8-hours (12:00PM - 8:00PM) Air control: 70F-82F (79F AVG) (Lights On) 66F (Lights Off) 65%-75% (72% AVG) humidity (Lights On) 65%-80% RH (Lights Off) ~1269PPM CO2 (Lights On) ~720PPM CO2 (Lights Off) Day 70 - April 20, 2021 Watering: 010:00AM-10:08AM ~0.25 gallons per pot 02:00PM-02:08PM ~0.25 gallons per pot 6:00PM-6:08PM ~0.25 gallons per pot 8:00PM-8:08PM ~0.25 gallons per pot Reservoir: * tested 8:45PM * 1.87 EC * 6.19 PH * 73.40F Lights: * Gavita LEDs On 12-hours (10:00AM - 10:00PM) ** 10:00AM Lights On (100%) * Gavita LEDs Off 12-hours (10:PM - 10:00AM) * UV Bars On 8-hours (12:00PM - 8:00PM) Air control: 70F-82F (79F AVG) (Lights On) 66F (Lights Off) 65%-75% (72% AVG) humidity (Lights On) 65%-80% RH (Lights Off) ~1260PPM CO2 (Lights On) ~700PPM CO2 (Lights Off) Day 71 - April 21, 2021 Pushing on the envelope on humidity. Dumidifier should be ready for pickup mid next week at the lastest barring any delays. In a worst case scenario, I'll turn off co2 and exchange air in the room until I can get dehu setup. Overall, been busy and haven't done much in the room. Just watching the growth, think we should be at the end of stretch, maybe one or two days to go. F7 has really been reaching up. Also recived my Jack's Nutrients today. Will finish out this grow with Mills Nutrients and will give Jack's a go on next run. Pretty excited to compare. Mixed 50-gallons nutrient solution: ** 40-gallons RO Water ** 10-gallons Tap Water (In replace of Cal-Mag+) *** RO + TAP water base ~0.38 EC ** 0.5 ML Mills Nutrients Vitalize (per gallon) ** 10.0 ML Mills Nutrients Basis A & B (per gallon) ** 8.0 ML Mills Nutrients C-4 (per gallon) ** 1.73 EC Watering: 010:00AM-10:08AM ~0.25 gallons per pot 02:00PM-02:08PM ~0.25 gallons per pot 6:00PM-6:08PM ~0.25 gallons per pot 8:00PM-8:08PM ~0.25 gallons per pot Reservoir: * tested 8:45PM * 1.89 EC * 6.26 PH * 73.94F / 23.3 Lights: * Gavita LEDs On 12-hours (10:00AM - 10:00PM) ** 10:00AM Lights On (100%) * Gavita LEDs Off 12-hours (10:PM - 10:00AM) * UV Bars On 8-hours (12:00PM - 8:00PM) Air control: 70F-82F (79F AVG) (Lights On) 66F (Lights Off) 65%-75% (72% AVG) humidity (Lights On) 65%-80% RH (Lights Off) ~1288PPM CO2 (Lights On) ~710PPM CO2 (Lights Off) Day 72 - April 22, 2021 Watering: 010:00AM-10:08AM ~0.25 gallons per pot 02:00PM-02:08PM ~0.25 gallons per pot 6:00PM-6:08PM ~0.25 gallons per pot 8:00PM-8:08PM ~0.25 gallons per pot Reservoir: * tested 8:45PM * 1.89 EC * 6.19 PH * 73.94F Lights: * Gavita LEDs On 12-hours (10:00AM - 10:00PM) ** 10:00AM Lights On (100%) * Gavita LEDs Off 12-hours (10:PM - 10:00AM) * UV Bars On 8-hours (12:00PM - 8:00PM) Air control: 70F-80F (78F AVG) (Lights On) 66F (Lights Off) 65%-75% (72% AVG) humidity (Lights On) 65%-80% RH (Lights Off) ~1325PPM CO2 (Lights On) ~660PPM CO2 (Lights Off) Day 73 - April 23, 2021 Watering: 010:00AM-10:08AM ~0.25 gallons per pot 02:00PM-02:08PM ~0.25 gallons per pot 6:00PM-6:08PM ~0.25 gallons per pot 8:00PM-8:08PM ~0.25 gallons per pot Reservoir: * tested 9:30PM * 1.77 EC * 6.19 PH * 73.58F Lights: * Gavita LEDs On 12-hours (10:00AM - 10:00PM) ** 10:00AM Lights On (100%) * Gavita LEDs Off 12-hours (10:PM - 10:00AM) * UV Bars On 8-hours (12:00PM - 8:00PM) Air control: 70F-88F (75F AVG) (Lights On) 66F (Lights Off) 65%-75% (72% AVG) humidity (Lights On) 65%-80% RH (Lights Off) ~1300PPM CO2 (Lights On) ~730PPM CO2 (Lights Off) Day 74 - April 24, 2021 Watering: 010:00AM-10:08AM ~0.25 gallons per pot 02:00PM-02:08PM ~0.25 gallons per pot 6:00PM-6:08PM ~0.25 gallons per pot 8:00PM-8:08PM ~0.25 gallons per pot Reservoir: * tested 9:30PM * 1.77 EC * 6.19 PH * 73.94F Lights: * Gavita LEDs On 12-hours (10:00AM - 10:00PM) ** 10:00AM Lights On (100%) * Gavita LEDs Off 12-hours (10:PM - 10:00AM) * UV Bars On 8-hours (12:00PM - 8:00PM) Air control: 70F-82F (79F AVG) (Lights On) 66F (Lights Off) 65%-75% (72% AVG) humidity (Lights On) 65%-80% RH (Lights Off) ~1350PPM CO2 (Lights On) ~680PPM CO2 (Lights Off)
Likes
6
Share
Flowering day 34 since time change to 12/12 h. Hey guys :-) The buds have developed incredibly nicely this week. The smell is getting more and more extreme :-) . The growth has slowly stopped as the full energy goes into the production of the buds. Watering was done twice this week, each time with 1.2 l (nutrients see table above) They were individually inspected and checked for their health. Osmosis water for the coming week was refilled in a 100 l tank ๐Ÿ‘. Have fun reading the diary and stay healthy ๐Ÿ’š๐Ÿ™๐Ÿป ๐Ÿ‘‡๐Ÿผ๐Ÿ‘‡๐Ÿผ๐Ÿ‘‡๐Ÿผ๐Ÿ‘‡๐Ÿผ๐Ÿ‘‡๐Ÿผ๐Ÿ‘‡๐Ÿผ๐Ÿ‘‡๐Ÿผ๐Ÿ‘‡๐Ÿผ๐Ÿ‘‡๐Ÿผ๐Ÿ‘‡๐Ÿผ๐Ÿ‘‡๐Ÿผ๐Ÿ‘‡๐Ÿผ You can buy this Nutrients at : https://greenbuzzliquids.com/en/shop/ With the discount code: Made_in_Germany you get a discount of 15% on all products from an order value of 100 euros. ๐Ÿ‘‡๐Ÿผ๐Ÿ‘‡๐Ÿผ๐Ÿ‘‡๐Ÿผ๐Ÿ‘‡๐Ÿผ๐Ÿ‘‡๐Ÿผ๐Ÿ‘‡๐Ÿผ๐Ÿ‘‡๐Ÿผ๐Ÿ‘‡๐Ÿผ๐Ÿ‘‡๐Ÿผ๐Ÿ‘‡๐Ÿผ๐Ÿ‘‡๐Ÿผ๐Ÿ‘‡๐Ÿผ You can buy this Strain at https://pcg.international/shop/pcg-int/ Water ๐Ÿ’ง ๐Ÿ’ง๐Ÿ’ง Osmosis water mixed with normal water (24 hours stale that the chlorine evaporates) to 0.2 EC. Add Cal / Mag to 0.4 Ec Ph with Organic Ph - to 5.8 - 6.5 MadeInGermany
Likes
Comments
Share
@3rnest
Follow
Nun geht es in die 9. Woche Leider haben sich ein paar Blattlรคuse breit gemacht und ich habe die Pflanze erstmal etwas separiert und mit Brennesseltee behandelt. Ich hoffe der Geruch geht nicht zu stark auf die Blรผten รผber.
Likes
7
Share
Moving along nicely. Plants are looking nice and healthy. No issues just trying to get a few more weeks in before harvest time. Weather will be in the 80s-90s this week
Likes
Comments
Share
Day 11 of flower๐Ÿ”ฅ๐Ÿ™๐Ÿผ Thank all yall for following it means alot. Iโ€™m Curious how these girls are going to bang out! Iโ€™m looking for that sweet Jealousy terp with some gas on the back end!๐ŸŒŠ๐Ÿฅ‡๐Ÿฅ‡
Likes
148
Share
@BioBuds
Follow
Gorilla, gorilla, my problem child. The only one popping out of 5 but she is weaker than her roommates. She stays behind compared to them. But what can I do other than TLC, she has the best conditions, which are optimal in this grow room, also judging by the other two plants. Until I have a bigger operation, which in the current political climate, is not soon, where I can make mothers and clone them, breed my own strains, and root out runts like this, we do it like life. We play the hand as it is dealt to us and we love all our children the same... although this one is special. So not a genderfluid Silverback yet, but it ain't over till the voluptuous lady sings. We shall nurse this little runt until adulthood, who knows she might surprise us, she should have the mighty Gorilla Glue Number Fouh genes in there somewhere. Now come on out here and show daddy what you're made of... This week we spread out the leaves and branches, some leaf tucking and gentle LST, to prepare for some higher stress and super cropping today. Two days back we made the switch and set the lights to 12/12. Now the flowering stretch will begin, thus we bend the branches further outward in preparation for the canopy. When I do this I notice the branches are thick and sturdy, with no breakage at all unlike my previous grow, the gelato 33. I snapped some branches applying the super cropping and just normal bending with those. It seems like the fan (I didn't have a good option previous grow, hence the flimsier branches there) but also this lighting and soil regime are topnotch, asides from outdoor I haven't seen such lush bushiness yet, even on a more runt-like plant. This MarsHydro SP3000 is still performing great, such controlled temperatures, such an ocean of light. I only wish I started growing with this earlier. Thanks again @MarsHydroLED for trusting us to test your mighty flagship light. It is so well made, it oozes quality, I just want to touch it every time (also to check if it stays cool) and it is just sexy, slender, and compared to my other 300 watt light, a completely different spectrum and clarity. If you are looking for new lights, look no further. At www.mars-hydro.com they have excellent and unbeatable deals on tent and light combinations where you practically get a tent for free, it is ridiculous. I was afraid the light wouldn't cover the sides of my tent with my 4.5-foot space. Penny at MarsHydro had to laugh at this a bit, said not to worry. What an understatement. This light could signal to other galaxies. I sincerely recommend good sunglasses with this light. Only thing I'm adding is an infrared light Sunshine found. With this I'm going to simulate sunrise and sunset and try to prevent stress by easing the light in and out, like in nature. We are in flowering now, very excited to see what she will do here. What can she perform? Will she cover the net? Will she deliver gorgeous buds, like she is known to do? On these cliffhangers I hope you will tune in next week for more gorilla-related plantporn... go on... you know you want it. Hug Bud!!
Likes
13
Share
Lemon Haze is just doing her thing quietly in the background, slowly getting overshadowed by the booming Ztrawberriez ladies. ๐Ÿ˜… She's started to give off a nice lemony haze scent, which is really pleasant, but she still looks like a small sword, tall and thin with not much going on on the sides. I don't expect much more stretch or branching at this point, but maybe the buds will fatten up a bit. Let's see what she has in store! ๐Ÿ‹
Likes
8
Share
@Kirsten
Follow
26.12.24: I have noticed light stress on my plants. I had moved the lights further away and increased the light intensity to 70%. Unfortunately that created some issues. Namely severe palour of the leaves. To try and rectify the situation, I've dimmed the lights to about 30%, staying at the same distance, about 30 inches away. I measured the par levels, after I did this. They should a reading of anywhere between 40 and 150, at the canopy of the plants. They are all different sizes. This seems to have improved the colouring on all plants. After this evenings watering, I will monitor recovery and increase lighting intensity again slowly. I am also using the light cycle of 21/3, so the plants have many hours more light to absorb, than for example 12/12 or 18/6. I am pleased with the progress, considering all of my mistakes! 29.12.24: So I finally gave LST a shot, it's probably a bit too late, however I really want to get the most of the triploid pheno, and I went a little crazy and LST'd all plants except 2, as they're too small. I did that late last night, this afternoon I was amazed to see the plants turn their leaves back to the light source. I'm glad I overcame my fear of trying it. I'm very excited to see them adapt and progress! ๐Ÿ˜ there are videos above with before and after of my LST process. Thanks for checking out my diary ๐Ÿƒ โœŒ๏ธ
Likes
10
Share
Ok so I put a significant amount of time into this grow. Learned a ton (everything lol) as it was my first. After the final week, I decided to harvest when the trichs were milky and clear. Few amber here and there but time constraints meant I had to chop a bit earlier than Iโ€™d have preferred. I do prefer a more uplifting cerebral effect yet realize with an indica leaning strain, having all cloudy and maybe 25% amber would have been ๐Ÿ‘Œ๐Ÿผ. My drying process began by chopping a plant at a time, I washed the buds to get the PM or traces off (also grime from outdoor city air). I used a big bucket and did hydrogen peroxide. In heindsight I would have used baking soda as well and did a two step wash. After washing them, I hung to dry with a fan until they stopped dripping then into the tent they went for drying at roughly 68 degrees and 55% humidity. I staggered the harvest and wet trimmed about 70% of the time with the latter 30% dry trimmed. This was done for convenience and to try both ways. I dried everything for about 12-13 days until the smallest stems snapped and the larger ones were borderline cracking. I started jarring everything with humidity meters, about a half oz per smaller widemiuth jam jar. The smell was never hay-like but did vary in strength and scent from plant to plant. Almost no seeds which was pretty great to see. One of the outdoor plants had quite a few seeds so I kept that separate. It ironically had the stinkiest floral smell. So whatโ€™s the total!! After curing in jars for about a month, I weighted everything and came out with 10.5oz of cured trimmed flower and about 2 oz of sugar leaf trim which I am making canna butter with and cooking. Made some reduculously strong cookies: 11 cookies from about 10 grams of trim. Ate two and was medicated for about 24hrs ๐Ÿ˜‚. Some of the buds were super dense and cured down to 58 RH easily. There were a few of the large big buds that had mass but less density and fewer trichomes. These were more red-hair visually than the others. The smoke: surprisingly smooth. The effect is energizing and uplifting at first, with a nice sedative body feeling on the second half of things. Overall, Iโ€™m super happy with the result. Learned a TON and will be modifying my approach a bit next go-around this spring. Stay tuned!!!
Processing
Likes
8
Share
Buenas noches familia, de nuevo actualizamos el diario, y acabamos la cuarta semana de floraciรณn, vaya brazos laterales que estรกn tirando, se van a poner hermosas, se las ve sanas y vigorosas, nota mucho la forma sativa de sus hojas asรญ que veremos lo que tardan en florecer. Ph controlado a 6,5 y humedad por debajo de 45% not bad las condiciones temperaturas mรญnimas de 20 y maximas de 27,5 Grados. Al atar las puntas los brazos tendieron a ir a la luz y gracias a eso la planta estรก tomando la forma de la esquina.
Likes
27
Share
Week 5 of flower. Strain is Nanda Devi(The Real Seed Company) X Skunk 1 (Spliff Seeds) F1 Hybrid cross. Started seeds outdoors and sprouted on May 10, seeds went indoors under 11 and 13 on June 16th. Check me out on youtube to see more of this grow https://www.youtube.com/channel/UCvBA-kG70hHVrnBxoHBHBuw/videos Like 1
Likes
3
Share
Last week or so on this one. Sheโ€™s got one last feed and then we will be heading to flush in the next 3 or 4 days. Aiming for the chop in 7 days ish. She smells like a sweet shop, starting to change to purple in places! I canโ€™t wait! Still using Monkey Nutes
Likes
2
Share
Likes
3
Share
Sembra andare tutto bene perรฒ consigliatemi come migliorare il coltivo
Likes
47
Share
More haircuts this week! I am very aggressively trying to keep up with the canopy growth. I'm continuing to remove the small branches underneath the canopy - more or less stripping the undergrowth, while defoliating around the growth sites that have made it to the canopy surface. I'm unsure of how much more growth to wait for before I send her into flower. Maybe next week? Who knows! Not me! Hah! Happily accepting any advice from any experienced main-liners out there! ๐Ÿ˜‰ She's been super thirsty - I have to add a gallon every few days to keep up! I also started adding some p31 Microbes to the reservoir to see what I can see. ๐Ÿ˜Ž