


Likes
Comments
Share


@PEAKYPLANTERS
Follow
good evening to all, brothers of the weed!
Welcome back to the PEAKY gardens where it is grown for passion
A good perfume all made in Holland comes out of the tent!
The beautiful Punch are the ones that surround the whole tent, while the barneys cookies are the purple ones in the center of the tent!
They seem to travel quite well and without irregularities ! We begin to see the first little heads of trichomes

Likes
6
Share


@Muravushka
Follow
During my previous grow, I harvested and made some bubble hash. Afterward, I dropped the used, wet buds onto this coco, and it seems some seeds sprouted from the leftover material. I’m not even sure if they’re photoperiod or autoflower, but hey—let's roll with it!
Both my pH meter and PPM meter are broken. I have no idea why they keep breaking so often. They’re ADWA meters, and while you can replace the reading elements, the replacements cost half the price of a new meter. It’s frustrating, and I really don’t want to keep buying them every time I start a new grow

Likes
4
Share

@SWITCH420
Follow
Hi folks,
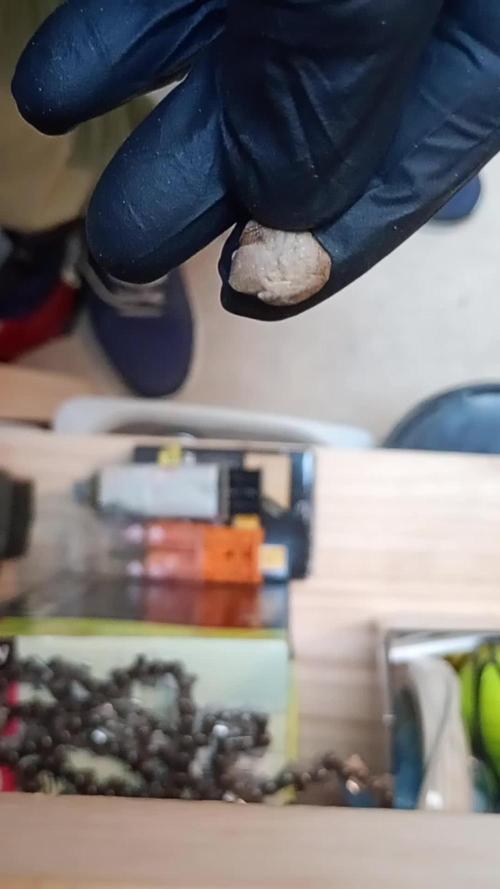
I'm coming here to start the process of ending this grow journal. I harvested about three months ago and the weed is definitely cured. Photos are about to come — I'm doing a real studio photo shoot for those buds, they deserve it!
While waiting for the shots, I made some pretty damn dank hash temple balls using the iced water extraction method (solvent-free) with my little washing machine. It's a mix of the 8 strains I grew here — never ideal to mix different kinds of resin... but man, this is some serious dedicated work, so I'm making myself happy with that 14g shiny temple ball in the end 😉
Here are a few details about my process for you guys (and don't forget — you can do it with fresh material! Fresh frozen is always tastier. Also, the drying process is much more efficient and faster with a freeze dryer, but... you need the budget for that. I don't, so I go with the air drying method — check it out below):
1. Get your dry trim, then cure it properly for at least a month (I did 3 months). Smell it — mmh, sweet, dried to perfection. ✅
2. Freeze it, delicately wrapped in a freezer bag.
3. Let a large amount of tap water sit for at least 24h to remove chemicals like chlorine, then use it to make plenty of ice cubes — don't be shy, especially if you're not working in a cool environment.
4. Prep your washing machine: add trim between two layers of ice, fill up with clean water (as much as you can, large vortex is better than a smaller one), then make it seat for 30 min (45 min for thicker buds) the time that the dried green material gets wet again.
5. Prep your filtering tools: catch bag, different mesh bags, spoon, etc.
6. Wash as many times as you can before green contaminants appear, as these lower the quality of your hash — don't hesitate to go up to 8 to 12 washes if the resin still looks clean! Important: each wash has its own specific duration, and they get progressively longer as you advance through the process. Frenchy Cannoli (a true hash legend) provides a detailed timetable for this — from as little as 30 seconds to 1 minute for the first wash, all the way up to around 25 minutes by wash 8. Make sure to follow that schedule rather than using the same duration for every run or running it too long the first wash !! It could breaks to quickly your precious material before you collect all the trich's and the quality would be lower in the end.
7. Collect the wet resin in the mesh bags with a frozen metal spoon, make patties with the resin, and let them sit over some towels in order to drain as much water as possible (place a tissue made for hash collecting over the towel).
8. When the patties are a little dry to the touch, wrap them as they are in the tissue and place them in the freezer for 48h or more.
9. With an iron strainer, microplane your patties over the biggest flat surface you can get! It's important that your micro pieces of hash dry widely and don't get too compacted. Any failure in the air drying process will nucleate rot, ruining your hash in the end and making it a poor product — eventually something to throw away. Sad when you think about all the phases of the process to get to this point!
10. So, in order to air dry properly, you must — it's not optional — lower the RH of your dry room to 35% or slightly below, never above and let it dry as long as needed until the material feels like dry sand. For myself, I found 10 to 15 days is ideal. The room must be very lightly ventilated (not directly on your resin!) and in complete darkness — the goal is to preserve all those delicious terpenes! Ideally, temps around 60°F or 16°C
11. Now that it's dry, collect your resin with a large thin spatula! Make a little mound between two layers of PaperHash, boil some water, and fill up a wine bottle with it!
⚠️ From this point on, to avoid exposing your carefully dried resin to a more humid environment — which could ruin all your hard work — everything must happen in the same drying room. Keep working at 35% RH until your temple ball is tightly and airtight wrapped in PaperHash. (And don't forget to drink water — it's dry in there! 💧)
12. Start to slowly press your resin. Magical moment. Finally....
13. Press 3 times for 10 to 15 minutes in order to really decarb your hash — because that's what it's all about! Between each press, try as best you can to shape a patty... until the final press, when you'll be able to form that magical shiny temple ball (it only shines with gloves on, guys 😄)
14. You are now allowed to try it — for quality control purposes only, of course!
15. Because you want to age your hash for the sweetest 5-star smoking experience: wrap your temple ball in a large piece of PaperHash — if you can get that brand it's ideal, or another kind (check https://thepressclub.co) as long as it's organic!
16. Place the wrapped temple ball in a glass jar and store it in a dark, cool place.
17. Wait a minimum of 3 months before opening it.
18. Open, smell, touch — you'll be amazed. Roll it up with some weed or tobacco or both (I do both) / Or get a Hooka... you are smoking some true primo aged hash made by yourself! Taste the difference and realize all the path from choosing the seeds online until this first amazing puff ... 🙏
I want to credit my inspiration for making this kind of hash to the great Frenchy Cannoli, who has shared all his knowledge through amazingly rich tutorial content that you can find online with a bit of searching. 😉 Peace Frenchy 🕊️☮️




Likes
2
Share

@theChimp
Follow
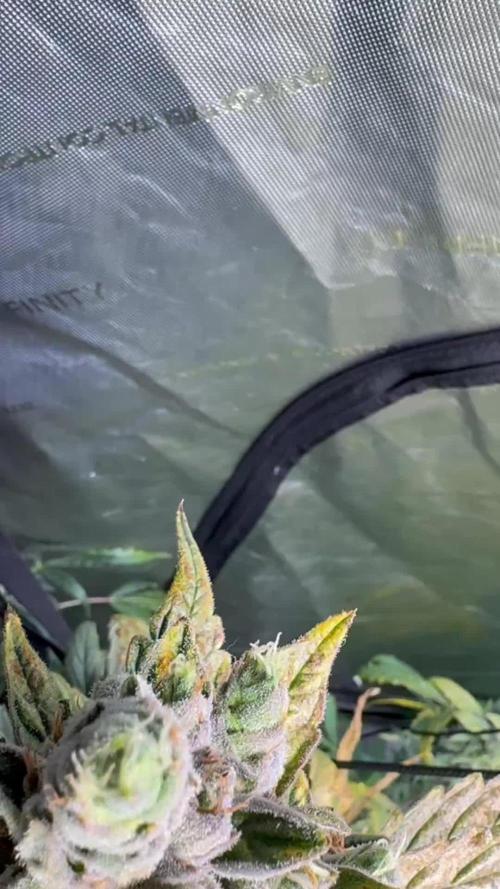
This will be my final flower entry for this plant, as we are CHOPPING HER DOWN THIS WEEK! I’m so excited to finally harvest this beauty, right as she hits that 5-10% Amber Trichome mark. This plant has exceeded my expectations for an autoflower, producing some absolutely massive buds, which have required I use extra rope to hold them up and support their weight.
The purple finish we have seen on the top cola was unexpected, but a pleasant surprise. The plant is demonstrating global senescence, and is giving me every signal in the book that she is ready for harvest.
My target yield for this plant, as of week 3/4 of flower, was 100g dried. I am supremely confident we will exceed that with great ease, as the main branch itself may give us that all on its own. That thing is huge! Check out the week 6,7,8 comparison photo to see just how much she filled out in the last few weeks! Brilliant stuff.
We learned a lot along the way, making a few mistakes and adjusted for them, and ultimately achieved another successful grow! Thank you everyone for reading along, I appreciate all of the support you have given me in the past months.


Likes
29
Share


@eldruida_lamota
Follow
Vamos familia, mirar que porte estás green poison, sweet seeds hizo un buen trabajo y a eso, hoy traemos un seguimiento de este clásico.
.
La humedad anda entre 50% la temperatura está entre 20/22 grados , y como siempre el ph, está en 5,8/6,0.
.
AgroBeta:
1 ml x L Growth black line , vía radicular.
0,2 ml x L Tucán , vía radicular.
0,2 ml x L Flash Root , vía radicular.
0,05 ml x L Gold Joker, vía radicular.
.
Hasta aquí todo familia , espero que os este gustando, un saludo y buenos humos 💨💨💨.


Likes
43
Share


@TheCannaProphet
Follow
~ FastBuds PAPAYA SHERBET Photoperiod~
Well here we go on another journey together through 'Canna-land' and this one's kinda special... forget that, it's VERY special because this is FastBuds newest surprise for the community, a FEMINIZED PHOTOPERIOD STRAIN!🤯
I was fortunate enough to score these seeds, of which only 1000 were available and can't wait to see what this strain can do! This Papaya Sherbet, according to FastBuds, is a hybrid with a 9-10 weeks flowering period. For a more detailed and accurate description of this strain the following from FastBuds says it best:
"Combining the massive stature of Papaya (Oni Selection) with the strength and resilience of one of our best keeper cuts (Sunset Sherbet), this strain develops into a big, expansive bush adorned with numerous bud sites that later transform into a generous harvest of medium-sized buds. Papaya Sherbet flowers deliver a signature flavor of premium cannabis with subtle citrus undertones that emerge upon inhaling. During growth, her aroma makes for a sweet yet pleasantly bitter fragrance, giving you an idea of what the smoke will taste like. Notably stress-resistant, Papaya Sherbet is a great choice for growers working in challenging environments. She is very forgiving and rebounds quickly from any adversity, allowing growers the freedom to experiment with confidence that she will take everything like a champion she is. This strain embodies resilience, flavor, and abundant yields in every grow cycle."
Sounds like an epic strain and I personally cannot wait for this lady to strut her stuff!😍
________________________________________________________________________________________________________________________________________________________________________________________________________________________________________________________________________________________________________________________
The Setup:
This is going to be an outdoor grow, but I have started the Papaya Sherbet photoperiod indoors as our weather is still a bit too chilly to put a newly sprouted seedling outside (nighttime temp's dipping regularly into the 40's℉).
The plan is simple... let her grow inside under a 19/5 light schedule until the nighttime temperatures are in the mid 50's℉, which shouldn't be long. After which, she'll be moved outside and transplanted into the soil which I have already setup and inoculated with beneficial microbes from BioTabs and slow release dry amendments from Gaia Green. Once she's established herself outside she'll be given periodic top dressings of Gaia Green 4-4-4 and 2-8-4 along with worm castings and Compost Tea's. Her grow area is approx. 5'x5' and I have posts and a trellis net set up already for when she gets bigger to aid in training her. Let the fun begin!🤪💚
________________________________________________________________________________________________________________________________________________________________________________________________________________________________________________________________________________________________________________________
Weekly Updates:
8/27- Here we go into Week Three of flower for the FastBuds Papaya Sherbet fem photo and she's shaping up to exceed my expectations!
8/29- I'm continuing to water the Papaya Sherbet in the mornings on days that we do not get any substantial rain with well water via the garden hose. Today I went through the plant and removed as many old dead leaves as I could reach, along with any shade leaves that were yellow.
8/31- My daily watering campaign continues with me giving the Papaya Sherbet approximately 5 gallons of well water from the garden hose.
The flowers on the Papaya Sherbet are stacking more noticeably now and are beginning to get a little frosty!
9/2- There's three weeks of flower finished for the FastBuds Papaya Sherbet fem photo and all I can say is... WOW! This is going to be a heavy yielder if I can successfully get her to the finish line without any issues... Fingers crossed! 😎🤞
Thank you for checking out my diary, your positive comments and support make it all worthwhile! 💚Growers Love!💚😎🙏


Likes
46
Share


@LittleBigTrees
Follow
Defoliated and trimmed lower fluff from The plant day 20 flower ,
Lots of air and light can now get to the plant and hopefully grow some nice buds

Likes
6
Share

@Phatlad187
Follow
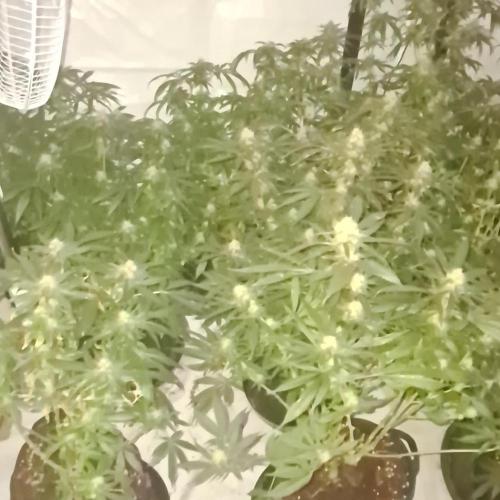
Week 6 on flush now sticky wasbi as been growing good got a bit of nut burn but they are on flush now and the smell is stronge and nuggets feel dence and soild
@growerchoice
@SHOGUN dragon force 4ml/l for 1 week then pure water for 1 week

Processing
Likes
26
Share

@TheCannaProphet
Follow
Week 2
7/26- All the girl's are doing great. I had to use some horticulture wire to prop up a couple of the girls that got a little 'top heavy'. Giving 12oz water ph'd to 6.3-6.5 as needed 2 hours after 'lights on' around each plant, and every other day in the saucers (1/4g/ea) to allow the medium to
wick it up and stay moist. Temp's running 72-81deg with an average RH of 55-60%. I'd like to have the RH a bit higher but the girl's seem to be doing fine at the present. 😎Ordered another HLG 650R with the supplemental UV Bar to replace the two SunSystems 315 CMH's....should be a game changer! 💪 Also have an AC Infinity 6" exhaust system w/controller on the way to replace the Hurricane 400cfm fan I'm currently running along with another TerraBloom 6'x24" carbon filter as my current filter is losing efficiency.
7/27- Watered today ph'd to 6.4 with 2 tbsp/gallon unsulfured molasses added. I split 2 1/2g between the eight girls by pouring 12oz around each plant and then dividing the rest in their saucers to be wicked up. Temp's, RH and CO2 all on point!
7/28- Light watering today with straight non-chlorinated water ph'd to 6.5. Growth is looking great across the board. Even the late starters, Seedsman Zkittles #1 & #2, are coming along nicely! All the ladies are averaging in height between 2 1/2' - 3 1/2" and should be getting ready to explode as their root systems become more established and are able to start taking in more nutrients. Fans are running 24/7 to strengthen the stalks....they're gonna need it to support the buds these ladies will be sporting in a couple months!
7-29- Watered all through the bottom today with straight .5g non-chlorinated water ph'd to 6.3. Temp's, RH, CO2 and VPD all on point. Unhooked carbon filter from hose as it's losing efficiency restricting exhaust air flow. Girl's all growing STRONG especially the #1 Seedsman Gelato OG in Fox Farm/Nature's Living Soil mix and the FastBuds Purple Lemonade #2 also in the Fox Farms/Nature's Living Soil mix with the Seedsman Gelato OG #2 in SOHUM soil is getting close. I appears the two girl's in SOHUM soil are not quite as tall as the others but are leafing out well and are stocky with close node spacing.....hmmm?
7/30- Lift checked all the pots and gave 2 1/2g straight non-chlorinated water ph'd to 6.4 with 2 tbsp of unsulfured molasses added. I split the 2 1/2g evenly between all eight giving 20oz through the top and the remainder in the pans to be wicked up. I turned up the HLG 650R to 400w at the wall and kept the height the same. My AC Infinity Cloudline T6 exhaust and new Terrabloom 6x24" carbon filter came today, as did the UV bar from HLG for the HLG 650R that'll be here on the 3rd.....CAN'T WAIT!!! All the girl's are really doing well and starting to begin 'gettin it on'! All are healthy and running between 3-4" tall. Side note: While installing the new exhaust fan setup on of my pooches sneaked in the room and munched off a half of a shade leaf on the #1 Purple Lemonade....she's definitely got good taste!😆 In the process of installing the AC Infinity fan I relocated it and the filter to the left side of the tent and re-routed the cold air intake hoses so that both enter the tent at the bottom and are positioned at either side of the tent. I setup the AC Infinity which is a breeze, set all my high/low limits and alarms and let here run! Temperatures now are running 72-81 deg. and RH is remaining stable @ 55%, CO2@800ppm. All in all a good day!😎👍
7/31- Water looks good on all the girls. I'll just top water lightly today with straight de-chlorinated water ph'd to 6.5. The AC Infinity is really a 'game changer' as temp's are now staying in a stable range without having to adjust the settings on my Ideal Air 14k BTU AC unit...niceee! All my ladies are finishing up their second week like champs and I'm looking forward to the next few weeks as when their root systems reach the 'super-soil' they are going to hopefully have some explosive growth. I'll also be evaluating all of them in the coming week to determine candidates for topping and LST to begin.
8/1- The second HLG 650R came today! I tidied up the tent before installing the 650R: moved EXHALE CO2 bags-one on each side, vacuumed, took care of any loose hanger cords and re-positioned the three thermometers/hygrometers. I installed the second HLG 650R w/UV bar in the tent and set both lights to 400w @ the wall and have both boards centered, level and hung @ 36" from the soil. These lights are AWESOME! I checked temp's on the boards & drivers after they were running for 4 hours: 98deg on the drivers and 94deg on the board...pretty freakin sweeet! Gave the girl's a day off from water as they all looked GTG and are all getting ready to really turn on! I plan on hitting them early tomorrow morning with a good watering. Temp's-RH-VPD all on point for this week. I've been continuing to run the humidifier set @ 60% RH and I'm going so far as to ph the water going into it to see if it makes a difference as my well water runs 7.8ph @225ppm dissolved solids and I hypothesized that as the plants were absorbing the moisture from the air it might be beneficial to have that moisture at the correct ph.....we'll see I guess!

Likes
16
Share


@JUNGLE_B4RNS
Follow
Barneys Farm are continually pushing the limits of marijuana genetics, improving their selection and breeding processes to create something that is truly breath-taking. ACAPULCO GOLD™️ is the next generation of marijuana. Like the original namesake the ACAPULCO GOLD™️ flowers with fat colas, flecked with beautiful reddish brown calyx, each covered with beautiful crystals of THC. #
The smoke has an intense fruit cocktail flavour that lingers for hours. This is a Sativa dominant strain that offers a long lasting high, balancing relaxing stress reduction with a real upbeat effect. Acapulco Gold far surpasses the rhapsodized smoke of days past.


Likes
43
Share


@MistaOC
Follow
11.02.: So far everything is well under control. temperature and humidity are well adjusted. We will see how it goes on.
The gold juice is intended as food (sugar) for the microorganisms.
Light intensity: 25%
——————————————————————
12.02.: Day 9!
water values checked:
RO Water
Temp. 18,1 degrees
015 ppm
5,7 PH
water value After adding 0,5ml/1L CalMag (BioBizz)
Temp. 18,1 degrees
054 ppm
6,3 PH
fertilized with BioGrow for the first time. (3g/1L substrate)
——————————————————————
15.02.: Day 12!
Today I drop the humidifier from 85% to 80%
The plants now use the water relatively quickly. now has to water every two days.
Before watering the pots had 125g and after watering 180g.
Poured with RO water and 0.3ml/1L CalMag
values:
water:
028 ppm
19 degrees
drain:
765 ppm
19 degrees
The roots looking perfect!
Soon the little ladies will be in their 19 liter fabric pots!
——————————————————————
16.02.: Day 13!
Today I changed the light intensity to 37%.
Everythig looking great.
——————————————————————
17.02.: Day 14!
Today I repotted the ladies into their 19 liter
fabric pots.
Composition per pot:
- 19 liters of BioBizz light mix
- 55g BioGrow - Greenhouse Feeding
- The roots were powdered with Rootmax and Bactrex.
- 3 liters RO water (017ppm) (15% of pot)
- 0.9ml Calmag - BioBizz (029ppm)
- 3g BioEnhancer - GH Feeding (154ppm)
Light intensity increased to 42%
Room temperature 25 degrees
75% humidity
——————————————————————
Likes
8
Share


@Ieiogrow94
Follow
Eccoci qui...
Ormai manca davvero poco ci siamo quasi.... Ora niente più fertilizzanti solo acqua ed attendiamo la maturazione..
Seguiranno aggiornamenti, grazie a tutti per il supporto🔥🌲❤️


Likes
6
Share


@GREENPHOENIX6262
Follow
* Week 1 Veg (Day 1) (12/17) - 2.5 Inches - Light nute feed only Myco and RAW NPK nitro for the next 2 weeks then will add heavier VEG feeds.
Likes
6
Share


@Northern_Ent
Follow
June 7: Sunday Punch EV is an excellent plant. I’m very impressed.
June 8: using the scrog net to keep the fan leaves from shading the growth tips. Loose scrog nets are great when doing a manifold outdoor. Very effective and easy. At this early stage just the weight of the string is enough so there’s no need to tie it down.
June 9: video tip about making up for dry air by moistening the leaves a couple time a day. Quick gentle shot with the hose is all it takes.
June 10: she’s growing fast now. Entering the stage of fast vegetative growth where it will be growing by over an inch per day. Fun times.
June 12: Sunday Punch EV is really growing fast now. Re-arranged Scrog net and clipped it down to spread it out and provide some stability. Leaves are quite big and catching wind.
The eight main colas are ready to be topped tomorrow, and there are another 8 inner growth tips that i can leave and they’ll be big enough to reach for sun like the soon to be 16 main colas…so 16 legit colas and 8 bonus cheaters for a nice and uniform 24 cola plant…sure why not?

Likes
10
Share


@ArtisticGrown
Follow
These last 2 weeks have been great! Week 6 i used the over drive with advanced nutritions. And i can say they deff kicked em into gear and the coals have been getting thicker and thicker. Loving hiw these clones are smelling!! I cant beleive how purple these og kush clones are! The seeds i got from seedsman idk why haha but gorgeous and sweet smelling! I cant wait to finish off this week flushing and harvesting soon! Happy growing! Thanks for all the support and love 💯🗝️
Likes
19
Share


@emeraldlabs
Follow
Happy to have this beast in flower. No major stretch so far; fingers crossed it stays that way.
Will continue to defoliate and add flowering nutes in the next week or 2.
Photos/video taken 84 days after breaking soil, day 7 of flower.
Likes
8
Share

@PhinolaGreen
Follow
14. Woche
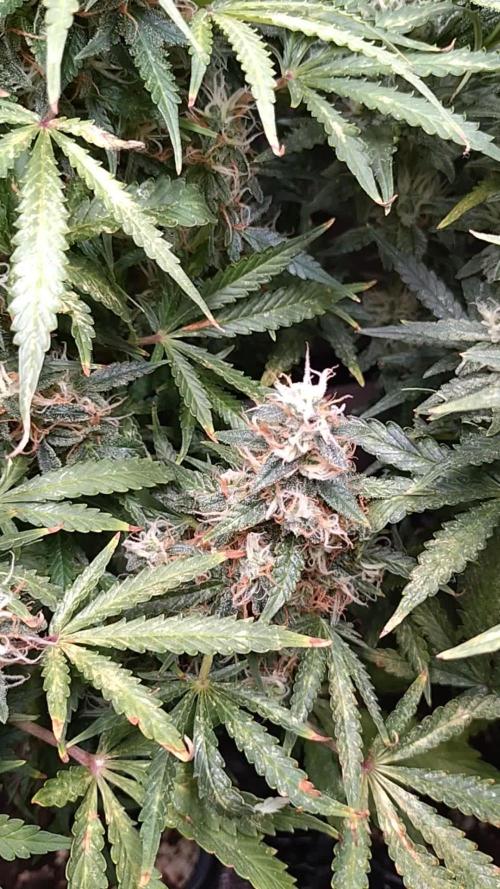
Sie will gar nicht aufhören zu Blühen hehe, freut mich natürlich, dass sie schön Fett wird 😍 😌
