The Grow Awards 2026 🏆 


Likes
Comments
Share
@ExoticoSativo
Follow
Alr guys, this banana was my first auto ever, I experimented with her a lot, did all type of mistakes, at first she was on a window getting not light at all, I move her to a different house 3 times, transplanted her like 4 times broke the rootmass, almost burned with nutrients and on top of everything I HST her like a mofo 😂 tried to mainlining but she overcome all my mistakes and thrive like a champ she was, beautiful sweet smell and taste even tho 80% of the buds were microwaved OMG im sorry for all but I learned a lot, need to try again with her with all the experience and proper equipment that i have now

Likes
3
Share
@JeyGanesha
Follow
Inizio conta dei giorni.. questo è il secondo giorno...provo questa nuova apricot. Ma sono quasi sicuro che sarà più che buona 🙏💪forza fast buds

Likes
18
Share
@mrHazeCake
Follow
26/09 The second week of vegetation has begun, the sprout feels super great, I buried it 2-3 cm, so it looks a little shorter.
I will start fertilizing from about the 15th day, until that moment I just pour water with the addition of Piranha 2ml / l, today I poured 10ml from a syringe around the sprout and today it stood all day without a cup under full light
Tonight I added to the AD Piranha solution more nutrition for these mycorrhiza fungus in the form of Bud Candy. And carefully poured 5 ml of the solution 2-3 cm from the sprout on one side. Perhaps this will immediately help develop an excellent root system.
I continue to occasionally wet the ground for it so that it would be more humid around it, since I have a fairly strong lamp for such a grow box, I think that it can be hot, although other plants felt great at this stage
30/09
Last night I poured her compote with Piranha and BudCandy 2 ml / l each, poured about 500 ml into her eye and lo and behold, she responded with rapid growth, she adds very much every day. I will try to alternate watering with ordinary water so as not to overfeed. And super genetics, she is gaining the thickness of the trunk already!
Likes
12
Share
@Studabaker
Follow
Growing great. Growth took off when I gave it recharge. Going to give it some mammoth p this week when it arrives 😎

Likes
13
Share
@SzkolaZiola
Follow
Ladies are doing fabulously. Today I did some defoliation and added ScrOG - they started to lie down due to weight of the colas.
Mimozz and Grandpa's Cookies are smelling super duper great - one of the best I ever smelled.
Cherry Atomic is fire as always - big, fast, sticky and kush-y.
Strawberry Cough is TALL as sativa should be - also her colas are stacked like crazy - they are 40cm / 15" in length! She is much slower than her sisters - will need extra 3-4 weeks probably to fully mature after I'll harvest rest of the tent. But I can't wait to see results. This will be something good 😎


Likes
Comments
Share


Likes
2
Share
@fabialien
Follow
Semana del 9 al 15 de septiembre 2024.
Las Positronics auto aun no Entran a Floración, y ya van bastante avanzadas, mientras las otras, unas van muy flacas y otras si van bastante gordillas.


Likes
38
Share
@GMSgrows
Follow
Another week in and this girl from Ganja Farmer is just going crazy. Can't get near her to get good pics until harvest time., but you will then see the true size of these flowers. Cycle nutrients are working good. Have been keeping the ongoing feed at 5.8 ph and the ec at 800. Runoff values are at 940 ppm and the ph has maintained itself at 6.2. Cyclo says to keep the ph from 5.5 to 5.8 in bloom, was kind of skeptical but kept it at 5.8 anyways. Guess they were correct.
Thanks for the looks and like to all you growers out there. Grow on, grow strong.

Likes
9
Share
@Wicked_Stix
Follow
This grape is a big frosty beast. I think she has the potential to put off an easy pound if she bulks up the way I think she will. I spread the plants out a little this week so they get better light and air flow. Other than that I haven't done anything besides keep the reservoir full. Still pumping nutrients 1 minute on 20 minutes off. They are getting .5 tsp maxibloom per gallon. Not going to run any boosters this round. They dont look like they want or need it.
Likes
24
Share
@PrairieFrostGrow
Follow
***** Week 6 Veg - January 9/21 to 15/21 *****
This week the girls saw lots of change! They have seen a light change and now they have been transplanted and topped. Push the girls harder and see how they react😃 They have been in very good shape and healthy so they have been reacting well to the stress. This girl has been a strong growers from the start and its not stopping yet. She is staying a nice bushy shape but not growing as tall as the other girls and that is a little concerning going into a SCROG situation. She is pushing some big fan leaves😎👍
Topped all of the ETS girls and left them with 4 sets of branches on each. If the lowest set of branches were tiny, I have stripped them off already. Not sure if I am going to SCROG or not.....I don’t really want to but it is the best way to fill the canopy and test out the light spread......will see.
They have continued to be fed once a week roughly and supplemented with calmag and microbes.
Little more detail.......
Jan 9/21, Day 36 Veg
- Transplant day today!!!!!! She went into a 5 gal pot
- Root mass was much better than in the solo cups......not as strong as Gorilla Girl for comparison but just about perfect and didn’t need to prune them.
- 1.5L watering of the pots after transplant with CalMag @ 2ml, Microbial Mass @ 3ml, Piranha @ 2ml (effectively microbes, fungi and CalMag watering)
Jan 10/21, Day 37 Veg
- 1.5L Feed with full strength week 2 nutrients
- added CalMag @ 1ml as well. New coco in the pots that have not been buffered so added a little more.
- 1,300ppm and 5.9pH.......feeling it might be a little high.....target was 1150ppm.
- no run off water from the pots. Didn’t want to “soak” the pots, jet wet them.
- New light in the tent today. 650watt but dialled down so the girls have roughly 10,500 LUX, drawing 135 watts
- Topped the girls today as well😃
- left 4 sets of branches on each girl. Topped them up high on the node above to help avoid splitting the main stem.
Jan 11/21, Day 38 Veg
- Dry out day
- girls reacting well to the high ppm feed from yesterday.
Jan 12/21, Day 39 Veg
- 1.5L watering with CalMag @ 1ml
- 200ppm and 5.9pH
Jan 13/21, Day 40 Veg
- Dry out day
Jan 14/21, Day 41 Veg
- 2L watering with CalMag @ 2ml
- 250ppm and 5.9pH (actually added 1ml of Micro as pH was a little high)
- IPM spray tonight with Lost Coast Plant Therapy @ 3ml/L. Done at lights out.
- This product been working well and nothing has been a set back so not going to stop now😃👍
Jan 15/21, Day 42 Veg
- Dry out day.
- Girls doing well. Still have some strong purple in the fan leaves coming off the main stem.


Likes
51
Share
@Grey_Wolf
Follow
Ozzie Deadhead
connoisseur genetics australian deadhead
29th April 2021
A Big week for the deadhead , I transplanted her into a much larger 50L pot and performed more
HST and LST right on schedule because the flowering has begun . 😀 👊
No feeds needed this week but will add more Guano ready for next week 👌
I hope that I have done a good job with the training on this one , so far it's been super fun 😎
Once again cheers for stopping by 👍

Processing
Likes
23
Share
@GrowGuy97
Follow
Everything seems to be going great for them to all be random bag seeds! Temp is staying a little higher than I would like trying to figure out some ways to cool it down may just order some new lights!
Likes
1
Share
@Chris87
Follow
Forgot to mention that I topped them at some point a couple of weeks back and it worked wonders. Trimmed them for the first time and wow did they like it! That's about it. Too tired now to remember anything else. Oh yeah I installed one of those terrarium ceramic bulbs that just heat up without emitting light but it seems like it's not needed
Likes
7
Share
@Viccrazyweed
Follow
Im so sorry that i fail in a week but i got too busy, so here it is
Flower week, my queen just started blooming nice and easy, as previously there is a big sister and a little one, with the big one i had the same problem as the purple, she became too tall so i LST her into a lateral growing, she grows diagonal but is that or nothing…

Likes
16
Share
@CanadianFillmore
Follow
Start of flowering week 1. This girl is already bigger then her round 1 sister and she's starting to stretch after just a few days of 12/12 light. The only nutrient difference this grow, will be the addition of sensizym, hopefully it helps pack on a few more grams per plant.

Likes
7
Share
@Scoota710
Follow
I gave her her first feed with the Emerald Harvest nutes. Still yellowing out on me anyone know what could be wrong?
Likes
295
Share
@Ju_Bps
Follow
Hello growmies 👩🌾👨🌾🌲🌲,
👋 The flowering is now started, hedgehogs are there 🦔, plant look good, and grow faster.
Started flowering nutes, did a litle defoliation.
Already a sweet smeel 😋😋
💡 I up a bit the supply of lamp each days.
💪 I continue the training, but don't need to touch so much now.
💧 Give water each 2/3 day
And vaporise plant with water + Plagron Roots (1ml/l)
1 l Water + Roots + Zym ( 1 + 1 ml/l)
1.25 l Water + Roots + Bloom + Sugar Royal (1 + 3 + 1 ml/l)
PH @6
💡Mars Hydro - FC 3000
37% 56 cm.
Mars Hydro Fan kit
Setting 6
Have a good week and see you next week 👋
Thanks community for follow, likes, comments, always a pleasure 👩🌾👨🌾❤️🌲
Mars Hydro - Smart FC3000 300W Samsung LM301B LED Grow Light💡💡
https://www.mars-hydro.com/fc-3000-samsung-lm301b-led-grow-light
Mars Hydro - 6 Inch Inline Fan And Carbon Filter Combo With Thermostat Controller 💨💨
https://www.mars-hydro.com/6-inch-inline-duct-fan-and-carbon-filter-combo-with-thermostat-controller
Anesia Seeds - Deep Jealousy Auto🌲🌲
https://anesiaseeds.com/product/deep-jealousy-auto/

Likes
14
Share
@Lazuli
Follow
the plants look like they will be ready in 2-3 weeks
i only give bloom booster and calmag from here

Likes
13
Share
@NSABND
Follow
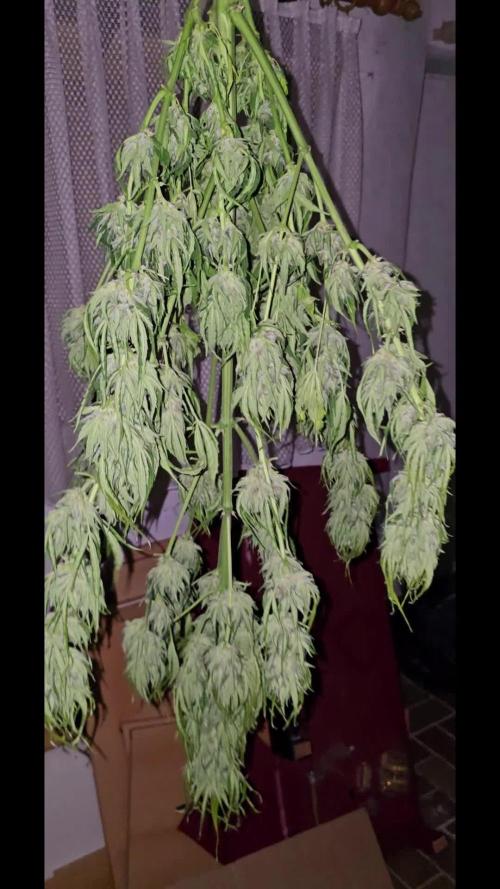
Day 66 ... the weather get´s more worst too cloudy and cold at night 😱😫😵... so i decide to harvest today 😃👍
Now "Hilde 2.0" is hanging in the dark in the basement and can dry... I'm curious to see how the harvest turns out 😃🙌🙏
Day 2 drying in the dark 😃👍