The Grow Awards 2026 🏆
Likes
Comments
Share
@GYOweed
Follow
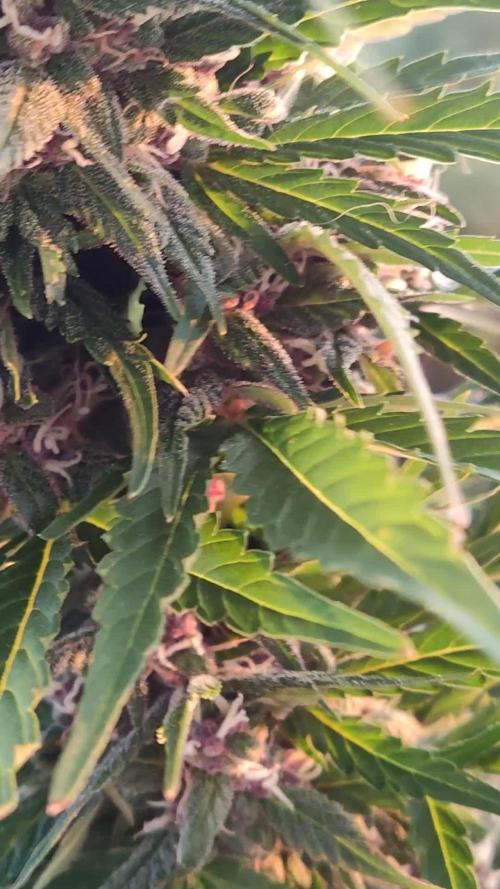
This was the squatest clone and grows thick heavy glowing marshmallow colas. Smells so sweet too soon to tell final taste.
Likes
40
Share
Am Wochenende haben wir das Netz gespannt. 2/3 der Blütezeit hat sie jetzt ca. hinter sich gebracht. Nach dem ausharren und dem neutralisieren des gekippten Wassers, trat sehr schnell auch ein Mangel sehr vermutlich ,,Schwefel,, am Haupttrieb im obigen Bereich auf. Da wir aber so oder so in der ersten Woche mit erhöhtem Mineralien bedarf (Top- Max) uns befinden, ist dieses nach dieser Situation ein absolut positives Anzeichen, da es bedeutet das sie die Nährstoffe benötigt und somit auch verarbeitet. Auffallend und auch nicht mehr zu ignorieren sind die Thripse. Um diese kümmern sich aber ab Paketeintreffen die neuen Florfliegenlarven. Ansonsten haben wir beim Netzt Spannen noch kleine nachwachsende Stins weggenommen um wirklich alle benötigte Kraft in die Cola´s zu bekommen. Wir Gießen im Moment ca. alle 24 Stunden 4 Liter Nährstofflösung inkl. 0,08 g Co2_ Tablette und 4 ml PK14/15 Wir wünschen allen Growmies viel Erfolg und eine angenehme Woche! Seit dem 16.10.24 wird Sie nur noch 11 Stunden beleuchtet und statt 4 Liter mag sie im moment eher wieder die 3 Liter pro Tag Nährstofflösung.
Likes
85
Share
😛 WELL HERE WE ARE AND I CAN SEE THE FINISHING LINE 😛 ( OMG THEY SMELLING GREAT ) !!!!!!! Check out the full grow video on the Harvest update ( DAY 26 AND BOTH NL 1 & NL 2 SHOWED PREFLOWERS ) ( DAY 49 AND RESIN PRODUCTION HAS STARTED ) ( DAY 57 , EQUIPMENT FAILURE , main FAN , over heated😡 tripped breaker , reset light timers , lost a DAY, REPLACED new Main Fan 😁 back up running 👌) ( DAY 70 DID ITS FINAL FLUSHING TODAY TO GET RID OF ANY BUILDUP ) ( DAY 77 AND IT SHOWS A SLIGHT DEFICIENCIE MAYBE A CAL/MAG GETTING CLOSE TO END OF LIFE ) IM ALSO DOING VERY LITTLE, SLIGHT DEFOLIATION 😃NL 1 SHOWS MOSTLY CLOUDY TO MILKY RESIN HEADS , ( 💀 PROBABLY PEAK THC LEVEL 💀 ) TO BE CHOPPED ANY SECOND 😋 ....... 😃NL 2 SHOWS MOSTLY CLOUDY TO MILKY RESIN HEADS ( 💀 PROBABLY PEAK THC LEVEL 💀 ) , AMBER IS PERFECT 😃CHOPPED😃 I hope you enjoy my growlog... (Who the hell is TropiCannibis Todd😎 Well This is not only my FIRST AUTOFLOWER but my FIRST GROW in over 11-12 Years😳 I Grew from 2002-03 TO 2010-11 , I'm back nahnahnahnahnah , Been a fun grow , learned alot , and it looks like I am gonna have a great harvest with some great smoke....... who new 😁 )
Likes
13
Share
Likes
38
Share
Utopia Haze is a rare heavily sativa dominant hybrid (90% sativa/10% indica) strain created through back crossing Brazilian Sativa strains. This tasty little bud took home 1st Place for Best Sativa in the 2008 High Times’ Cannabis Cup and for good reason – with its potent 18-22% average THC level and long lasting cerebral effects, Utopia Haze is one powerhouse smoke. The Utopia Haze high comes on soon after you finish your first toke, hitting you with a strong cerebral lift that infuses you with a sense of hazy relaxation. Type: Feminised/Photoperiod Cultivation: Indoor/Outdoor Flowering Time (days): 70-75 Indoor Yield (g): Up to 650 Feminised Outdoor Harvest Month: October Feminised Outdoor Harvest Month Week: 3rd-4th week Aroma: Citrus, Woody, Pungent, Mint Effect: Cerebral Lift, Hazy Relaxation, Sleepy Welcome Everyone to the Final Entry of my Utopia Haze Grow ! There is so much to discuss ! I have been extremely busy as of late trying to get this Harvest together, but i am happy to have it here for you now ! I Seriously under estimated the amount of time, help from others, and my own necessary skills to pull this off.. and i still kind of screwed it up lol ! But its worth noting i have never actually done this before and trying to document it during....was extremely hard. It is next to impossible to work an iPhone with rubber gloves on ! First I want to discuss everything step by step so before you jump straight into the comments on how the end product is so small in "quantity" Rest assured i am happy with its"quality"...and thats all that matters to me because Life is a journey not a destination! and i have learned so much from this grow that I couldn't be any happy even if i messed some things up :) But at the very least I hope you read through this entry in its entirety with an open mind and focus more on the process, rather than just the outcome! I ran out of Ice & i was only able to wash three times..(normally I've heard you should go sometimes 5-6 washes) Preparation is Key & things will be much better next round :) Photos 1-22 These are pretty self explanatory but for those of you just tuning in now.. this is what happens to a very happy plant when you don't have the necessary tools to monitor key components of growing cannabis.. Ph, as well as EC levels play a very key role in the outcome of your grow lol that being said I was just able to save this plant by purchasing both tools but that doesn't mean the plant didn't suffer because of the prior events.. This was a Huge reason behind me choosing to turn this harvest into what i would consider "Solventless Hash Rosin" from "Ice water extracted Bubble hash". Pictures 23 The idea here is the process of using "fresh Frozen Cannabis" this has been discussed many a time online on such sites as instagram and here on grow diaries as well.. I personally have Never tried the process so i decided to try it out and make a judgement for myself.. Video 24 The Cannabis has now been in the freezer for 72 hours making it very well frozen.. as you can tell i struggled getting it all into the 25u Screen Wash Bag. One thing of note i would do differently is i will de-stem my next batch as i also believe this played a part in the amount of plant matter that escaped through the sieves. Photo/Video's 25-28 The idea here is "ice water Seiving" & especially with the bags that I am using here that are only have screen material on the bottom portion of the bag it is very important to have spaces in-between the screens to allow the water to pass directly through the screens into the bottom bucket with the least amount of resistance.. because the hash is so extremely temperature dependant if it gets warm on the side of the bag.. it will stick there and not make it to the bottom to become use able product.. 29 You do not need to use as much Ice as i used here lol... the idea is to keep everything very cold..i certainly achieved that but at the sacrifice of using so much that i ended up grinding product and producing "contaminants" but in the end they are just plant matter that i would be smoking when i rolled up my joint either way so.. I'm not super disappointed.. But it should be noted that what you want to achieve here is a Layering effect where you have the wash bag between two small layers of ice while the "water current" washes the Trichomes away allowing them to be separated by the screens setup below :) Before Starting the machine you should allow some time (i.e.;10-12minutes pre soak to allow the product to become saturated) before the first cycle. By video 32 I have just ran out of ice lol.. Video 33-34 Here I have a tip for you.. to separate the screens that you sieve through.. cut 5 gallon buckets to stretch them across nice and tight.. it'll make scooping your Bubble that much easier ! i learned this from the many "Frenchy" videos I have watched :) Picture 35 Here in lays the problem for most people.. drying your hash without loosing vast amounts of "Terpenes" whilst also stay ever vigilant against mold ! Thanks to all those videos I've watched on youtube.. id like to think this was one of my most successful parts of this process.. Things to Note; Terpenes start to seriously evaporate at temperatures 68F or 20C you need to stay as cold as possible whilst bringing the Relative Humidity in the space down into the 40-30% to stay away from that nasty mold ! I used my cold storage room in the basement.. with a dehumidifier running to keep the space at 45% RH & staying at a constant 15c. All while spreading the hash as thin as possible across parchment paper, on top of the white screens with a fan moving air across both sides of the paper. Pictures 36-38 These are some macros i took in the middle of my drying session I fell in love with the colour. Yes i know the black spots are plant material but they will get caught when i bag the hash & squish the oil out. Thing to Note; at this stage it is important to ensure you 'micro plane" the hash down as fine as you can whilst staying weary of the temperature... any "chunks" will hold pockets of moisture.. that lead to potential problems..ie; mold ... Picture/Video 39-41 Successfully planed bubble hash ready to be bagged and Squished ! Picture 42 Ive decided to follow Pedro.. from Pedros Grow Room and double bag to be on the safe side so i don't have any blow outs. So thats One 25u bag inside one 160u bag ! :) Pictures 43 This is almost 3 grams of the bubble hash from above, already melting in the bag.. this is where i ran into trouble again lol things started getting to warm in the house and i was only able to get one of the three squish's i did on video :( things started getting sticky. Picture 44 This is basically just a photo of the equipment I'm using; 3x5 LowTemp Cage in the frame I built myself, with a 20Ton bottle jack. Something to note here is this is an older Lowtemp model with only a single heating zone which is which i have it closed here heating Both sides of the press :) As well as the importance of having adequate pressure on your plates.. my rig is very overkill for the size of hash bags..lol Video 45 Here is the lovely press video.. its didn't quite work the way i wanted either lol my directional folding wasn't quite tight enough for a big "drip" :) &the Press was set to 65°c Photo's 46-50 are pretty self explanatory :) I had a blow out.. but still managed to pull an 80% return from the hash once squished...& yes it tasted amazing :) Was it worth it in the end... that could be debated.. for some..i understand..its not your thing, but for those of us that are interested in making our own concentrates.. free from Solvents... I wouldn't make it any other way :) If even ONE of you reading this diary finds it helpful to reference for ANYTHING.....even if its "what not to do" ill consider it a success ! Thanks again for tagging along on this garden adventure.. its been one heck of a journey ! Much Love from B.C. Canada, Until Next time, Cariboo
Likes
6
Share
этот сорт супер,он выдерживает все жару, холод, lst ,hst ,super cropping я делал все что мог,вывод такой что не трогайте авто сорта,пусть растут себе )))) 314 г но ребята он без воды стоял больше суток в гидропонике в темноте,так что он за сутки немного подсох,так что я не могу сказать что было вчера на весах когда я я отключил гидропонику и оставил на сутки в темноте без воды, на фотке видно что листья уже упали,так что было больше! будем ждать когда высохнут 😉 ну вот ребята что вышло )) 62 сухих, вкус и запах соответствуют описанию,я не могу в точности передать вкус,но очень вкусный! это растение получило очень много стрессов,я всем советую!!!!
Likes
12
Share
Estos videos fueron echos el 25 de diciembre de 2021. Creciendo poco a poco, se les hizo poda de bajos y tutorado. feliz navidad les desean las babys! ig: @micro.semilla
Likes
15
Share
I switched nutes preemptively but we are back to veg(terp tea grow 711) for atleast one more week, maybe 2 to account for her stretching. 5/3/24 She’s stacking bud sites. She’s so much more squat than I thought. She’s like stiff and wants to just grow upright. I wanna grow this plant without training, I bet she would be beautiful.
Likes
13
Share
Mad I only had one seed can't wait to grow more 420 Fast Buds
Likes
11
Share
Hey guys :-) The lady has developed very nicely this week 👍. They were planted in their 8 liter pot where they can now really take root again. Depending on what time is left in the vegi phase, you might be trained :-) . Otherwise everything was cleaned and checked. Have fun and stay healthy 💚🙏🏻 👇🏼👇🏼👇🏼👇🏼👇🏼👇🏼👇🏼👇🏼👇🏼👇🏼👇🏼👇🏼 You can buy this Nutrients at : https://greenbuzzliquids.com/en/shop/ With the discount code: Made_in_Germany you get a discount of 15% on all products from an order value of 100 euros. 👇🏼👇🏼👇🏼👇🏼👇🏼👇🏼👇🏼👇🏼👇🏼👇🏼👇🏼👇🏼 You can buy this strain at : Clearwater Seeds Water 💧 💧💧 Osmosis water mixed with normal water (24 hours stale that the chlorine evaporates) to 0.2 EC. Add Cal / Mag to 0.4 Ec Ph with Organic Ph - to 5.8 - 6.5 MadeInGermany
Likes
81
Share
Transplanted to 40l container on week 4 day 1. Container has approx 30l in it. Also added a photo of the setup for size reference. Let me explain my thinking behind the repotting strategy. Firstly I should say that I am quite an old school kind of grower, although I've never grown cannabis before I have grown hundreds of other plants. Due to my experience with other plants, I understand the value of well planned and executed transplants, they can have an absolutely transformative effect upon root systems when done properly, as far as I know it's the main reason why they are done at all. It is fair to say I have never grown any auto-flowering plant indoors before, and I have read all about how you should not transplant autos, and all the good reasons why not. Ultimately though, as I am not called UnorthadoxDude for nothing, I believe that I can make it work with an auto, and get the benefit of improved root growth pattern, without delaying or interrupting the growth. I want to have my cake and eat it, as it were. So the strategy is to avoid transplant shock, which admittedly I have already failed in the first unplanned transplant, but in my hopeful naivety I still believe I can make the second one work! I'm using coco, and I have had the larger pot prepared and have been watering and feeding them as well as the plant. If I am careful not to disturb the plant at all, and move the entire contents of the pot gently into the larger pot (which is exactly the same medium in broadly the same state), then I may be able to avoid shocking the plant and just let it crack on. We will find out in a few days! If it stops growing or slows at all then I failed, otherwise it worked! A note about my use of organic nutes with coco. I have read a lot about coco and nutes and microbes and PH and TDS and what have you, and I know that the overwhelming majority of people believe that you can't or at least shouldn't use organic nutes with coco. The thing is, I like organic gardening, I prefer to cultivate a beneficial microbiota and keep it healthy. I recycle, and reuse all my compost except where a plant is diseased and this has worked well for me for a long time. I've never grown with coco before though, I always used soil. I wanted to gain the benefits of coco (better drainage, more air to roots, lighter, less inviting to pests, etc) - but I wanted to use a method of nutrition that I was already familiar with. I think I've mentioned that I am not called UnorthadoxDude for nothing, so I am using BioBizz and coco. By adding bacterial, mycorrhizal, and trichoderma inoculants and having the unplanted coco in the tent being fed and watered I hope to have cultivated a nice microbiota which will feed my plant. That's the theory. However just in case, I have a trick up my sleeve. Now, I do not know if you are aware of this, but there is a fiery debate raging on the internet about using BioBizz organic nutes with coco for cannabis. Some people try it, most people shout it down, and I have not found much in the way of solid evidence of it being a good idea. Except one! I found a commercial grower that has used biobizz nutes, and he said that as long as you are using "Acti-Vera" you can use anything from the BioBizz organic range. Apparently the enzymes in the mix break down nutes chemically in a similar way to what the theoretically missing microbes do. So I have ordered a bottle of that, and if my microbial cultivation attempts don't work out, I at least know I have a fallback that should work. Those are my thoughts on it, let's see how it pans out. Oh I should also probably point out that I am growing some companion plants, specifically alfalfa (nitrogen fixing), basil (improved flavour), and German Chamomile (increased essential oil production). Update week 4 day 2 dropped PH to 5.8 after advice from a grow question. Look! It's carried on growing... maybe there was no transplant shock? Update week 4 day 3: Growth continues, interveinal chlorosis lessening. Plant is pushing out node five at the moment. Update week 4 day 4: Growth continues, interveinal chlorosis further lessening. Apologies for the poor quality photos for the last few days, I was lazy and didn't want to move everything out to photograph. Today I have done that and the pic is better. I am declaring the second transplant a complete success. I do not believe that plant was in any way shocked. Update week 4 say 5: I think I've finally managed to overwater. Going to skip watering today. Update week 4 day 6: Photo taken just before lights on hence wilting. Growth continues to accelerate. I believe the alfalfa has been raising the PH so I've removed it. Today I will flush through with PH lowered water and then fertigate. The colour is still too pale but the growth and overall look and feel of the plant screams to me that it's happy and about to explode. Day 27.5 flushed with 30l of PH lowered water then fertigated with 5l. Day 28: Height 12cm Width: 28cm Nodes: 6 Weekly growth data: From 5cm Height to 12cm +140% From 12cm Width to 28cm +133% From 4 primary nodes to 6 +50% Summary: Wow, wow. Wow. What else can I say. What a crazy week, amazing and unexpected given the problems. I am really excited to see what happens over the next seven days!! It looks like it has quite severe chlorosis, but otherwise seems robust and is seriously stretching. Almost unbelievable growth. Pre-flowers appeared a few days ago, so I guess this was the final week of veg. Let's see how the first week of flowering stretch goes! Update 7/2/23: My instincts about this plant on week 4 day 6 were absolutely correct, she was happy and, she was about to explode. Since my early attempts at transplanting, I practiced multiple times with Citronella (a photoperiod plant) and then I did it again with an auto (Polly) - this one went flawlessly and further demonstrates that you can transplant an auto without shocking it. Time will tell, because I can compare Polly to both Misty and Nesia both of whom were sown directly in their final pots.
Likes
5
Share
@Ninjabuds
Follow
Obama runtz x gas tax they both are a little taller than all the seedlings as I'm smoking some.of the flower from last grow I'm seeing the more wild plants like this plants mother sister they smoke great but these 2 seedlings have a look to their leaves like some of the wild from the face off og from the gas tax Last grow I overwatered and had to toss them because growth got stunted and a bunch if fungus knats got to the soil. This time I'm trying promix potting soil wish I had tried promix hp but the store close by isn't a hudro store and that's what they had. So this time I'm being very cautious with the watering I'm only useing a spray bottle I'm currently giving 45 spray per solo cup every few days when it dries out. This promix soil seems to hold water decent so the 45 spray there is 0 water coming out the bottom the cup yet. Here soon I think I'm going to double the amount of spray to 90 and start letting the soil get dry dry before watering again. Probably will hold off on any nutes quite yet. I'm going from 24/0 to 20/4 light schedule this week. There getting to the point they won't strech as much is 4 hrs of darkness and I'm rasing the light intensity a little it's been around 150 I'm upping it to around 175. Most likely by the end of the week I'll probably be pushing 200 or close. Hopefully I can get them into the big tent soon At this stage I like to alternate having the fan blowing on them I feel it gives them time to recover and get stronger instead of wind stress. Also every few days I will turn the plants so they are facing away from the light making them grow back towards the light I fell it makes them stronger
Likes
10
Share
@Roscio99
Follow
hello beautiful ones, they managed to enter flowering!! everything is going smoothly apart from a few insects... I think it's normal when you do them outdoors. They have been flowering for a week and continue to grow every day! DAJE ROMA DAJE
Likes
39
Share
@MisterZ
Follow
Bonjour les amis. Cette semaine les fleurs ont pris du volume et surtout l'odeur est est nettement plus forte. Dès que j'ouvre mon placard une odeur terrible se répand. Ma femme est terrifiée. C'est la dernière semaine théorique mais il faut encore quelques jours, je pense récolter la semaine prochaine. Les 2 grandes plantes ont une forme et un volume normal, je vais les libérer de leurs liens très rapidement. La petite semble encore plus chargée en résine. Je n’arrose que à l'eau pH ~6.8. Led 80%. Bon grow à tous. M.
Likes
6
Share
@jkadabra
Follow
Esta semana le encontré araña roja, cómo está en prefloracion apliqué fórmula antiacaros