
Likes
Comments
Share


@jonesy_grows
Follow
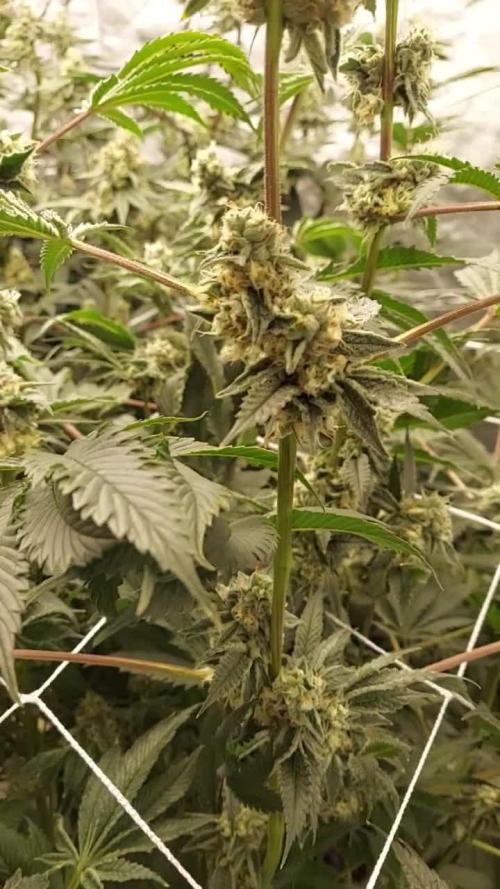
I've started lollipopping and removing the smallest skinniest branches. I'll do this throughout the week and stop on day 21.
I've picked off a few top fan leaves for light penetration too.
It's awesome to see this many pistils going into week 3.
I'll be posting a midweek update as well.
6/20
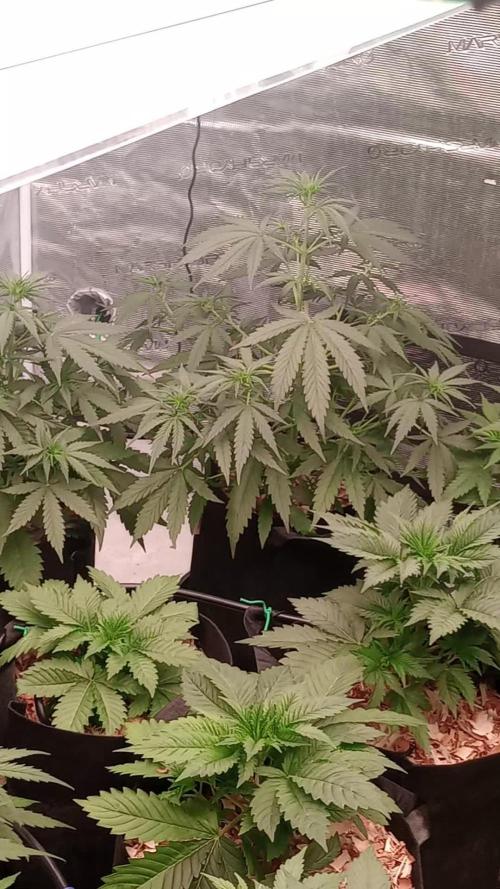
Not too much to update, I've plucked off all the small short stems that I don't want, added a 7" oscillating fan, and started working koolbloom powder into my nute regimen.
My clone tent has a pretty bad fungus gnat infestation, so I treated that tent and this one with neem oil.
Happy growing!

Likes
15
Share


@Bootlegelkk
Follow
I skipped a week sorry y’all! Anyways man this blueberry muffin is a masterpiece… I think next year I will be growing this baby In a 20gallon pot want to be able to stock up lol.. she has loved everything I’ve given her and I think she could take more if I have it but she doing just fine so no need to add more to her. Starting to smell yummy definitely not a typical cannabis smell it’s very pleasant ( although there is nothing like the smell of some skunk! ) and the buds are filling out very good. After checking out a few post on her I haven’t seen any massive buds but some small perfect ones so maybe I’ll get some them heavy colas. But anyways still
Dealing with spider mites but they’ve slowed down a lot still every now and then hitting them with keen oil when I start to see them pop up. Probably going to be removing heavy grow nutes and blast more bloom and boosters. Anyways thanks for checking me out I know I ramble
Peace,love and grow my friends!

Likes
18
Share


@Mastr
Follow
She grow super fast and I start nutrient on her day 6 and she loves it
Today day 12 I start on her lst training and I will top her too

Likes
6
Share


@Mr_Green79
Follow
Nach dem Ich eine Woche mit Canna Flush und Osmose Wasser gespühlt hatte , habe ich Ihr kein Wasser mehr gegeben bis alle Blüten nach unten gehangen haben..
Da die Temperatur gerade recht hoch ist , habe ich die komplette Pflanze einfach aufgehängt, damit die Luftfeuchte langsamer entweichen kann..
Hatte diese Pflanze sozusagen als Test um zu sehen wie eine Automatik so wächst.. Hatte anfangs die ersten 4 Wochen auch nur eine 25 watt Lampe , dann 3 wochen lang 8 stunden 25 watt und dann 10 stunden 60 WattWatt und letzte 2 wochen 120 Watt , aber auch gedimmt auf 70 %
Verbrauch Stromkosten
30 Tage 25 Watt 18 Stunden - 13,5 Kw
21 Tage 25 Watt 8 Stunden - 4,2 Kw
21 Tage 60 Watt 8 Stunden - 12,6 Kw
14 Tage 70 Watt 18 Stunden - 17,64 Kw Durchschnittlich mit Daylight zyklus
70 Tage lüfter 5 Watt 24 Stunden-8,5 Kw
70 Tage Abluft 15 Watt 24 Stunden- 25 Kw
Verbrauch zusammen für den Grow ist 81,44 Kw
Bei einen Kwh preis von 0,37 cent sind das insgesammt ausgaben von knapp 30 euros
Und das Hydro system war nur ein 2 Liter kanister mit einen Aquarium Sprudelstein.

Likes
45
Share


@masterofsmeagol
Follow
8/27 I think I mightve been overwatering. It's so hard to tell when the conditions change week to week. That's Maine for ya. Bags were still heavy and plants were soaked. I tried to shake the more advanced flowering plants without sending water everywhere. That's how septoria spreads. The event horizon I treated with plant doctor looks the best it ever has. It's tile for another application on the toasted toffy. I'm seeing a few spots again. I didn't have time to take pictures or do a video. This video is from last night. I'll treat that toasted toffy again today and I'll record it here. After I see it working u may treat the others. I see some residue of k bicarb but it has pretty much eradicated the pm. I know it will always be there but these treatments seem to be working. I'll be adding beastie bloom to my line up soon. EVERYDAY I go over the buds are bigger more compact and dense. Event horizon, toasted toffy and the red runtz (I think) in the 50 are flowering to beat hell! The get bigger everytime I see them. I can smell them as soon as I round the corner. This is going to be a good year. These strainsxare high in thc. Maybe I gave up some mold resistance and a harder to grow strain but if I can make it to the end it will be fire.
WENT BACK OVER AROUND 5. OBVIOUSLY IN THIS SCORCHING 80°+ day the seedling in the 10 was dry as a popcorn fart. Some other plants seemed dry when I stuck my arm down the bag but I could feel some moisture when I pushed my finger through the medium. They WILL need water but I'm not giving it to them tonight. Took a shit ton if pictures and a video this morning. I'll uploadcthat shit tomorrow. I'm trying to do a couple right now. Anyway I continued to defoliate what needs it. Flowers are swelling. I GAVE THE TOASTED TOFFY ITS 2ND TREATING OF PLANT DOCTOR. I USED A QTR GALLON OF A 4 TSP PER GALLON MIXTURE. I MADE SURE TO GET AS MUCH OF THE FOLIAGE AS POSSIBLE AND THEN I USED THE RESTCON THE MEDIUM. I SHOULDVE PROBABLY WATERED THAT ONE BUT ITS GOING TO RAIN TONIGHT. AT LEAST I HOPE IT IS. Looks like some of the pics are uploading! Yay! The plants looked the best I've ever seen them tonight so I held off watering. My wife is I'll and may need to go to the hospital. So instead of watering prematurely I can monitor the situation and make a decision in the morning. I made enough phed water for my father to go around and water everything. He is aware of the situation. Hopfully that will not be necessary. However, I don't want to over water and I feel like they didn't want it. Just going with my intuition. It's done me pretty good so far.
8/28 Luckily no hospital. It's sprinkling out. Plants are covered in water so we got SOME rain. It says we will get 0.00 but that can't be right. I watered the 10 yesterday and everything else this morning with a gallon each except the middle gmo in the 30 which got 1.5 gallons. Did not water the one in the 50 gal pot. It looks a little overwatered. Also looks like it has a slight calcium/magnesium deficiency. I'll up the calmag and i'll make sure when I do water I'll water thoroughly. Like usual toasted toffy is looking better after the treatment. The all star has been the k bicarb. I haven't seen shit for pm. Just a little residue from the k-bicarb. Took a video and some pictures. This is the fun time. I like watching the buds develop. Some of these plants were monster cropped so they are STACKED. I'll keep what I do updated.
8/29 Made an awesome video today bit it won't upload. Probably because its a little over 2 minutes. I'll do another one if it won't upload. Nope it won't even attempt to upload it now. Oh well. They flowers just looked so pretty this morning. I noticed some WPM on the event horizon in the middle. I noticed SOME on the bottom and interior of the GMO that I had already identified. I'll do another k-bicarb treatment and see how that goes. Plant Doctor seems to he doing a pretty good job on the septoria on toastedctoffy and my favorite event horizon. That plantvis THICK. it's going to be stacked and have some huge colas. I need to LST it and suppirt those giant colas and separate them a bit more. There is never any shortage of work to be done I can tell you that. I have defoliation to do on the sherb pie and the middle event horizon. It seems like crisis after crisis. Bu my plants are STRONG.
8/30 It was in the 40s at 6am. Shook off the plants. Bags are still heavy. I see some septoria climbing a bottom branch of the toasted toffy. It's foggy as hell out. Can't see a foot in front of me. Saw a LITTLE PM on the gmo I've been treating. It's just time to apply the ki bicarb. Plant Doctor is working wonders on even horizon in the back. I see some pm on the one in the middle. I think I'll treat that with plant doctor as well. I'm not sure. I messed up the video. I've got work to do. I'm waiting until I water and I'll feed again. I'm going to add beastie bloom to the lineup this time I think. Only one plant seems like it m9ght be too early for it. We'll see. I need to look back. I'll document what I do. Video won't upload. I'll try later but it's sideways
WENT OVER AROUND 3PM AND EVERYTHING LOOKED FABULOUS. WELL....THE PLANT I DIDNT WATERCLAST TIME IN THE 50 WAS DROOPING SO I GAVE IT A GALLON AND A HALF. THE TEN WAS LIGHT SO I GAVE IT A GALLON. IT WASNT DROOPY BUT ITS A HUGE PLANT IN A 10GAL AND USES A LOT OF WATER. I WAS PLANNING TO GO CHECK THEM TONIGHT AND SEE IF THEY NEEDED WATER BUT EVERYTHING IS PRAYING TO THE SUN! I DONT WANT TO OVERWATER AND I BELIEVE THESE WOULD BE BEST SUITED TO BE WATERED IN TGE MORNING. ILL FEED THIS TIME AS WELL. IM CONSIDERING ANOTHER APP OF K BICARB. TOOK A FEW PICTURES AND VIDEOS BUT ILL NEED TO UPLOAD
8/31 FED AND WATERED EVERYTHING. TOASTED TOFFY DIDNT GET FED DUE TO SEPTORIA AND THE 10 ISNT FAR ENOUGH ALONG.. THE 50 WAS WATERED YESTERDAY BUT GOT THE FEED WITH A LITTLE MORE WATER THIS MORNING. I ADDED ABOUT 1/16 TSP BEASTUE BLOOM TO THE REGULAR LINEUP TO SEE HOW IT GOES. MY BUDDY TOLD ME LOTS OF PEOPLE HAVING PROBLEMS WITH PM. I WENT BACK OVER TO DEFOLIATE AND LOOK FOR PM AND I FOUND IT. ON THE GMO INTETIOR AND SOME BOTTOM BRANCHES. I DEFOLIATED WHAT WAS BAD AND THEN I SPRAYED 3 GMO'S, EVENT HORIZON IN THE MIDDLE AND SHERB PIE WITH K-BICARB. HOPFULLY THAT WILL KEEP THINGS OUT OF CONTROL. I WILL BE WATCHING AND KEEPING UP WITH FUNGACIDES. IF I FIND ONE NOT WORKING ILL SWITCH IT UP. I HAVE A FEW OPTIONS. BUDS ARE EXPLODING IN GROWTH! WINDY OUT. I SAW A SECONDARY BRANCH LIMP AND MY GEART SUNK. I LOOKED DOWN THOUGH AND SAW THAT IT JUST WAS BLOWN HATD AGAINST THE TOMATO CAGE AND SNAPPED. I REMOVED IT WITB A SIGH OF RELIEF. MY BUDDY SAYS THE SEPTORIA DOESNT LOOK TO BAD AND ITS PRETTY FAR IN FLOWER SO HE THINKS ILL BE ALRIGHT. NEVER GROWING CLONES AGAIN. ILL STICK TO SEEDS AND STEAINS MADE FOR MAINES
9/1 Forgot to write an entry. IT RAINED FOR A BIT BUT TURNED TO BRIGHT 80'S
9/2 WATERED EVERYTHING. I THINK ITS TIME FOR ANOTHER TREATMENT OF PLANT DOCTOR TODAY. The septoria is getting a little worse. The buds are swelling everyday though. I think this plant only has a month left. I just need to outrun it. So far so good. I think my watering habits are better now. It's different depending on weather. Potassium bicarb has been wonderful treating the pm on that gmo. I treated the middle event horizon with it as well. It seems to work awesome. I'm losing tons of leaves. I hope that's normal senescence. I think it is seeing as how I see SOME foliage in the woods. Its matching other diaries. The plant must shed some leaves to make these flowers that seem to double in size every time I see them! Trying to upload a couple videos but they are long so we'll see what happens.
WENT BACK OVER AT NIGHT ANDCAPPLIED A LITTLE BIT OF K BICARB AND DEFOLIATED WHAT I SAW ON THAT GMO. IVE BEEN DEFOLIATING WHAT SEEMS LIKE A LOT BUT BUDS ARE SWELLING AND ITS CONGRUENT WITH THE MAJORITY OF MY DIARIES. I WISH I HAD PERFECT CONDITIONS BUT I DONT. I TREATED THE EVENTHORIZON WITH PLANT DOCTOR AGAIN. I USED APPROX A QTR GALLON OF 2 TSP/GALLON AND TRIED TO AVOID BUDS WHILE STILL GETTING THE LEAVES. I KINDA USED THE REST AS A SQUALCH SINCE I HAD WATERED THIS MORNING. THE WIND WAS STRONG. I ADDED A GARDEN STAKE AND ROPE SUPPORT TO THE TOASTED TOFFY AND ATTACHED IT RIGHT TO THE FRAME OF THE CAGE. LOOKS GOOD FOR NOW. ILL KEEP THINGS UPDATED.


Likes
40
Share


@Drgreenthumb627
Follow
The blue/purple hue in the buds is starting to come through under the shimmering trichomes, the size and density of these buds is blowing me away. week 8 is at an end and i am avidly checking trichomes awaiting the end. the fade is in full effect

Likes
8
Share


Likes
4
Share


@Barcelona_Farmers710
Follow
Mientras yo me divertía en la spannabis las niñas se ponian cada vez mas resinosas farmers!! Solo basta ver la shining haze para darse cuenta que el mammoth p es brutal!!👌🏻
Likes
3
Share


@Trinidad
Follow
15.06.25. Day 46.
Just a reminder that 2 seedlings died at start of grow. Big plant is drinking alot of water, I had to top up her reservoir with about 2 liters of water on 2 sperate occasions. High day time temperatures lately. Approximately 34°C.
16.06.25. Day 47
Changed out reservoir on small plant.


Likes
2
Share

@00110001001001111O
Follow
:
Total days 91
Total flower nights 51
Nice frosty buds forming on extra floppy plants because I didn't have a well-managed canopy. Only need 2-3 primary branches per square foot. something I adhered to early in my growing experience but for some reason got lazy about for a few years in the middle.
Processing
Likes
105
Share


@Green_Friends_Inc
Follow
Commencing week 4: Day 22 on November 14th
Day 22-ph'd back to 5.8x range from 5.5 to 6.1
It
Day 23- added 5ml Clonex to each buck and ph'd. Ppm around 600-650
Day 24- added a little fertilizer salts for N mostly and then ph'd again. Ppm 750-850. Also turned on a few more lights as well as turned timer off to increase temps in lieu of pending storm. Also adding passive humidifier to at least help with the coming dip in humidity from snow outside.
Day 25- pass few days are going well. Aside from a heavy dip in the temp and humidity last night (we have a bit of snow come already). Plants seem to be picking up the pace a little finally. Not much but A little bit which is great because it feels like I've been watching paint dry lol
Day 26- plants are doing great. Seem to be happy 😄 despite or maybe because of the changes over pass two days. And..,.we have roots in water!!!!!! So far gorilla zkittlez2 and gorilla zkittlez3 both have a few roots in the nutrient solution. Now I expect growth rate and work to pick up soon. Hopefully the rest get their feet wet soon 💧
Day 28 last day of week 4 Nov 19
Some plants went from seedlings to "hardened off" this week nearly tripling and doubling in size as well as starting with the secondary growth. Some still a little behind. I've noticed all the Gorilla Zkittlez are simply growing much faster then the rest so far. And that out of the three GZ s one seems to be leaving more hybrid or possibly sativa (see pics) .
Also one or two of the plants seems to have some funny traits like the Boss Hogg1 very purple and covered in baby hairs.
Overall I am amped to see the growth in the coming two weeks and expect big changes 👍👍
Thank you all! who view, like, comment, follow, and support me. I swear it will be much more exciting grow soon!😎


Likes
61
Share


@Esoteric_growing
Follow
Potted in to 20L and put under a 400w mh, they look a little tired as it was right before lights out. All going well and seem quite a vigorous strain
Likes
38
Share


@PapaNugs
Follow
Another good week generally speaking. The girls are drinking a lot but nothing crazy. Things are wrapping up here in this tent shortly.
This Gorilla Cookie will go the longest out of the group and will push everyone else out. She looks good but no smell that I can tell
Dimmed to 80%
Here are the lights details:
Medic Grow Mini Sun-2 150W LED
Model: MN150-022
Spectrum mode: V1
Efficacy: 2.8 umol/J
Thanks for stopping by!
You can find the light on Grow Diaries:
https://growdiaries.com/grow-lights/medic-grow/mini-sun-2-150-watts
You can find the light on Medic Grow's website:
https://medicgrow.com/
Likes
60
Share


@BudBoutique
Follow
! this is my current status, gonna upload my last veg weeks within the next week - got a bit busy around Spannabis - thank you for your understanding! 💚
Welcome to Bud Boutique Grow Diary - really appreciate all your love and support :)
Dont forget to check out my other current grows!
🗓️ This Week:
- Stretch was super high within the first 3 weeks of flower
- Day 24: attaching once a week APTUS Foliar with Regulator & Nutrispray with the amazing CannaFogger by Petra Grow
- Day 28: bud development is super beautiful and praying up, even though the plant still pretty small and compacts compared to others
Thank you for still staying with me 💚
___________________________________________
--- 🌱 Strain (Sponsor) 🌱 ---
🏷️ Cookie Haze by Kannabia Seed Company
https://www.kannabia.com/en/feminized-cannabis-seeds/cookies-haze
--- 🥗 Nutrients and Feeding (sponsored by APTUS: APTUS Ambassador) ---
🍸 APTUS: full nutrient schedule extreme
-- Regulator, N-Boost, P-Boost, CaMg-Boost, K-Boost, Allin1 Liquid, Startbooster, Topbooster, Enzym+ every feeding
-- Fulvic-Blast, NutriSpray as Foliar each once a week
🔗 https://aptus-holland.com/
--- ♻️ Grow Control (Sponsor) ---
TROLMASTER: TENT-X + LM14 Light Adapter to dim/sunrise/sunset lights + Temp & rH Sensor all remote on App
🔗 https://www.trolmaster.eu/
--- 🚿 PetraGrow (Sponsor) ---
CannaFogger Foliar Spray
🔗 https://www.petratools.com/product/petragrow-cannafogger-atomizer-new-mini-fogger
--- 🏭 Grow Setup ---
💡LUMATEK Zeus Pro 600
* 🏠🌿 Indoor: Homebox 120x120x200cm (4x4)
* 📐🌀 PrimaKlima exhausting Fan 1180m3/h (running on 60-80%)
* 🌀 Can Light Filter 800m3/h & 1x Fanbox 1x Dyson fan for Air circulation
🔗 https://lumatek-lighting.com/zeus-600w-pro-29/
🔗 https://primaklima.com/de/shop/ventilatoren-de/ec-ventilatoren/pk160ec-tc/
🔗 https://canfilters.com/products/filters/
All Likes and comments are highly appreciated!!!
👨🌾 don't forget to check out my Instagram for daily educational content: budboutiquee
- Bud Boutique

Likes
52
Share


@Santica_Garden
Follow
At the end of Week 1 of Flower and this is how things are looking for the King's Juice , not much to update on really, I have uploaded a video for a better look at the ladies 👍🏾🌱💚 HAPPY GROWING GUYS

Likes
8
Share


@Mr_Puff_N_Stuff
Follow
Week 14 and my babies are almost completely done. Hopefully I can pull them at the end of this week. Their colors are really showing now. Buds are getting pretty chubby. Happy and healthy…
Likes
129
Share


@Regenwurm
Follow
Die 13 Blütewoche ist erfolgreich abgeschlossen!
Tage der Wachstumsphase = 32 Tage.
Tage der Blütephase = 91 Tage
Wachstum h in Blütewoche 9= 0 cm
Blütenbildung: sehr Hoch
Die Blütenkelche sind am Ende der Produktion und verfärben sich.
Die Trichome sind bei beiden ladies im gesamten trüb. Heißt, der Harvest Day nähert sich. Ich denke 1 Woche 👌
In dieser Woche den Ladies einige Blätter abgenommen das in der Endphase das Licht die buds erreicht.
Der Wasserbedarf der Pflanze ist gleichbleibend moderat.
Diese Woche 2 Tage von 7 gegossen (2* gespült mit 10 l)
Mutation 1= strähnige Blüten (wie bei der Dr. Greenspoon öfter mal vorkommt)
Mutation 2 = Gigantismus (doppelt so viele DNA Ketten wie regulär)
Mutation 3 = Sekundäre Blüten an Blättern
2 mal in dieser Woche mit Purolyt Mischung 1:25 besprüht
Lichtstärke: 87 %
Lichtabstand: 36 cm
Std Tag/Nacht: 12/12
Temperatur Tag: ca. 23,5 Grad
RLF Tag: 40-45%
Temperatur Nacht: 20-21 grad
RLF Nacht: ca. 45 %
VPD Wert: ca. 1.2
PH Wert Wasser/Düngelösung: 6,4
EC Wert: 0,3
Ventilator Oszillation: Stufe 3
Befeuchter: aus
Entfeuchter: mit Steuerung an
Zusätzlicher Entfeuchter: 1 Stk außerhalb vom Zelt im Raum
Bewässerung: 2* bewässert mit Dünger mit den o.g. Mengen
Purolyt Besprühung: 2 mal
Controlling: Grow Control
Dünger: Greenbuzz Nutrients
Licht: Pro Emit Vollspektrum
Abluft: EC Carbon Active 750 m3 gesteuert/PrimaKlima 480m3
https://greenbuzznutrients.com/de/
Danke an Greenbuzz
Ihr bekommt 25 % Rabatt bei der Nutzung des Codes auf der GB Homepage
https://greenbuzzliquids.com/de/shop/
Code: GD42025
(Mindestbestellwert 75€)
Likes
18
Share


@RakonGrow
Follow
Tag 92:
2 Liter Leitungswasser mit letzter Phase des Canna Düngeschema Leicht
+ PH 6.0
Tag 94:
2 Liter Leitungswasser
+ PH 6.0
+ LED auf 80% gedimmt
Tag 96:
Komplett Entlaubung fürs Trocknen . Ein paar Größenvergleichsphotos gemacht .

Likes
8
Share
@Gorillagrower
Follow
A shout out to my brother's at Spliff Seeds! Without the good genetics you don't have shit! Lol 😂 Dutch Blue Automatic is a very aggressive growing strain.
