
Likes
Comments
Share


@KeemBboomin
Follow
So where I live we had a really bad storm it had knocked out my power for a full 24 hrs so I had to give them some extra attention to insure there was no mold or any pest with no fan rotation. Then I also had to put them back on there proper timer to get things back on a roll so far so good they still look and smell amazing wish me luck
Likes
23
Share


@NorwegianNugs
Follow
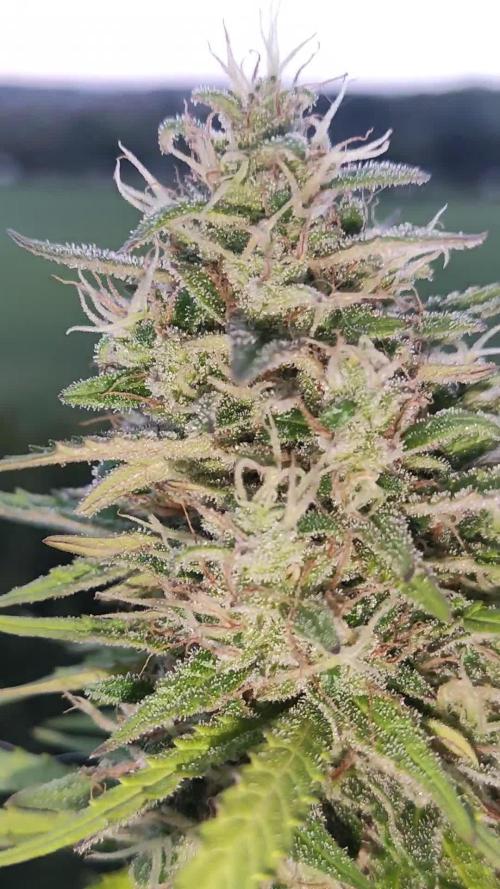
Week 14!
I am starting to get really excited about this plant! She is plumping up and producing a lot of trichomes!
Smell is very enjoyable. Fruity, sweet and lemony are smells that come to mind.
Doing minor defoliation if I see leaves shading buds.

Likes
17
Share


@RDWCGrowing
Follow
Week 1 Day 1 - 8/12/2023
1st Water change Day! Such a special time it is when you remove the little bit of Nutes that you gave them as an appetizer and you give them their first real meal.
Added
39 Gallons of Water to my system
SILICA= .5mil/Gal = 19.5 = 20mil
Root Drip = 1mil/Gal = 39mil
Cal Mag= .25mil/Gal = 9.75 = 10mil
FLoraMicro= 3.0mil/Gal = 114mil
FloraGro = 2.0mil/Gal = 78mil
FloraBloom = 2.0mil/Gal =78mil
ORCA= .5mil/Gal = 19.5 = 20mil
Week 1 Day 2 - 8/13/2023
Everything is looking good the roots are making their way to the water and the new grow is looking nice and green.
Week 1 Day 3- 8/14/2023
Everything is right on track, they are looking beautiful and in the praying position all leaves happily lifting towards the light.
Week 1 Day 4- 8/15/2023
A little worried today her birth Twin the BA I am growing out is looking great and is raised towards the light and this one is just slightly under.. Will keep an eye on Her.
Week 1 Day 5- 8/16/2023
Walked in and the humidity was under 60.... ohh noooooo.. So I added 2 humidifiers to the tent and attached them to my InkBird controller which is set to 62.
Also looking at the roots and she has some poking out the bottom but just not in the water yet.. Luckily we are set for 14 days before next water change so the system will stay stable and her sister already has roots in the water so she should only be a day or two behind.. we will just keep tracking but she is delayed.
Week 1 Day 6- 8/17/2023
Roots in the Water!!! Huston, we have a successful launch. This grow is on!
Humidity was a little low this morning so I refilled the humidifiers. Other than that the temp looks great, the PH looks good, the PPM looks good the plant is in the praying position and all damage from the little drowning from over filling the cloning machine seems to have been fixed. Happy Happy.
Week 1 Day 7- 8/18/2023
Yay.. week 1 in the books, roots in the water growth has started. Everything for growth and environment is looking good and on track, there are a couple of mutations with this Lady will keep an eye on those leaves.
IMO this grow is going A lot during this week 1 then week 1 of the last grow when I had them drowning.
Really excited on how this grow is going to come out.
Likes
25
Share


@Fatnastyz
Follow
Week 8
10-14
Water, both drinking around 750 ml a day!
Pretty much just fun with pictures from here.
Kosher still seems a bit hungry, but doing awesome!
Ztrawberriez is just nasty! Cant seem to get good enough pictures! Lol
10-17
Water and Guy was up to no good! 😻
10-15
Guy stopped in to pose today!
10-19
Flushed both today. I thought they should be low on food, but I over loaded again, I guess.
K ppm starting was 1200, now 440
Z 1050 now 310
Sheesh! One day I may Not over feed. 🤣
I even thought 2 tbs was light. 🤣
.

Likes
11
Share


@Chow_13
Follow
Aug 05 - Temp(High/Low) 28/19 Rain(mm) 0.0
Aug 06 - Temp(High/Low) 32/17 Rain(mm) 0.0
Aug 07 - Temp(High/Low) 32/18 Rain(mm) 2.6
Aug 08 - Temp(High/Low) 18/15 Rain(mm) 30.3
Aug 09 - Temp(High/Low) 19/14 Rain(mm) 5.2
Aug 10 - Temp(High/Low) 24/16 Rain(mm) 0.0
Aug 11 - Temp(High/Low) 25/15 Rain(mm) 0.0
Cold weather and rain has stunted her. Put her in the gazebo to keep her as dry as possible.
Processing
Likes
15
Share


Likes
3
Share


@Jointjourney
Follow
I feel like I didn’t put enough fertiliser in the soil of the Morello Cherries Auto. It’s starting to show early signs of autumn colours and nutrient deficiencies. However, it has a very distinctive sweet odour.


Likes
12
Share


@MicroHidroGrow
Follow
Esta es la última semana de crecimiento. Espero llegar a unos 30cm de altura para esta semana. He hecho varios cortes de bajos, defoliacion y super cropping. Se ven saludables y sigo esperando el estiramiento de la pequeña que quedó atrás. Iré actualizando.
Día 25. Hoy hice una corte de hojas grande. Esta noche voy a aplicar EMRO foliar. Algunas plantas se van muy arriba. Pero dentro de todo vienen parejas. En unos días paso a floración. Probablemente ya la próxima semana sea naranja.
Día 28. Último día de crecimiento. Esta noche cambio el depósito. Voy a tener que comprar otro, o ir rellenando a los 3 días del cambio, dado que estan tomando mucha solución. Algunas se estiraron más de lo esperado y la pequeña no alcanzó el tamaño deseado, pero no importa. Voy a ir aplicando LST para mantener una altura pareja. Las raíces crecieron muchísimo, pero por ahora es manejable el tema. Ahora llega la hora de la verdad.

Likes
42
Share


@Ultraviolet
Follow
Thank you. Gave her a cocktail to help with stress. Added 1st net for lateral support, not so much now, but for later. Blue light is absorbed by photoreceptor proteins called phototropins, which trigger a hormonal response that causes cells on the shaded side to elongate, making the plant bend toward the light. Try and fill this side a little. She is quite big already, just needs to find her stride again after the undue torture.
5 apex stems with 20-30 mini cola, let them develop a little, with the apical dominance shattered, all those 20-30 will all compete with each other as soon as that stretch is initiated. Key to a good stretch is making sure the plant is cycling efficiently, with large ATP conversions occurring lights out.
For now, I'm keeping light intensity high. A plant will slow its vertical growth in very high light intensities, leading to a more compact form with thicker stems and leaves. This response is a protective mechanism against light stress, which can damage the photosynthetic apparatus and lead to symptoms like leaf scorching, yellowing, and brittleness. Instead of growing taller, the plant invests its energy into creating a more robust, stress-tolerant structure.
Providing plants with necessary antioxidants helps protect the photosynthetic apparatus by scavenging reactive oxygen species (ROS) that cause damage from excess light.
UV light exposure can impact the xanthophyll cycle by either enhancing its photoprotective role or causing damage, depending on the intensity and type of UV radiation. UV exposure can trigger the synthesis of more xanthophyll cycle pigments to increase the plant's capacity to dissipate excess energy, but it can also cause direct damage, particularly to Photosystem II, and may lead to a decrease in the de-epoxidation state (DEPS ratio) which indicates a reduced capacity to dissipate excess energy.
Plants can respond to UV stress by increasing the synthesis of xanthophyll cycle pigments, such as violaxanthin and zeaxanthin, to improve their photoprotective capacity. UV-induced changes in xanthophyll cycle pigments can be linked to a plant's overall tolerance to high radiation stress. The xanthophyll cycle helps protect against photoinhibition, which is especially important when the plant is exposed to high levels of both UV and visible light. High doses of UV radiation can directly damage photosynthetic components, including the proteins, lipids, and pigments in the thylakoid membranes. Exposure to UV radiation can have a mixed effect on the de-epoxidation state (DEPS ratio) of the xanthophyll cycle pigments. In some cases, UV can inhibit the conversion of violaxanthin to zeaxanthin, resulting in a lower DEPS ratio and a reduced capacity for energy dissipation. However, the total pool of xanthophyll cycle pigments may increase, and this enhanced pool size could provide a greater potential for photoprotection despite a lower DEPS ratio.
The xanthophyll cycle works alongside other mechanisms, such as the accumulation of flavonoids (UV screens), to protect the plant from UV-induced damage.
Blue light repairs 100% UV-induced damage in plants through a process called photoreactivation, which uses a light-dependent enzyme called photolyase. This enzyme uses energy from blue and UV-A light to directly reverse the damaging pyrimidine dimers in the DNA caused by UV-B radiation, a key mechanism for maintaining the plant's genetic integrity.
After carbon, light, water, temperature, and nutrients, the limiting factor of a plant's growth is often its own internal factors or the amount of a key ingredient. Chlorophyll concentration is one such factor, as the amount of this pigment limits how much light can be captured for photosynthesis. Other factors include chloroplast number, respiration rate, and the concentration of carbon dioxide in the atmosphere, as plants are often in a CO2-deficient condition.
60x60x18=64800seconds x 700 = 45,360,000moles. 45DLI
Exposure to 165 µW/cm² of ultraviolet-B (UV-B) light for 3600 seconds = 1 hour, a extremely high, acute dose triggering stress responses and protective mechanisms.
.
The plant's photoreceptor protein, UVR8, senses the UV-B radiation. This triggers a signaling cascade that activates specific genes to protect the plant from damage. In response to the UV-B signal, the plant ramps up the biosynthesis of protective compounds like flavonoids, phenolic acids, and anthocyanins. These compounds absorb UV radiation and accumulate in the epidermal layers of leaves to shield inner photosynthetic tissues. The plant may increase leaf thickness or deposit more cuticular wax, creating a physical barrier to the radiation. The plant will produce more enzymatic and non-enzymatic antioxidants to neutralize the reactive oxygen species (ROS) produced by the UV-B radiation. The plant activates enzymes, including photolyases, to repair DNA damage caused by the UV-B. These repair mechanisms are critical for preventing permanent genetic mutations.
While protective measures are activated, a high dose delivered over a short period can cause stress that overwhelms the plant's defenses.
Photosynthesis is highly sensitive to UV-B. A high dose can inactivate Photosystem II (PSII), damage thylakoid membranes within the chloroplasts, and reduce chlorophyll content, which lowers the plant's overall photosynthetic capacity. Despite repair mechanisms, high UV-B doses can inflict persistent damage on the plant's DNA. One study found that acute, high-dose UV-B had a greater effect on genome stability than chronic, low-dose exposure. The overproduction of reactive oxygen species can cause oxidative stress, leading to the oxidation of lipids and proteins and disrupting cellular function.
Likes
1
Share

@gse314
Follow
Did a lil experiment and clip the top of each was looking to see a increase veg
Processing
Likes
32
Share


@Vega0284
Follow
Hey Guys!
Super excited this week! I've really been wanting to try growing outdoors, so I built a cheap hoop house! Got most of this stuff for the frame from Lowes under 300$. All the soil products I got from GrowGreenMI. Some really cool people out there.
One thing I'm super worried about is drainage. Right now those holes are about 4 feet deep and they've got about 4 inches of water in them already. What's been cautioned is that, eventually, about 2 months in these plants roots will grow and reach the bottom and cause root rot to form. One of the biggest things I was trying to be wary of was causing root rot. This was also the biggest precautionary measure I took when mixing the soil. Adding the extra perlite, coco, and clay pebbles. Best advice right now is to build the soil up on the holes another 16 to 18 inches and possible stick a PVC pipe down to the lowest drainage point of the hole to allow some of that natural occurring water to evaporate.
Any advice anyone has on it is welcomed!
Making a compost tea for the soil outdoors, will probably put 2 cups in each RDWC bucket as well and let that do it's magic for a day or so before nutrient change. Raised the bed about 14 inches as well!
All the seeds sank! Off to a good start! Lol

Likes
40
Share


@Hempface86
Follow
Another week and thease girls are starting to build their buds nicely now..Grease Gun seems to be the farthest along followed by Froot by the foot then Cream and Gummiebears .. Gummiebears starting flowering almost 2 weeks after the other 3 girls but she is catching up fast.. she gonna be a MONSTER .. As you can see i raises the lightup as much as possible, we are running out of space..the tent is 63 inches tall. Grease Gun is so frosty and so pretty 😍 so is FBTF...I'm looking forward to this harvest! Till next week everyone be safe ! Happy growing ✌️


Likes
2
Share


@TOMI08
Follow
Sziasztok
9.héten vagyunk
A sütinek adok melaszt+canna flush
Az ak47 valami szörny imádom
Likes
59
Share


@TheCannaProphet
Follow
~ AirCube Active Oxygen Ebb/Flow System sponsored by GrowAce, featuring Tropicana Cookies by FastBuds ~
Well guy's and gal's here we go again on another exciting Autoflower run together! This time will be different as I will be doing a 'Hydroponic' run utilizing the AirCube Active Oxygen Ebb/Flow System by GrowAce, who were kind enough to sponsor me for this run, so it should be interesting to see what results I get and have some fun along the way!
•Let me first tell you about this 6 Pot Ebb/Flow system from GrowAce:
"The AirCube system is the one and only Ebb & Flow grow system on the market that combines the benefits of air pruning with a fully automated Ebb+Flow system! With the AirCube's proprietary fabric pot in bucket design, this system is guaranteed to outgrow any other Ebb + Flow system on the market. The results speak for themselves- grow MASSIVE roots that result in MASSIVE fruits!
Air Pruning- Air Pruning only happens with fabric pots. As the roots reach the fabric walls of the pot, they penetrate and grow into the breathable fabric. Once penetrated, the roots are exposed to air, which causes the tips of the root to dehydrate and naturally prune themselves. This natural pruning process forces the roots to grow tons of lateral fibrous feeder roots. This results in a plant that utilizes the entire root zone and fills the entire pot with tons of roots. These fibrous feeder roots are incredibly effective in uptaking water and nutrients, resulting in a plant that grows healthier and more vigorously!
Oxygen Benefits- Without oxygen, nutrient absorption cannot occur. On a molecular level, oxygen is needed to transmit nutrients across the cell walls and into the roots of a plant. With the AirCube's proprietary bottom lifted draining design, the system actively draws all of the water out of the bucket pulls vital oxygen into the root zone.
Maximum Versatility with Any Grow Medium: The AirCube System is the only system on the market that allows you to use any growing medium you like. Use coco coir, soil, peat moss, perlite, vermiculite, hydroton, rockwool or any other medium you wish! This system is the most versatile Ebb and Flow bucket system in today's hydroponics industry.
Temperature Control- with the fabric pots constructed with highly porous polypropylene fabric, heat dissipates easily and effectively. Unlike standard plastic pots, heat isn't trapped in the root zone. Heat in standard plastic containers can reach temperatures of up to 125 degrees. When this type of heat is trapped and unable to escape, it can damage your plant's health and limit the potential of your harvest. Growing in the AirCube System, plant roots grow cooler, healthier, and more vigorous.
Largest Pots in its Class- this system features 5 Gallon grow buckets, the largest pot size of any other ebb and flow hydroponic system in the market.
Modular and Expandable- start with 6 grow buckets and expand up to 36 grow buckets with the optional 105 gallons PopTank reservoir!"
For my medium and nutrients I decided to also switch things up from my regular Organic runs, going with Plagron Nutrients and Root Royale 70/30 Coco/Perlite. When filling the fabric pots with medium, I first added just under a gallon of horticulture perlite from Nor-Cal as a base layer to ensure good drainage and then filled the remainder with the Root Royale.
•Now for the outstanding, award winning strain from my friends at FastBuds... Tropicana Cookies Auto:
I'll be running Tropicana Cookies Autoflower which is a 60/40 Indica/Sativa Hybrid. "Tropicana Cookies Auto is the perfect variety for growers of all levels, especially beginners as this strain performs very well outdoors and indoors, and can produce up to 500 gr/m2 in 56-63 days without needing extra maintenance. Reaching up to 110 cm, this strain grows fairly tall with medium-sized branching, showing its mixed heritage. Definitely the right choice for those with a high tolerance looking to get their hands on the strongest autoflowers out there. You can expect an extremely powerful and long-lasting high that’ll boost your mood and give you that extra push you need to start your days on the right foot. This variety offers the whole range of citrus and woody flavors with a strong candy-sweet background that will keep you coming back for more and more."*
*References: GrowAce.com, 2fast4buds.com
______________________________________________________________________________________________________________________________________________________________________________________________________________________________________________________________________________________________________________________________________
The Setup:
• AC Infinity 4x4 tent
•AC Infinity Cloudline T6 Exhaust Fan w/ Controller 67
•HLG 650R w/UVA Bar *** For some reason GD does NOT have a listing for the USA version of the 650R so I selected the closest match to it.
•AirCube Active Oxygen Ebb/Flow 6 pot System
•DL Wholesale Root Royale Coco Lite 70/30 coco/perlite
•TrolMaster Hydro-X Controller for light
•AutoPilot APC8200 co2 controller fed by a 50# tank
•16" Hurricane oscillating fan and 8" floor fan
•Tent cooling via filtered outside air delivered by AC Infinity Cloudline T6 fan
•BlueLab instruments: PH Pen and Truncheon Nutrient Meter
______________________________________________________________________________________________________________________________________________________________________________________________________________________________________________________________________________________________________________________________________
Weekly Updates:
11/12- Week Three of flower, here we go! The FastBuds Tropicana Cookies are all doing great! Two plants, the #1 & #3, are expressing a beautiful dark purple coloration in their flowers, while the #2's flowers are the normal green with snow white pistils and already have a good amount of trichomes formed.
I'm continuing to feed them 6 times a day for 15min. each feed, and have adjusted the nutrient level down to 800ppms. The 650R is now 26" above canopy, set to 100% output.
11/14- I'm continuing with daily monitoring of the AirCube reservoir, checking/adjusting ph and topping off with straight water. The solution strength in the reservoir is still hitting 650ppm but is starting to get discolored so I'll be doing a drain/refill in the next 48hrs before it gets funky.
11/17- Today I drained the reservoir and refilled it with straight well water that has a .3 EC(100ppm) to which I added Plagron's Cocos 'A' and 'B' in equal amounts, Green Sensation, and Royal Rush at 1ml/L and 2ml/L respectively. I also added the last dose of silica, then ph'd the solution to 5.7 @ 69℉.
I also went through all three plants, adjusting their LST and tucking a few leaves that were blocking light.
11/18- There goes Week 3 of flower and I can't wait for the upcoming weeks where these ladies will really be strutting their stuff!
💚 Thank you for checking out my passion in life! Please visit as often as you wish and I hope you enjoy this journey as much as I know I will! Grow what you love, Love what you grow!💚
Likes
23
Share


@adam_pawloski87
Follow
This week went real great , one has been getting flushed and the rest we will start flush Tomorrow! These ladies are doin so amazing! Hope you all enjoy !! Stay tuned for next week! Cheers an happy holidays!


Likes
4
Share


@Hix57
Follow
Je me lance dans l'expérience du topping sur ma nouvelle plantation de cannabis. Bien que cela ne soit généralement pas recommandé pour les variétés automatiques, j'ai remarqué que de nombreux blogueurs le pratiquent.
Après avoir obtenu de mauvais résultats
avec la technique de LST (Low Stress Training), je me suis dit que je ne risquais pas grand-chose.
Pour l'instant, je ne remarque pas de ralentissement significatif par rapport au LST.
Cependant, lors de mon premier arrosage avec des nutriments, j'ai mis un 8e de la dose recommandée, ce qui a entraîné l'apparition de griffes sur les feuilles... Vraiment déconcertant, je cherche encore à comprendre cette réaction...
Topping au 16 ème jour, 5eme noeuds.
Engraissage : 1/8 de la dose et apparition de légères griffes sur les feuilles
Merci de m'avoir lu 🌱


Likes
149
Share


@CBD_Sweden
Follow
Hi all the happy people here in GrowDiaries.
This is my second cultivation ever and it will be fun to try a bigger space than my closet grow.
First, I'm just going to say I'm done with the construction of my new growroom.
I put some pictures on the construction here in week one.
The room is 2.14 meters by 1.7 meters and has a ceiling height of 2 meters.
It provides a floor area of 3.6 square meters.
I use a 54 Watt Lightwawe T5 for germination and 2 Pcs 400 Watt HPS lamps.
I have a channel fan that replaces the room air about 40 times an hour to get a comfortable theme in the room, the air enters a fresh air intake from the outside.
The air is purified through a carbon filter to then leave the room to the rest of the basement.
Then I use that heat to heat the rest of the basement.
I will use 8 pcs 15 liter Autopots to grow with and a 100 liter water tank that supplies the pots of water and nutrition.
I will grow completely organically in soil and will watercure my buds to get the best possible medicine for me.
But there are no cultivation rooms to be displayed here, so I continue with what is most important.
Today I have put my seeds in my moisture dome and hope the seeds have germinated within a few days.
I am very excited to see how the new growroom will work and how this Blue cheese Auto from Royal queen seeds will turn out.
Blue Cheese automatic cannabis seeds are a cross of Blueberry Automatic and Cheese Automatic that has been perfected over five years of breeding and careful selection. The result is a feminized, autoflowering strain with superior yield, flavor, and effects to either of its distinguished parent strains.
THC: 16%
CBD: Low
Yield Indoor : 325 - 375 gr/m2
Yield Outdoor: 60 - 110 gr/plant
Height Indoor: 40 - 70 cm
Height Outdoor: 60 - 110 cm
Flowering: 7 - 8 weeks
Harvest month: 9-10 weeks after planting
Genetic Background: Blueberry x Cheese x Ruderalis
Type: Sa 35% In 40% Ru 25%
Effect: Cerebral and uplifting
Climate: Mild
..............................................................................................................................................................................................................................................................................................................................................
2017-09-11. Kl 12.00. Week 4 starts. I have cleaned the whole room for the new week and gave the girls water and nutes. Added videos and pics. Girl nr 1 is 27 cm high and girl nr 2 is 50 cm high and nr 3 is 15 cm high.
-------------------------------------------------------------------------------
2017-09-12. Kl 10.00. New pics and video. Nr 2 has grown 5 cm in 23 h, its incredible.
---------------------------------------------------------------------------------------------
2017-09-13. Kl 22.00. Everything is great in the garden right now. Updated with new video.
----------------------------------------------------------------------------------------------------------------------------
2017-09-15. KL 10.00. New pics and videos. Girl Nr 1 is 33 cm high, Nr2 is 70 cm and girl Nr is 22 cm. Nr 2 has grown 20 cm the last 3 days. Look at the stem of girl Nr 2 😍
The girls are starting to smell a lot now. Its a intense smell in the grow room.
-----------------------------------------------------------------------------------------------------------------------------------------
2017-09-16. Kl 10.00. The girls grow like crazy, i have to defoliate about 20 leafs a day. Nr 2 is 76 cm tall now, i wonder when she slows down?. Added 2 liters of water and nutes this morning and 2 new videos.
------------------------------------------------------------------------------------------------------------------------------------------------------------------
2017-09-17. Made a time laps of the girls first 28 days.
