
Likes
Comments
Share


@Naturalist
Follow
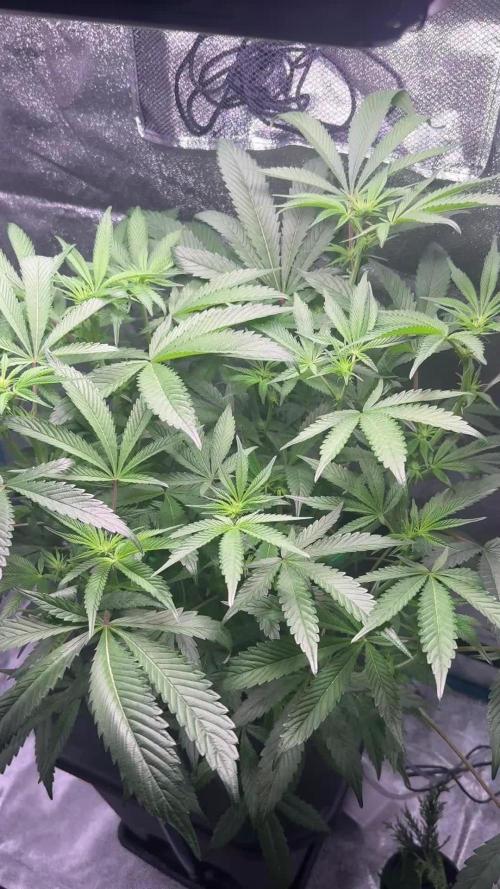
Flower week 2, keeping the RH & temp down as much as possible, so far so good.
Processing
Likes
17
Share


@greennug
Follow
plants looking great dinafem standing out from the crowd.my stardawg cuttings are thriving and a few of the fastbuds strains look beautiful.should be kicking into flower late next week. daily updates until harvest!


Likes
9
Share


@ThatsmyGrow
Follow
In the end, it's still a nice phenotype, but not at all frosty. Very dense buds with a slightly lemony scent.

Likes
36
Share


@TheGreenLeopard
Follow
Lovely lovely. Easy to get Around . Long stems with sizable gaps but enough bud on the site to keep you very happy. I had 8 plants to get through today so sorry for the lack of cut bud - will post the dry stuff later in smoke report. The pics are the night before harvest


Likes
13
Share


@NanoLeaf
Follow
Week 8 and week 3 of flower!
The terpenes are making my mouth water and the ladies are fluffier than ever and stacking up nicely.
Due to weather changes recently I was able to keep lower over all temperatures and the humidity has increased slightly but it’s right where I want it (50% RH).
Purple Lemonade is fading nicely and her colours are becoming more and more vibrant - she has about 2 weeks left. Terps are insane!
All the other strains are happy as can be and also showing slight fade on leaves here and there. Very impressed with my Divine Seeds pheno’s and definitely recommend giving their strains a try very strong and easy to grow. Ethos Zweets literally smelling like candy canes. Dutch Passion Colorado cookies definitely giving off hues of a bakery.
Overall it was a smooth week and I can’t wait for the smooth smoke!
Organics is the easiest way to grow with minimal effort and great results. Shoutout to Green House Feeding Bio Line 😎


Likes
27
Share


@Basementganja
Follow
Each plant has been watered/fed, with a glug or two, from a 1 gallon mixture of 1tsp/gal floranova-grow (ph7).
Mother plants are definitely ready for a pruning/cloning!
Likes
5
Share


@GirlGoneWeed
Follow
Nothing like a stress free transplant, where the plant don’t need time to recover!!
Bokashi Pro-Gro, my home made KNF input Fish Amino Acids (FAA) and rain water that’s all this plant is getting. Organic grow is cost efficient and you’re producing flowers that won’t bring any chemical sh!t into your body.
Follow my Instagram @GirlGoneWeed click the link in bio to have access to all my discount codes!
Happy growing !
Likes
8
Share


@Kawannabic
Follow
El 4 de ocubre se cambia el ciclo a 12-12.
El 7 de octubre se pueden apreciar en el video varias marcas de super cropping que hice tratando de controlar la altura, esta hay una planta en concreto que crece rapidisimo y con mucho vigor, después también resultará ser la más sabrosa. Digna de haber hecho madre


Likes
57
Share


@nonick123
Follow
Día 6 (29/04) Spray solo agua el top del sustrato. DLI 13
Día 7 (30/04) Spray solo agua el top del sustrato. DLI 13
Día 8 (01/05) Spray solo agua el top del sustrato. Subo a DLI 17
Día 9 (02/05) Elimino la cúpula casera de humedad y empiezo a regar con 300 ml solo agua
Día 10 (03/05) Empiezo a luchar con una ola de calor inesperada para esta época, que me trae temperaturas exteriores de 30 ºC y humedad relativa del 30%...
Mantengo la cúpula casera de humedad
Día 11 (04/05) Hace muchísimo calor.. 30 °C. A ver como lo llevan
Hago un invento casero para aumentar la humedad
Día 12 (05/05) Primera alimentación con Aptus! 300 ml H2O + Regulator 0,15 ml/l + CaMg-Boost 0,25 ml/l + Startbooster 0,25 ml/l - pH 6.2
Creo que las plantas se ven un poco pequeñas para tener 12 días... esperando por explosión de crecimiento en los próximos días....
💦Nutrients by Aptus Holland - www.aptus-holland.com
🌱Substrate PRO-MIX HP BACILLUS + MYCORRHIZAE - www.pthorticulture.com/en/products/pro-mix-hp-biostimulant-plus-mycorrhizae


Likes
7
Share


@NCgrower252
Follow
44oz of plant food mix is given to 5 plants (3- Colombian Gold, 2- Grandaddy Purple). All 3 of the Alcapulco Gold plants are still receiving pH balanced water- no nutrients. They’re measuring 10” tall.
Colombian Gold and Grandaddy Purple measurements range from: 12.5”-18.5”

Processing
Likes
2
Share


@Cogollo_eu
Follow
**Encontrarás la traducción a español al final de la descripción**
From/Desde: 09/09/19 || To/Hasta: 15/09/19
From day/Desde día: 08 || To day/Hasta día: 14
Blueberry Cookies Diary / Diario de las BlueBerry Cookies:
https://growdiaries.com/diaries/38769-dinafem-039-s-blueberry-cookies-at-the-ocean
-----IMAGES & VIDEOS-----
V1 - Transplanting day. I'm using 10 l Aeropots as final recipient. I've used:
- Small layer of ATAMI HydroRokz (perlite) at the bottom of the pot, just for cover bottom holes and to retain a bit of humidity
- Over the perlite i placed 1l of mixture with BioBizz "All Mix" and Volcanic Soil
- Again over, 1l of mixture with BioBizz "Light Mix" + Volcanic Soil & Guano
- And filled the rest with BioBizz "Light Mix" + Volcanic Soil
It's the second time that i broke half of the roots of a plant doing a transplant, It happened to me just for not being careful enough to hold the soil by the lower part. While this is no good, no further signs of that mistake other than the recorded video ;).
V2 - Quick show up on how to correct the color of photos taken under red/ping/purple light.
First I merge the HDR image from 3 bracketed shots, then I apply my custom color adjustment in the HDR resulting image.
As i show in the video, to correct the red light, you have to enhance the blue and green curves, just play with a point in the curves until you find the best adjustment for each of both curves. Then you should go to tones, and play a bit with reds, pinks & purples... and.... Voilá, you can see the results, easy and effective..... but no more easy than using the right white spectrum.
P1 - Cookies Showdown before transplant
P7 - Volcanic soil and Guano
-----WEEK SUMMARY-----
This week was very easy, i didn't do anything to these babies apart from the transplant. This is the first time im mixing something with the soil, I hope not to overfeed the Cookies with the nutes, as i'm going to use the same nutrients i was using.
The first 10 days they were growing in my 60x60x40 tent (DP60), with a terrible chinese light that i always use the first week wen I plant.
PandaGrow 100W (50W draw) - http://www.pdgrow.com/index.php?m=Show&a=index&cid=12&id=53
So after transplanting when i place the plans under the Quantum Board or the Platinum LED, i've notice it on them immediately, they really don't like this kind of chinese lights.
Thus after the transplant the plants has started to grow and wide much more and much quickly.
-----WATERING CALENDAR-----
12/09/19 DAY 11 - 1,5 l after transplant with all week nutrients @ 0.8 EC & PH5.8
*****ESPAÑOL*****
-----IMÁGENES & VÍDEOS-----
V1 - Día de transplante. Transplantaré a AeroPots de 10 l. Para el transplante he usado:
- Una capa pequeña de ATAMI HydroRokz (perlita) en el fondo de los tiestos, sólo para cubrir los agujeros y retener un pelín de humedad.
- Encima de la perlita he puesto 1 l de mezcla de BioBizz "All-Mix" con tierra volcánica
- De nuevo encima he puesto otro litro de mezcla de BioBizz "Light-Mix" con guano y tierra volcánica
- El resto está relleno con una mezcla de BioBizz "Light-Mix" con tierra volcánica
Es la segunda vez que se me parter unas raíces por la mitad en un transplante, eso me pasa por no ser lo suficientemente cuidadoso como para agarrar el sustrato por su parte baja. Esto no es algo bueno, pero he de admitir que aparte del mal rato de que se te partan las raíces, a la planta no le sucede nada de nada, sigue creciendo al mismo ritmo que su hermana.
V2 - Un ejemplo rápido de como corregir la iluminación de una foto tomada bajo un espectro rosado o rojizo
En el vídeo primero compilo el HDR compuesto de 3 fotografías horquilladas y una vez compilado le aplico mi ajuste de color.
Como muestro en el vídeo, para corregir este tipo de luces hay que realzar las curvas de color azul y verde, simplemente con un punto por encima de la mitad de la línea media hasta encontrar los puntos más adecuados para tu luz. una vez encontrados, sólo hay que ir a los tonos y ajustar un poquito el rojo, rosa y morado.
P1 - Muestra de las Cookies antes del transplante
P7 - Tierra volcánica y Guano
-----SUMARIO SEMANAL-----
Esta semana ha sido muy sencilla, no les he hecho absolutamente nada a las pequeñas a parte del transplante. Esta es la primera vez que mezclo algo con el sustrato y espero no sobrealimentar las cookies ya que voy a seguir usando los mismos nutrientes que he usado con anterioridad y de la misma manera.
Los primeros 10 días han crecido en mi tienda de 60x60x40 (DP60), con una luz china terrible:
PandaGrow 100W (50W draw) - http://www.pdgrow.com/index.php?m=Show&a=index&cid=12&id=53
Siempre uso esa luz los primeros días de cada cultivo, por lo que al cambiarlas a la Quantum o al Platinum LED lo noto al toque, realmente no les gusta nada la luz china esa, inmediatamente se ponen a crecer y ensanchar mucho mas.
-----CALENDARIO DE RIEGO-----
12/09/19 DÍA 11 - 1,5 l después del transplante con todos los nutrientes semanales @ 0.8 EC & PH5.8
Likes
5
Share


@Ensign420
Follow
Greetings fellow growers 🖖 and welcome to my first grow ever. This adventure actually started several months ago when I decided to stop buying flower from dispensaries and just grow my own bud. How hard can it be!?
This is actually my second seed of this strain. The first bean sadly died due to over watering (sorry girl, RIP). I was literally watering the cube to the point where water was dripping from the bottom, then heavily sprayed the humidity dome and tray with the vents completely closed. Everyday. Multiple times. I never let the dome or try dry out. So after about 8 days of not sprouting, there was a funky smell of rot. So that was that.
Later I learned that rockwool retains a lot of water and can easily drown seeds. So a wet/dry cycle is best for rockwool germination.
So even after hours of researching and digging through forums and tutorial videos, I was still under prepared for this journey. Did not consider how delicate the germination phase is. Oh well. Lesson learned. Reset and try again!
I hope everyone is safe and stoned during this corona crisis. Just like everyone else in the world, I want this pandemic to be over with. But in the meantime, let's grow some weed! 🖖
[START OF WEEK 01]
Day 01 - Monday - 08/03/20 - Total Days: 001
-----------------------------------
- [0830]: Light Schedule: 24Hrs/0
--- Soaked cube in 5.5 PH water for 10 min. Did not shake water out.
--- NO NUTES! Only PH'd down to control the PH levels.
--- Did not use the default hole (way too deep).
--- Flipped cube upside down and made a shallow hole for the seed (less than 0.25" deep).
--- Placed seed in and pinched hole close. No additional water added.
--- Sprayed the tray and dome with straight water (5.5 PH).
--- Vents are cracked opened a for ventilation (about 1/4 opened each).
--- Distance between the light and tray was 53"
--- AC was set to 80 °F
--- Exhaust fan was set to 86 °F
--- Room average temp was at 85 °F
--- Dome humidity was at 85-99% when sprayed.
--- Allowing to completely dry before respraying.
- [2200]: Dome and tray were completely dry! Sprayed only tray and dome with more water.
Day 02 - Tuesday - 08/04/20 - Total Days: 002
-----------------------------------
- [0845]: Sprayed dome and tray in the morning. Everything was dry.
--- Hoping for the best!
- [2130]: Everything was dry again, so sprayed dome and tray at night along with a light spray on the cube.
Day 03 - Wednesday - 08/05/20 - Total Days: 003
-----------------------------------
- [0830]: Everything was dry again. Resprayed dome and tray. Slightly sprayed cube.
- [2125]: Hooo damn!! She popped! Am little stub is visible! Resprayed dome and tray again.
--- Still going 24/0 for lights.
- [+0033]: Just checked up on her and I swear she grew a bit taller! Getting excited!
Day 04 - Thursday - 08/06/20 - Total Days: 004
-----------------------------------
- [0845]: Wow! Went from a little stub to fully sprouted overnight! Everything was pretty dry again so resprayed dome and tray.
- [2200]: Tap root is visible! Over 1" long too! Just resprayed dome and tray again.
-- Going to prep for hydroton transplant tomorrow!
Day 05 - Friday - 08/07/20 - Total Days: 005
-----------------------------------
- [0930]: She keeps growing!
-- Added a bit of CalMag to the spray bottle (8 drops to 650ml of distilled water). Resprayed dome and tray. Water was at a 5.4 PH with 141 PPM.
- [1045]: Prepped the bubble bucket with 4.5gal of water. Water is high enough to reach about 0.25" above the bottom of the net pot.
--- Added 3 drops of Superthrive
--- Added 3.5ml of CaliMagic
--- Added 2ml Hydroguard
--- Then PH'd down to 5.6
--- Solution Strengh: 120 PPM
--- Water chiller is set to 20 °C
- [1100]: Transplant time!
--- Filled the net basket 1/3 with hydroton. When placed in the bucket, air bubbles are not visible, but are slightly below the surface (slight digging will reveal the water/bubbles below).
--- Removed plastic on rockwool cube and placed in basket, then filled around and covered with hydroton. Making sure to block any light from passing through the net pot and into the nutrient solution.
--- Covered with a half-bottle dome sprayed with the CalMag water from earlier.
--- Hoping for the best!
- [1300]: Raised Bucket 5" higher. Now light distance is 48" to top of bucket.
- [1820]: Lowered tent exhaust temp to 76 °F
--- Lowered AC to 75 °F
--- Raised bucket even higher so light distance is 30" to top of bucket.
- [2300]: Looking good!
--- Sprayed dome and surrounding hydroton with more CalMag water.
--- Attached timer to light! So new 18 Hrs On/6 Hrs Off light schedule.
--- Lights On: [1600] (4pm)
--- Lights Off: [+1000] (10am the next day)
--- Decided to go with lights on during the evening/night and off during the later mornings/afternoon (the hottest part of the day) to see if temps can be controlled better.
--- Please survive girl!
Day 06 - Saturday - 08/08/20 - Total Days: 006
-----------------------------------
- [0800]: Everything was dry. Resprayed hydroton and dome.
- [2000]: Here first night cycle seemed to go well! Get'n taller!
--- Dry again. Removed the dome.
--- PH went up to 6.5 so PH'd down to 5.7
--- Ran the top feed drip ring for a bout a minute to wet the hydroton and rockwool with the nutient solution.
---Too scared to leave the top feed on 24hrs (I don't want over water her and cause dampening-off). Will let dry before re-watering.
- [2100]: After closer inspection, I think she's looking a bit yellow.
--- Decided to add a bit of grow nutes to the bubbler solution.
--- Added 2ml of Sensi Grow A
--- Added 2ml of Sensi Grow B
--- Solution strength after adding more nutes: 176 PPM
--- PH went up to 6
--- I hope that the extra chelating properties of the 'PH Perfect' solution is enough of a buffer for proper nutrient uptake.
Day 07 - Sunday - 08/09/20 - Total Days: 007
-----------------------------------
- [0800]: Water dropped a bit (mostly due to evaporation) so solution strength was at 190.
--- Checked PH again. Was still at 6, so PH'd down to 5.4
--- Ran the top feed for a minute to wet the hydroton a bit.
- [0915]: Since she's looking perky but still a bit yellow. So decided to up the nutrient concentration even more before lights out.
--- Added 2ml more of Sensi Grow A
--- Added 2ml more of Sensi Grow B
--- Solution strength after adding more nutes: 199 PPM
--- PH went up to 5.8
- [1700]: Checked nutrients.
--- PH: 5.9
--- Solution strength: 202 PPM
--- Added 4ml of Voodoo Juice
--- Added 4ml of B-52
--- PH after adding more nutes: 5.9
--- Solution strength after adding more nutes: 238 PPM
- [2130]: Decided to make a new foliar spray to address the continued yellowing.
--- Started with 500ml of distilled water.
--- Added 3 drops of CaliMagic
--- Added 3 drops of Sensi Grow A
--- Added 3 drops of Sensi Grow B
--- Added 3 drops of B-52
--- Added 1 drop of Superthrive
--- Solution strength: 164 PPM
--- PH was at 5.9 and did not adjust.
--- Gave her one spray.
--- Also sprayed the surrounding hydroton.
[END OF WEEK 01]

Likes
7
Share


@Danger90946
Follow
Day 43 12/06/2021- Beginning of week five of flower. She should be done soon, she will also get her final feeding soon.
Day 45 12/08/2021- She got her final top dress today from here on out she is on her own all I will do is water with pain water PH to 6.2-6.8 when dry.
Day 47 12/10/2021- She is coming along nicely. Very frosty wish she wasn't a auto so I could of clone her for sure. Today she got a nice treat as it rain in my hometown and that's the water she got. Hoping she is ready by the end of the year. I know she looks funny but she was never topped either.
Day 49 12/12/2021- End of the week, nothing new.
Likes
2
Share


@MrDoubleHaze
Follow
Velvet Moon = EC 1.2 pH 6.5
Lemon Orange = EC 1.2 pH 6.5
Super Lemon Haze = EC 1.77 pH 6.5
Brake Pad Breath = EC 1.54 pH 6.5
AUTO SVF OG = EC 1.91 pH 6.5
Ja ja und zum Thema Auto vertragen nicht viel Dünger ist jetzt schon bei EC 1.9 und da wird noch was gehen 😂


Likes
5
Share


@Willy_Balls
Follow
Doing ok. Hard to battle humidity even though I have dehu and ac running . It’s 25 degrees and raining outside. some botrytis is showing up. Already ordered some particulate filters for air recuperators.
Botrytis spores are supposedly 4 microns large or more. These filters are supposed to catch particulates smaller than one micron. Lets see if it helps stop the grey mold fucking bullshit.
Likes
19
Share


@adam_pawloski87
Follow
Let’s Go Day 67 from seed !! So this week went real great! 2 Ogreberrys an Bruce Banner started getting flushed! The rest will follow up and start flush next week ! Today the 3 will continue getting flushed while the 3 others get there dose of nutrients, PHd at 6.5! Let’s grow lil ladies let’s grow!!! You all have an amazing productive day as well as a a great safe week !! Peace love and positive vibes to y’all Cheers 😶🌫️💨💨💨💨🤙🏻If there’s any questions please ask, I’ll be opened up to answer at best of my knowledge! Thank you all have a dank day !!
