
Likes
Comments
Share


@PapaNugs
Follow
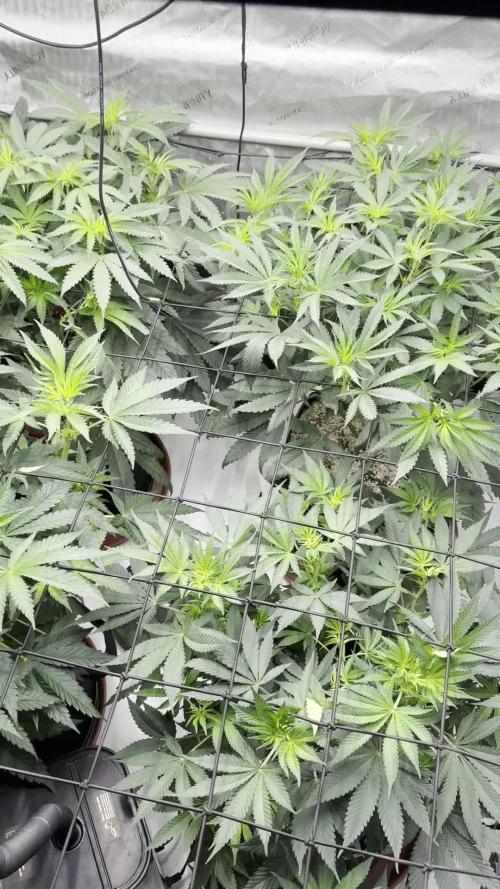
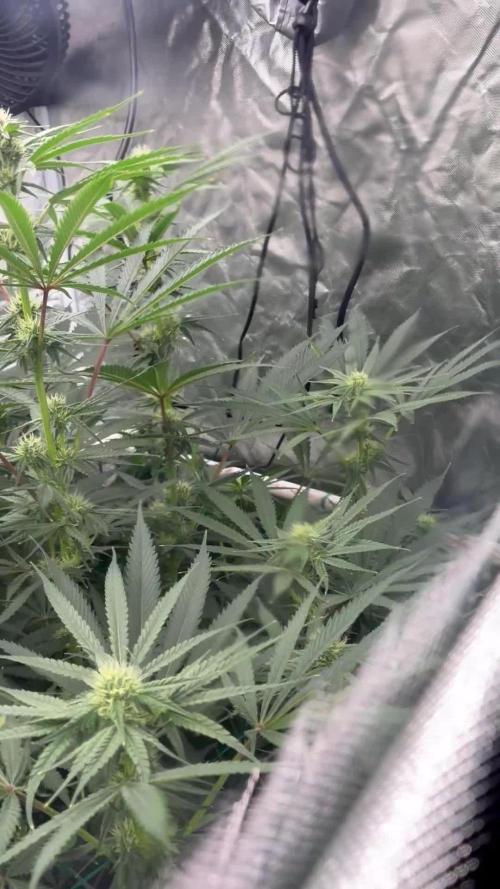
Another good week here in the tent. Getting water daily. Defoliated as needed every other day. The girls are looking great and smelling great. Lots of frost coming off these girls.
Started the UVB at 30 minutes and have moved up to an hour. The tests went right to two hours but I wanted to ramp it up. Will go up thirty minutes tomorrow and continue that every few days to ramp up usage.
The trichomes are coming along but not milky


Likes
5
Share


@Northern_Ent
Follow
Sep 24: starting new diary to accommodate 30 week limit on Growdiaries.
Buds are nearly ready but weather is good so will keep her going a bit longer. Nothing harvested from this plant yet but the clones are mostly harvested and produced great dense buds. Fantastic plant.
Sep 28: took 995 g wet in first round which might be half of the plant, but I think I’ll end up over 2 kg wet which means 454 g dry is possible. Come on, I still haven’t had a one pound plant.
Either way, this is the best growing strain I’ve ever tried, the buds are great and trimming is a total breeze. 👍👍

Likes
32
Share


@Sadhus
Follow
Difficile à tenir les niveaux de pH ( descend en flèche)et ec (grimpe en flèche ) ,plante très saine apart deux ou trois fleurs qui ont l'extrémité des pistil blanc qui sont comme brûler, changement du réservoir dans 2 jours pour essayer de stabiliser les valeurs, en tout cas plante très robuste qui résiste parfaitement a mes erreurs et qui mange tout ce que je lui donne sans discuter ! Peace ✌️🕊️ sådhũs

Likes
8
Share


@GreenGrampa
Follow
last 2 plants...the one with lst did 92grams...the other one made 82 grams
really enjoyed my first lst , will definetely make all my plants lst from now on
grand total .. 588grams dried bud from 8 plants at my first indoor grow

Likes
95
Share


@JuanHaze_Arg
Follow
Me gusta hacer estos seguimientos y ver para atrás siempre si está creciendo o no y cómo lo viene haciendo día a día, la outlaw arranco mal, yo la pase de agua y de humedad porque era época de mucho frío y no calefaccionaba el ambiente, la planta fue desarrollando buenos tallos, musculosos, pero no ramificaba, si no le hacía una poda apical los laterales hubieran sido pobres, al resto de la planta en cuanto al olor y al sabor que tiene es realmente un 10
Para ver todos mis otros diarios
https://growdiaries.com/grower/juanhaze-arg/diaries


Likes
14
Share


@MountainFlowers
Follow
I am very happy with the results of this growth cycle. I have improved my techniques for growing plants (LST and topping) and methods for stopping mite infestation. I didn't get a great harvest(not too much big flowers), but I like the result, nice compact and very good smelling buds.I make a wet trimming process and after this I tried for the first time to wash the buds before the drying process, because I use the foliar products to defeat the mites and the result is excellent (the ganja tastes good when I smoke it). Next time I will try to grow bigger and denser flowers to get a bigger harvest💪💪😊. An excellent plant that I would recommend to beginners, who want to experiment without risking too much.

Likes
Comments
Share

@Gardens_of_Of
Follow
The first week of flowering is now complete, and the plants have transitioned smoothly into the flowering stage. They have begun their initial stretch, reaching eagerly toward the light and showing vigorous, healthy growth across the canopy.
To accommodate this rapid vertical growth, I have been raising the light by approximately 5 cm every two to three days, ensuring a consistent distance from the canopy. At the same time, I increased the light intensity to level 7, providing approximately 700 µmol/m²/s of PPFD, which is well suited for this stage of flowering. Over the coming weeks, I plan to gradually increase the light intensity further, with the goal of reaching between 900 and 1,000 µmol/m²/s as the plants enter peak flower production.
The canopy remains remarkably even, although Gelato continues to be slightly smaller than the others. Rather than being a concern, this appears to be a characteristic of the cultivar, as she simply doesn't seem to stretch as much during the early flowering phase.
Overall, the first week of bloom has gone exactly as planned. The plants are healthy, responding well to the environmental adjustments, and the flowering stretch is now fully underway.


Likes
16
Share


@Naturalist
Follow
Starting to bud up & the gelatos are stretching quite a bit at 30" to 24" on the LSDs.
Runoff PPMs are running a bit high at 1183/pH 5.7 average last watering, going to flush straight water next time.

Likes
3
Share

@Rodburn
Follow
Went out of town for the weekend, things nearly got out of control. Stretch should be near over. Defoliating tomorrow, healthy girls
Likes
Comments
Share


Processing
Likes
5
Share


@Sur_cannabico
Follow
Partiendo una nueva semana vegetativa para nuestras fatbanana de ROYALQUEENSEEDS.
Esta semana a sido movida, Trasplantamos, aplicamos apicales y supercropping. Ademas con la defoliación logramos una gran cantidad de nuevos ápices que ya reciben luz más que felices gracias al #spectrumboard de 75w (x2) de
HEAVENGROWLIGTH.
Alimentadas con WONDERLANDAGRONUTRIENTS.

Likes
169
Share


@Hattiwatti
Follow
Hola traveller 🐴
Week 7 begins and we have 4 crazy branches total. 2 in purple nuts and 2 in edge. First water change yesterday and seems to like new solution. 6.1ph 1.2ec.
Buds start to form so its time to try raise ec for a bit. Still stretching a lot in day. Cant wait to trim it almost naked.
Roots look great. Video from yesterday when bubbler was empty.
13.6 Stretching and forming. 1.2ec is max it wants. 6.2ph. Defoliation starts tomorrow. Way too much stuff there.
15.6 defol. Finishing it at monday.
16.6 continued defol. Still let couple leaf for tomorrow to take out.
DLI ~38
With high hopes 🍀
Likes
117
Share


@Nomad
Follow
What can i say the maui is charging it handle my little heat problem this weekend alot better than my TSA plant (trans siberian auto). I topped her once and have her tied down im gunna try and let her veg until the TSA is almost finished then ill flip the light schedule just so she can grow up big and the autoflower still gets 20/4 for most of its flowering stage. Im thinking about scrogging this plant im going to let it veg for a really long time so everything can grow up sortve tall so when i flower it i can make it a giant. Ill vaeg it until my tsa is harvested than flip it.
THE GIRLS ARE LISTENING TO NEIL YOUNG


Likes
68
Share


@cRypto666
Follow
Freunde der Sonne :) KURZE INFO DER LETZTE EINTRAG HIER IST IMMER DER AKTUELLLSTE NACH DATUM NACH UNTEN SOLLTEN UNTEN SCROLLEN UM ZU VORHIERIGEN EINTR'GE ZU GELANGEN : <3 WEEED
wollte dir ein text drücken :) hab mich vertippt... aö ich bin heute eine Bewustseinsstufe beim Grown aufgestiegen ! Endlich kann man jetzt Täglich meine Real Talk oder Reaktion ViD/PIC anschauen. Absofort werde ich meinen GARTEN anderts wahr nehme wer rein schaut kann Exklusive Tipps für seinen Garten gebrauchen. Gerne bin ich für Fragen offen und ich helfe wenn ich kann fals nicht findet sich in der Gruppe immer jemand.
DER GRUND IST DAMIT ICH NACHVOLLZIEHEN KANN WAS ICH FALSCH GEMACHT HABE BZW UM WISSEN ZU MANIFESTIRE UND GEWISSE GEDANKENVERBINDUNGEN GESACHFFEN SIND. IM GRUNDE MEIN GROWTAGBUCH ICH TEILE MEINE GEDANKEN MIT EUCH GLEICHGESINNTEN UND WÜNSCHE ALLEN EINE ERFOLGREICHEN GROW brO
cRypto666
2 minutes ago
cRypto666
<LIEBE> BRUDER ICH LADE DIE VIDEOS UND BILDER NOCH HOCH UND ICH BIN MIR EIGENTLICH SICHER ES KÖNNTE DIR GEFALLEN VIEL SPAß
AUF QEEN SEED GIBTS WIRKLICH GUTE BLOGS MIT TOURTORIALS FÜR NEULINGE/ANFÄNGER .
Konnte mir so mein Verständnis und Grundlage die fürs grown wichtig ist gut lernen und Aneignen ! WIRKLICH VIELE UND GUTE INFOS !!
https://www.royalqueenseeds.de/blog-cannabis-anbau-c3
https://www.royalqueenseeds.de/blog-die-10-grossten-fehler-von-cannabiszuchtern-n86
es ist soweit heute beginnt Woche 1 ... BEVOR WIR STARTEN, WICHTIG WASCH DIR GRÜNDLICH DIE HÄNDE UND BENUTZE GUMMIHANDSCHUE BEIM ARBEITEN! SEHR WICHTIG!
Ich freue mich das ich heute wieder das Gärtnern begonnen habe und eine Hällfte der Samen in der Erde sind. Kennt ihr das Gefühl der Vollkomenheit wenn man sich im Garten beschäftigt ? Für mich ist das Therapie und für euch?
Ich spiele mit dem Gedanken anstatt Samen zu growen mir einfach eine Mutterpflanze Anschaffe um mir meine Stecklinge zu ziehen ! Dafür brauch ich aber noch ein anderes Zelt und eine Lampe. Die Mütterpflanze kann dann erst mal wachsen und ich kann nebenbei noch mal ein Durchgang mit Autos schaffen bevor die Steckis fertig sind. Wenn es soweit ist gebe ich euch bescheid wenn ich Samen und Setup bei mir stehen.
So jetzt aufs eigentliche zurück. Ich habe heute erst mal mein Setup geprüft und so gut wie möglich desinfiziert. Es ist verdammt wichtig das nach jedem Durchgang sauber gemacht wird also zb Zeltwände, Boden, Topfe, Boxen, Wasserbehälter. Habe ich gemacht und habe meine ersten Samen in Anzucht Erde gesetzt, befeuchtet, markieren und in die Box. Wände und Deckel mit zersteuber befeuchten und ab unter die Lampe. WICHTIG MACH DIE ERDE NICHT SO NASS ! DAS GEFÄLLT IHNEN NICHT SONDERN HALTE SIE AM BESTEN FEUCHT IN DEM DU ABEND / MORGEN EIN BISCHEN WÄSSERST!
ICH STELLE DIE LAMPE AUF CA 40 cm zum Boden ein bzw der Box. Ein gewisser abstand muss sein um die Fläche komplett zu Beleuchten. Da meine Lampe dimmbar ist muss sie nicht ganz oben hängeng sondern Kann näher an die Pflanzen ran und Stelle den Dimmer auf 20 %. Das reicht anfangs in dem Stadium völlig aus, muss aber dann später angepasst bzw hoch geschraubt werden!
Lüfter I läuft 24/7 und sorgt für optimale Bedinungen! WICHTIG
LAMPE 20/4 HELL/DUNKEL (REGLER STEHT AUF 20 % LICHTLEISTUNG)
DANN HABEN WIR ES EIGENTLICH SCHON GESCHAFFT UND ALLES RICHTIG GEMACHT!
Ich versuche schon so viel wie möglich von meiem Wissen an euch weiter zugeben bzw auf Papier zubringen, ist aber NICHT IMMER ZU 100% Möglich, da es einfach zu viele Informationen sind !
Bei fragen einfach fragen und die Comiunity hilft sicher !!!
KOMMT ZEIT KOMMT RAT ... ich hab 2 Monate Infos eingeholt und Produkte verglichen !
Auf Queen Royal Seeds gibt es gute Anfänger Tipps sogar teilweise mit Video. Mir hat das sehr geholfen mein Grundwissen aufzubauen.
BEVOR IHR DAS GÄRTNERN ANFANGEN KÖNNTE MACHT DIR GEDANKEN WO DEINEN GARTEN STEHEN KANN.
#1 AM BESTEN IHR HABT EIN GARTENZIMMER DER NUR ZUM GÄRTNERN BENUTZT WIRD IST DIE BESTE LÖSUNG DA DU DEINE UMGEBUNG VIEL LEICHTER SAUBERHALTEN KANNST
#2 DU KANNST DEIN GARTEN AUCH INS WOHN. BZW SCHLAFZIMMER STELLEN WENN DU KEINE MÖGLICHKEIT HAST EIN GARTENZIMMER ZU MACHEN. DAS IST NICHT DIE PERFEKTE UMGEBUNG ABER WENN DU ABLUFT RAUSLEITEN KANNST DANN MACH ES ! DU KANNST ES AUCH IN DEN RAUM STRÖMEN LASSEN MUSST DIR ABER BEWUST SEIN DAS ES EVTL DAS SCHIMMELN IM RAUM ANFÄNGT! IST MIR SCHON PASSIERT ! LEITE SIE WENN MÖGLICH AM BESTEN RAUS !
ACHTE DAS DARUF DAS DEINE LUFTFEUCHTIGKEIT UND TEMP KONSTANT BLEIBEN UND ES NICHT EINMAL ZU WARM UND EINEMAL ZU KALT... IHR WISST SCHON SORGE FÜR EINEN KONSTANTE UMGEBUNG IN DEINEM GARTEN. DIE WAHL DER SAMEN IST AUCH WICHTIG DA ES SORTEN GIBT DIE EINE WARME UMGEBUNG EINE KONSTANTE ODER EINE EHER KALTE UMGEBUNG. AM BESTEN IHR PASST EURE SAMEN EURER UMGEBUNG AN HEIST DU WOHNST IN EINEN LAND WO ES EHER WARM IST ALSO 25-30 ° C dann WÄHLE AUCH EINE PASSENDE SORTE AUS!
MEHR GIBTS ERST MAL NICHT ! BIS ZUM NÄCHSTEN MAL!
Likes
29
Share


@gottagrowsometime
Follow
Welcome to my Wedding Glue Auto Diary, sponsored by Fastbuds. With Spider-Farmer & Mars-Hydro providing the lights I've had 8 months -2.2yrs and all still as good as the day I fired them up.
Veg Days 15-26
Plant has come on really nice. Building a lovely shape. Huge fan leafs. Will be removing about 10-15% this week. As I want her to put her focus on growing out her nodes. As they've enough foliage to support themselves. The 1st leafs/nodes 'removed stall didn't send her into an early flip. Id be happy if she was to flip this week. As she has enough height and veg in her without any signs of stigmata or sexing.
Veg Days 27-28
Plant is moving along really nice. I can see some stigmata (hairs where bracts will be during pre flower).
Maintenance
Been giving 1 4-500ppm Alga Grow every 7-10 days. Fish Force and Silic Boost from Atami. EC has been kept in check with pure zym helping nutrient uptake. I've made she her pot doesn't or hasn't dried up too much. PH I don't messaure organic nutrients with soil. Siilic Boost was 6.6 so no need to adjust. I'm not keven sure what ph silica works best at. I jst see thick stems, strong lush green growth. And a resurgence in veg after she picked up foliage slowly in her 3rd week
Thanks to my sponsors, Bella, Heather and Elena. 3 amazing women. Who I'm glad to have worked with. Its a pleasure to see them lead the way in tis industry. Showing pot really has no boundaries but ones we place on ourselves and in societies misgivings.
I appreciate all who stop by. I look forward to seen your diaries. Either way thanks for dropping by.
Likes
5
Share


@Ninefold
Follow
I'm afraid the Raspberry Pi's time got reset somehow resulting in the timelapse being taken mostly at night rather than during the day, which means there aren't a lot of usable photo's :(.
Likes
1
Share


@Ertomid
Follow
Still drying in my wardrobe on hangers with a rotating fan and a mini dehumidifier. Harvested when the dirt were really dry. Splitted the stems to dry correctly.

Likes
19
Share


@sativamsi
Follow
25.10.2020 - 12/12 ışık periyoduna geçildi. Bio bloom ve topmax gübresi eklendi.