


Likes
Comments
Share


@smexy
Follow
Hey some early Week2-flowering update.
In the video you can see my 24h aerated compost tea. mhh that smells so good. I want to drink it too :P
Each plant got 2L
I did a lot of defoliation again
I wont be there for a few days :P
I turned the light to full power with a distance of 44cm
stretch is doing the rest
cya

Likes
6
Share

@I_Identify_As_A_Dan
Follow
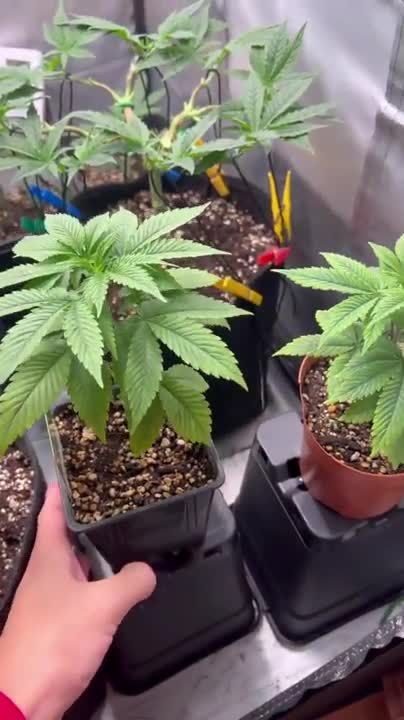
Week 4 for Space panda by atlasseed,
End of week 4 for this cultivar, really wishing i had spare soil to put these these in 5L pots but i have to order some soon. At this point id of topped them both by now but they are getting any side branch growth.
Im not in a rush with these girls because they will end up getting longer than 3months veg.

Likes
11
Share


@hanzSour
Follow
68 days of flower
sticky frosty solid buds
branches supported
becomes big
dark green buds covered with frost

Likes
44
Share


@MadeInGermany
Follow
Info :
Unfortunately, I had to find out that my account is used for fake pages in social media.
I am only active here on growdiaries.
I am not on facebook instagram twitter etc All accounts except this one are fake.
Flowering day 58
since time change
to 12/12 h.
Hey guys :-) .
We are getting closer and closer to the end :-).
The trichomes are 80% milky, 10% amber and 10% clear.
In the coming days, fresh water will be prepared for the last time with one Pure Ec value of 0.4 so that you can use up the last of the sewing materials for 3-4 days.
I'm very excited about the end result because I have the same phenotype in another diary on Cocos :-).
As always, an update comes during the harvest and the last update comes after drying 👍.
Have fun with the diary and stay healthy 🙏🏻
You can buy this Strain at
www.Zamnesia.com
Type:
Runtz
☝️🏼
Genetics:
Zkittlez
X
Gelato
👍
Vega lamp: 2 x Todogrow LED CXB3590 COB 55 W
1 x Sanlight S2W 62 W
💡
Flower lamp : 2 x Todogrow LED CXB3590 COB 55 W
1 x Sanlight S2W 62 W
💡 ☝️
Grow Aero System : Growtool 0.8
☝️
Fertilizer:
Canna Aqua Vega A + B , Canna Aqua Flores A + B , Rizotonic, Cannazym, CANNA Boost, Pk 13/14, Canna Cal / Mag, Canna Ph - Grow, Canna Ph-Bloom
☝️🌱
Water:
Osmosis water mixed with normal water (24 hours stale that the chlorine evaporates) to 0.2 EG. Add Cal / Mag to 0.4 Ec Ph with ph- to 5.6 - 6.4
💦 💧

Likes
2
Share


@Mr_Prawn
Follow
Las flores aparecen y las plantas se estiran, algunas son mas altas que los tutores, se puede ver en una foto, también dejo video de los luxes que tiene cada planta, solo agua y todo bien, el sistema de bandeja funciona correctamente. Una foto a principios de la semana y el resto a finales.
Likes
12
Share

@therealgrowmie
Follow
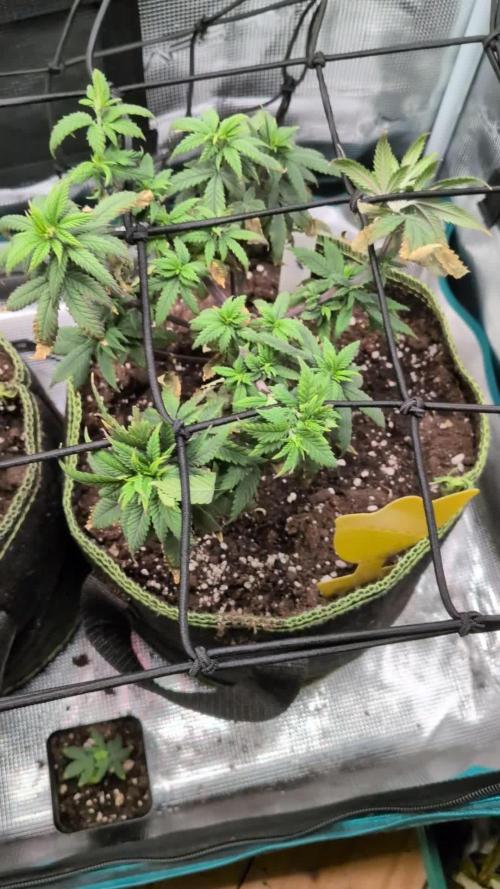
There’s still a lot to learn. Just when I thought things were back in the sweet spot, moderate signs of nutrient burn started to appear. Several older leaves are showing the typical symptoms, so I’m cutting back on feeding and switching to pH’d water for the next couple of weeks until they stabilise and it’s time to flip.
I’m also hoping the move into the 11L pots encourages more lateral growth, because what I have right now can’t really be called a canopy yet 😅. The goal is to fill things out properly before installing the net and thinking about 12/12.
For now, it’s about restraint and letting them rebalance.
Stats so far:
💧 Watering: Every third day
🌡️ Temp: 26–28°C
💦 Humidity: 65% RH
📈 VPD: ~1.18 kPa
💡 Light: ~600 PPFD

Likes
3
Share


@GanjaFarmer101
Follow
Smooth trim, last of the first wave of autos this summer - yields are very low but the bud looks great :)


Likes
21
Share


@NSABND
Follow
Hi there start of week 11 today 😏
today (Day 78) the weather is cold and very high humidity because of rain 😲😩😕
Day 79 same shit weather then yesterday with very high humidity and rain 😵😲😵😲😵
Day 80 autumn has arrived 😱😨😰 cold with rain and high humidity 😲😵😭
Day 82 there are no Updates sorry 😵

Likes
8
Share


@Creme_De_La_Creme
Follow
All photos are fromDay 35 for Sour Jealousy from FB, the growth is absurd, she is already 5ft tall, no LST, no Defoliation at all!!
Pre flower stretch is going on, which scaries me, is she going over my tent size? hahaha
Likes
7
Share


@Naujas
Follow
wow, she's amazing:) with the conditions she has, this is a super result :) the weather is not spoiling us - every day, little sun - lots of clouds + almost half a balcony :D :D she has 3 more weeks - then I'll go on a long vacation :) everything didn't go as planned,:) I think she needs more time:) there will be a renewal until the finish :).

Likes
71
Share


@ThrashedTV_BakedByGlaze
Follow
Week 9 - Day 58 - 02/23 to 2/28 2021
All phone pictures. Go off site to my instagram for HD/DSLR content: https://www.instagram.com/glazedgrow/
Very excited if this is just the first bulk week because it's easily the biggest main bud I've seen so far/still a couple weeks left on it. New lights killing it. Great Candy/Citrus smell to it / Very similar to the Dark Devil beside it in profile/build structure.
Gave all the plants mostly water feeds this week in order to avoid salt build up. Some staining on the bottom of the fabric pots from the bottom feeds so just making sure the soil is fine for the final major nute feeds before flushing in a week or so.
Made some caps with homemade thc olive oil from a friend that sent me some "Intergalactic Cable" viewing materials as well 😎 Have to use them fast but been stable for a week and not just starting to come through the gel caps, will have to get something harder next time still a lot left in the bottle.
Still clear signs of the Tobacco Mosaic/Genetic issue in the leaves but clearly not affecting anything else, might tip the top of the bud when i start the flush to have it back build on itself and see how dense I can make it once it's dried.
Other than that, the new @MarsHydroLED TSL 2000 and @ViparSpectraLED PS1500 for veg definitely made a huge difference and the buds on the Dark Devil.
Big thanks to @ViparspectraJennie for putting a new XS1000 in the mail to test on my next grow. The FB testers finally came in so excited to get some of those in the tent and under the new tester.
*Sponsored Content*
Feel free to check out/save some money on your next @ViparSpectraLED using discount code "GLAZEDGROW" at this link: https://www.viparspectra.com/?aff=378&utm_source=affiliate
(Again check out my insta, very limited quality content will be posted here)
Thanks for checking out the latest #GlazedGrow🍩
--
Go off site and check out my Instagram for better content: https://www.instagram.com/glazedgrow/
Go off site and check out my CannaBuzz profile: https://www.cannabuzz.app/users/GlazedGrow
Processing
Likes
9
Share


@Grey_Wolf
Follow
Barneys Farm Red Diesel
Revegged Cutting 4 weeks of Flowering completed
10th March 2020
Man this smell brings back all the good memories of the last time I grew this strain. 😍 I'ts pure Gas and still the best smelling Diesel variety I have tried so far.
It's also tasty as all fuck and I was surprised and saddened to see that Barneys were discontinuing it as a Strain variety 😓
But I suppose if it wasn't a good seller then it had to make room for New stuff and thats also a good thing .
Back to this grow and I'm very happy with this plants size considering it started out as a tiny clone from a good Mother and is now looking likely to yield me a few
Jars of Top shelf Buds. 🙏 I do worry about what the weather will be doing in about 5-6 weeks time as she's relatively unprotected from heavy rains unless I
construct some type of Cover for her. 😏
Checked Soil ph and temp and it was 6.4 and 23 c Also gave a good feed of a few goodies and watered it in well . The native bee's seem to like her too
as there's always a few hanging around during the day.
Thats it For this week
Cheers for taking the time to check out my update 👍

Likes
17
Share


Likes
Comments
Share


@gr3g4l
Follow
Seguimos con el engorde de los cogollos.
Actualemente han formado ya unos gollos bien duros.
Olor especial y muy agradable.
Parece ser que los 220W estan aportando lo necesario para engordar sin sufrir de un exceso lumínico, por norma general con 300W me suele salir en las copas , cogollos apicales, algo de albinismo por lo qu entiendo que tb frena algo el engorde. Sin albinismo parece ser que continuan engordando y puede que saque lo mismo o muy parecido. Cultivo en un armario de 74x74 con lo que podria ser sufiiciente con 220W. Lo veremos mas adelante.
La seta me salió en una de las macetas, no mide mas de 1ctm. xd vino y se fue
Likes
170
Share


@Tropicannibis_Todd
Follow
👉Alrighty Then👈
42 days in flipped at 28 days
It's been a great week all plants are killing it ......... 👉The Strech Is On👈
There all gonna get a slight defolation over the next few days to let air and light get in there 👈
👉So I topped all but Babba Kush and Slurricane they didn't require it ... 👌 Got some nice level tops 👌
I've now started there nutrients program ,for the flip so we are set to go ......
Persian Pie from Greenhouseseeds
Full Gas from Greenhouseseeds
Babba Kush from Greenhouseseeds
Rainbow Melon from Fastbuds
Papaya Sherbet from Fastbuds
Weddingcheesecake FF From Fastbuds
Purple Oreoz F1 From Seedsman
Slurricane From Premium Cultivars
Soil by Promix
Nutrients by Cronks
Well this should be fun 🙃
Thanks to all my growmies out there for stopping by its much appreciated 👈
👉Happy Growing👈


Likes
15
Share


@Jr104th_st
Follow
Got 3 weird looking ones and 9 clones I don't want and 3 plants good growing one it's penut butter breath don't know make or female got it from a seed of some bud I bought in Vegas @woodys_official_


Likes
44
Share


@Jays_Not_Here_Man
Follow
I transplanted the girls and got them ready for flower. Did a small defoliation, and put them in the 4 gallon tall pots that I have grown to like. The girls took about 48 hours to recover fully from the transplant, and at the end of the week, I switched the light cycle to 12/12 Happy Gardening ! 🇨🇦👊❤️

Likes
12
Share


@Eauderay
Follow
Hello fellow cannabis Gardeners,
El Patron is becoming an absolute pleasure to grow and look developing her flowers...
Interesting sativa with calixes like Indica I believe?
It seems this one will make a better harvest than the last one I have grown, her stem is bigger and flowering sites peppered overall the stems, let's see if she needs supporting.... Fingers crossed I do not messed it up again! 😬🙃😁