The Grow Awards 2026 🏆 


Likes
Comments
Share
@Grow4Releaf
Follow
/nov 30th.
Got days left now getting there tho, in no rush but good bit of milky/cloudy but coming down soon.
...
She's done basically .
Her sister was getting ready to be cut sat in a dark area at the new house.
Things got alil behind having to move locations like this.
But will be updating for a harvast shortly.
Stoked how these are smelling and looking!!
Be back soon with the proper updating. Just need to get situated .


Likes
17
Share
@RDWCGrowing
Follow
Week2 Day 1- 08/19/2023
Weekly Maintenance- Non-Water change week
Added
.5mil/gal of TPS SILICA Gold = 39 gallons X .5 = 19.5mil = 20mil add
She really does look great today. More roots are finding their way out of the basket and into the water, looks like I might be able to give her, her first top soon. Humidity is still running just a little low, I am making sure I keep a close eye on the humidifiers and added more water as needed.
Week2 Day 2- 08/20/2023
She is definitely a mutant, I was having a hard time deciding if I could Top her and if I did, where, since she is so closed up still. Found one side node that looked promising to let it spread out and not compact in harder from the cut. Hopefully the topping will help induce a rapid growth like her sister and spread her out a little bit more. She got her first hair cut today.
Week2 Day 3 - 08/21/2023
She is absolutely growing but with the mutations not outwardly exploding, the root ball is starting to form very nicely.
She overall looks really happy to me. I will just continue to observe and do what feels right in regard to methodologies as she grows.
Week2 Day 4 - 8/22/2023
she is looking great.. From me thinking she wouldn't make it to me having to support the stem and hand drip water.. I didn't think this little Mutant would make it but she is doing great, lets see what we can do with her over this grow.
Week2 Day 5 - 08/23/2023
What more can you say then I am proud of my little mutant.. she is taking to the system well, still not much I can do with her. Small tops in awkward spots.
Week2 Day 6 - 08/24/2023
Not much to report today, her growth is going great. Looks nice and comfortable, Saturday Water Change day. Tomorrow I will get all of her end of week measurements for height and all.
Week2 Day 7 - 08/25/2023
Week 2 is officially in the bag, my little mutant is now at 6 and just right at a 1/2 inch tall. The Rate of growth is showing she might need the full additional 6 weeks of Veg, but depending on continued growth of her sister, she might not be able to get the time and need to go to flower a little on the small side in 4-5 weeks. We will see how it goes but she is looking great and the root structure is looking great! Humidity is still a little low I added water to the Humidifiers and adjusted the input air flow down slightly. I also turned on the 4th fan to increase circulation in the tent.


Likes
3
Share
@Ieiogrow94
Follow
Eccoci qui!!!
Tutto procede per il meglio, i pistilli sono usciti e ora si va dritti dritti alla maturazione, NE VEDREMO DELLE BELLE!!!
La piccola cresce molto vigorosa ed in salute, chissà cosa ne verrà fuori intanto possiamo solo ammirare questa bellezza!!
Grazie a tutti per il supporto ❤️🔥🌲


Likes
17
Share
@420DeepGrow
Follow
Gracias al equipo de Kannabia Seed, Marshydro, XpertNutrients y Trolmaster sin ellos esto no sería posible.
💐🍁 Moby Dick 🐋:
Criada a partir de dos parentales icónicos, como es el cruce de White Widow y una Haze pura G13, este choque de titanes provoca un híbrido que golpea a las puertas de las sativas más fuertes disponibles en el mercado.
Estamos ante una criatura impresionante en todos los sentidos, con ejemplares que florecen en solo 9-10 semanas en interior y arrojan un peso en lonja de 550 gr./m²
Al igual que su padre Haze, nuestra Moby Dick ofrece agradables notas cítricas, pero con efluvios de vainilla y eucalipto, una mezcla de aromas que genera una combinación intrigante, que puede llenar cualquier habitación con una fragancia inolvidable.
El sabor es muy parecido a su olor, con toques de limón agrio que harán que tu lengua cosquillee al inhalar, convirtiéndose lentamente en un humo dulce y terroso, con pinceladas de madera e incienso que se adhieren al interior de la boca al exhalar.
💡TS-3000 + TS-1000: se usaran dos de las lámparas de la serie TS de Marshydro, para cubrir todas las necesidades de las plantas durante el ciclo de cultivo, uso las dos lámparas en floracion para llegar a toda la carpa de 1.50 x 1.50 x 1.80.
https://marshydro.eu/products/mars-hydro-ts-3000-led-grow-light/
🏠 : Marshydro 1.50 x 1.50 x 1.80, carpa 100% estanca con ventanas laterales para llegar a todos los lugares durante el grow
https://marshydro.eu/products/diy-150x150x200cm-grow-tent-kit
🌬️💨 Marshydro 6inch + filtro carbon para evitar olores indeseables.
https://marshydro.eu/products/ifresh-smart-6inch-filter-kits/
💻 Trolmaster Tent-X TCS-1 como controlador de luz, optimiza tu cultivo con la última tecnología del mercado, desde donde puedes controlar todos los parametros.
https://www.trolmaster.com/Products/Details/TCS-1
🍣🍦🌴 Xpert Nutrients es una empresa especializada en la producción y comercialización de fertilizantes líquidos y tierras, que garantizan excelentes cosechas y un crecimiento activo para sus plantas durante todas las fases de cultivo.
Consigue aqui tus Nutrientes:
https://xpertnutrients.com/es/shop/
📆 Semana 9:
El engorde de los cogollos está prácticamente terminado y solo falta que maduren un poco antes de ser cosechada.
Gran trabajo por parte de mis colaboradores, estoy bastante contento con este grow, el próximo tendré más atención en la etapa de crecimiento, la cual es muy importante si quiero obtener una cosecha de calidad.
A partir de ahora agua hasta el fin.

Likes
24
Share
@el_cultivito
Follow
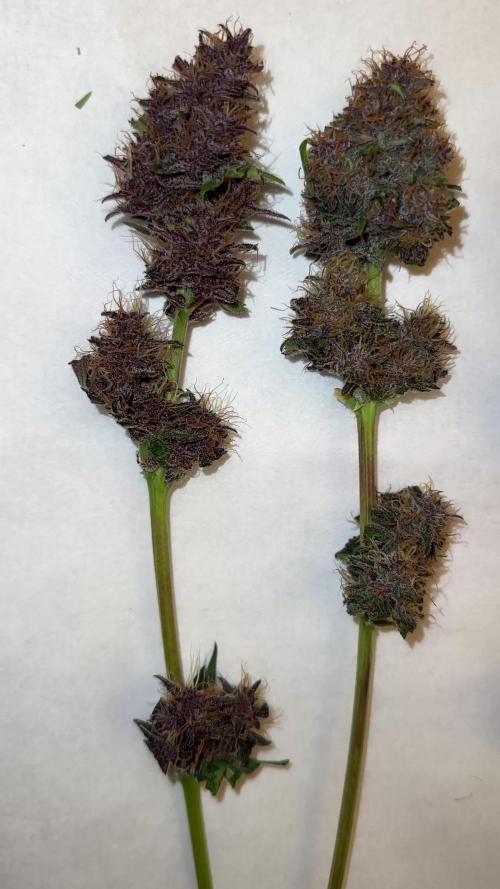
TOTAL YIELDS wet weight
Blue Dream 1 - 600.2 G
Blue Dream 2 - 552.9 G
Blue Dream 3 - 565.3 G
TOTAL Blue Dream - 1718.4 G
________________________________
Chemdog 1 - 616.9 G
Chemdog 2 - 598.1 G
Chemdog 3 - 558 G
TOTAL Chemdog - 1773 G
________________________________
TOTAL OVERALL - 3491.4 G
7.7 pounds wet

Likes
23
Share
@CannaTrope
Follow
Moved this plant from the front to the back to make it easier to finish LST and defoliating on two other plants. This plant is slightly smaller then 2211 and the node spacing is tighter.
Anyway. No signs of deficiency or over feeding. No signs of under or over watering. Everything seems good. Some slight red on stalks and petioles, so slight under feeding of P or K. Humidity is hovering between 55 and 65 which I am okay with for now. I added black strap molasses and set dehumidifier to 60% this week. Will drop to 55% next week, and 50% for final weeks.
Pictures coming soon
Likes
9
Share
@HeartStrong_Garden
Follow
Those first leaves really grew out. This is my first seed popped of the new year! This strain is an Attitude Seedbank and Fast Buds collaboration, it is actually called STRAWBERRY WHIP and wasnt an available strain option


Likes
21
Share
@420DeepGrow
Follow
Gracias al equipo de Kannabia Marshydro XpertNutrients y Trolmaster sin ellos esto no sería posible.
💐🍁 Amnesi K - Lemon:
La Amnesi-K Lemon es una semilla formada a partir de un trío de reyes, la Amnesia, la Lemon Skunk y la Jack Herer. Este matrimonio de tres dio lugar a una gran sativa que, con tonos dulces, terrosos y muy cítricos
🌻🚀 Consigue aqui tus semillas:
https://www.kannabia.com/es/semillas-marihuana-feminizadas/amnesi-k-lemon
💡TS-3000 + TS-1000: se usaran dos de las lámparas de la serie TS de Marshydro, para cubrir todas las necesidades de las plantas durante el ciclo de cultivo, uso las dos lámparas en floracion para llegar a toda la carpa de 1.50 x 1.50 x 1.80.
https://marshydro.eu/products/mars-hydro-ts-3000-led-grow-light/
🏠 : Marshydro 1.50 x 1.50 x 1.80, carpa 100% estanca con ventanas laterales para llegar a todos los lugares durante el grow
https://marshydro.eu/products/diy-150x150x200cm-grow-tent-kit
🌬️💨 Marshydro 6inch + filtro carbon para evitar olores indeseables.
https://marshydro.eu/products/ifresh-smart-6inch-filter-kits/
💻 Trolmaster Tent-X TCS-1 como controlador de luz, optimiza tu cultivo con la última tecnología del mercado, desde donde puedes controlar todos los parametros.
https://www.trolmaster.com/Products/Details/TCS-1
🍣🍦🌴 Xpert Nutrients es una empresa especializada en la producción y comercialización de fertilizantes líquidos y tierras, que garantizan excelentes cosechas y un crecimiento activo para sus plantas durante todas las fases de cultivo.
Consigue aqui tus Nutrientes:
https://xpertnutrients.com/es/shop/
📆 Semana 1:
Gran comienzo primaveral después de una germinación excelente. La etapa de plantula se desarrolla con normalidad.
Esta semana aplico tierra de diatomeas espolvoreada en el sustrato para proteger las plantas y las rocio con una solución de cola de caballo para prevenir futuros hongos.
Potencia de la lámpara: 40%
Likes
5
Share
@BeefslayerBuds
Follow
Going well, have a small light burn on one of the Skrilla colas..sad, but must soldier on. Still very frosty. Colors are developing in the hair now and there is a noticeable change in each cultivar.
Nana Glue developing a red-brown hue and delicious Earthy, creamy terpenes. Skrilla is packing on weight and stacking, lowers are crowned in orange hair. Smells like Like Jolly-Ranchers.
PLCG is packing on some weight, all the buds are getting that spherical addition. Also, some of the frost on the leaves, termed 'frost rails' by a friend, have begun to turn a nice pink color.
Let's see where this grow goes this week. Maybe some color or weight.
The smell is very good. PLCG is like a scented highlighter, very lemon. 🍋
The Skrilla is like a sweet and sour candy, quite delicious.
Nana glue is Earthy and cream, very rich.


Likes
17
Share
@Kirsten
Follow
9.2.25:
The plants had a good watering, they're all still drinking a lot. Which is great, as that means growth, which, at this stage, we desperately need!
I went ahead and gave all the plants a thorough watering each with:
2ltrs of dechlorinated water, PH'd to 6.5 with:-
♡ 4ml of Xpert Nutrients Bloom Booster
♡ 4ml of Xpert Nutrients Cal-Mag amino acids
♡ 4ml Seaweed extract liquid
I don't know how this scrog net is going to work out.
I think the squares are too big. It's elasticated, which I like. However, I'm extremely cautious with watering and moving the net. It's only a matter of time before I break more branches. It's such a hassle with it in there, honestly. I can't get in the tent properly to even check the weight of pots, as it's all weaved through, and again, I will snap branches.
I did have a free net with the tent, which I think was smaller squares. I think I will use some other training next run.
It's really not my kind of setup. I'm too interested in moving things and inspecting the plants constantly.
The net is driving me up the wall. 😣 I'm considering removing it and trying something else, but it's also a bit too late for oldest plants.9.2.25:
Gave the plants another good soak.
I used 2ltrs of dechlorinated water PH'd to 6.4. It contained the following nutrients;
♡ 4ml of Xpert Nutrients Bloom Booster
♡ 4ml of Xpert Nutrients Cal-Mag amino acids
♡ 4ml Seaweed extract liquid
♡ 0.5g of Ecothrive Biosys.
The plants are undergoing explosive growth at this stage, which I'm thrilled by!
Purple Lemonade is turning purplish hues.
Pink Mist has so many bud sites and is looking very healthy.
Do-sì-dos is growing vigorously and looking promising, especially considering all my unfortunate mishaps! 😅
Watermelon also has considerable growth. However, my training has made a mess out of the structure. Which I consider another valuable take away.
Bubble

Processing
Likes
9
Share
@diamondtrichomes
Follow
Snag a quicker video this week!! Sorry been super busy helping a friend build a greenhouse. Will start posting more when we get big beautiful flowers 😍

Likes
Comments
Share
@Beargrower
Follow
Questo è stato il mio primo ciclo indoor della mia vita ho ottenuto 40 grammi o più a pianta tutta trimmata essiccata e tutto.
