
Likes
Comments
Share


@Roberts
Follow
Bubble OG Gun autoflower is growing great. She had her first solution change today. I switched her to blooming nutrition since she has pistils started. Everything is going really good , and smooth. She will yield good if I can keep her trucking along at the pace she has been going. Thank you Ganja Farmer. Spider Farmer, and Athena nutrition. 🤜🏻🤛🏻🌱🌱🌱
Thank you grow diaries community for the 👇likes👇, follows, comments, and subscriptions on my YouTube channel👇. ❄️🌱🍻
Happy Growing 🌱🌱🌱
https://youtube.com/channel/UCAhN7yRzWLpcaRHhMIQ7X4g

Likes
17
Share


@JonnyKush
Follow
hey growmies I decided to switch to flowering, I am using ADV nutes with the dosage recommended by them and they seem to me in great shape, tonight I will do a defoliation in order to breathe better and get as much light as possible. I'll keep you up-to-date. good growth and happy day 💚🌳

Likes
5
Share


@Bili_R
Follow
Yo community!
A friend of mine just started a Legal Grow in Germany with his roomate under my Supervision, as it is now Legal to grow in Germany.
So I thought about documenting this grow. I've been growing for long time now, but my buddy Bili is a complete newbee at this stuff.
I am positive that this "is gonna be huge".
We plan on growing 6 plants. Bili is gonna be growing 3 and his roomate also 3 plants. Of course Bili will only care for his own 3 plants and his rommate for the other 3 as it is regulated like that by law. It is Germany where everything has to be like this apparently. lol.
This grow will be 2-3 Weeks indoors 51w with low cost 3x17 Watts 4000 k LED Bulbs. (3€ each) Those produce 2500 lumens each, about 147 lm/W
1.45 l pots for the first few weeks indoors.
The plants will then go into 5l pots on the window sill until harvest. faced to the south.
So far the seeds have been placed into water over night. tomorrow we will put them into the soil.
They are all Automatics.
Day 2:
seeds soaked over night. about 16 hours. The Gelato are already opening their shells.. The others are still closed. All sinked to the bottom over night.
We are now planting them into the Soil.:)
We soaked 9 seeds. 3x O.B. 4x Kryptonite and 2x Gelato.
After cutting the dome off the lamps and counting the LED's (81) it looks like these are 0.21w SMD 31lm per LED (manufacturer says 147lm/w). for bulbs really good little LED's. looks like these are cree 2835 J series or similar types. there are cree 4000k J types that are exactly 31lm wich would be exactly what each LED should produce. (2500/81).
Plant in Soil Date was 05 june. 14:00
Today, 2 Days and 10 hours, (58 hours) after planting in soil The 2 Gelatos came to life:) and one Kryptonite
basically 3 full days including soaking time.
08.06 at 1:30 is the beginning of VEG Day one
We will give them 24 hours light.
day 5 after waterglass. Berries still no sign of life.
lamp is at 30 cm distance. no signs of stretching.
At Day 5 Veg we located the berry seeds and put them into paper towel, cracked them open and scraped the shell. we have enough plants now but nothing to choose from in case a plant has weak genes. So we hope a few berries will make it. probably old Seeds.


Likes
17
Share


@PottingShed
Follow
Day 33 and she's looking great, getting bushy.
Day 31 and 8" tall. she's sprouted a little overnight. fed with biogrow today app 400ml


Likes
24
Share


@Mr_Awesome_Badass
Follow
Well she is coming along great. Looks great, very healthy girl.
Can't wait to start revealing what is behind the curtain so to speak.
Good luck to all the other growers and DON'T FORGET TO UPLOAD A VIDEO EVERY WEEK!!

Likes
18
Share


@Staffedition
Follow
Привет друзья. Моей растихе сегодня 96 дней.
Заметил паутинного клеща.
Сегодня обработал раствором.
Растение почти пришло в себя.
20.10 перевёл свет в режим 12/12
Начал применять LST технику на 19 дне и продалжаю применять её через день, а 18 августа добавил ДЕФОЛИЗАЦИЮ
С 20.08 ДЕФОЛИЗАЦИЮ делаю каждые 3,4 дня
С 20.08 LST технику делаю каждые 4.6 дней
На сегодняшний день влажность 54%
5.09.2023 заметил высокий Ph 7.9
С 48 дня Ph не ниже 5.8
На сегодняшний день Ph 6.0
Начал кормить с 60 дня Canna Terra Vega
PPM 770
Всем мира и добра!
Не забудь поставить лайк❤️, если понравилась как прошла неделя
Likes
10
Share

@Schmucker
Follow
Das purpeln der einen Pflanze ist stark ausgeprägt. Wir gehen in die finale Phase.
Die Trichome sehen echt super aus. Nur noch wenige Tage. Ich bin sehr auf den Ertrag gespannt.

Likes
7
Share

@Ziocannabis
Follow
Sono stato via 10 giorni ed ecco il risultato affidando a una persona il compito di bagnare! Mai più in vita mia lascio a qualcuno di fiducia, ma che vaffanculo non gli frega un benemerito cazzo!!!!
Ora speriamo di riuscire a recuperare perché sicuro. Ph sbagliato, bagnate in modo scomposto e il risultato è una merda! Tutte foglie ingiallite e cime poco corpose!!
Auguri e buona fortuna a me!!
Likes
17
Share


@StoneJackson
Follow
Loved growing this unknown Indica Strain the effects are medicinal, the experience is euphoric and pleasant being surrounded by flowery herby scents while you bliss out. A true gem and pleasure to grow
Likes
11
Share


@Mr_Motalovah
Follow
Hello Growers & Tokers!
The route to having a jungle starts with the roots!
That's why my main goal in those first 14-21 days is developing the root system.
I like to give them time to expand the roots which is very important for a healthy plant.
That also gives them more time to get bigger and stronger before going into flower.
More growth, more bud sites, more buds. Trust me the wait is worth the reward.
We'll be seeing some truly sweet and zenzational flowers.
This week they got transplanted to their final pot, 11L fabric pots.
It's one step closer to getting that jungle, zenzational!
Medium used was Light Mix from BioBizz.
Synergy from Grotek nutrients was blended in the medium to help out the roots.
Let the mycorrhizae do its job and take over the soil, then the roots just follow.
Take care out there and happy growing!


Likes
21
Share


@Fullmeltalchemist
Follow
Alright I've updated this postmortem and cure just to give an idea of what I was up to during the dry and cure weeks. This grow was a ton of work and I'm very please with the results. I learned a ton about soil and environment control and really feel like I'm gaining confidence and coming into my own as a cultivator.
I've been playing a lot with ice water hash and rosin and have set some neat goals for the future like hunting ice water hash cultivars, going perpetual and expanding the amount of canopy I can work with by building a network of remote-operated satellite flower tents in friends' and family's abodes . I'm not sure I'll go through all this effort of documentation here again, but please follow along on my instagram, stay in touch and chill out with me sometime @Fullmeltalchemist.00
All in all, I was running 1000w of quantum board across three tents and pulled just over 1100 grams, which was a big goal of mine.
Thanks for all the advice and love growmies! And thanks growdiaries for the platform. It's been coo.


Likes
9
Share

@Enki_Weed
Follow
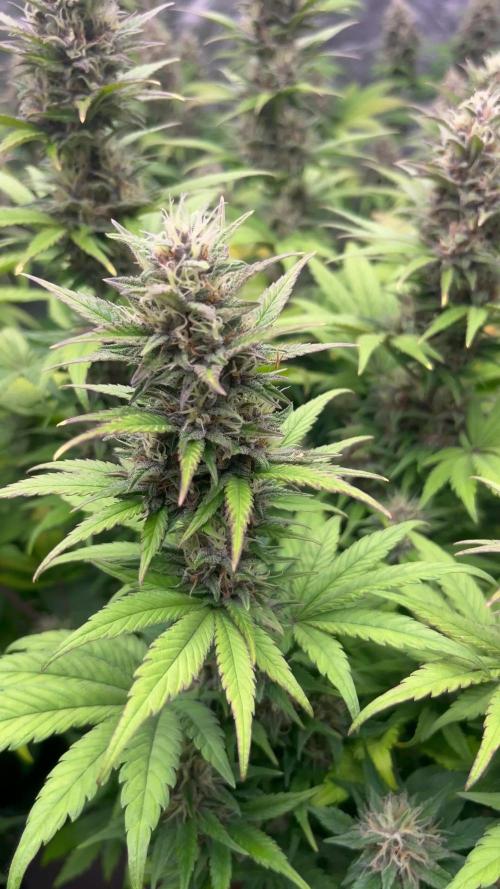
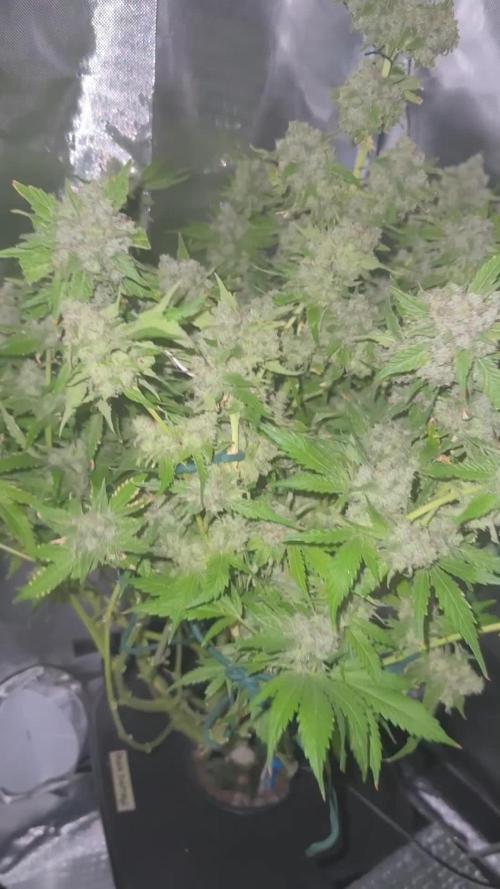
In den letzten ein bis zwei Wochen hat sich unsere Pflanze weiterhin prächtig entwickelt und zeigt nun deutliche Anzeichen einer fortgeschrittenen Blütephase. Es gab keine dramatischen Veränderungen, sondern eine stetige Reifung, die uns dem Erntezeitpunkt näherbringt.
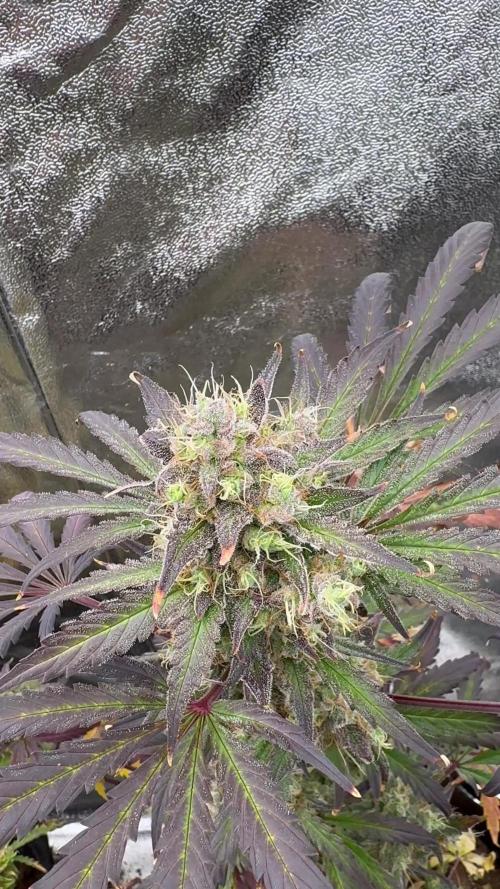
Die Pflanze präsentiert sich sehr buschig und vital, mit zahlreichen dichten Blütenständen, die sich gut ausgebildet haben (siehe Gesamtansicht der Pflanze). Die Buds sind kompakt und haben in den letzten Wochen an Volumen und Gewicht zugelegt. Man kann deutlich sehen, wie die Blütenkelche anschwellen und sich zu reifen Blütenständen formen.
Trichom- und Stigmen-Reife:
Ein genauerer Blick auf die Buds (wie im ersten Nahaufnahme-Bild der Trichome und im weiteren Nahaufnahme-Bild der Buds mit orangenen Stigmen ersichtlich) zeigt den Fortschritt der Reifung. Die weißen, harzigen Trichome bedecken die Blütenstände in Hülle und Fülle, was auf eine intensive Produktion von Cannabinoiden hinweist. Bei den Trichomen ist nun eine gute Mischung aus milchig-trüben Köpfen zu erkennen, die auf die volle Potenz hindeuten. Erste bernsteinfarbene Trichome beginnen ebenfalls aufzutreten, was ein Zeichen dafür ist, dass der Erntezeitpunkt bevorsteht.
Parallel dazu haben sich die Stigmen (die feinen Härchen auf den Buds) von Weiß zu einem satten Orange-Braun verfärbt. Dies ist ein weiteres starkes Indiz für die Reife der Blüten und die nahende Ernte.
Blattwerk und Nährstoffbedarf:
Das Blattwerk der Pflanze ist größtenteils weiterhin gesund und grün, was auf eine gute Nährstoffversorgung schließen lässt. Einige der größeren Fächerblätter können in dieser späten Blütephase leichte Anzeichen von Vergilbung zeigen, da die Pflanze ihre Energie nun primär in die Blütenentwicklung steckt und Nährstoffe aus den Blättern zieht. Dies ist ein natürlicher Prozess, der oft als "Herbstfärbung" bezeichnet wird.
Wir werden die Reifung der Trichome weiterhin genauestens beobachten, um den optimalen Erntezeitpunkt zu bestimmen, der je nach gewünschtem Effekt variieren kann. Auch die allgemeine Gesundheit der Pflanze wird weiterhin im Auge behalten, um sicherzustellen, dass sie bis zur Ernte optimal versorgt ist.

Likes
31
Share


@XperencdGmanXG
Follow
well we are through the stretch and fully into the flower now. They look really nice, I hope I have enough P and K in the soil, I may need a Banana tea halfway through but only time will tell.
Likes
141
Share


@Anonymous_2022
Follow
Thanks for stopping by.. Please hit the like button if you like what you see and ill be sure to check you out too Growmies 🌱
Week 6 of flower .. sooo nearly there.
Last week developed a calcium deficiency and some of the leaves are deteriorating 😡
Added Calgel(CalMag) at a 0.3ml per L dose hopefully there perk up abit again,
Will also be adding a NPK booster this week as there starting to fade quite abit early,
Dehumidifier is doing its job dropped the humidity around 15-20%
Temps 21-28 ✅
Humidity 45-55 % ✅
Overall happy with the progress this week now to focus on getting through this deficiency 👍👍👍
Likes
8
Share


@DWCpaqy
Follow
Week has been good. I'm not sure about the ppm and salt around roots, they are a little brown. Wounder if I should flush them and start again with nutrient?
And see some of the last picture, it's pretty thigth between the leaf and buds, should I but some of the leaf?
Ppm 1400-1600
Temp 22 to 31
Temp in water 20-26
Humidity 50-60%


Likes
7
Share


@Medmandan420
Follow
2
screws ups 1
fox farms is 2 hot
switching to roots organic 2 the pot I put her in
cracked when I tried to run lst wire threw it so we ended up testing monster cropping for the first time thus her height
incredible smell
like dank pop tarts
I am dying for a test bowl then into the Grove bag she goes for 2 months
next videos and pics in new diary will be better looking
got another purple and a strawnana from @fastbuds @2fast4buds
Likes
5
Share


@Ensign420
Follow
Greetings fellow growers 🖖 and welcome to my first grow ever. This adventure actually started several months ago when I decided to stop buying flower from dispensaries and just grow my own bud. How hard can it be!?
This is actually my second seed of this strain. The first bean sadly died due to over watering (sorry girl, RIP). I was literally watering the cube to the point where water was dripping from the bottom, then heavily sprayed the humidity dome and tray with the vents completely closed. Everyday. Multiple times. I never let the dome or try dry out. So after about 8 days of not sprouting, there was a funky smell of rot. So that was that.
Later I learned that rockwool retains a lot of water and can easily drown seeds. So a wet/dry cycle is best for rockwool germination.
So even after hours of researching and digging through forums and tutorial videos, I was still under prepared for this journey. Did not consider how delicate the germination phase is. Oh well. Lesson learned. Reset and try again!
I hope everyone is safe and stoned during this corona crisis. Just like everyone else in the world, I want this pandemic to be over with. But in the meantime, let's grow some weed! 🖖
[START OF WEEK 01]
Day 01 - Monday - 08/03/20 - Total Days: 001
-----------------------------------
- [0830]: Light Schedule: 24Hrs/0
--- Soaked cube in 5.5 PH water for 10 min. Did not shake water out.
--- NO NUTES! Only PH'd down to control the PH levels.
--- Did not use the default hole (way too deep).
--- Flipped cube upside down and made a shallow hole for the seed (less than 0.25" deep).
--- Placed seed in and pinched hole close. No additional water added.
--- Sprayed the tray and dome with straight water (5.5 PH).
--- Vents are cracked opened a for ventilation (about 1/4 opened each).
--- Distance between the light and tray was 53"
--- AC was set to 80 °F
--- Exhaust fan was set to 86 °F
--- Room average temp was at 85 °F
--- Dome humidity was at 85-99% when sprayed.
--- Allowing to completely dry before respraying.
- [2200]: Dome and tray were completely dry! Sprayed only tray and dome with more water.
Day 02 - Tuesday - 08/04/20 - Total Days: 002
-----------------------------------
- [0845]: Sprayed dome and tray in the morning. Everything was dry.
--- Hoping for the best!
- [2130]: Everything was dry again, so sprayed dome and tray at night along with a light spray on the cube.
Day 03 - Wednesday - 08/05/20 - Total Days: 003
-----------------------------------
- [0830]: Everything was dry again. Resprayed dome and tray. Slightly sprayed cube.
- [2125]: Hooo damn!! She popped! Am little stub is visible! Resprayed dome and tray again.
--- Still going 24/0 for lights.
- [+0033]: Just checked up on her and I swear she grew a bit taller! Getting excited!
Day 04 - Thursday - 08/06/20 - Total Days: 004
-----------------------------------
- [0845]: Wow! Went from a little stub to fully sprouted overnight! Everything was pretty dry again so resprayed dome and tray.
- [2200]: Tap root is visible! Over 1" long too! Just resprayed dome and tray again.
-- Going to prep for hydroton transplant tomorrow!
Day 05 - Friday - 08/07/20 - Total Days: 005
-----------------------------------
- [0930]: She keeps growing!
-- Added a bit of CalMag to the spray bottle (8 drops to 650ml of distilled water). Resprayed dome and tray. Water was at a 5.4 PH with 141 PPM.
- [1045]: Prepped the bubble bucket with 4.5gal of water. Water is high enough to reach about 0.25" above the bottom of the net pot.
--- Added 3 drops of Superthrive
--- Added 3.5ml of CaliMagic
--- Added 2ml Hydroguard
--- Then PH'd down to 5.6
--- Solution Strengh: 120 PPM
--- Water chiller is set to 20 °C
- [1100]: Transplant time!
--- Filled the net basket 1/3 with hydroton. When placed in the bucket, air bubbles are not visible, but are slightly below the surface (slight digging will reveal the water/bubbles below).
--- Removed plastic on rockwool cube and placed in basket, then filled around and covered with hydroton. Making sure to block any light from passing through the net pot and into the nutrient solution.
--- Covered with a half-bottle dome sprayed with the CalMag water from earlier.
--- Hoping for the best!
- [1300]: Raised Bucket 5" higher. Now light distance is 48" to top of bucket.
- [1820]: Lowered tent exhaust temp to 76 °F
--- Lowered AC to 75 °F
--- Raised bucket even higher so light distance is 30" to top of bucket.
- [2300]: Looking good!
--- Sprayed dome and surrounding hydroton with more CalMag water.
--- Attached timer to light! So new 18 Hrs On/6 Hrs Off light schedule.
--- Lights On: [1600] (4pm)
--- Lights Off: [+1000] (10am the next day)
--- Decided to go with lights on during the evening/night and off during the later mornings/afternoon (the hottest part of the day) to see if temps can be controlled better.
--- Please survive girl!
Day 06 - Saturday - 08/08/20 - Total Days: 006
-----------------------------------
- [0800]: Everything was dry. Resprayed hydroton and dome.
- [2000]: Here first night cycle seemed to go well! Get'n taller!
--- Dry again. Removed the dome.
--- PH went up to 6.5 so PH'd down to 5.7
--- Ran the top feed drip ring for a bout a minute to wet the hydroton and rockwool with the nutient solution.
---Too scared to leave the top feed on 24hrs (I don't want over water her and cause dampening-off). Will let dry before re-watering.
- [2100]: After closer inspection, I think she's looking a bit yellow.
--- Decided to add a bit of grow nutes to the bubbler solution.
--- Added 2ml of Sensi Grow A
--- Added 2ml of Sensi Grow B
--- Solution strength after adding more nutes: 176 PPM
--- PH went up to 6
--- I hope that the extra chelating properties of the 'PH Perfect' solution is enough of a buffer for proper nutrient uptake.
Day 07 - Sunday - 08/09/20 - Total Days: 007
-----------------------------------
- [0800]: Water dropped a bit (mostly due to evaporation) so solution strength was at 190.
--- Checked PH again. Was still at 6, so PH'd down to 5.4
--- Ran the top feed for a minute to wet the hydroton a bit.
- [0915]: Since she's looking perky but still a bit yellow. So decided to up the nutrient concentration even more before lights out.
--- Added 2ml more of Sensi Grow A
--- Added 2ml more of Sensi Grow B
--- Solution strength after adding more nutes: 199 PPM
--- PH went up to 5.8
- [1700]: Checked nutrients.
--- PH: 5.9
--- Solution strength: 202 PPM
--- Added 4ml of Voodoo Juice
--- Added 4ml of B-52
--- PH after adding more nutes: 5.9
--- Solution strength after adding more nutes: 238 PPM
- [2130]: Decided to make a new foliar spray to address the continued yellowing.
--- Started with 500ml of distilled water.
--- Added 3 drops of CaliMagic
--- Added 3 drops of Sensi Grow A
--- Added 3 drops of Sensi Grow B
--- Added 3 drops of B-52
--- Added 1 drop of Superthrive
--- Solution strength: 164 PPM
--- PH was at 5.9 and did not adjust.
--- Gave her one spray.
--- Also sprayed the surrounding hydroton.
[END OF WEEK 01]
