


Likes
Comments
Share


@mariocave
Follow
Stay tuned to see what the final few weeks in this 75 day run have in store these OG Skywalker Cookies 🍪
Likes
38
Share


@Cariboo_OG
Follow
Utopia Haze is a rare heavily sativa dominant hybrid (90% sativa/10% indica) strain created through back crossing Brazilian Sativa strains. This tasty little bud took home 1st Place for Best Sativa in the 2008 High Times’ Cannabis Cup and for good reason – with its potent 18-22% average THC level and long lasting cerebral effects, Utopia Haze is one powerhouse smoke. The Utopia Haze high comes on soon after you finish your first toke, hitting you with a strong cerebral lift that infuses you with a sense of hazy relaxation.
Type: Feminised/Photoperiod
Cultivation: Indoor/Outdoor
Flowering Time (days): 70-75
Indoor Yield (g): Up to 650
Feminised Outdoor Harvest Month: October
Feminised Outdoor Harvest Month Week: 3rd-4th week
Aroma: Citrus, Woody, Pungent, Mint
Effect: Cerebral Lift, Hazy Relaxation, Sleepy
Welcome Everyone to the Final Entry of my Utopia Haze Grow !
There is so much to discuss ! I have been extremely busy as of late trying to get this Harvest together, but i am happy to have it here for you now !
I Seriously under estimated the amount of time, help from others, and my own necessary skills to pull this off.. and i still kind of screwed it up lol !
But its worth noting i have never actually done this before and trying to document it during....was extremely hard.
It is next to impossible to work an iPhone with rubber gloves on !
First I want to discuss everything step by step so before you jump straight into the comments on how the end product is so small in "quantity"
Rest assured i am happy with its"quality"...and thats all that matters to me because Life is a journey not a destination! and i have learned so much from this grow that I couldn't be any happy even if i messed some things up :)
But at the very least I hope you read through this entry in its entirety with an open mind and focus more on the process, rather than just the outcome!
I ran out of Ice & i was only able to wash three times..(normally I've heard you should go sometimes 5-6 washes)
Preparation is Key & things will be much better next round :)
Photos 1-22
These are pretty self explanatory but for those of you just tuning in now.. this is what happens to a very happy plant when you don't have the necessary tools to monitor key components of growing cannabis.. Ph, as well as EC levels play a very key role in the outcome of your grow lol that being said I was just able to save this plant by purchasing both tools but that doesn't mean the plant didn't suffer because of the prior events.. This was a Huge reason behind me choosing to turn this harvest into what i would consider
"Solventless Hash Rosin" from "Ice water extracted Bubble hash".
Pictures 23
The idea here is the process of using "fresh Frozen Cannabis" this has been discussed many a time online on such sites as instagram and here on grow diaries as well.. I personally have Never tried the process so i decided to try it out and make a judgement for myself..
Video 24
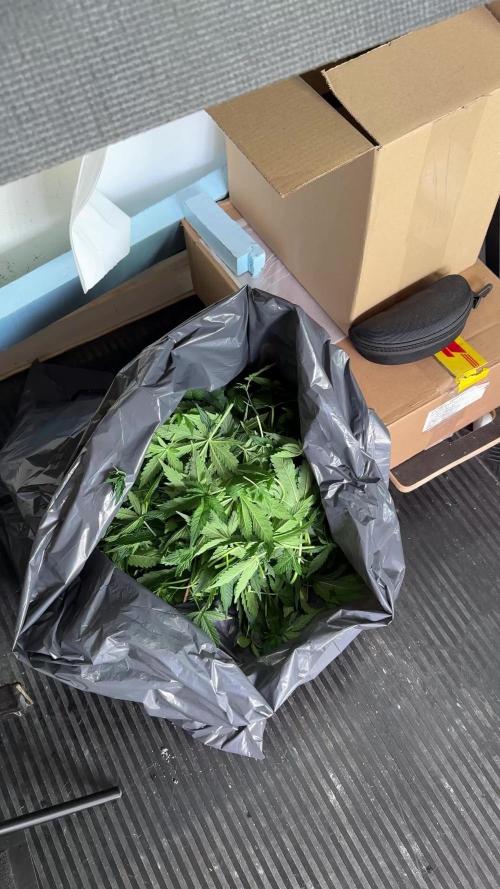
The Cannabis has now been in the freezer for 72 hours making it very well frozen.. as you can tell i struggled getting it all into the 25u Screen Wash Bag. One thing of note i would do differently is i will de-stem my next batch as i also believe this played a part in the amount of plant matter that escaped through the sieves.
Photo/Video's 25-28
The idea here is "ice water Seiving" & especially with the bags that I am using here that are only have screen material on the bottom portion of the bag it is very important to have spaces in-between the screens to allow the water to pass directly through the screens into the bottom bucket with the least amount of resistance.. because the hash is so extremely temperature dependant if it gets warm on the side of the bag.. it will stick there and not make it to the bottom to become use able product..
29
You do not need to use as much Ice as i used here lol... the idea is to keep everything very cold..i certainly achieved that but at the sacrifice of using so much that i ended up grinding product and producing "contaminants" but in the end they are just plant matter that i would be smoking when i rolled up my joint either way so.. I'm not super disappointed..
But it should be noted that what you want to achieve here is a Layering effect where you have the wash bag between two small layers of ice while the "water current" washes the Trichomes away allowing them to be separated by the screens setup below :)
Before Starting the machine you should allow some time (i.e.;10-12minutes pre soak to allow the product to become saturated) before the first cycle.
By video 32 I have just ran out of ice lol..
Video 33-34
Here I have a tip for you.. to separate the screens that you sieve through.. cut 5 gallon buckets to stretch them across nice and tight.. it'll make scooping your Bubble that much easier ! i learned this from the many "Frenchy" videos I have watched :)
Picture 35
Here in lays the problem for most people.. drying your hash without loosing vast amounts of "Terpenes" whilst also stay ever vigilant against mold !
Thanks to all those videos I've watched on youtube.. id like to think this was one of my most successful parts of this process..
Things to Note; Terpenes start to seriously evaporate at temperatures 68F or 20C
you need to stay as cold as possible whilst bringing the Relative Humidity in the space down into the 40-30% to stay away from that nasty mold !
I used my cold storage room in the basement.. with a dehumidifier running to keep the space at 45% RH & staying at a constant 15c.
All while spreading the hash as thin as possible across parchment paper, on top of the white screens with a fan moving air across both sides of the paper.
Pictures 36-38
These are some macros i took in the middle of my drying session I fell in love with the colour.
Yes i know the black spots are plant material but they will get caught when i bag the hash & squish the oil out.
Thing to Note; at this stage it is important to ensure you 'micro plane" the hash down as fine as you can whilst staying weary of the temperature... any "chunks" will hold pockets of moisture.. that lead to potential problems..ie; mold ...
Picture/Video 39-41
Successfully planed bubble hash ready to be bagged and Squished !
Picture 42
Ive decided to follow Pedro.. from Pedros Grow Room and double bag to be on the safe side so i don't have any blow outs.
So thats One 25u bag inside one 160u bag ! :)
Pictures 43
This is almost 3 grams of the bubble hash from above, already melting in the bag.. this is where i ran into trouble again lol things started getting to warm in the house and i was only able to get one of the three squish's i did on video :( things started getting sticky.
Picture 44
This is basically just a photo of the equipment I'm using; 3x5 LowTemp Cage in the frame I built myself, with a 20Ton bottle jack.
Something to note here is this is an older Lowtemp model with only a single heating zone which is which i have it closed here heating Both sides of the press :)
As well as the importance of having adequate pressure on your plates.. my rig is very overkill for the size of hash bags..lol
Video 45
Here is the lovely press video.. its didn't quite work the way i wanted either lol my directional folding wasn't quite tight enough for a big "drip" :)
&the Press was set to 65°c
Photo's 46-50 are pretty self explanatory :) I had a blow out.. but still managed to pull an 80% return from the hash once squished...& yes it tasted amazing :)
Was it worth it in the end... that could be debated.. for some..i understand..its not your thing, but for those of us that are interested in making our own concentrates.. free from Solvents...
I wouldn't make it any other way :)
If even ONE of you reading this diary finds it helpful to reference for ANYTHING.....even if its "what not to do" ill consider it a success !
Thanks again for tagging along on this garden adventure.. its been one heck of a journey !
Much Love from B.C. Canada,
Until Next time,
Cariboo

Likes
9
Share


@TiRobotProds
Follow
Nous somme à la 6ème semaines de floraison tout se passe comme prévu les bourgeons continuent de gonflés les paramètres sont excellents 24 degrés en température 55% en hydrometrie.
- L'ajout de RQS guano a redonner un coup pouce à la plante les bourgeons ont sacrément gonfler aimer et regarder par vous même. Cet semaine sera aussi la dernière irrigation avec nutes. Ce run est l'une de mes préférée.
Léger carences en azote post-stretch cela es dû a un faible apport de celui-ci mais rien de grave cela indique les derniers semaine de vie de cette dame le rinçage sera simple et éfficace.
L'odeur quelle dégage es fortement fruité cela sent le 🍬 🍬. A plus pour d'avantge d'informations.👍🏼


Likes
7
Share


@mperkins37
Follow
LST, HST and defoliated second time, Fimmed main 1x, fimmed all tops 14 days later, fimmed all resulting tops 3 weeks later. well over 100 tops and counting, removed all tiny branches off the mains. pre loli.. lol Ill let em up in a few days. should be well beyond the 20" circumference of the 20 gal pots. Gonn a flower 2 in the space , and 2 in my newly acquired 48x48x80 tent. Shopping a few Flowering beasts to put in for the next phase. Love to get 2x https://opticledgrowlights.com/products/slim-720s-dimmable-led-grow-light-720w-triple-dimmer-3500k-uv-ir-lh351h-v2. Oh well, we will see. HAppy growing peeps!

Likes
15
Share


@902EastCoast
Follow
Day 43 of flower: This week was great again. Tied a few branches up that had fallen. All the ladies look and smell amazing. Afghan kush early harvest will be the first done for sure. 🔥💨✌️🏼💚

Likes
62
Share


@Varinaut
Follow
Feeding schedule has been steady with the girls transpiring 5 liters of water and "eating" 8 g of Megacrop and 20 ml of P-K booster per day.
It's about that time when it would be wise for me to freeze my pruning shears in a gallon of ice to help with my impulse control. Geezuz these gals are getting dank. I had been running the 6-in carbon filter only during lights-on but noted a serious spike in terps during dark hours lately that I'm sure drifted to the neighbours, so the grow room air is now being scrubbed 24/7. That doesn't help with the stank that sticks to me whenever I touch the plants or even just go in the room. Candidly, I the smell is addictive to me, but the wife ain't no fan, so I have to do a body douche with alcohol, soap and water whenever I've been in the grow room.
Bo is on the home stretch -- or fattening, at this stage -- with pistils browning across the canopy and trichomes starting to cloud up. I'm starting to believe @PirateJoe and @SativaKid in their mid-December estimates, for Bo, at least. Sophia continues to plug away, getting thick, but pistils are just starting to brown and trics are crystal clear, so 2 weeks behind, at least.
The buds on both plants are developing a texture similar to the Kilimanjaro I grew outside this summer, @PirateJoe and @SativaKid have alluded to this as well: Dense, mushy buds that have an almost oily feel. I'm guessing this is characteristic of Sativas in general? Community input would be appreciated.
I've been increasing the duration of UV exposure by 30 min during each of the 2 daily exposure periods every few days. Now up to 2 hours each period, and since I'm seeing no damage, I'll probably continue to increase the UV so it's on continuously for 7 hrs straight during the middle of the "day."
Likes
Comments
Share


@DogDoctorOfficial
Follow
👑 Godfather OG – Pheno B
Week 5 | Elegance in Every Stretch
Welcome back to another chapter of the 8×8 Adventure!
One of the greatest joys of running a true phenotype hunt is discovering how differently each individual plant expresses herself, even when every variable remains exactly the same.
Same genetics.
Same lighting.
Same environment.
Same feeding philosophy.
Yet every plant tells her own story.
Godfather OG Pheno B is proving that perfectly.
While some of her sisters are building broader, bushier canopies, this lady has chosen elegance over width, reaching confidently toward the lights with long, graceful branches and beautifully spaced flowering sites.
She isn't trying to be the biggest.
She's simply becoming herself.
And that's exactly what makes phenotype hunting so fascinating.
🌱 The Journey So Far
If this is your first visit to this diary, welcome!
Every plant in this project is being grown using the 12/12 From Seed technique.
Rather than extending the vegetative stage before inducing flowering, every seed has lived under twelve hours of light and twelve hours of darkness from the very first day.
That means I never decide when flowering begins.
The plants do.
Each phenotype follows its own internal clock, revealing its own pace and personality.
It's one of the reasons this project has become such an incredible learning experience.
Watching sister plants develop into completely different individuals under identical conditions never stops amazing me.
🌸 Week One of Flower
This week marks what I consider Week One of Flower.
The transition is now unmistakable.
Fresh white pistils are emerging across every growing tip, quietly announcing that the plant has shifted her priorities from building stems and leaves to creating flowers.
These tiny white hairs may seem insignificant today...
…but they are the first chapter of every future cola.
Every morning seems to bring another cluster of pistils, another little burst of growth, and another reminder of how quickly this stage evolves.
It's one of my favourite moments in the entire cultivation cycle.
The excitement is only just beginning.
🌿 A Structure Built for Success
Now standing close to 96 cm, Pheno B has become one of the tallest ladies in the room.
Rather than producing a dense, compact canopy, she's expressing a wonderfully open architecture.
Long internodal spacing.
Strong central stem.
Healthy side branching.
Excellent airflow.
Instead of fighting her natural shape, I've simply allowed her to develop the way she wanted.
No aggressive training.
No heavy defoliation.
Just a little leaf tucking here and there to improve light penetration while letting the plant write her own story.
Sometimes the best thing a grower can do...
...is simply stay out of the plant's way.
The result is an elegant framework where every future flowering site has room to breathe and access to plenty of light.
💧 Hand Watering — Every Plant, Every Decision
Unlike some of her sisters growing on AutoPots, Pheno B continues to be hand-watered.
There's something incredibly rewarding about this approach.
Every watering becomes an opportunity to slow down.
To observe.
To inspect every leaf.
To notice the smallest changes before they become problems.
Rather than simply feeding the plant, hand watering encourages a closer relationship with her development.
As flowering begins, the nutrition program continues its gradual transition toward bloom production.
Bloom nutrients are now taking a larger role while enough nitrogen remains available to support the final stretch before the plant fully dedicates her energy to building flowers.
Everything is progressing exactly as planned.
🌡️ Environment — Consistency Creates Confidence
The room continues delivering stable conditions that allow every phenotype to perform at her best.
Current averages include:
• 🌡️ Day temperature: 29°C
• 🌙 Night temperature: 25°C
• 💧 Relative humidity: 60%
• ? Root zone: 21°C
• 💦 Nutrient solution: 24°C
• 🌿 CO₂ concentration: 639 ppm
Rather than chasing perfection every day, I focus on maintaining consistency.
Healthy plants don't just grow because they're fed well.
They thrive because they're never forced to constantly adapt to changing conditions.
A stable environment allows the plant to spend her energy growing instead of recovering.
📸 This Week's Gallery
This week's photographs capture a plant that's confidently stepping into her flowering journey.
Full-length portraits highlight her elegant vertical structure and balanced branching.
Close-up images showcase the first clusters of bright white pistils appearing across multiple flowering sites.
Several photographs also reveal the open architecture that has naturally developed through gentle guidance rather than heavy intervention.
Every branch seems eager to join the race toward becoming a future cola.
Watching these subtle changes unfold week after week is one of the most rewarding parts of documenting this project.
Sometimes a camera captures progress that our eyes almost miss from one day to the next.
🔮 Looking Ahead
Over the coming week I expect the stretch to continue as flowering becomes fully established.
More pistils will appear across every branch, while the first true bud clusters begin forming at each flowering site.
Training will remain minimal.
Only occasional leaf tucking will be carried out whenever necessary to improve light penetration and airflow.
At this point, the goal isn't to reshape the plant.
It's simply to support the structure she's already chosen for herself.
If she continues growing with this same rhythm, I think she's going to produce a canopy filled with long, beautifully stacked colas.
She's healthy.
She's vigorous.
And she's only just getting started.
💚 Thank You
Thank you so much for following another chapter of this 8×8 Adventure.
Every phenotype teaches something different, and that's exactly why documenting each one individually has become such a rewarding experience.
A huge thank you to:
💚 GrowDiaries for providing an incredible platform where growers from around the world can learn, share their experiences, and inspire one another.
🌱 Zamnesia for supplying the outstanding genetics that make this phenotype hunt possible.
? Plagron for providing the nutrients supporting these ladies from seed to harvest.
💡 Future of Grow LED for delivering the light driving every stage of development.
🌿 TrolMaster for helping maintain the stable environment that allows every phenotype to express her full potential.
And finally...
Thank you to everyone reading these updates, leaving comments, asking questions, sharing knowledge, or simply following along.
Your support makes this journey even more enjoyable.
I'll see you all next week as Godfather OG Pheno B continues transforming graceful branches into what I hope will become a canopy full of beautiful flowers.
Growers Love, and happy growing everyone! 🌱👑💚


Likes
11
Share


@Cheeba_Inu
Follow
December 16: Seeds places into rapid rooters for germination.
December 21: Germinated seed just starting to push plug out of rapid rooter.
December 22: Planted in seedling pot.
December 23: Seedling having issues shedding seed.
December 24: Removed shell and casing, seedling showing signs of recovery.

Likes
20
Share
@DogDoctorOfficial
Follow
🌱 Nectar Drip Update
Week 8 from Seed · Week 2 Flower (12/12 from seed)
Quick recap for anyone joining us now:
This run is a 12/12 from seed experiment, meaning each plant chose on its own when to enter flower. Because of that, flower timing is not perfectly synchronized — and that’s an important part of this grow and of the decisions we’re making.
We’re working with an exclusive collaborative genetic pack, not commercially available anymore, bred for stability, vigor, and resilience. What you see here is a real-world expression of those genetics, grown without chasing trends or hype — just observation, patience, and consistency.
⸻
🌡️ Environment & Feeding (Why We Changed Nothing)
This week, we deliberately changed nothing.
• Day temperature: ~28 °C
• Relative Humidity: ~65%
• EC: 2.4
• pH: 6.5
• Plant height: ~40 cm to ~80 cm
• Lighting: LED
Many growers would say these temperatures are “too high for flower,” but context matters.
Under LED lighting, leaf surface temperature typically runs 2–4 °C cooler than room temperature. Because of that, we focus on leaf VPD, not room VPD. The plant is what matters — not the number on the wall.
We are not chasing numbers.
We are paying attention to them.
The plants are responding perfectly:
• Lush, deep green foliage
• No signs of stress
• Strong internodal structure
• Uniform uptake across different phenotypes
When the plant is happy, stability beats adjustment. That’s why the nutrient recipe stayed exactly the same.
⸻
✂️ Defoliation — Why This Week, Why This Way
This week marked an important decision.
Normally, defoliation would happen around day 21 of flower. But in a 12/12-from-seed run, there is no universal day 21. Each plant entered flower on its own schedule.
The room was getting dense.
Airflow was being restricted.
Light penetration was becoming uneven.
So we listened to the plants — not the calendar.
We opened the canopy, improved airflow, and allowed the plants to:
• Breathe better
• Receive more uniform light
• Push growth upward instead of inward
We’ll be honest:
👉 We went harder than planned.
But it was a conscious decision, not an emotional one.
Leaves removed were healthy — not sick — which tells us the plant had energy to spare. The remaining structure is strong, clean, and well-shaped.
⸻
🛠️ Training & Recovery
• Structural branches previously damaged were taped last week
• All repaired nodes bounced back perfectly
• Plastic clips are still being used dynamically — on and off — to guide shape, not force it
This tells us everything we need to know about the genetics:
stable, resilient, forgiving, and strong.
⸻
🔮 What We Expect Next
After a hard defoliation, plants tell the truth quickly.
What we expect:
• Fast rebound
• Vertical push toward the light
• Strong flower site development
• Clean airflow through the canopy
If they slow down, we listen.
If they explode, we let them run.
So far, these girls are behaving like champions.
⸻
❤️ Final Words & Gratitude
To everyone reading this —
the supporters, the critics, the silent observers:
You all have a place here.
Growth doesn’t happen without contrast.
Learning doesn’t happen without mistakes.
And progress doesn’t happen without conversation.
Thank you to:
• The platform
• The OGs
• The new followers
• The sponsors
• The lovers and the haters
We treat everyone the same.
Criticism is welcome.
Questions are encouraged.
This is Nectar Drip — honest, detailed, educational, and real.
Let’s see what the future shows us 🌱💧
📡 Please stay tuned.we never quit https://www.youtube.com/@DOGDOGTHEDOCTOR NEW
🙏 Thank you for your patience and continued support.
FOR DISCOUNT CODES AND MORE JUST FOLLOW THE LINK https://website.beacons.ai/dogdoctorofficial
📲 Don’t forget to Subscribe and follow me on Instagram and YouTube @DogDoctorOfficial for exclusive content, real-time updates, and behind-the-scenes magic. We’ve got so much more coming, including transplanting and all the amazing techniques that go along with it. You won’t want to miss it.
GrowDiaries Journal: https://growdiaries.com/grower/dogdoctorofficial
Instagram: https://www.instagram.com/dogdoctorofficial/
YouTube: https://www.youtube.com/@dogdoctorofficial Deleted by Youtube
Vimeo : https://vimeo.com/dogdoctorofficial Under construction stay tuned ⸻
Explore the Gear that Powers My Grow
If you’re curious about the tech I’m using, check out these links:
🔆 Lighting & Environmental Control
• Future of Grow — Advanced LED lighting technology
https://www.futureofgrow.com/
DISCOUNT CODE: DOG20
• Lumiflora — Under-canopy LED lighting
https://lumiflorade.com/
• TrollMaster — Environmental controllers and automation gear (past collaboration)
⸻
Genetics
• Zamnesia Seeds — Genetics used in this project
https://www.zamnesia.com/
⸻
🌱 Soil, Substrates, Boosters & Root Support
• Plagron — Substrates, bio mixes, and supportive products
https://plagron.com/en/
⸻
🎒 Storage, Curing & Preservation
• Grove Bags — Curing and storage solutions
https://grovebags.com/
⸻
📸 Photography Equipment & Tools
(Not sponsors, but part of my creative toolkit)
• Sony A6700
• Sony full-frame macro lens + few more
• Stacking photography workflow - learning
• iPhone (for behind-the-scenes shots)
We’ve got much more coming as we move through the grow cycles. Trust me, you won’t want to miss the next steps, let’s push the boundaries of indoor horticulture together!
As always, this is shared for educational purposes, aiming to spread understanding and appreciation for this plant. Let’s celebrate it responsibly and continue to learn and grow together.
With true love comes happiness. Always believe in yourself, and always do things expecting nothing and with an open heart. Be a giver, and the universe will give back in ways you could never imagine.
💚 Growers love to all 💚
📸 P.S. – The Eye Behind the Lens
All photos in this diary (for now — except for the ones showing the camera, which I took with an iPhone) are taken with a Sony A6700 paired with a Sony full-frame macro lens and a few more.
Photography is part of the story — it’s how we share the fine textures, the glow, and the quiet details that words can’t always capture.
I’ve also started experimenting with photo stacking — a technique where multiple images, each taken at a slightly different focus point, are layered together to create one perfectly sharp image from front to back.
It’s not digital enhancement or AI; it’s pure photography — a way to reveal the plant’s beauty in microscopic depth, from trichome to petal.
You’ll even see a few shots of "ghost me" capturing the shots — camera, lens, setup — because every grow deserves not just to be cultivated, but documented like art.
FOR DISCOUNT CODES AND MORE JUST FOLLOW THE LINK https://website.beacons.ai/dogdoctorofficial
NEW DISCORD - Official Server Invite Link : https://discord.gg/ksjAkA5T74

Likes
2
Share


@Saintvicious
Follow
Not much to do with Autos. I take a handful of leaves everytime I'm in the tent. Veg thru 2-3 weeks of flower.
Likes
14
Share


@MARLEYtheDAWG
Follow
Wow, I can't believe the sea of green my tents turned into! I'm actually amazed all 6 are doing really well for my first time!
I've started to add some dutchpro explode to my feed and the buds have done what it says on the tin!
Purple queen is still taking the lead and I cannot wait to try her! 😍 she's so sticky and oozing with Trichomes.
I've made my own spray that has organic honey, brown sugar, bicarbonate of soda, green tea which I spray on them before I turn the lights out and I'm not sure if it's helping but they are looking amazing weather it's from that or not.
I'm not sure how longs left to be honest they seem to be all at different stages at the minute.
Hats off to Royal queen seeds for this amazing purple queen pheno I wish it wasn't an auto so I could take some clones 💚




Likes
42
Share


@MadeInGermany
Follow
Flowering day 25
since time change
to 12/12 h.
Hey guys :-) .
The ladies are developing more and more beautiful and fat week after week 😊.
The tent fills up perfectly 👌.
I removed the bottom shoots to allow the energy to flow to the top buds.
This week it was watered 3 times with 1.3 l each (nutrients see table above)
Otherwise everything was cleaned and checked.
Have fun and stay healthy 💚🙏🏻
👇🏼👇🏼👇🏼👇🏼👇🏼👇🏼👇🏼👇🏼👇🏼👇🏼👇🏼👇🏼
You can buy this Nutrients at :
https://greenbuzzliquids.com/en/shop/
With the discount code: Made_in_Germany you get a discount of 15% on all products from an order value of 100 euros.
👇🏼👇🏼👇🏼👇🏼👇🏼👇🏼👇🏼👇🏼👇🏼👇🏼👇🏼👇🏼
You can buy this strain at :
Clearwater Seeds
Water 💧 💧💧
Osmosis water mixed with normal water (24 hours stale that the chlorine evaporates) to 0.2 EC. Add Cal / Mag to 0.4 Ec Ph with Organic Ph - to 5.8 - 6.5
MadeInGermany

Likes
1
Share


@LAShugars
Follow
Growing fast and strong 💪 May back off on the Silica Gold for a couple waterings. It’s working almost too well.
Likes
10
Share


@HIAZ_urbanbudfarmer
Follow
Hi Gromie's welcome to my 8th grow, have been half hearted at doing perpetual growing in recent times. Just get a bit lazy after a grow& harvest ( as U put a lot of time, love,& energy & passion into those beautiful girls who will reciprocate the love in return in the form of beautiful sticky solid dense & plentiful buds😍 but it can take a bit out of you! I tell myself I'll take a week off & then I've got around a pound+ to trim & I end up slacking for a couple of weeks, even been guilty of murdering a few clones/ young plants by starvation & or mistreat them & slow/stunt growth. But I am tired of running out of weed & waiting ages 4 more . I smoke a lot & recoup my grow cost, nutrient, electricity & initial investment. Due to demand! (Seem people prefer to get home grown hydro due to the very high quality & great terpenes) it runs out Fast. So after much thought I've decided to get right on top of thing's with my grows this will be my 8th grow in just over 2years & the plan is to run an expanded & upgraded Hydroponic perpetual operation. Originally started in 1mx1m with 600watt hps/mh . Upgraded to 1.2m tent & mars hydro FC-E480 480watt. Fooled around a bit with perpetual using 1m tent 4 veg. 7 quite successful grows & harvest's. Average a pound per grow from 4 plants easily with the FC-E 4800. Upgraded to 1.2 X 2.4m tent for flower, using old1.2m flower tent as new veg tent & old 1mx1m veg tent will be a drying tent /extra grow space if needed.Ive also set up cloning & propergation area , storage space 4 nutrients & grow equipment & workbench/ desk to record diary/grow journal . Both tents are hooked up to a 2 into 1 splitter venting out window, flower tent uses filter both tents run 6" air extraction set ups. Clone light is a viper spectra p600 100watt fully dimmable to a couple of watts. I obviously don't need that many watts for clone area (on 25watts) but this light was cheaper than a led or T5 clone light & versatile, use in veg or flower tent. Veg runs a viper spectra XS1500 150 watt & have a 2 nd XS1500 if needed flower tent runs a mars hydro FC-E4800 480watt with top feed recirculating hydro. Waiting on another FC-E 4800 for the other side of flowering tent & will do some DWC that side. Should easily pull 2+ , training & scrogs hopefully closer to 3p
Likes
4
Share


@Green_Thumb
Follow
How the time has flown by. She completes her flush this week and will start her dry, Sticky, smelly and buds are thick. Extremely happy with how she handled these last few weeks! Excited to taste her.
Likes
4
Share


@MaestroBud
Follow
The journey of a legend begins: Acapulco Gold.
Carefully selected seeds, allowed to hydrate in water for 12 hours, then transferred between two sheets of absorbent paper in a propagator heated to 25°C.
After 48 hours, the first roots break the shell: a sign that life has won once again.
At the time of the transplant, a light and draining Light Mix bed awaits you, enriched with Cellmax Rootbooster, Extreme Garden and Dynamyco: a welcome designed to immediately stimulate a strong, vital and mycorized radical structure.
A simple but fundamental start: here the foundations are laid for healthy and productive plants
Likes
19
Share


@DogDoctorOfficial
Follow
one more week up we go, and after intruducing the AC to the Girls, and rase some of them up closer to the ligth ( i did this because the most of my SG are 3 phingers from the ligth lol, so bringing the ligth down was not an option )now i realize that the BB and the AP are showing some spots on the older leaves with i think it migth be nutrients problem, so i'm intruducing Calmag Agent and see how they react. Appart from that they all look amazing, the smell is starting to show off in all of them, it's like a rainbow of fruity smels with a sweet taste going from one strein to another, so far the one i think is the winer in tha smel factor is the PG, man, she's becoming and amazing white frosty smly litle plant <3 the same is happening to all of her siters in my litle love garden.
So let's see how the wee goes, i'l try and keep it updated the most i can,
Stay safe
Peace out
D
So day 31 F and i intruduce Calmag and lower EC to 1.8 , now let's seeee :)

