
Likes
Comments
Share


@Strife957
Follow
This week went good.
The girls are pressing on the ceiling.
They seem happy

Likes
11
Share


@Ninjabuds
Follow
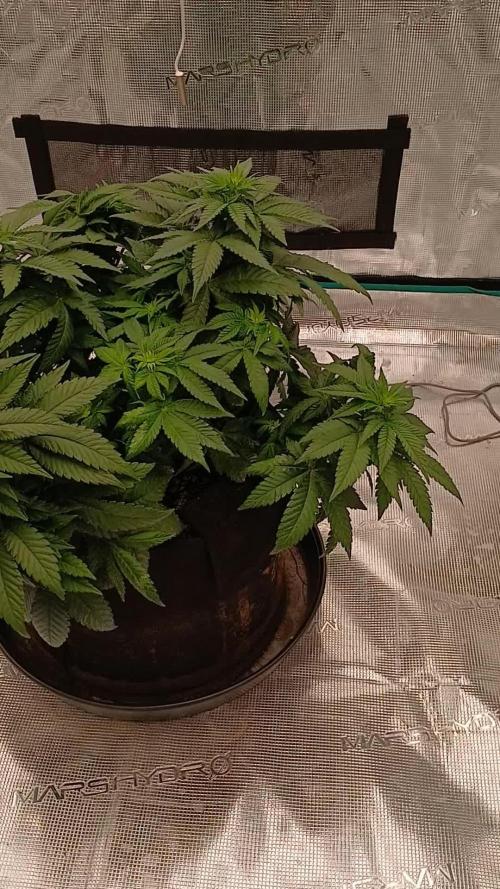
The Blackberry Moonrocks are looking great. They're definitely the healthiest plants in the whole tent. I might have gotten a little carried away with the nutrients, so the leaves are a bit funky right now, but they're still going strong. I'm excited to see how they do in the next few weeks.
The new year is off to a frosty start! We've had snow falling for what feels like forever. My kids are loving it, of course. They're building forts, having snowball fights, and turning everything into a winter wonderland. It's been a lot of fun to watch them enjoy it.
All this snow is really making me think about how quickly time flies. It feels like just yesterday we were celebrating the holidays, and now here we are knee-deep in winter. I'm looking forward to warmer weather, but for now, I'm enjoying the quiet beauty of fresh snow.

Likes
26
Share


@pifflestikkz
Follow
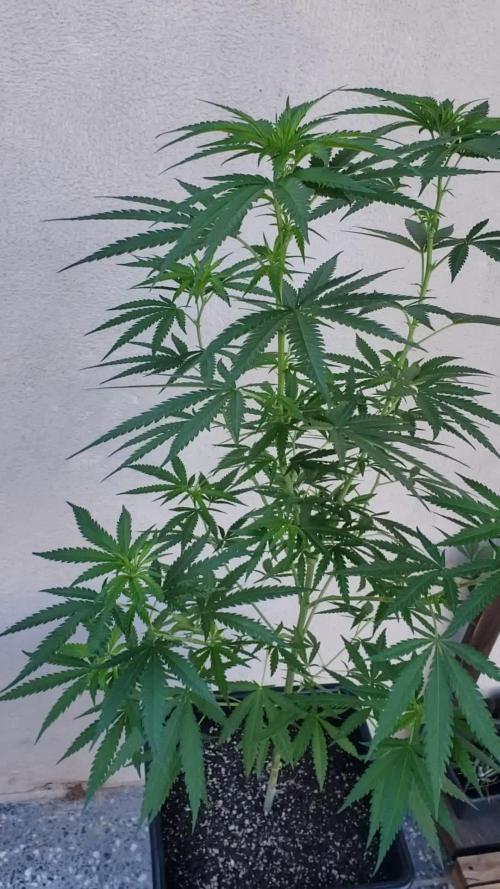
Day 93
01/10/24 Tuesday
De-chlorinated tap water pH 6 only today.
Day 95
03/10/24 Thursday
De-chlorinated tap water pH 6 only today.
Day 96
04/10/24 Friday
De-chlorinated tap water pH 6 only today.
Picture and video update 😎
Day 98
06/10/24 Sunday (End of week)
De-chlorinated tap water with Plagron PK13-14 to just help with nutrients.


Likes
Comments
Share

@JiveBear916
Follow
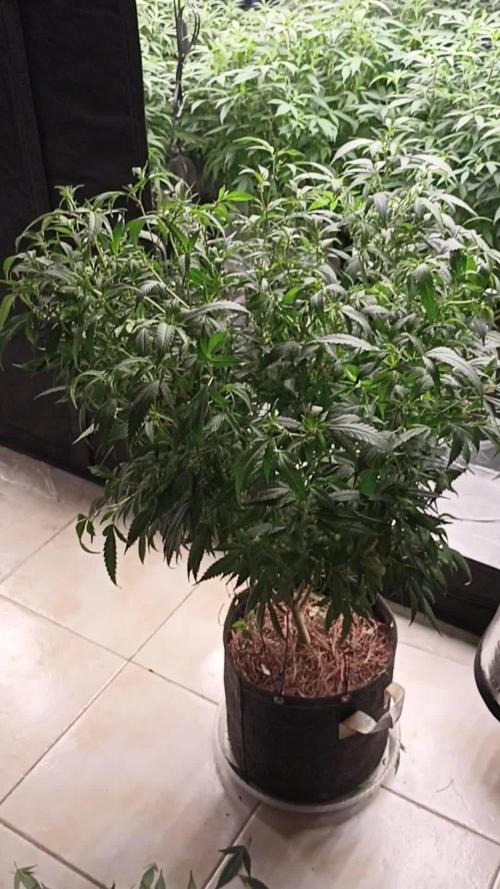
Well, here gotta another week, it's been sorta hectic so I apologize for not posting on time. this Dino from Royal Queen series simply amazing I haven't had the opportunity to grow too many strands from Royal Queen but aside from the cookie gelato which is also from the Royal Queen Strain line all I can say is that these girls are growing robust, tall, they got some really strong branches right now I'm trying to go ahead and actually make some space because I am trying to go ahead and do a little bit of mainlining stretch them out you know, just make those branches spread out. I'm going to be flipping to flower soon, I'll be doing a little top dressing since I'm going to be switching them to flower here towards the middle of May so get ready for that as well.


Likes
3
Share


@BananaBonga
Follow
Deleafed on D75 and put in darkness for 2days.
Chopped and hung in tent for 9 days.
Smoked up a fair bit before weighing so easily would of been over 3oz dry which was pretty surprising considering the problems.
Bud has a strong fuel taste and smell with a little fruitiness.
Likes
Comments
Share


@Growhome_90
Follow
26/06
Sie wächst großartig. Die Buds entwickeln sich und bekommen langsam Trichome.
Man kann erkennen, dass Sie anfängt zu purplen.
- - - - - - - - - - - - -
Dünger wurde bisher nicht zugegeben.


Likes
3
Share


@sunshinegroww
Follow
Busy schedule so no s lot time to update but here we go into week 5 now and she is solid flowers and shooting orange hairs allready smells really stinky and potent i guess not long now


Likes
4
Share


@4F1M6
Follow
Stretch is done and flowers are piling on now! I treated with lost coast as a preventative. I kept the feed the same but it will be altered end of grow week. Canopy is getting hella full can't wait to watch these colas stack on. Until next update. Happy growing and stay lit fam.

Likes
2
Share

@The_Doctor_Green
Follow
HOLA A TODO EL MUNDO!!🙌🙌.
LES CUENTO QUE ESTA SEMANA A ESTA BELLEZA SOLO LA HE REGADO CON AGUA Y APLIQUE 1 SOLA DOSIS DE TOP BLOOM DE @TopCrop (2MLX LITRO DE AGUA).
YA A FINALES DE ESTA SEMANA LA EMPECE A GUARDAR EN UN CUARTO OSCURO POR 12 HORAS, CON LA IDEA DE QUE EMPIECE A FLORAR Y QUE NO TENGA CONTAMINACIÓN LUMINICA EXTERNA( ES UN TRABAJO MOLESTO, PERO NECESARIO PARA QUE EMPIECEN A LARGAR LAS PREFLORES) SI BIEN LOS DIAS COMIENZAN A ACORTARSE DE A POCO, QUIERO Y NECESITO COGOLLOS🤪😆🤭.
ASI QUE ESO ES TODO AMIGOS.
GRACIAS @DivineSeeds por hacer posible este diario!🙌🙌.
NOS VEMOS LA PROXIMA SEMANA😀🙋♂️


Likes
3
Share


@valiotoro
Follow
Easy trim✂️
The buds are solid like a diamond 💎💍
The smell : citrus pine & rosemary🍋🌲absolutely divine super fresh it’s a one way to the Mediterranean Sea☀️✈️
Likes
6
Share


@mikheil007
Follow
Vanilla Latte from Huboldt Seed Company seems to be very stron strain! others still going very well...

Processing
Likes
2
Share


@MephodMan
Follow
Topped to 4th node. Started brewing ~5l of neem/kelp/aloe
Trying out LST clips for the first time. Added a couple of small LST clips on the 4 largest fan leaves.
One of the large lower fan leaves snapped off this morning when I was adjusting the LST clips. It looked like it had already snapped yesterday.
Adjusted VPD to lower humidity

Likes
5
Share

@Green_Zyphoria
Follow
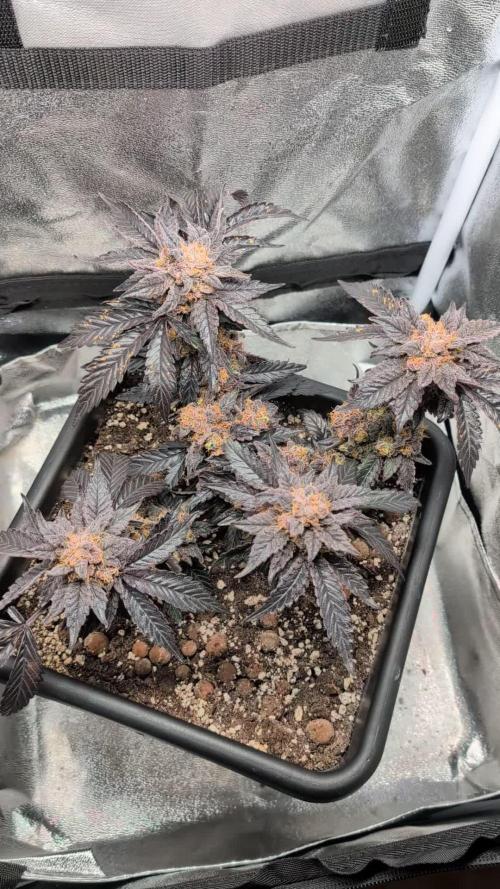
We’re officially on the home stretch with the Papayton #3, and honestly, the view every time I open the tent is just insane. This phenotype has developed into a real "Dark Empress." The contrast between the deep, almost onyx-colored leaves and that thick, white blanket of frost is exactly what I was hoping for when I started this run.
Looking at the buds today at Day 63, the density is incredible. The calyxes have swollen to the point where the stems have completely disappeared under a mountain of resin. I spent some time today removing the last few crispy fan leaves to make sure the airflow is spot on for these final days—especially after those 29°C peaks we had. Luckily, things have cooled down to a steady 26°C, which is perfect for preserving those loud, gassy, and sweet terpenes.
Trichome-wise, she’s sitting at a perfect 100% milky state. I’ve spent a good amount of time with the loupe, and while amber is still rare—maybe around 2% on the actual calyxes—the sheer depth of the cloudiness tells me she’s right at her peak potency. I’m sticking to the plan: one very last small drink tomorrow to keep her from wilting, and then a slow dry-down leading up to the harvest on Friday or Saturday. It’s been a pleasure watching this organic Biotabs-fed lady finish so strong. Can't wait for the final weigh-in and the smoke test!
Likes
15
Share


@Momentum
Follow
No nutes the last two weeks, only water, at the moment they're looking good so far. we're coming to an end, it was a small, experimental & nice Wintergrow.

Likes
14
Share

@Chubbs
Follow
These ladies are in full flower and progressing like a dream. The colas on them are chunky to all get out. And to think they've barely begun the flower period is mind blowing to me. I'll go in this week and do a good cleaning taking out some of the crispy leafs on the under canopy. Over all though Happy Growing.
Processing
Likes
12
Share

